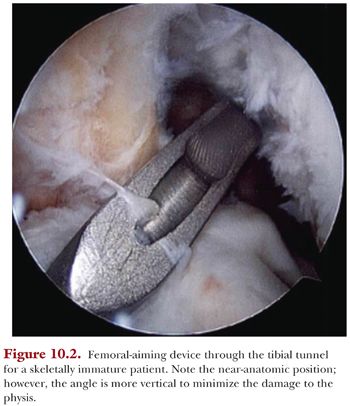
The femoral tunnel is drilled using a transtibial technique (Fig. 10.2). An over-the-top guide is placed with guide pin centered on the ACL footprint. Some fibers of the ACL are left at the femoral footprint to allow for optimal identification of tunnel placement. A guide pin is placed, and an acorn-type drill bit is used to create the femoral tunnel. The drill is passed by hand through the tibial tunnel. The same principle of high-torque, low-speed drilling is employed. The femoral tunnel is drilled to the lateral femoral cortex without violation of the cortex. This creates a long femoral tunnel that will ensure the hamstring graft will traverse the distal femoral physis.

Graft Passage and Fixation
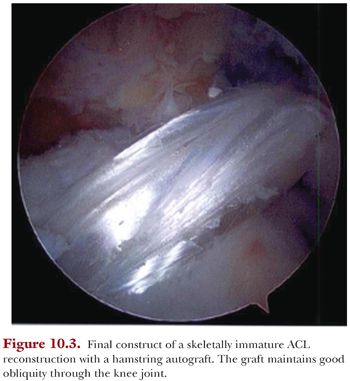
Once the tunnels have been created, the graft is passed retrograde, under direct arthroscopic visualization, through the tibial tunnel and into the femoral tunnel. Our preferred femoral fixation is the ACL TightRope (Arthrex, Inc., Naples, FL). The arthroscope can be used to make sure the cortical button exits the socket and flips on the femoral cortex. We routinely use intraoperative fluoroscopy to confirm deployment and engagement of the fixation button. The graft is then advanced into the tunnel in a minimum of 25 mm to ensure there is soft tissue traversing the physis. The knee is put through 10 full cycles of flexion and extension while maximally tensioning the graft limbs. This is done to eliminate any graft laxity. The knee is placed in 10 degrees of flexion and a posterior drawer force is placed on the tibia. The graft is manually tensioned. The sutures from the graft can be tied over a post, such as a screw and washer construct, or can be dunked into the bone using a lateral row rotator cuff anchor, such as the SwiveLock (Arthrex, Inc.) anchor. This can be used as either the primary mode of fixation or more commonly used as backup fixation. Our preferred method of tibial fixation is via a post and washer or, if the tibial tunnel is long enough, with interference screw fixation kept below the physis. After final graft fixation, a Lachman and pivot shift tests are performed to assure good knee stability. The arthroscope is reinserted and the graft is palpated (Fig. 10.3). If there is any residual laxity in the graft, it can be further tensioned by advancing the femoral side of the graft using the ACL TightRope. Incisions are then closed with an absorbable suture both in the subcutaneous layer and subcuticular layer. The brace is then applied.

POSTOPERATIVE REHABILITATION AND MONITORING
Rehabilitation Protocol
A postoperative brace is used routinely in this patient population. We have found that children may be less compliant with postoperative instructions and the brace may restrict them from excess activity. The brace is worn locked in full extension at all times except for physical therapy (PT) for weeks 0 to 2. During weeks 3 to 4, it is locked for ambulation, unlocked for sitting set at 0 to 90 degrees, and removed for sleeping. The brace is removed at postoperative week 6 or when good quad control is regained. In this specific patient population, compliance with home exercise programs can be challenging. Formal PT is used, beginning 3 to 5 days postoperatively. The initial phase is directed at swelling reduction and regaining full range of motion. Active, active-assisted, and passive range of motion from 0 to 125 degrees is allowed, without forced passive flexion. Prone hangs are taught and performed as well as patellar mobilization exercises. Strengthening exercises emphasize primarily isometrics or limited closed chain progressive resistive exercises. Quad sets and leg lifts are initiated during this first phase as well as leg press from 90 to 40 degrees in an eccentric fashion. Active-resisted hamstring exercises at 90 degrees of flexion are initially avoided due to hamstring graft harvest. Short crank bicycle ergometry is allowed.
Phase II (Weeks 6 to 12)
Goals of this phase are to ensure full range of motion, normalize gait, and continue quadriceps strengthening. A squat/step program, wall slides, and leg press are initiated for additional quadriceps strengthening. Treadmill program can be initiated. Proprioception program is started, including balance board, single leg stance, and other balance maneuvers. Nordic track or elliptical trainer can be used as tolerated. Quadriceps isotonics with a proximal pad are allowed in a 90- to 40-degree arc.
Phase III (Weeks 12 to 24)
Goals of the third rehabilitation phase are to restore full lower extremity strength and proprioception, focusing on proper jumping and landing mechanics. In this phase, we aggressively advance agility and functional exercises. We also begin and progress a running program. Limited return to sports is allowed at 16 to 20 weeks, followed by full activity at 20 to 24 weeks. Baseline isokinetic strength testing and functional testing is performed at 16 weeks.
Skeletal Growth Monitoring
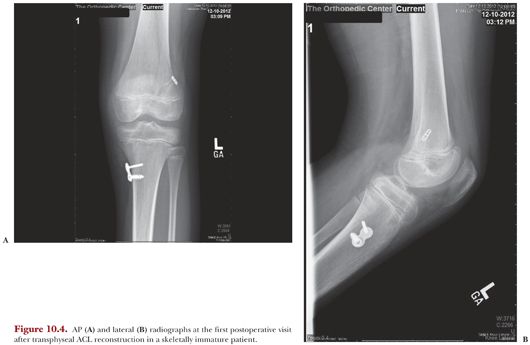
Initial postoperative anteroposterior (AP) and lateral radiographs are obtained at the first postoperative visit (Fig. 10.4A,B). Patients should be followed until skeletal maturity is reached to monitor for growth disturbance. Patients are evaluated annually both by clinical examination and radiographic assessment. A full-length standing AP long cassette radiograph of both lower extremities and a lateral radiograph of the affected knee are obtained (Fig. 10.5). These allow for assessment of limb length and angular deformity as well as changes in tibial slope.


