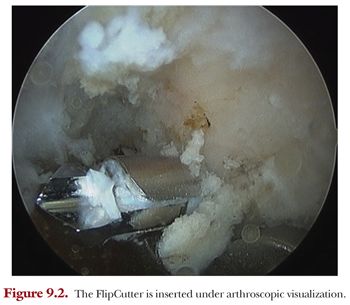
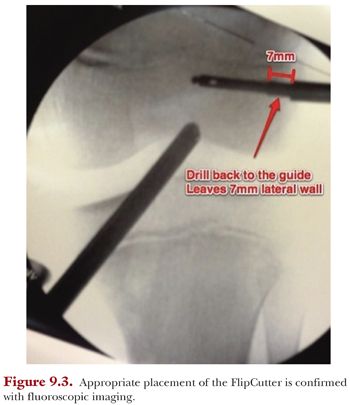
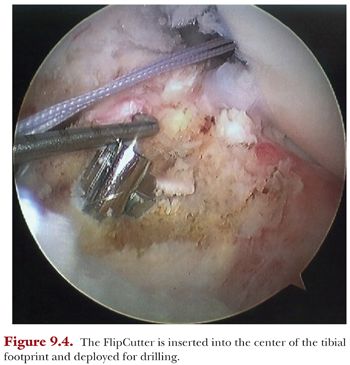
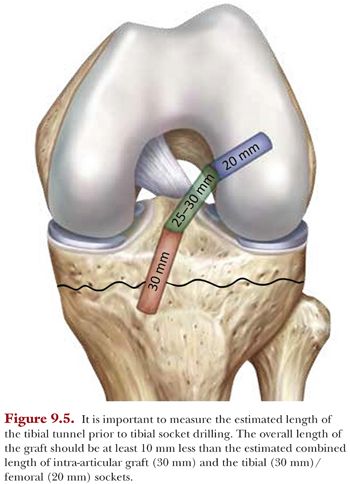
On the tibial side, transtibial drilling can be performed in a retrograde or anterograde fashion using an appropriately sized reamer. We prefer to use a FlipCutter on the tibial side. The tibial ACL guide is set at approximately 55 degrees and inserted through the anteromedial portal. The guide is placed at the center of the tibial footprint, and the aiming arm is placed flush against the proximal tibia to measure the eventual length of the tibial tunnel. We prefer to place this tunnel as vertical as possible to minimize volumetric disruption of the proximal tibial physis. The FlipCutter is inserted under arthroscopic visualization, and the drill sleeve is malleted through the proximal cortical bone prior to drilling (Fig. 9.4). The FlipCutter is advanced as far as possible to provide a long socket (approximately 30 mm) with adequate preservation of the 7-mm bone bridge. It is important to note that the estimated length from the end of the femoral socket to the end of the tibial socket should be at least 10 mm longer than the graft to ensure the graft can be appropriately tensioned (i.e., avoid “bottoming out”) (Fig. 9.5). A TigerStick is inserted and retrieved through the anteromedial portal. One important step to note is that the tibial and femoral passing sutures (i.e., FiberStick/TigerSticks) should be retrieved together to avoid creation of a soft tissue bridge that may hinder graft passage.
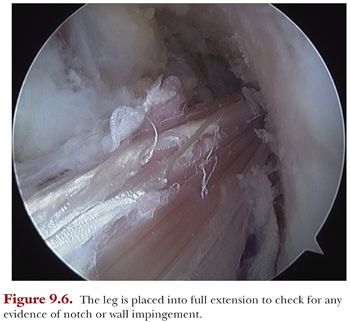
The graft is initially passed in a retrograde fashion through the anteromedial portal using the femoral passing suture. A 70-degree arthroscope is inserted through the anterolateral portal to visualize the cortical button pass through the femoral socket and deploy along the lateral femoral cortex. Once the button is secured to the cortex, initial graft tensioning to a depth of 10 to 15 mm is performed. We typically place 10- and 20-mm markings on the graft to help determine the amount of graft that is docked within the socket. It is important to note that we do not fully seat the graft within the femoral socket until tibial side graft passage is complete. The TightRope ABS is then secured with a cinch suture to avoid inadvertent tightening of the TightRope as the graft is passed. The tails from the graft are loaded with the cinch suture into the TightRope ABS and the graft is docked within the tibial socket to a depth of approximately 20 mm. The ABS button is secured to the TightRope ABS for secure tibial fixation. We then turn our attention back to the femoral socket, as the TightRope RT is now fully tensioned to completely seat the femoral side of the graft within the socket with the knee in extension. The knee is cycled through full flexion and extension and the tightrope ABS on the tibial side is tightended and secured to the ABS button with standard knot tying techniques. Using an arthroscopic knot pusher, the free ends of the tightrope RT can be sequentially tied down to the femur. The graft is probed to ensure excellent tension, and the knee is placed in full extension to check for graft impingement (Fig. 9.6).