1. The patient is positioned supine on the operating table. The leg of the bed is not dropped. This allows the surgeon to place K-wires under fluoroscopic guidance with the knee in an extended position in order to facilitate a good anteroposterior (AP) image of the lesion.
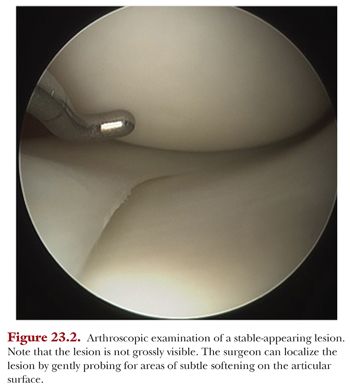
2. A standard arthroscopic examination of the knee is performed, with careful inspection of the chondral surface to confirm that the lesion is indeed stable. Care is taken to probe the area, ensuring that there are no fissures at the periphery of the lesion and that the articular cartilage overlying the lesion is in good condition. Often, the OCD is not readily visualized from the chondral surface and only found by subtle softening of the cartilage on gentle probing (Figs. 23.2 and 23.3).
3. Once the arthroscopic examination has confirmed that the lesion is appropriate for retroarticular drilling, the arthroscope is removed.
4. The knee is placed in full extension on the radiolucent table, and the C-arm is used to obtain an AP view of the knee joint visualizing the lesion. It is helpful for the C-arm to be positioned on the side opposite the surgeon. Note that this position will change based on whether the lesion is on the medial or lateral femoral condyle. For example, when drilling a medial lesion, the surgeon will find it easiest to stand on the medial side and have the C-arm come from the lateral side. This setup is reversed for lateral lesions.
5. After localizing the lesion and the physis, a K-wire is placed percutaneously at the medial or lateral edge of the epiphysis directed toward the center of the lesion. The pin driver is used to drill the pin to the center of the lesion. Care is taken not to advance the pin through the articular cartilage. Note that generally, the surgeon can detect a slight increase in resistance while drilling as the wire passes through the sclerotic rim of the lesion.
6. The position of the wire is checked on both the AP and lateral images to confirm its position in or near the lesion.
7. Once the surgeon is satisfied with the position of the initial pin, a small longitudinal incision is made proximal and distal to the K-wire (1 to 2 cm). Making a small incision serves two purposes: (1) The pin guide can be placed directly against the bone, allowing for more accurate K-wire placement, and (2) the incision prevents multiple perforations in the skin by the wire, which can cause tattooing from the heat created by the spinning K-wire (Fig. 23.4).
8. The pin guide is then placed over the initial wire and seated on the femur. Multiple K-wires are then drilled into the lesion through the guide while checking the position periodically on AP and lateral images. The pin guide can be shifted over a single reference wire to ensure that the entirety of the lesion is drilled (Fig. 23.5A,B).
9. Once the surgeon has confirmed that the lesion has been completely drilled, the K-wires are removed and the incision is irrigated and closed.


