Fig. 29.1
Typical appearance of a coxa breva deformity demonstrated in this patient with a history of Perthes disease of the right hip. Reprinted with permission from the Rubin Institute for Advanced Orthopedics, Sinai Hospital of Baltimore
Coxa magna is defined as the enlargement and deformation of the femoral head. This deformity can cause loss of congruency between the femoral head and acetabulum resulting in femoral-acetabular impingement (FAI) (Fig. 29.2a, b). Severe coxa magna is associated with chronic inflammation, loss of motion, labral pathology, chondromalacia, and eventual degeneration of the hip joint [3–6]. Coxa magna is caused by a combination of the collapse of the proximal femoral epiphysis and altered growth of the articular cartilage. The immature femoral head’s articular cartilage is a true growth cartilage, which allows the femoral head to grow in a circumferential fashion [7]. The alteration of this growth due to abnormal joint pressures from joint contractures along with concurrent collapse of the epiphysis can result in a coxa magna deformity. This deformity is caused by avascular necrosis of the proximal femoral epiphysis. The most common cause of proximal femoral epiphyseal AVN is Legg–Calvé–Perthes disease. Other causes of pediatric hip AVN include infection, sickle cell disease, significant steroid use, trauma of the proximal femur, and iatrogenic loss of proximal femoral blood supply [8].
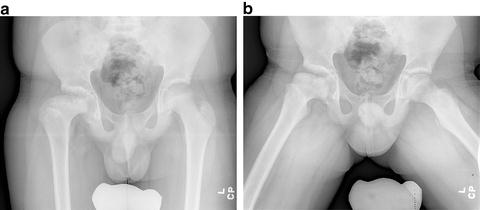
Fig. 29.2
A 12-year-old patient with severe coxa magna resulting from Perthes disease of the right hip as demonstrated on the AP (a) and lateral (b) views. Reprinted with permission from the Rubin Institute for Advanced Orthopedics, Sinai Hospital of Baltimore
Acetabular dysplasia is defined as an abnormal shape of the acetabulum with a decrease in depth, increased in circumference, and an increased slope in relation to the horizontal pelvic line [9]. This deformity results in an oblong-shaped, or “capacious” acetabulum, that allows lateral and proximal migration of the femoral head with concurrent reduction of joint coverage (Fig. 29.3). In this abnormal position, the contact surface between the articular cartilage of the femoral head and acetabulum is decreased. Consequently, there are increased and concentrated contact forces that ultimately increases wear rate of the articular cartilage.
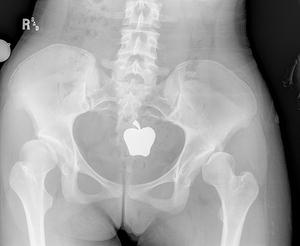
Fig. 29.3
A 14-year-old female with Down’s syndrome and bilateral acetabular dysplasia noted by the enlarged, oblong, and shallow acetabulum and concurrent femoral head migration. Reprinted with permission from the Rubin Institute for Advanced Orthopedics, Sinai Hospital of Baltimore
Concurrently, the surgeon needs to recognize that a normal shaped femoral head must be present for an acetabulum to be defined as truly dysplastic. In other words, an oblong acetabulum with a congruent enlarged femoral head does not constitute acetabular dysplasia (Fig. 29.4). This situation is better described as coxa magna with a congruent oblong acetabulum, which can produce a functional, mobile hip joint in certain situations. The abnormal acetabulum with a concurrent abnormal femoral head must be carefully evaluated for congruency, impingement, and the area of force transfer of the articular surfaces.
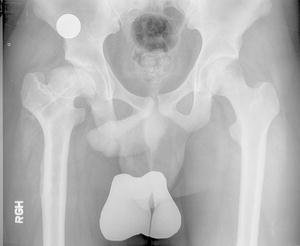
Fig. 29.4
An example of an enlarged and oblong acetabulum secondary to remodeling effects of a large femoral head after Perthes disease. This acetabulum should not be termed dysplastic due to the absence of a normal femoral head. In this situation, the right acetabulum is insufficient due to the decrease in force transfer noted by the reduced sourcil and patient’s symptoms. Reprinted with permission from the Rubin Institute for Advanced Orthopedics, Sinai Hospital of Baltimore
The etiology of acetabular dysplasia is most commonly developmental in nature. However, other conditions resulting in chronic joint instability, such as Down’s syndrome, or severe joint contractures, such as cerebral palsy, can result in hip subluxation with concurrent acetabular dysplasia [10, 11].
This chapter will concentrate on the residual hip deformities resulting from various etiologies including; developmental dysplasia of the hip (DDH), slipped capital femoral epiphysis, and Legg–Calvé–Perthes disease. Innovative treatment strategies are presented with detailed surgical techniques of six innovative procedures: triple pelvic osteotomy, modified Dunn procedure (with surgical hip dislocation), modified Southwick intertrochanteric osteotomy, Morscher femoral neck lengthening osteotomy, femoral head reduction osteotomy, and hip distraction with a hinged external fixator.
Box 29.1 Residual Deformities of the Hip
Defining key points:
True acetabular dysplasia includes INCONGRUENCY of the hip joint
The significance of coxa breva is determined by the center of femoral head to tip of greater trochanter distance
Coxa magna is caused by avascular necrosis of the immature femoral head leading to abnormal and asymmetric growth.
Residual Deformities of the Hip Joint Secondary to Developmental Dysplasia
The early postnatal examination and screening for congenital dislocation of the hip has substantially decreased the incidence of patients presenting with late dislocations of the hip joint during infancy and early childhood [12, 13]. However, the stable hip with mild to moderate hip dysplasia that is silent during the early developmental years remains a challenge to detect with clinical exam alone. The primary treatment for hip dysplasia depends on the age of the child at diagnosis. The various treatment options range from simple observation or bracing to complex periacetabular osteotomies. The diagnosis of hip dysplasia for the older infant, toddler, and young child, is consistent with the radiographic Acetabular Index (AI) measurement >30° [14, 15]. Hip dysplasia for the older child, preadolescent, or adolescent is confirmed by the radiographic Center Edge Angle of <20° [16] (Box 29.2). Other radiographic signs of acetabular dysplasia are an abnormal sourcil, decreased femoral head coverage, and lateral/proximal migration of the femoral head, which collectively help to confirm and stratify the severity of the hip dysplasia [16].
Box 29.2. Radiographic Parameters of Acetabular Dysplasia
Acetabular index >30°
Center Edge Angle <20°
Flattened/upsloped sourcil
Treatment of Residual Hip Dysplasia for Patients <6 Months of Age
The treatment for residual hip dysplasia without clinical instability for infants <6 months of age consists of application of a Pavlik harness or abduction bracing [17]. The harness is worn initially 16–18 h per day and then weaned to a nighttime brace within the first month of treatment. The night time bracing continues until the radiographic AI measurement is <30° and the sourcil is normal in appearance. After the hip has normalized based on such radiographic parameters, the bracing is discontinued and the patient is followed annually until the age of 5 years.
Treatment of Residual Hip Dysplasia for Patients >6 Months to 2 Years
The treatment for residual hip dysplasia for patients >6 months to 2 years of age consists of hip abduction bracing (Box 29.3). These older infants and toddlers are often too large and strong for the Pavlik harness, but a nighttime abduction brace is very effective. The main difficulty with this treatment in the older toddler is the compliance with the orthosis. However, in the authors’ experience, once the potential surgical option is discussed with the parents, the compliance with the bracing often improves. Despite limited published data, this simple orthotic treatment is common among pediatric orthopedists and can yield a high success rate with resolution of the hip dysplasia in the vast majority of patients if the brace is worn consistently. A recent study has shown that part-time abduction bracing significantly improves residual acetabular dysplasia at 6 months of age versus observation alone [18]. After the hip has normalized radiographically, the abduction brace is discontinued and the patient is followed annually at least until the age of 5 years.
Box 29.3. Nonoperative Treatment of Acetabular Dysplasia <2 Years of Age
Pavlik harness for patients <6 months of age
Simple hip abduction orthosis for patients >6 months of age
Night time bracing until radiographic parameters and appearance normalizes
Treatment of Residual Hip Dysplasia for Patients >2 Years Until Closure of the Triradiate Growth Plate
Once the child is older than 2 years of age, the nighttime bracing becomes very difficult due to patient cooperation and compliance. However, in the older toddler, if the nighttime hip abduction brace could be tolerated, then this would be the initial treatment strategy as stated above for the younger child. For the majority of older toddlers and young children, the treatment for clinically significant hip dysplasia consists of a single cut pelvic osteotomy that hinges on the triradiate growth plate or the pubic symphysis (Box 29.4). The direction and severity of acetabular deficiency influences the exact type of pelvic osteotomy that is performed. The type and direction of coverage of the commonly used pelvic osteotomy is as follows: the Pemberton pelvic osteotomy primarily provides anterior coverage, the Dega pelvic osteotomy covers anterolaterally, and the San Diegoplasty covers laterally [10]. These three “volume-reducing” osteotomies are very similar but with distinct differences. All three are incomplete osteotomies, hinging on the triradiate cartilage and do not usually require internal fixation for stability.
The Dega osteotomy is the classic pelvic osteotomy that hinges on the triradiate growth cartilage [19, 20]. The Dega osteotomy begins at the anterior inferior iliac spine and curves posteriorly around the acetabulum to end at the triradiate cartilage. Medially, the Dega pelvic osteotomy is directed in a curvilinear fashion over the acetabulum towards the triradiate cartilage, leaving the inner table intact. Wedges of bone graft (autograft harvested from the iliac crest or the proximal femur when a shortening is being performed, versus allograft bone), can strategically be placed in the osteotomy site to provide a combination of increased anterior and/or lateral coverage (Fig. 29.5a, b).
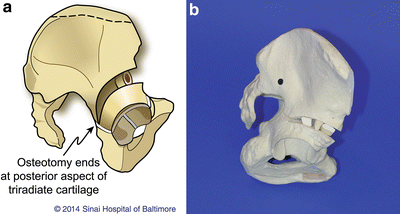
Fig. 29.5
The classic Dega osteotomy curves from the anterior inferior iliac spine to the triradiate cartilage posteriorly hinging on both the inner iliac table and the triradiate cartilage. This is demonstrated in both the schematic drawing (a) and bone model (b). Reprinted with permission from the Rubin Institute for Advanced Orthopedics, Sinai Hospital of Baltimore
Two modifications of the Dega-type osteotomy are the San Diegoplasty osteotomy and the Pemberton osteotomy (Fig. 29.6a–e). The San Diegoplasty osteotomy does not violate the inner table; however, a notch of bone is removed with a Kerrison rongeur at the anterior inferior iliac spine and the sciatic notch. This allows more coverage directed laterally without sacrificing posterior coverage, and was originally described for hip dysplasia associated with neuromuscular disease, which typically entails posterior acetabular deficiency [21] (see Fig. 29.6a–c).
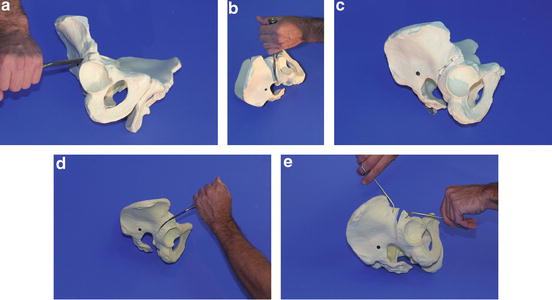
Fig. 29.6
(a–c) The bone model depicts the San Diegoplasty pelvic osteotomy that begins at the anterior inferior iliac spine (AIIS) and ends at the sciatic notch, hinging on the inner table of the ilium. (d, e) The bone model depicts the Pemberton osteotomy that is directed from anterior to posterior, beginning at the AIIS and ending at the triradiate cartilage behind the acetabulum. Unlike the Dega osteotomy, the Pemberton osteotomy divides both the inner and outer tables of the ilium. Reprinted with permission from the Rubin Institute for Advanced Orthopedics, Sinai Hospital of Baltimore
The Pemberton osteotomy, first described in 1965, also hinges on the triradiate growth cartilage, but the direction of this osteotomy is from an anterior to posterior direction instead of a lateral to medial direction, as with the Dega and San Diegoplasty [22]. The Pemberton osteotomy begins at the anterior inferior iliac spine and curves over the acetabulum and ends at the triradiate growth cartilage posterior to the joint identical to the Dega osteotomy. However, the Pemberton osteotomy divides both the inner and outer tables of the ilium as it heads over the acetabulum to the triradiate cartilage. This creates a pure anterior opening wedge osteotomy with a greater increase of anterior coverage for the acetabulum (see Fig. 29.6d, e).
Another type of pelvic osteotomy that can be used in this age group is the Salter osteotomy that consists of a complete osteotomy from just above the anterior inferior iliac spine to the sciatic notch, including both inner and outer tables of the ilium [23]. The Salter is a redirectional osteotomy that hinges on the flexible symphysis pubis and requires internal fixation due to the amount of inherent instability. However, the Salter osteotomy affords greater movement of the acetabulum and thereby a greater ability to correct a more severe dysplasia. The surgeon must be aware that a dysplastic acetabulum with poor posterior coverage is a relative contraindication for a Salter osteotomy, as while it provides excellent anterolateral coverage, it can further uncover the femoral head posteriorly (Fig. 29.7a–f).
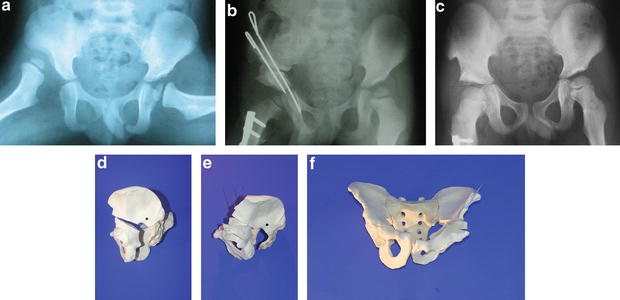
Fig. 29.7
(a) A 5-year-old male with R DDH. (b) Status-post open reduction, capsulorraphy, femoral shortening derotational osteotomy, and Salter innominate osteotomy. (c) Healed osteotomy with complete restoration of normal acetabular index, center-edge angle, and Shinton’s line. (d–f) Bone models representing the Salter osteotomy. Reprinted with permission from Scott Nelson, MD
Postoperative care for innominate pelvic osteotomies requires non-weight bearing for approximately 6 weeks. The patients between the ages of 2 and 5 years are placed into a 1-½ hip spica cast for the initial 6 weeks, whereas the older patients (6 years and older) are often placed into a hip abduction pillow. After the initial 6-week period, the cast/pillow is discontinued and physiotherapy is started. The patient gradually returns to full weight bearing. Full activity is allowed after reestablishing full hip strength and range of motion. The patient is then followed annually until skeletal maturity.
Box 29.4. Acetabuloplasties in the Skeletally Immature
Choosing your osteotomy:
Planning your osteotomy is determined by acetabular deficiencies specific to underlying etiologies (i.e., DDH = anterolateral, congenital femoral deficiency = lateral, neuromuscular = posterolateral).
The Salter osteotomy can provide significant deformity correction, but requires internal fixation for stability.
The Dega, San Diegoplasty, and Pemberton osteotomies do not require fixation routinely.
Bone graft wedges can strategically be placed in a Dega osteotomy to provide more anterior, posterior, or lateral coverage.
Treatment of Residual Hip Dysplasia for Patients After Closure of the Triradiate Growth Plate
As the patient becomes older, the treatment for hip dysplasia becomes more complicated and invasive. However, unlike the asymptomatic younger child who is usually diagnosed incidentally and treated prophylactically, the older patient typically presents with mild to moderate pain associated with activity. Therefore, the treatment goals in this age group are the alleviation of pain, improved joint function, and prevention of early degenerative joint disease of the hip.
In the authors’ practice, the preferred method of treatment for symptomatic residual hip dysplasia in the young patient after the closure of the triradiate cartilage is the periacetabular triple osteotomy (Box 29.5). The triple is a redirectional osteotomy including ischial, pubis, and supra-acetabular innominate bone cuts. An early technique described by Steel has continued to evolve [24]. Tonnis modified the procedure by performing the ischial cut in closer proximity to the acetabulum, facilitating acetabular fragment mobility and greater correction of severe acetabular dysplasia [25]. Originally described as two-incision procedure, further modifications of the triple osteotomy utilize a one-incision technique [26]. Because this is a complex osteotomy, a brief description of the technique will follow, highlighting certain technical tips.
The Ganz periacetabular osteotomy is another very popular type of pelvic osteotomy [27]. This particular osteotomy maintains the integrity of the posterior column by performing a bone cut connecting the iliac osteotomy to the partial ischial osteotomy. This osteotomy travels through a very narrow column of bone in the young patient. Therefore, the author prefers the periacetabular triple technique for adolescent and smaller adult patients
Periacetabular Triple Osteotomy of the Pelvis: Operative Technique
Positioning and Exposure
The patient is placed supine on the operating table with no bumps placed under the pelvis. The entire lower extremity, to include the groin, gluteal region, and subcostal area are prepared and isolated into the sterile field. A single incision is performed in the flexion crease of the hip joint, approximately 1 cm below the anterior superior iliac spine. This incision starts just medial to the palpable neurovascular bundle and extends 6–8 cm lateral to the anterior superior iliac spine (Fig. 29.8).
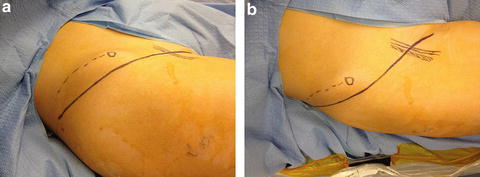
Fig. 29.8
(a, b) The single incision technique is depicted from an anterior and lateral view. The iliac crest is marked with the dashed line ending at the ASIS. The longitudinal marked structures are the palpable neurovascular bundle. Reprinted with permission from the Rubin Institute for Advanced Orthopedics, Sinai Hospital of Baltimore
The entire operation is performed through this single anterior incision. The interval between the sartorius and tensor fascia lata muscles is defined in the typical fashion protecting the lateral femoral cutaneous nerve. The rectus femoris tendon is identified and released, tagging the insertional portion of tendon. Next, the iliac crest is exposed. Both the inner and the outer tables are subperiosteally dissected to the sciatic notch. Surgical gauze and/or bone wax may be used to control bleeding from the iliac wing. Dissection of the medial structures is subsequently performed. The fascia overlying the sartorius and iliopsoas muscles is divided. The iliopsoas tendon is identified (typically on the posterior aspect of the muscle) and fractionally lengthened within the muscle belly. Gentle retraction of the iliopsoas muscle belly brings the femoral nerve into the operative field. The femoral nerve should be identified prior to the division of the iliopsoas tendon. The femoral nerve, artery, and vein are carefully identified and exposed with individual small vessel loops placed around each structure. Fluoroscopic visualization of the superior pubic ramus is performed to confirm the osteotomy position just medial to the pubic eminence (Fig. 29.9). It is always surprising how medial the dissection must be carried out in order to place the superior pubic ramus osteotomy in the correct position. Typically, the osteotomy site lies between the femoral nerve and artery. However, with smaller patients, the osteotomy position can be medial to the femoral vein. The interval between the femoral nerve and artery is exposed down to the periosteum of the superior pubic ramus. Great care must be used when retracting the neurovascular bundle. If the interval for the exposure of the superior pubic ramus is performed lateral to the femoral nerve, the tension placed on the neurovascular structures will be substantially increased in order to reach the proper osteotomy position.
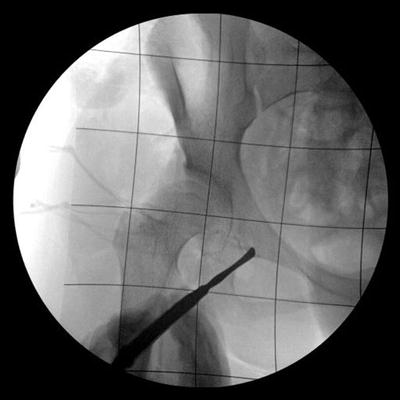
Fig. 29.9
A 4-year-old female undergoing a triple osteotomy for right hip dysplasia. Intraoperative fluoroscopic image demonstrating the position for the superior pubic ramus cut. This position is usually directly behind or medial to the neurovascular bundle. Reprinted with permission from the Rubin Institute for Advanced Orthopedics, Sinai Hospital of Baltimore
Osteotomies
After the exposure of the correct interval for the pubic ramus osteotomy is completed, the overlying periosteum is divided. Multiple drill holes are created in the superior pubic ramus using a smooth 1.8- to 2.0-mm wire. The osteotomy is completed with an osteotome. The interval for the ischial osteotomy is then created. This interval lies between the medial aspect of the hip capsule and the iliopsoas muscle. The interval is carefully created with gentle blunt dissection using a large curved Mayo scissor. The interval is opened and widened by gentle spreading of the blunt tipped scissor. A small Cobb elevator is placed into the interval to palpate the superior portion of the ischium, just below the acetabulum (Fig. 29.10). A Cobb elevator is advanced on both the medial and lateral sides of the ischium to push the soft tissues away and prepare a path for the Ganz osteotome (see Fig. 29.11d, e).
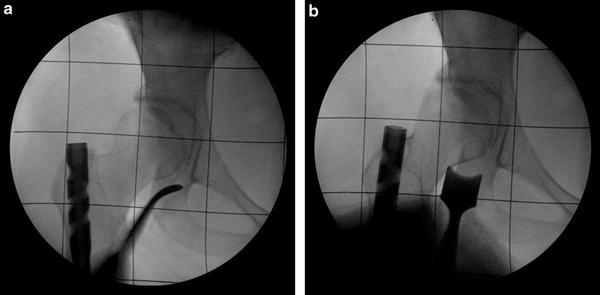
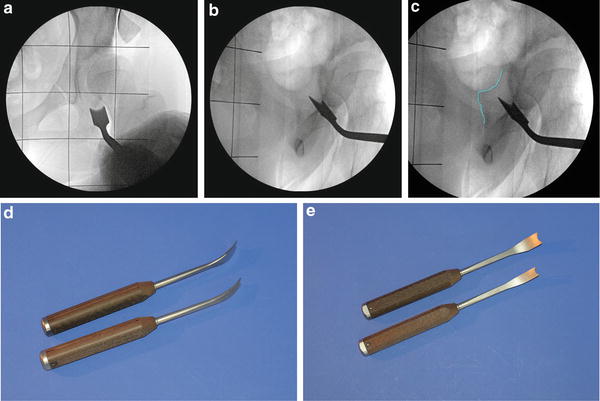
Fig. 29.10
A 16-year-old female undergoing a triple pelvic osteotomy for retroversion of the right hip. (a) Intraoperative fluoroscopic image of a Cobb instrument palpating the superior portion of the ischium just beneath the acetabulum. (b) Image demonstrating the placement of the Ganz osteotomy at same location as identified by the Cobb instrument. Reprinted with permission from the Rubin Institute for Advanced Orthopedics, Sinai Hospital of Baltimore
Fig. 29.11
(a) Fluoroscopic view denoting the position of the Ganz osteotome in the AP view preparing to perform the lateral cortical cut of the ischium. (b) Fluoroscopic view in the oblique position to confirm placement of the Ganz osteotome under the acetabulum and directed above the ischial spine. (c) Same fluoroscopic view as Fig. 29.11b with the ischial spine highlighted. (d, e) Clinical pictures of the specialized Ganz osteotomes. Reprinted with permission from the Rubin Institute for Advanced Orthopedics, Sinai Hospital of Baltimore
The Ganz osteotome is inserted into the prepared interval and positioned just under the acetabulum. It is critical to have adequate fluoroscopic visualization for this osteotomy. The osteotome is aimed approximately 45–55° proximally in order to direct the osteotomy above the ischial spine (Fig. 29.11a–e).
This osteotomy is visualized with an oblique fluoroscopic view, similar to an obturator Judet view (C-arm is rotated toward the operative hip between 30° and 50° from the AP position). Again, fluoroscopic visualization of the acetabulum, ischium, and ischial spine is essential in this oblique view in order to complete the periacetabular ischial osteotomy successfully. Another critical technical tip is the protection of the femoral nerve while completing the ischial osteotomy. During this osteotomy, the hip must be flexed 15–20° to prevent stretch of the femoral nerve as the Ganz osteotome handle is levered distally in order to aim the osteotomy above the ischial spine. Before the final osteotomy of the ilium, two reference half pins are inserted into the acetabular fragment. These two reference half pins enhance the accuracy of the bony correction and help prevent secondary deformities (Fig. 29.12).
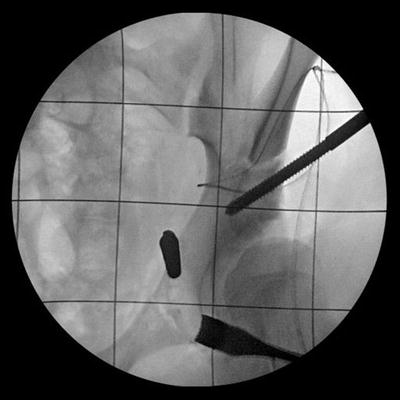
Fig. 29.12
Fluoroscopic view demonstrating the placement of the two reference half pins prior to the completion of the iliac osteotomy. The AP half pin marks the acetabular version whereas the lateral to medial half pin marks the slope of the acetabular roof. Reprinted with permission from the Rubin Institute for Advanced Orthopedics, Sinai Hospital of Baltimore
The first half pin is place from the anterior to posterior direction, just lateral to the superior pubic ramus osteotomy. This anterior reference half pin marks the acetabular version. The second half pin is inserted from lateral to medial in the supra-acetabular region, parallel to the roof or sourcil of the acetabulum. This lateral reference half pin marks the dysplastic acetabular roof. After the reference half pins are placed, the final osteotomy of the ilium is performed. A Gigli saw is carefully passed through the sciatic notch. The final osteotomy is completed with the Gigli saw from the sciatic notch to the anterior aspect of the ilium, just above the anterior inferior iliac spine.
Deformity Correction and Fixation
The acetabular fragment should become freely mobile after the third cone cut. If the fragment does not easily move, then the pubic ramus osteotomy and ischial osteotomy are revisited with repeat passage of the osteotome. After mobilizing the acetabular fragment, the reference half pins are used to reorient the acetabulum and temporary fixation is performed (Fig. 29.13a). The anterior half pin should still be pointed in a straight anterior to posterior direction if the version of the acetabulum was planned to remain the same. If anteversion is needed, then the anterior half pin should be internally rotated. Similarly, if the anterior half pin is externally rotated, retroversion has been imparted to the new acetabular position. The temporary fixation consists of three separate 1.8-mm Ilizarov or similar sized smooth k-wires. After adequate correction and repositioning of the acetabulum is completed and confirmed under fluoroscopy, the wires are sequentially overdrilled with a cannulated 3.2-mm drill bit and solid 4.5-mm screws are inserted for final stabilization (Fig. 29.13b).
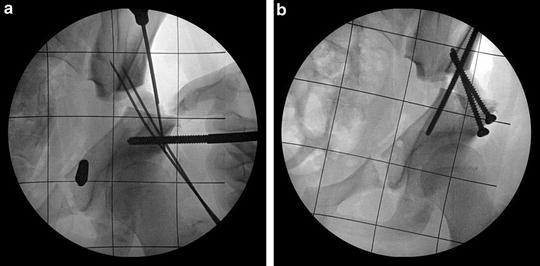
Fig. 29.13
(a) After the acetabular fragment is reduced into the corrected position, temporary fixation is achieved with smooth wires. (b) The smooth wires are sequentially overdrilled with a 3.2-mm cannulated drill and 4.5-mm solid screws are inserted. This is the same patient as Fig. 29.16. Reprinted with permission from the Rubin Institute for Advanced Orthopedics, Sinai Hospital of Baltimore
The following figures are case examples of the triple pelvic osteotomy (Figs. 29.14, 29.15, and 29.16).
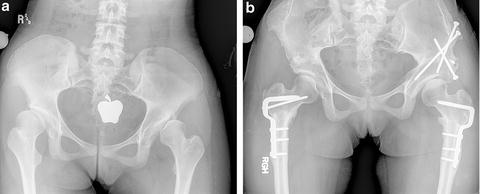
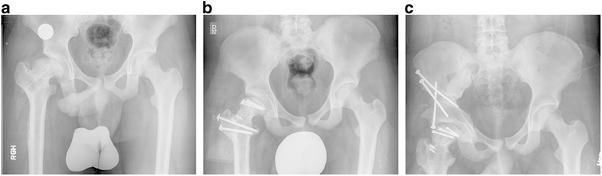
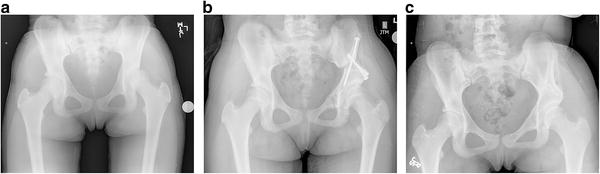
Fig. 29.14
(a) A 14-year-old female with Down’s syndrome and concurrent severe coxa valga and acetabular dysplasia. (b) Left hip corrected with proximal varus osteotomy of the femur with periacetabulr triple osteotomy. Reprinted with permission from the Rubin Institute for Advanced Orthopedics, Sinai Hospital of Baltimore
Fig. 29.15
(a) An 18-year-old male with history of Perthes disease of the right hip who had previously undergone aproximal femoral valgus osteotomy with residual impingement pain and gluteus medius weakness. (b) Same patient after Ganz femoral head reduction surgery and relative femoral neck lengthening with greater trochanter transfer. (c) Subsequent triple pelvic osteotomy in same patient to address residual hip pain due to decrease contact area between newly shaped femoral head and oblong acetabulum. Reprinted with permission from the Rubin Institute for Advanced Orthopedics, Sinai Hospital of Baltimore
Fig. 29.16
A 13-year-old female basketball player presents with new-onset left hip pain with radiographs depicting underlying acetabular dysplasia (a), radiographs after triple osteotomy with improvement of femoral head position and coverage and normalization of the center edge angle (b). (c) Radiographic appearance of pelvis after hardware removal with excellent left hip configuration and no compromise of the pelvic outlet for future childbearing. This is the same patient shown in Figs. 29.11, 29.12, and 29.13. Reprinted with permission from the Rubin Institute for Advanced Orthopedics, Sinai Hospital of Baltimore
Closure proceeds with repair of the iliacus fascia to the gluteus medius fascia to cover the exposed iliac crest, repair of the rectus femoris tendon, and a layered closure of the subcutaneous tissues and skin over a drain.
Postoperative Care
The patient is placed into a hip abduction pillow prior to leaving the operative suite and converted to a single leg hip abduction brace before discharge from the hospital. Toe-touch weight bearing is allowed with crutches or a walker for 6 weeks. After radiographic confirmation of healing, the patient is advanced to full weight bearing and physiotherapy.
Box 29.5. Modified Triple Osteotomy
Technical tips:
Can be performed with a single anterior ilioinguinal incision.
Identify, isolate with a vessel loop, and protect the femoral nerve, artery and vein prior to iliopsoas tenotomy as well as during the superior ramus and ischial bone cut.
Adequate medial exposure must be achieved for the superior rami bone cut.
The superior rami osteotomy site usually lies directly behind the neurovascular bundle.
A multiple-drill hole technique, Ganz osteotome, and Gigli saw are utilized for the pubic rami, ischial, and ileal bone cuts, respectively.
Proper oblique fluoroscopic views are critical to performing the ischial osteotomy.
The Ganz osteotomy must be directed above the ischial spine for the correct ischial osteotomy.
It is critical to flex the hip 15–20° while levering the Ganz osteotome distally to achieve the proper osteotomy direction; this position protects the femoral nerve from a tension injury.
Two half-pins are used as anatomical reference points and for controlled mobilization of the fragment.
Three to four large fragment screws (4.5 mm) are adequate for fixation.
Residual Deformities of the Hip Joint Secondary to Slipped Capital Femoral Epiphysis
The residual deformities that result from a previous slipped capital femoral epiphysis (SCFE) are typically varus, extension, external femoral rotation, leg length discrepancy, and anterolateral femoral acetabular impingement (FAI) [28, 29]. The clinical relevance of each of these deformities depends on the severity of the SCFE and the prior treatment. Some patients will present with a long standing SCFE with severe deformity that has never previously been diagnosed.
The typical treatment of in situ screw fixation for minimal or mild SCFE has proven effective with long-term success [30]. However, the same strategy for moderate or severe magnitude of SCFE often results in unacceptable residual deformities and is associated with pain, gait abnormality and joint dysfunction [31, 32]. There is no absolute criterion for the amount of deformity that requires immediate or eventual reconstruction. However surgeons are increasingly managing even milder deformity associated with FAI in order to prevent poor long term outcomes [33, 34]. The decision to perform a corrective osteotomy should be based on the patient’s function and symptoms, as well as the magnitude of deformity. If conservative observation is the treatment strategy, then the physician should follow the patient well into young adulthood to monitor the presence of early degenerative joint disease or impingement that would require a more aggressive treatment plan.
The recommended treatment strategy for residual hip deformities secondary to SCFE consists of either a modified Southwick intertrochanteric osteotomy or a modified Dunn procedure for femoral head reorientation. The osteotomy elected may depend on whether the proximal femoral growth plate is open or closed. If the physis remains open, then the author’s treatment of choice is the modified Dunn procedure via a surgical hip dislocation described by Ganz [35]. Once the physis has closed, the proximal femoral periarticular retinaculum becomes very thin resulting in a higher risk of avascular necrosis for the modified Dunn procedure. In the face of a significant proximal femoral deformity with a closed capital femoral physis, a modified Southwick intertrochanteric osteotomy is recommended.
Performing a subcapital osteotomy versus an intertrochanteric osteotomy for a chronic SCFE deformity remains controversial. Several studies of the modified Dunn procedure have reported favorable results with significantly low rates of avascular necrosis [36–38]. However, there exists inconsistent reports on the incidence of avascular necrosis associated with subcapital osteotomies [39–41]. The decision may be surgeon dependent, and related to experience with surgical hip dislocation and the Modified-Dunn procedure. Surgeons may elect to stage treatment of a skeletally immature, chronic stable SCFE by first performing in situ screw fixation, and then following with a planned intertrochanteric osteotomy after physeal closure. An open or arthroscopic osteoplasty, or “bumpectomy,” of the femoral neck deformity can also be performed in combination with this approach to avoid femoral-acetabular impingement.
The Modified Dunn Procedure for Residual Deformities of the Proximal Femur Secondary to SCFE: Operative Technique
The modified Dunn procedure has been described multiple times in the current literature. H. Huber et al. provided an excellent description of this procedure in 2009 [39].
Positioning and Exposure
The modified Dunn procedure is performed with the patient in the lateral decubitus position. The incision is centered on the greater trochanter with approximately 5–8 cm distal and 5–8 cm proximal (Fig. 29.17).
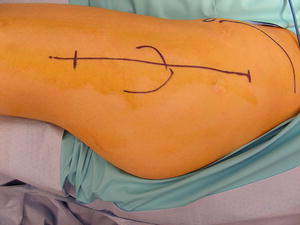
Fig. 29.17
The incision is centered on the greater trochanter for a total length of 15–20 cm. The clinical photograph depicts the outline of the iliac crest, the ASIS, the greater trochanter, and the longitudinal incision centered on the greater trochanter. Reprinted with permission from the Rubin Institute for Advanced Orthopedics, Sinai Hospital of Baltimore
The interval between the tensor fascia lata and gluteus maximus muscles is used to gain access to the level of the vastus lateralis and gluteus medius muscles. The posterior border of the vastus lateralis muscle is identified at the level of the vastus ridge. The posterior border of the gluteus medius muscle is identified along with the piriformis tendon and the sciatic nerve. A greater trochanteric osteotomy is performed with an oscillating saw that connects the posterior border of the vastus lateralis muscle to the posterior border of the gluteus medius muscle. The greater trochanteric fragment should be approximately 1–1.5 cm thick for adequate fixation at the end of the procedure. The digastric muscle flap to include the vastus lateralis muscle, the greater trochanteric fragment, and gluteus medius muscle is flipped medially allowing exposure of the gluteus minimus muscle and underlying hip joint capsule (Fig. 29.18a–c).
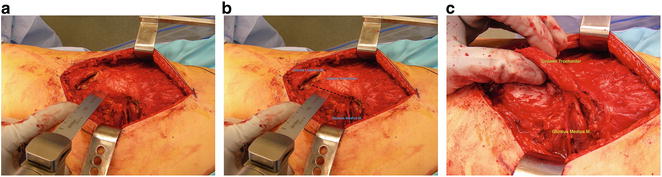
Fig. 29.18
(a, b) The greater trochanteric osteotomy begins at the posterior border of the vastus lateralis muscle and extends to the posterior border of the gluteus medius muscle. (c) The greater trochanteric fragment should be approximately 1.0–1.5 cm in thickness. Reprinted with permission from the Rubin Institute for Advanced Orthopedics, Sinai Hospital of Baltimore
Surgical Hip Dislocation
The next step in the procedure is the exposure of the hip capsule and the Z capsulotomy. A small Cobb elevator is used to lift the gluteus minimus muscle off of the capsule and provide an interval for a Taylor retractor to be inserted onto the outer table of the ilium. The surgeon will note a prominence in the hip capsule caused by the superior ridge of the femoral neck that was “left” behind as the femoral head progressively slipped in a posterior and medial direction. The Z-capsulotomy is performed with the longitudinal limb in the midline of the capsule. The anterior limb of the capsulotomy is performed at the base of the femoral neck while the posterior limb is extended along the posterior rim of the acetabulum (Fig. 29.19).
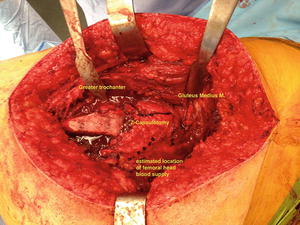
Fig. 29.19
The Z-capsulotomy is created with a longitudinal incision in the capsule in line with the femoral neck. The anterior limb of the capsulotomy is performed anterior at the base of the femoral neck. The posterior limb of the capsulotomy is directed along the posterior border of the acetabulum. Reprinted with permission from the Rubin Institute for Advanced Orthopedics, Sinai Hospital of Baltimore
The critical step at this point in the procedure is the creation of the retinacular soft tissue flap that will contain the blood vessels to the femoral head. Careful removal of bone from the base of the greater trochanter will create this flap that consists of the proximal femoral periosteum, pericapsular retinaculum, and short external rotator muscles. The creation of this flap is accomplished by removing 5–8 mm of bone from the posterior aspect of the greater trochanteric base by the “inside out technique”(Fig. 29.20). It is critical to minimize soft tissue tension and stretch while excising the bone.
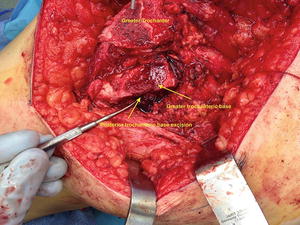
Fig. 29.20
The posterior aspect of the base of the greater trochanter is excised to create the soft tissue vascular sleeve to the femoral head. The excision of 5–8 mm of bone produces soft tissue redundancy that allows greater mobility of the femoral head during the realignment procedure. Reprinted with permission from the Rubin Institute for Advanced Orthopedics, Sinai Hospital of Baltimore
Similarly, the proximal aspect of the greater trochanter base is removed to create a surface that is flush with the superior portion of the femoral neck. This will result in the “relative” femoral neck lengthening after the greater trochanteric fragment is advanced distally during the closure.
If the femoral head has not been previously secured with prior screw fixation, then temporary fixation with a stout single threaded K-wire is performed (Fig. 29.21). The hip is gently dislocated with release of the ligamentum teres from the fovea capitis. After the femoral head is delivered out of the joint, the acetabulum and labrum are inspected for any detrimental changes. Next, the periosteum and retinaculum of the femoral neck is carefully peeled from anterior to the mid-line both medially and laterally. The lateral aspect of this dissection is critical and the continuity of the soft tissue flap to the femoral head must be maintained.

Fig. 29.21
(a, b) A 14-year-old male who presented with an acute slipped capital femoral epiphysis. (c, d) Intraoperative fluoroscopic views depicting temporary head fixation to allow for surgical dislocation of the hip without compromising the vascular supply to the femoral head. Reprinted with permission from the Rubin Institute for Advanced Orthopedics, Sinai Hospital of Baltimore
Deformity Correction and Fixation
Following dislocation, the femoral head fixation is removed and a curved osteotome is inserted into the physis. Gentle levering of the curved osteotome is performed to allow the femoral head to gradually detach from the femoral neck. While the femoral head is carefully being levered off the neck, the retinacular soft tissue flap should be visualized to prevent any tearing or stretching. If the final posterior portion of the physis is difficult to detach, the osteotome is carefully directed slightly distally, removing a small portion of the posterolateral femoral neck with the femoral head in order to protect the blood supply. The femoral head along with the soft tissue vascular flap is allowed to fall back into the acetabulum and the femoral neck is lifted into the operative field for inspection (Fig. 29.22).
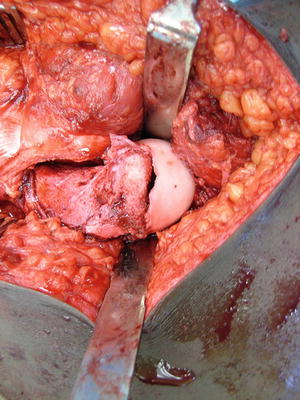
Fig. 29.22
The femoral head is allowed to fall back into the acetabulum after gently levering the femoral head off of the neck through the pathologic physis. Reprinted with permission from the Rubin Institute for Advanced Orthopedics, Sinai Hospital of Baltimore
The femoral neck is trimmed of excess bone and shortened to eliminate any tension of the vascular leash with femoral head reduction. The shortening does not have to be excessive, approximately 1 cm, as long as no tension of the blood supply is evident when the femoral head is reduced. The femoral head is carefully retrieved from the acetabulum and reduced to the “new” femoral neck. The vascular retinacular leash is inspected to insure no tension is present after which temporary K-wire fixation is performed. The hip joint is reduced and its position is confirmed under fluoroscopy. The fixation is finalized via 4.5-mm screws, 3.5-mm screws, or threaded K-wires. The size of the fixation depends on the size of the femoral head and balancing stable fixation while minimizing the amount of area of the femoral head violated to prevent devascularization. The capsule is repaired with care not to over tighten the posterior capsule, which could stretch the blood supply to the femoral head. The greater trochanter is advanced distally and repaired with two 4.5 mm solid screws or two 5.5-mm cannulated screws. The goal of the greater trochanteric transfer is to advance the proximal tip of the greater trochanter below the newly established center of the femoral head (Fig. 29.23). The remainder of the closure is performed in the typical fashion over a drain.
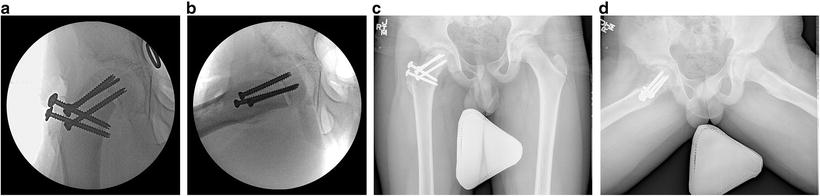
Fig. 29.23


(a, b) Demonstrating the same patient as in Fig. 29.21 with intraoperative fluoroscopic views of the final femoral head alignment after reduction of the slipped capital femoral epiphysis. (c, d) AP and frog pelvis radiographs at 8-month postoperative follow-up. Reprinted with permission from the Rubin Institute for Advanced Orthopedics, Sinai Hospital of Baltimore
Stay updated, free articles. Join our Telegram channel
Full access? Get Clinical Tree
