Step 1: Graft Harvest
Hamstring autograft is the graft choice in this skeletally immature population. A 2-cm vertical incision over the distal insertion of the hamstring tendon is the preferred approach. The vertical incision allows evaluation of the tibial physis and will be used later for placement of the tibial guide (see Step 5).
Layer one of the medial structures of the knee, the sartorius fascia, is incised.21 The gracilis and semitendinosus tendons, which lie between the first and second layers of the knee, are identified. In general, both tendons are harvested unless the semitendinosus is large enough to provide a diameter of 9 mm or more. The semitendinosus and gracilis are left attached distally to facilitate the graftlink preparation. A native graft length of 27 cm will provide enough tissue to allow for an appropriate length for the final graftlink autograft (between 55 and 65 mm for the all-epiphyseal construct). If the combined tendons do not allow for a final diameter of at least 8.5 mm, we consider adding an allograft semitendinosus to the construct. This is discussed as a routine part of the consent preoperatively with the patient and family. Although it is clear from the literature that allograft alone is not an appropriate choice in this population of young athletes,22,23 we have not found that adding allograft to autograft tissue when the diameter is less than 8.5 mm has been a clinical problem and we are not comfortable using a graft less than 8.5 mm in diameter given the evidence in the literature.24–27 An alternative is to harvest the contralateral semitendinosus in this setting. Given the incidence of contralateral injury in this population of young athletes, we prefer to supplement with allograft than to harvest contralateral autograft.
Step 2: Graft Preparation
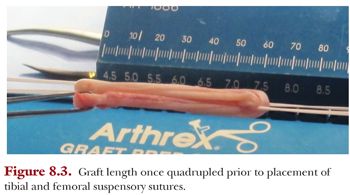
A graft preparation table is used to construct the tendon graft and to secure the surgical fixation on the femoral end (Fig. 8.2). The tendons are looped together on this table to increase the graft’s diameter. The result is a shorter and thicker graft, which is biomechanically stiffer (Fig. 8.3). A TightRope RT suture (Arthrex, Naples, FL) is used on the femoral end of the graft, and a free TightRope Attachable Button System (ABS) is used for fixation on the tibial end.
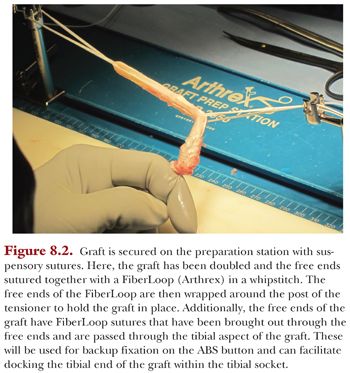
Our preference is to secure the graft on both the tibial and femoral side using suspensory fixation in the form of a reverse tensioning (RT) button (TightRope RT device) and a free tensioning button (ABS device) on the tibial side using the GraftLink technique. We modified the original technique of using TightRope RT buttons on both sides, as we found that passing the tibial button through the anteromedial portal and through the tibial socket was unnecessary. The length of the graft is generally 55 to 65 mm (Fig. 8.4). If the length of the graft is too long, it will “bottom out” in one of the sockets; but if it is too short, it may compromise biologic fixation within the socket. The diameter of the graft is assessed through the same sizing block.
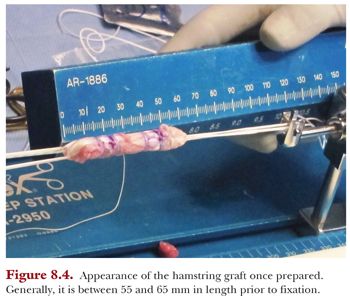
We also bundle the graft using four separate Ethibond sutures through and around the graft to form a more compact and denser graft. This stitch is started by passing the needle through the inner graft limb to the outer graft limb, then wrapping the suture around the graft and finally passing the needle through the outer limb back to the inner limb. This results in a buried knot tucked inside the graft. This is repeated three more times to create two stitches at 15 and 20 mm from each end of the graft for four stitches total (see Fig. 8.4).
The graft is generally symmetrical throughout in diameter, approximately 9 to 11 mm. However, if one end of the graft has a greater diameter than the other, we can adjust the size of our femoral or tibial socket accordingly. While we move on to the diagnostic knee arthroscopy, the graft is pretensioned to 20 lb for 5 minutes on the back table. Following tensioning, the graft is wrapped in moist gauze and stored in a sealed plastic bag.
Step 3: Diagnostic Knee Arthroscopy and Site Preparation
Standard diagnostic knee arthroscopy is performed via anteromedial and anterolateral portals. At this time, any meniscal or chondral pathology is addressed appropriately. The ACL tear is visualized and confirmed, and the footprints are débrided. We use the anterolateral portal with a 70-degree lens to visualize the femoral footprint. We identify both footprints, débride the stumps, and leave intact portions of the ligament that do not interfere with the procedure for the theoretical benefit of facilitating proprioception by leaving behind Pacinian corpuscles, Golgi apparatus, etc. Rubberized flexible cannulas (PassPort, Arthrex Inc., Naples, FL) are used to facilitate suture management and graft passage.
Step 4: Femoral Socket Preparation
We prepare the femoral socket first and, at this time, switch the arthroscope from the 70-degree lens in the anterolateral portal to a 30-degree lens in the anteromedial portal. We start by first placing the side-specific small-angle femoral marking hook (Arthrex) through the anterolateral portal. We have found that the optimal angle for the guide is between 90 and 95 degrees, onto the center of the femoral footprint, approximately 2 to 3 mm from the back wall. Once we have established the guide’s correct intra-articular position within the ACL’s femoral footprint, we need to align the trajectory of the tunnel correctly. To do this, we carefully palpate the posterolateral femoral condyle with respect to the marks we made on the distal femoral physis. The insertion of the popliteus tendon can be a useful landmark for placement of the guide pin.28 A less than 1-cm incision is made just anterior to the lateral epicondyle, and the guide is seated onto the lateral cortex of the lateral femoral condyle.
Then, we insert a small guide pin under fluoroscopic guidance to assess its position relative to the physis and articular surfaces. After the guide pin position is verified fluoroscopically, a FlipCutter (Arthrex) of the appropriate diameter based on measurements of the graft on the back table is drilled through the stepped drill sleeve to reach the ACL footprint in the notch. Again, the position of the FlipCutter is confirmed by fluoroscopy (Fig. 8.5).
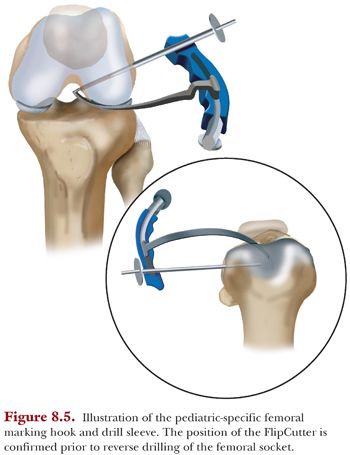
The stepped drill sleeve is then gently placed through the lateral cortex using a mallet to ensure a bone bridge of at least 7 mm between the end of the tunnel and the lateral cortex of the lateral femoral condyle. Next, the FlipCutter is deployed and the femoral socket is reamed retrograde to approximately 25 mm. The intraosseous length of the socket is noted at this time and used to mark the femoral side of the GraftLink construct to facilitate arthroscope visualization during the graft passage step (see the following texts). Then, the FlipCutter is removed, and a FiberStick (Arthrex) is inserted through the drill sleeve and exits via the anteromedial portal for later graft passage.
Step 5: Tibial Socket Preparation
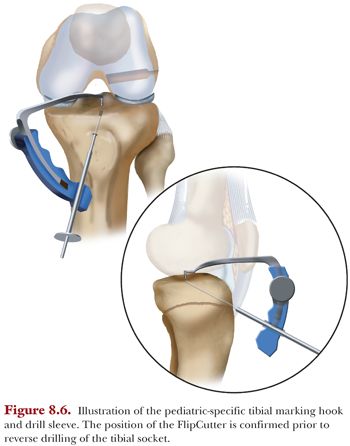
At this time, the arthroscope is returned to the anterolateral portal, and again, a 70-degree lens is used. Using a radiofrequency probe, the ACL’s tibial footprint is prepared. The pediatric-specific tibial ACL guide, which is set to approximately 30 to 40 degrees, is inserted through the anteromedial portal. The correct intra-articular position of the guide on the tibial footprint of the ACL is confirmed via arthroscopic visualization. The extra-articular point of the guide is just proximal to the proximal tibial physis. Correct placement is aided by palpation of the physis through the vertical incision made for graft harvest.
The small-angle tibial marking hook (Arthrex), which is attached to the stepped drill sleeve, is inserted and placed onto the tibial footprint. This positioning is directly visualized with the arthroscope. A guide pin is generally placed and evaluated fluoroscopically to confirm correct placement within the epiphysis. The stepped drill sleeve is then gently placed through the tibial cortex using a mallet. Then the appropriate-sized FlipCutter is drilled through the guide and exits through the tibial footprint, visualized fluoroscopically and via the arthroscope in the anterolateral portal. If positioned correctly, the FlipCutter is deployed and reamed retrograde to a predetermined depth, but typically between 15 and 20 mm and a bone bridge of at least 7 mm (Fig. 8.6). A FiberStick is advanced through the guide, traversing the socket and retrieved intra-articularly to exit through the anterolateral portal for later graft passage.
Step 6: Graft Passage
The graft is passed through the anteromedial portal into the femoral socket. The intraosseous length markings on the femoral side sutures are visualized arthroscopically while docking the graft in the femoral socket to help avoid passing the RT button through the skin on the lateral side of the distal femur. The RT button is passed through the lateral femoral epiphyseal cortex, flipped, and secured onto the lateral epiphyseal cortex. Once secured, the slack is removed from the suture and it is partially tensioned. Pulling back on the graft will provide tactile feedback that the RT button is secured on the cortical bone. The strands should be pulled one at a time in 2-mm increments to advance the graft.
The tibial aspect of the graft is brought in through the anteromedial portal using the previously placed FiberStick that has been shuttled from the anterolateral to anteromedial portals. Then the TightRope suture is shuttled into the suture in the FiberStick, and that stitch is pulled through the tibial drill hole, pulling the tibial end of the graft into the tibial socket. Then a TightRope ABS button is placed onto the ABS loop attached to the tibial end of the graft. Any soft tissue blocking the path of the button to the bone needs to be cleared so the RT button can lie flush on the periosteum. Once the button abuts the medial tibial cortex, the ABS button is partially tensioned onto the medial proximal epiphyseal cortex of the tibia. Then the whipstitch sutures are loaded onto the button and secured for backup fixation.
Step 7: Graft Tensioning
Markings were placed on the graft at the 15- and 20-mm level on both the femoral and tibial side to help assess how much graft is docked into both the femoral and tibial socket. The graft is tensioned with the knee in 20 degrees of flexion, first on the femoral side and then on the tibial side. The knee is then cycled through flexion and extension 50 times and then final tensioning is performed. We recommend backing up the RT and ABS buttons by tying knots over the buttons once final tensioning has been accomplished. The graft is evaluated throughout a full range of motion under direct visualization arthroscopically. The pivot shift and Lachman tests are performed and compared to the patient’s preoperative assessment. We then tie knots over the self-tensioning suspensory fixation devices. Prior to wound closure, the position of the tensioning buttons is confirmed fluoroscopically. The incisions are thoroughly irrigated and closed. A hinged knee brace locked in extension is placed in the OR.
In general, we have admitted this cohort of young athletes for one night following ACL reconstruction. Cryotherapy is applied in the postanesthesia care unit. Physical therapy begins in the hospital on postoperative day 1. Patients are weight bearing as tolerated unless they have concomitant injuries that dictate otherwise. The postoperative program is extensive and outlined in a later chapter of this textbook.
Despite the dramatic surge in ACL reconstruction surgery in pediatric patients over the past 20 years, there is still no consensus on the best technique. Historically, the physeal-sparing technique used most commonly has been the modified McIntosh, popularized by Micheli.29,30 Although some authors have reported good outcomes with this extraepiphyseal ACL reconstruction technique,29 recent biomechanical evidence has found that this technique may overconstrain the knee.31,32 We have reported favorable kinematic and contact stress results in a biomechanical study of the all-epiphyseal technique.33 Our group has also reported that the AE technique is safe with the absence of growth disturbance in a cohort of athletes following physeal-sparing techniques using SPGR MRI analysis.33a
When an ACL-deficient knee sustains an anterior load, increased contact pressures are noted at the posterior aspect of the tibial plateau, which may lead to degenerative changes to the meniscus and the articular cartilage.34
Colleagues at our institution compared the all-epiphyseal femoral technique to over-the-top and transphyseal techniques in a canine model, finding less angular deformity and better position of the femoral graft origin after growth in the all-epiphyseal model.7 We have compared this all-epiphyseal technique to the complete transphyseal (CT) technique biomechanically and have found that the all-epiphyseal technique is superior to the CT technique, which uses vertical tunnels to avoid physeal compromise.35
The clinical outcomes of our all-epiphyseal ACL reconstruction technique begin with a routine imaging assessment of standing radiographs and MRI at the 6-month, 1-year, and 2-year postoperative time frames to check for growth disturbances, injury to the physis, and graft incorporation.33a These athletes begin standard objective testing including KT-1000, isokinetic testing and a movement assessment and return to play evaluations. Symmetry, alignment control and the ability to decelerate are assessed during progressively challenging movement patterns encountered in sport. This is indicated in preparation for return to play clearance by our multidisciplinary team.36 The athlete and his or her parents are prepared for this process pre-operatively with the understanding that at the 6 month stage the rate-limiting step is less about the knee and more about how the body moves in space around both the ipsilateral and contralateral knees in an attempt to minimize the potential for injury to either knee.
Our group has reported on the 2 year follow-up of a group of 23 athletes following all-inside, all-epiphyseal ACL reconstructions using the technique described in this chapter.37 There were 6 females and 17 males. The average chronologic age was 11.8 and the average skeletal age using the HSS Shorthand Bone Age method was 12.1. The majority sustained a non-contact injury during sports participation. These athletes were injured playing a number of sports and Lacrosse (38%) and Soccer (31%) were the two most common. Lachman and Pivot Shift testing were negative in all patients at final follow-up. The KT-1000 arthrometry demonstrated no significant differences between the injured and contralateral knees. Isokinetic testing revealed deficits at both 180 and 300 degrees per second to be acceptable at less than 10% deficits in those athletes cleared for return to play. Two of the 23 (8.6%) skeletally immature athletes in this study required a second surgery. One athlete sustained an ipsilateral graft rupture 10 months post-op and the second athlete required a partial medial meniscectomy 18 months post-operatively for an incompletely healed medial meniscus repair that had been performed at the index operation. The average time for return to unrestricted competitive activity after successful completion of the Movement Assessment and Return to Play process was 12.5 +/− 1.25 months from the time of surgery.
While awaiting long term clinical outcomes, the theoretical benefit of the all-inside, all-epiphyseal technique is clear. The technique fulfills both the requirements of creating an ACL reconstruction that has demonstrated favorable kinematics and contact stress results while avoiding physeal injury. Studies to date have reported in vitro biomechanical results comparing different physeal-sparing and physeal-traversing techniques and results in animal models. Long-term outcomes in pediatric patients comparing various techniques will be the most useful in determining a superior technique.
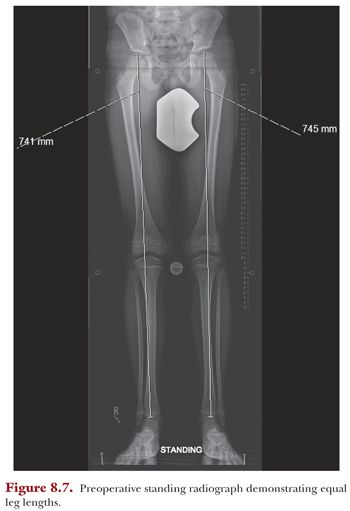
The patient is an 11-year-old male with no other medical history who presented with a left knee effusion after a twisting injury during a soccer game. His exam was notable for a moderate knee effusion and a grade IIB Lachman and 2+ pivot shift test. His preoperative standing radiographs demonstrate equal leg lengths (Fig. 8.7). On MRI, he had a complete midsubstance ACL tear (Fig. 8.8). His bone age was 11 years and 6 months by the Greulich and Pyle system. Given his growth remaining, he was indicated for an all-epiphyseal ACL reconstruction. His postoperative images demonstrate placement of the tensioning buttons (Fig. 8.9).
