Fig. 17.1
Operating room setup for pelvic procedures (e.g., cystoplasty)
Prevention of Deep Venous Thrombosis
Deep venous thrombosis presents a significant risk in this patient population due to the long operating times associated with robotic ileocystoplasty, during which the patient is in lithotomy position. In addition, these patients tend to have limited mobility secondary to their underlying medical conditions. At the authors’ institution, sequential pneumatic compression stockings are placed preoperatively and continued throughout surgery and the remainder of the hospitalization.
All patients should be screened for nutritional abnormality and hematologic disorders, including protein C and S deficiencies. High-risk patients receive subcutaneous heparin prophylaxis beginning prior to induction of anesthesia and continuing through the remainder of the hospital stay.
Surgical Steps
1.
Port placement – Proper port placement is critical for the success of any robotic procedure. The primary camera port is placed using an open Hasson technique 12 cm from the superior edge of the pubis, preferably at or below the umbilicus. If the distance to the umbilicus is less than 9 cm, the port is placed superior to the umbilicus (Fig. 17.2). Secondary (working) ports are marked and placed after pneumoperitoneum is achieved. We place two 8 mm ports in line with the camera port, each 6–8 cm lateral to the camera port. The port for the 4th arm (8 mm) is placed in the left iliac fossa at the anterior axillary line. When placing the stoma in the right iliac fossa, we place an additional 12 mm port in the right iliac fossa at the midaxillary line. This serves as the stoma site at the end of the procedure. The extra 12 mm port is used for application of LAPRA-TY clips and passing large needles.
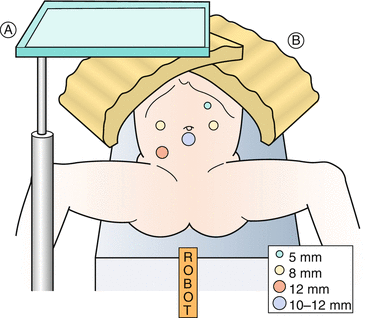
Fig. 17.2
Patient position and port placement for augmentation cystoplasty. A Mayo stand, B Foam pad to cover chest. (Reprinted with permission from Gundeti [24])
We currently use a 12 mm balloon port for the camera because their short intracorporeal length allows for increased intra-abdominal working space and because it is less likely to become dislodged during the surgery. We use a heated coil gas tube for insufflation to prevent the lens from fogging. We set pressure to 15 mmHg for trocar insertion and then drop the pressure to 10–12 mmHg with a flow of 2 L/min. We use a 0° lens for the initial assessment and bowel anastomosis and a 30° lens for the remainder of the procedure.
2.
Primary assessment – We start with an initial intraperitoneal examination of the small bowel and bladder, paying particular attention to length and vascularity. In patients with a ventriculoperitoneal shunt, we place the shunt in an Endo Catch bag to avoid damage or contamination during the procedure.
3.
Bowel isolation and anastomosis – We identify the ileocecal junction and then mark a 20 cm segment of the ileum 15 cm proximal to the ileocecal valve using a premeasured 10 cm silk suture. We place percutaneous stay sutures at both the proximal and distal ends with 3-0 silk sutures, taking care to maintain good vascular supply to the mesentery. Percutaneous suspension allows for improved visualization of the mesentery, bowel transection, and anastomosis. Prior to anastomosis, we place traction sutures on the mesenteric borders. We then perform a single-layer seromuscular end-to-end anastomosis with 4-0 monofilament or polyglycolic acid suture (Fig. 17.3).
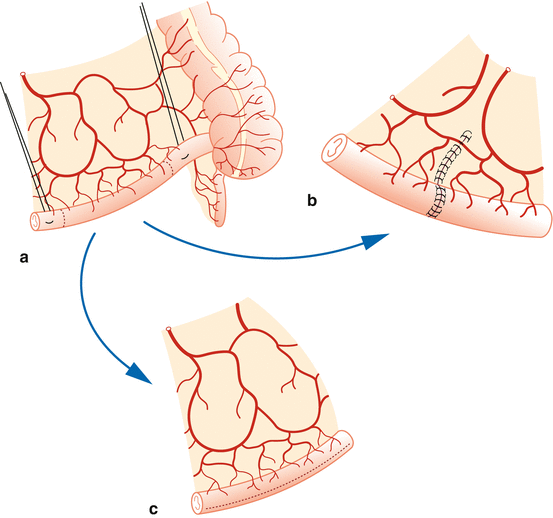
Fig. 17.3
Bowel isolation and anastomosis. (a) Bowel isolation. (b) Anastomosis of the bowel and (c) isolated bowel patch for augmentation system cystoplasty (Reprinted with permission from Gundeti [24])
4.
Vesicostomy, detubularization, and ileovesical anastomosis – We distend the bladder with saline through the previously placed Foley catheter. After the bladder is distended, a transverse cystotomy is made in the coronal plane extending to the bladder side walls up to the ureteral insertion, taking precaution not to be in close proximity. Prior to detubularization of the small bowel, we place a suction cannula in the lumen to assist with alignment and identification of the antimesenteric border. The fourth arm helps to maintain traction of the ileal segment during detubularization. Pre-placed dyed and undyed sutures are used to assist with orientation of the ileal patch and to complete the ileocystoplasty anastomosis. The posterior anastomosis is performed first, followed by the anterior anastomosis using 3-0 polyglycolic acid sutures. Unmatched lengths of the ileocystoplasty anastomosis are overcome with imbricating sutures. We place a suprapubic catheter after completion of the posterior anastomosis. After completion of the anastomosis, its integrity is tested by instilling saline through the suprapubic catheter (Figs. 17.4 and 17.5).
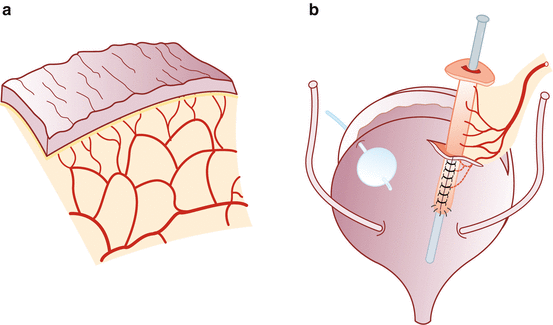
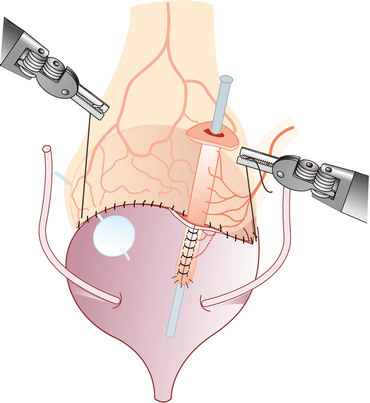
Fig. 17.4
Detubularization and vesicostomy. (a) Detubularization of the isolated bowel segment. (b) Vesicostomy (Reprinted with permission from Gundeti [24])
Fig. 17.5
Completed ileovesical anastomosis and appendicovesicostomy (Reprinted with permission from Gundeti [24])
5.


If a simultaneous catheterizable channel is to be performed, appendix is harvested first, and then after bowel work before the ileovesical anastomosis, the appendix is reimplanted on the posterior wall.
Stay updated, free articles. Join our Telegram channel
Full access? Get Clinical Tree
