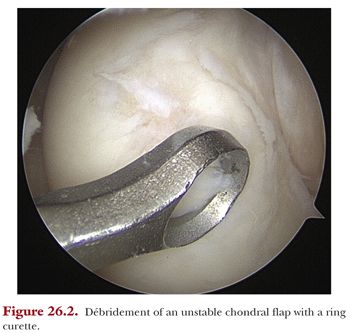
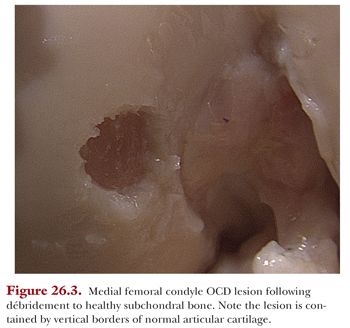
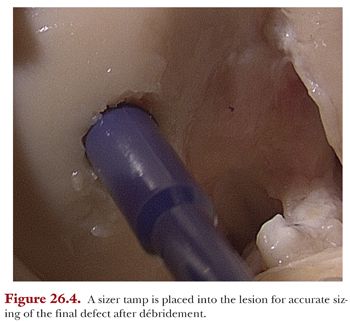
Any loose, fibrillated, or unstable full-thickness articular cartilage defect should be removed from the bed of the lesion using a curette, ring curette, and motorized shaver (Fig. 26.2). Take care to remove large fragments of cartilage from the joint as they are removed from the lesion to prevent loose bodies. The edges of the lesion should be débrided to have vertical smooth walls to circumferentially contain the OAT plug(s) using a scalpel or small curette (Fig. 26.3). When the lesion is completely prepared, the total diameter can be sized with a plastic sizing tamp (Fig. 26.4). If multiple donor plugs will be needed, the surgeon can make an assessment of the appropriate number and sizes of plugs.
If the lesion is located in a more anterior or distal position on the femoral condyle, the remainder of the procedure may be performed arthroscopically. If the lesion is more posterior on the femoral condyle, an appropriate angle for harvesting the lesion and placing the plug may not be feasible, in which case an arthrotomy should be made. The decision for an arthroscopic or open technique is ultimately at the discretion of the surgeon. (Figures in this section depict the use of an arthrotomy for visualization and perspective in this text.) If an open incision is used, a longitudinal incision is made through the skin from the distal pole of the patella to the tibial plateau. The location of the skin incision can be midline or parapatellar on the side of the lesion at the discretion of the surgeon. Often, it is possible to plan the incisions to incorporate one of the initial anterior arthroscopy portals into the incision for a more cosmetic result. The subcutaneous tissue is divided in line with this incision down to the paratenon of the patellar tendon. A medial or lateral parapatellar arthrotomy is made adjacent to the patellar tendon depending on the location of the lesion. The skin incision and/or arthrotomy may need to be extended for visualization and should be tailored to the location of the lesion and the comfort of the surgeon. Controlling flexion and extension of the knee is helpful in allowing for a smaller arthrotomy by bringing the lesion into view.
Should the previously described incision allow for access for the donor plug harvest, no further incision is needed. If not, a separate arthroscopy portal, open incision, or extension of the arthrotomy is made. The autograft osteochondral donor plugs are harvested from a non–weight-bearing portion of the femoral condyle. Options for locations of harvest include areas of the femur which are not major load-bearing areas such as the lateral supracondylar ridge, medial supracondylar ridge, posterior femoral condyle, lateral aspect of the lateral femoral condyle just above the sulcus terminalis, medial or lateral portions of the trochlea, and the superior aspect of the intercondylar notch. The size and contour of the recipient site should be taken into account when deciding where to harvest the plug. The distal medial aspect of the trochlea has been shown to have the least load-bearing area during range of motion followed by the intercondylar notch.20 The same study found that the medial and lateral trochlea matched recipient sites on the femoral condyles well, and the central portion of the non–load-bearing trochlea in the notch matched trochlear lesions best.20 Another consideration in the decision for a donor site in the skeletally immature population is the open physis. Harvest of the plug should be performed under fluoroscopic control and as far from the physis as possible to avoid inadvertent damage. The supracondylar ridge is the closest to the physis. The authors’ preferred technique is to harvest the donor graft from the distal medial trochlea in skeletally immature patients to stay farther from the physis and in a non–load-bearing zone.
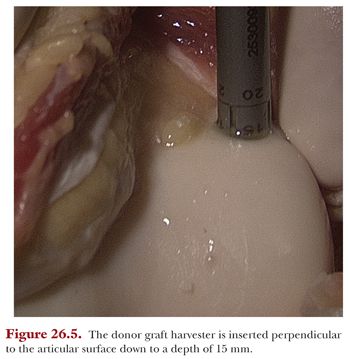
For implantation of a single OAT donor plug, the harvester size 1 mm larger than the size of the measured lesion is chosen so that upon seating of the donor plug, there will be a press fit. The harvester should be placed perpendicular to the articular surface and the angle should not be changed during harvesting. Using a mallet, the donor plug harvester is impacted to a depth of 15 mm using the numbered laser lines as a guide (Fig. 26.5). Without changing its angle, rotate the harvester clockwise 90 degrees twice and pull the device straight out of the lesion. It is recommended to harvest grafts perpendicular to the articular surface and without any levering during extraction to obtain the most anatomically suited graft for the recipient site.21,22 Both arthroscopic and open techniques can yield an appropriate graft with attention to proper harvesting technique.21,22 The donor plug will be withdrawn inside the harvester. The actual depth of donor plug that was taken can be measured inside the harvester device through the window and is then used to determine the depth of the recipient plug that will be removed. Leave the donor plug in place within the harvester until needed for implantation.
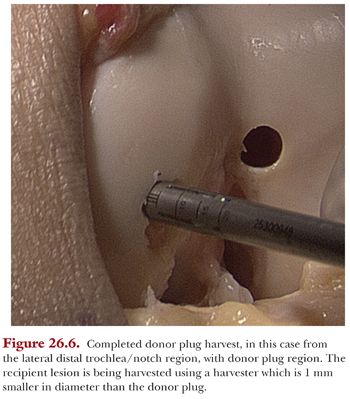
The recipient site harvester corresponding to the size of the lesion (1 mm smaller than the donor plug) is chosen and placed over the recipient defect perpendicular to the articular surface (Fig. 26.6). The recipient plug depth should be approximately 1 to 2 mm shallower than the donor plug length to avoid countersinking the donor plug. This harvester is then malleted in to this depth using the laser lines etched on the outside of the harvester as a guide. Similar to the harvest of the donor plug, take care not to change the angle of the device during this step. The harvester is again removed with two 90-degree clockwise turns and by pulling straight back on the device. The plug is removed and an alignment rod is inserted into the recipient site to recheck the depth and visualize the angle needed for insertion of the OAT donor plug.
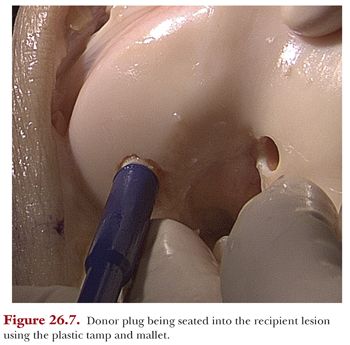
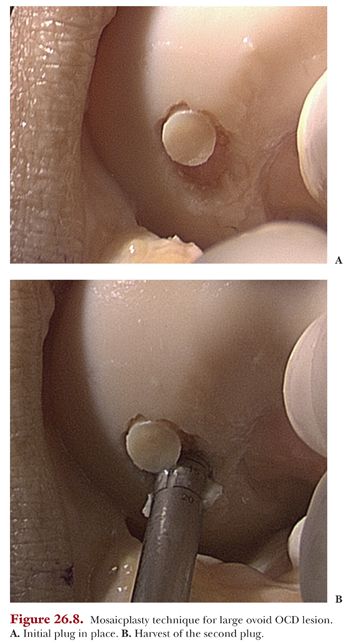
To remove the donor plug, a plastic delivery tube is placed over the donor harvester. The core extruder is placed into the harvester and the donor plug is advanced until it is flush with the edge of the harvester. This complex is placed into the recipient site at the previously determined angle. The core extruder is then used to advance the OAT plug. The plug can also be seated by removing it from the harvester with the core extruder, placing it over the recipient site at the appropriate angle and using a plastic tamp and mallet to tap the plug into position (Fig. 26.7). Grafts have been shown to incorporate best when they are press fit between 0 and 2 mm of being flush with the surrounding articular surface but not countersunk below the articular surface.22 If impacting the osteochondral dowel, a larger number of less forceful blows has been shown to decrease damage to chondrocytes.16,23 If using a mosaicplasty technique, following placement of the first graft, the steps are repeated for subsequent grafts (Fig. 26.8). Once the donor plug is inserted, the knee should be taken through a range of motion to ensure that there is no mechanical block to full motion and the graft is stable.
Postoperative Protocol and Rehabilitation
The limb is placed into a hinged knee brace locked in extension until the initial physical therapy visit within the first few days post op. For femoral condylar lesions, unrestricted passive range of motion is begun at the initial therapy session, followed by strengthening once full active range of motion is recovered. Touchdown weight bearing with crutches is permitted, in weight-bearing lesions, for the first 6 weeks, and at that time, a gradual return to full weight bearing is started. We require brace wear locked in extension during weight bearing until quadriceps strength and endurance is adequate to prevent falls. For patellar or trochlear lesions, full range of motion and full weight bearing is allowed with the brace locked in extension immediately as pain allows.
Outcomes
Short- and medium-term results of OAT in patients younger than the age of 18 years are encouraging. Gudas et al.8 found that 84% of patients returned to their preinjury activity level between 9 and 14 months postoperatively, and 81% were still involved in sports at this level at an average of 4.2 years. All patients returned to their previous level of sports at an average of 5.7 months in another small series of patients who received both single plugs and mosaicplasty.24 A variation of the traditional OAT technique using internal fixation of a portion of the OCD lesion with a small osteochondral autograft plug with25,26 and without27,28 augmentation of the defect with further OAT plugs has also been described with good short-term results.
OSTEOCHONDRAL ALLOGRAFT TRANSPLANTATION
The use of fresh osteochondral allograft transplantation in the knee was first reported in 1908.29 Fresh osteochondral allograft transplantation involves the transplantation of mature hyaline cartilage containing viable chondrocytes that survive hypothermic storage while maintaining the metabolic activity of the chondrocytes and maintaining the integrity of the surrounding collagen matrix. The second portion of the osteochondral allograft is the osseous portion. The osseous portion of the graft differs from the hyaline cartilage component in that the osseous portion was originally vascularized tissue and its cells are not thought to survive transplantation. Rather, the osseous portion of the osteochondral graft functions like other types of bone graft in that it provides a scaffold for healing to the host through creeping substitution.15,30 In the 1970s and 1980s, the use of fresh osteochondral allografts for posttraumatic reconstruction of the knee was popularized.31–34 More recently, many authors have reported good to excellent short- and medium-term success using fresh osteochondral allografts for the treatment of OCD and focal chondral lesions in young, active patients.5,6,10–12,35 Retrieval studies have shown successful graft incorporation up to 25 years after implantation and that histologic features associated with long-term osteochondral allograft survival include viable chondrocytes, functional preservation of matrix, and complete replacement of the bone graft with host bone.33,36
Indications
Debridement, microfracture, and OAT are often ineffective or impractical for lesions greater than 2 cm2 to 2.5 cm2. Osteochondral allograft transplantation is a single-stage surgical technique that is particularly useful in the setting of an OCD lesion with extensive subchondral edema or extensive bone loss that requires restoration.15 Fresh osteochondral allografting for OCD has been used at some institutions as both a salvage procedure and as a primary treatment when the fragment could not be reinserted.6
Authors’ Preferred Surgical Technique
The same anesthetic plan and surgical setup described in the OAT section is used.
Graft Acquisition and Storage
Osteochondral allograft tissue became commercially available in the late 1990s from tissue banks whose guidelines for sterile procurement and processing were established by the American Association of Tissue Banks, with oversight by the U.S. Food and Drug Administration. Donor tissue should be recovered from the cadaver specimen with 24 hours of expiration, and the age criterion for donors of fresh grafts is generally between 15 and 40 years. Chondrocyte viability directly correlates with the clinical success of osteochondral allograft transplantation. Osteochondral allograft storage methods (e.g., frozen, cryopreserved, fresh) have different effects of chondrocyte viability, immunogenicity, and time to transplantation. Among the available storage options, fresh osteochondral allografts have been shown to have the highest level of chondrocyte viability. Fresh osteochondral allografts stored hypothermically at 4°C, chondrocyte viability, and graft biomechanical properties begin to deteriorate at 14 days, and in general, the maximal recommended time from harvest to transplantation is 28 days. Tissue banks currently retain osteochondral allografts until microbiologic and serologic testing is complete, which often takes longer than 14 days. Donors are screened for HIV, hepatitis B surface and core antigens, hepatitis C antibodies, and syphilis, among others. Although the articular cartilage portion of an osteochondral graft elicits no humoral immune response, the subchondral bone and marrow components of the graft elicit a strong immune response, and for grafts larger than 10 cm2, a systemic immune response can take place; however, pharmacologic immune suppression is unnecessary.30,36–39
Before the procedure, the donor and recipient are matched on the basis of size using standard anteroposterior radiographs of the recipient knee corrected for magnification, and the donor knee is measured directly by the tissue bank. MRI can also be useful in assessing defect size but, as stated previously, has been shown to underestimate the defect area by as much as 60%.19 A match is considered acceptable if it is within 2 mm of the recipient condyle. There can be substantial variability in anatomy that is not always recognized on sizing measurements. In particular, in patients with OCD, the pathologically affected condyle typically is larger, wider, and flatter; therefore, a larger donor condyle generally should be used. In light of this, it is imperative that the surgeon inspect all tissue being considered for transplantation prior to undertaking the actual procedure.6,30,36–38
Types of Allograft Transplantation
Procedures are performed through a medial or lateral parapatellar arthrotomy. For small or solitary defects, a quadriceps-sparing mini-arthrotomy may be performed.
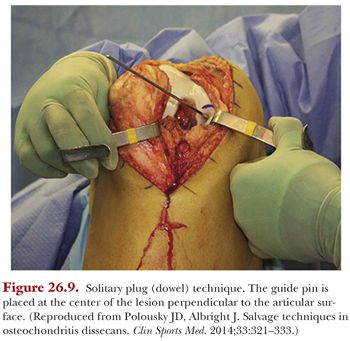
A solitary plug (dowel) technique is ideal when the defect is well-circumscribed in an easily accessible surface of the knee. The dowel technique requires a set of specialized reamers to achieve a press fit between the donor bone and recipient site. First, the diameter of the required graft is determined. A guide pin is placed through the center of the sizer with the sizer in even contact with the articular surface, which ensures that the trajectory of the guide pin is perpendicular to the articular surface (Fig. 26.9). The corresponding recipient site reamer is selected and the site is reamed over the guide pin until healthy, bleeding subchondral bone is encountered, generally 8 to 15 mm from the chondral surface. The 12 o’clock position is marked on the articular surface. Depth measurements are taken and recorded at the 3, 6, 9, and 12 o’clock positions. Attention is now turned to the donor condyle. The corresponding anatomic area is identified to match the contour of the recipient as closely as possible. A guide pin can be placed through the sizer to assist with maintaining a perpendicular trajectory with the reamer if necessary. Again, the cartilage of the donor is scored; the 12 o’clock position is marked on the graft, and it is cut with the dowel reamer. The graft is then removed from the donor condyle with a sagittal saw, taking care to preserve the appropriate depth (Fig. 26.10). When the dowel is free, it is trimmed to the appropriate depths at the marked clock positions. Pulsatile irrigation is used to remove marrow elements from the donor bone and the graft is placed. Generally, the diameter of the plug can be precisely matched to the size of the defect, providing complete coverage of the area and stable integration with the surrounding host bone and cartilage2,39 (Fig. 26.11).