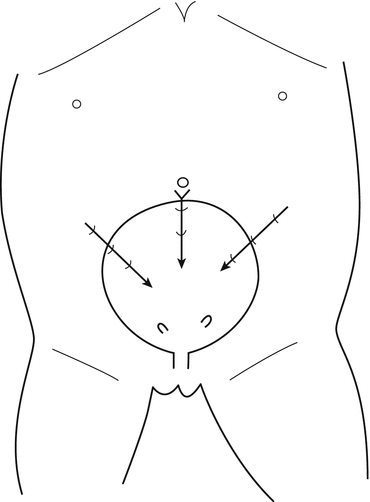
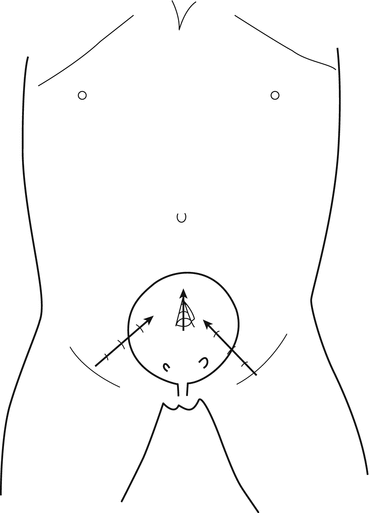
Fig. 12.1
Principle of ureteral reimplantation under pneumovesicoscopy
1.
To insufflate the bladder with a gas (carbon dioxide) that allows creation of a working space equal to the bladder capacity and to provide a clear intravesical vision, much better than the vision in a liquid filled bladder.
2.
To introduce in this distended natural cavity through suprapubic ports, three trocars, one median for the telescope, and two lateral for operative instruments; such a setup provides a familiar forward intravesical view toward the trigone and the ureteric orifices that is similar to that obtained with an open bladder incision [1]. So the ergonomic position for working is well adapted.
The goal of pneumovesicoscopy is to reduce the morbidity associated with the classical abdominal and bladder wall incision while maintaining the same good results achieved by open surgery.
Initially, operative pneumovesicoscopy was performed to correct vesicoureteral reflux; however, this technique is evolving, and its application is gradually widening to other indications like obstructive mega ureter, ureterocele, bladder diverticulum, bladder lithiasis, and bladder neck surgery for incontinence.
Limitations and Contraindications
Related to the surgeon:
All the vesicoscopic procedures are challenging: Expertise in intracorporeal suturing in confined spaces with fine 5/0 or 6/0 suture is essential; there is a tremendous learning curve; in short these procedures are still reserved to expert laparoscopic pediatric surgeons.
Related to the patient:
The major limiting factor is the bladder capacity. The smaller the bladder, the more reduce the working space. Even if our youngest patients was 4 months old, the decreased working space does make the procedure more technically demanding and may obviate the advantages of vesicoscopic repair. Hence, this method seems difficult to apply under 1 year of age (or in bladder less than 100 ml). That explains why the use of robot, even if it seems theoretically a good solution, is not in fact the way to solve the problem [2]. In the publication of Marchini [3], patients under 4 years or with a bladder capacity less than 200 ml were excluded.
Another limiting factor is the bladder wall conditions: in case of markedly thickened or inflamed bladder wall, the procedure could be quite difficult.
However, previous failed injection therapy or previous intra- or extravesical surgery should not be considered a contraindication. This technique is also workable in augmented bladder.
Technique
The details concerning preparation, special equipment, muscle relaxation, positioning of patient, crew, monitors, and equipment have been already described [1, 4] and have not changed since the first edition. However, several technical points have been modified to simplify the process and avoid any disturbance or complication.
Port placement can be tricky; the specific problem of pneumovesicoscopy is, when introducing the ports, to go through two walls, firstly abdominal wall then the bladder wall and during the procedure to avoid any dislodgment of the trocar out of the bladder. Suspending the bladder to the anterior abdominal wall and fixation of the trocar to the abdominal wall are of upmost importance.
In the previous description, the bladder was distended with normal saline fluid as in classical cystoscopy, and the 3 trocars were introduced under cystoscopic control. Now the bladder is filled with gas during the first cystoscopic step, and only the first median trocar is introduced under cystoscopic control. Of course filling the bladder with liquid offers a better counter pressure than with gas, and it can be an advantage because the bladder wall is particularly soft in children and can be distorted or pushed away by the trocar tip before being entered; but we changed for CO2 insufflation for two reasons: first, blood oozing from the bladder port sites could cloud the cystoscopic irrigation fluid; secondly, any liquid extravasation out of the bladder could occur and lead to collapse of the bladder and poor visibility.
Pneumovesicum is created after having emptied the bladder (transurethral catheter + Crede maneuver) using CO2 introduced through the irrigation channel of the rigid cystoscope at maximal pressure of 10–15 mmHg. Once the bladder is distended, the dome is fixed to the abdominal wall under cystoscopic guidance; if the abdominal wall is thin, a percutaneous transfixing, 2/0 or 0/0 suture with a curved needle, is sufficient, quick, and effective; in case of thick abdominal wall, more time and two additional instruments are needed: one endoscopic grasper passed through the operating channel of the cystoscope in order to manipulate the thread into the bladder and one suture passer (suture passer 1 GSPO1 GORE) to introduce and extract the thread. This suture passer technique replaces the technique using two angiocath described by CK Yeung and reduces time required for this maneuver. Once the bladder wall is tightly secured to the abdominal wall, the 5 mm port is introduce through the dome; then the surgical team moves to adopt the “pneumovesicoscopic position”; the vision provided by the 5 mm telescope is much better than the cystoscopic vision; the surgeon stands in line with the trigone and the screen. An operating instrument usually a grasper could be introduced through the urethra in girls as well as in boys to replace the cystoscopic grasping forceps. The lateral suture for bladder suspension are placed according the same technique used for the dome.
The position selected for insertion of the ports in the abdominal wall could vary according to the size of the patients; in small children younger than 3 or 4 years (Fig. 12.2), the bladder is located in a more superior position, and the trocars are more close to the umbilicus, carrying the risk of peritoneal penetration; in older children (Fig. 12.3), the bladder is deeper and lower in the pelvis: the lateral trocars are closer to the bikini line, carrying the risk of epigastric vessel injury; for the lateral working port, usually 3 mm of diameter, the penetration point in the bladder must be chosen carefully because if they are placed too inferiorly, the ports will be right on the orifice. Introducing a fine needle before the lateral trocar allows to visualize the right direction, the right depth and to put the trocar in the right position at the first attempt, avoiding multiple mucosal perforations.


Fig. 12.2
Introduction of trocars in young children (3–5 years): in the abdominal bladder, a trocar through the interior wall of the bladder, with the tip of the trocar turned toward the lower part of the bladder

Fig. 12.3
Introduction of trocars in children older than 5 years of age: with the bladder deep in the pelvis, the trocar is inserted through the lateral wall of the bladder, with the tip of the trocar turned toward the upper part of the bladder
As locking trocars (autosuture, Pediport Vigon) are no more available, the choice is reduced to normal reusable trocar or disposable self-expandable trocar (step ports 3 or 5 mm inner Dyne USA); the step ports are safe (blunt needle), quite easy to introduce, but expensive; the normal reusable trocar are sharp, must be cautiously manipulated, but have a better penetrating index. At anytime during the procedure, a third 3 mm operating instrument could be passed through the urethra if needed.
A camera holder – mechanical, pneumatic, and robotic – is useful to achieve stability of vision, especially when suturing: as for all reconstructive surgery in a confined space, this point seems crucial.
At the end of the procedure, the trocars are extracted: if it seems possible to leave all trocar holes open reckoning on spontaneous healing with time and bladder drainage, my position is not so optimistic and more qualified; concerning the 3 mm lateral holes, especially if the trocar course through the bladder wall is oblique, that is to say that the mucosal hole is out of line with the detrusor hole, I agree with them that the port site could be left open; but all 5 mm port sites, whatever the patient age or the bladder wall thickness, must be closed to avoid any bladder leak during the postoperative period.
Some surgeons [1, 5, 6] recommend to place the suspension suture around the trocar at the beginning of the procedure and just to tie it at the end. For the two lateral holes, I used the suture passer under vision control by the telescope; the third 5 mm median hole could be closed under direct vision control; during this last step continuous bladder insufflation through the urethral catheter could facilitate the location of bladder mucosal edges; after tying the knot, if no gas leak is audible, the maneuver is considered successful, and bladder drainage could be removed early during the postoperative period (1–3 days).
Complications
Some complications are directly related to the pneumovesicum technique. During the trocar introduction, an injury could occur on bladder floor, epigastric, or iliac vessels; during the procedure failure to reinsert the working port after its dislodgment could lead to conversion; gas leak could occur into the perivesical space, the scrotum without adverse effects, but gas leak in the peritoneal cavity must be evacuated with a transumbilical Veress needle. In the early postoperative period, urine extravasation in the perivesical space or intraperitoneal cavity or both could lead to reoperation by open surgery.
Indications and Results
Vesicoureteral Reflux
The technique has been already described [1, 4–6], but some details must be underlined because as in open surgery, some complications could occur.
Stay updated, free articles. Join our Telegram channel

Full access? Get Clinical Tree


