Radical Abdominal Hysterectomy (Type III)
The five “types” of hysterectomy are defined in Chapter 30. Of these, radical hysterectomy differs from simple hysterectomy in that the parametrium, paravaginal tissue, and their lymphatics are widely resected to achieve negative tumor margins. Described in this section, type III (radical) hysterectomy is chiefly indicated for stage IB1 to IIA cervical cancer or small central recurrences following radiation therapy, or for clinical stage II endometrial cancer when tumor has extended to the cervix (Koh, 2015).
Type III radical hysterectomy is increasingly being performed by minimally invasive approaches. With these techniques, the principles of the abdominal operation are still applied. Namely, radical hysterectomy is a dynamic operation that requires a focused, consistent surgical approach but also significant intraoperative decision making. Familiarity with its concepts continues to be critically important in developing expertise in complex pelvic surgery.
Radical hysterectomy is not appropriate for women with higher-stage cancers. Thus, accurate clinical staging is critical prior to selection of this surgery. Pelvic examination under anesthesia with cystoscopy and proctoscopy is not mandatory for smaller cervical cancer lesions, but the clinical staging described in Chapter 30 should be completed before proceeding surgically. To refine patient selection, for most patients with grossly visible cervical tumors, abdominopelvic computed-tomography (CT) or magnetic resonance (MR) imaging is also performed to identify nodal metastases or undetected local tumor extension. That said, there are limitations on what can be reliably detected preoperatively (Chou, 2006).
Women undergoing hysterectomy are specifically counseled regarding the loss of fertility. In those considering bilateral salpingo-oophorectomy (BSO), a discussion of menopause and hormone replacement is included and detailed in Chapter 43. The tone of the consenting process should reflect the extent of the operation required to hopefully cure or at least begin treatment of the malignancy. Moreover, a patient must be advised that the procedure may be aborted if metastatic disease or pelvic tumor extension is found (Leath, 2004).
Radical abdominal hysterectomy can result in significant morbidity from short- and long-term complications. These complications may develop more frequently in women with obesity, prior pelvic infections, and previous abdominal surgery, in whom surgery may be more difficult (Cohn, 2000). Of potential intraoperative complications, the most common is acute hemorrhage. Blood loss may reach 500 to 1000 mL, and transfusion rates are variable, but high (Estape, 2009; Naik, 2010). Subacute postoperative complications may include significant postoperative bladder or bowel dysfunction from surgical denervation (20 percent), symptomatic lymphocyst formation (3 to 5 percent), and ureterovaginal or vesicovaginal fistula (1 to 2 percent) (Franchi, 2007; Hazewinkel, 2010; Likic, 2008). With any cancer surgery, risk for venous thromboembolism (VTE) is also increased. Additionally, long-term effects on sexual function and other body functions are candidly reviewed and are detailed on page 1139 (Jensen, 2004; Serati, 2009).
For this, a blood sample is typed and crossmatched for potential transfusion. Pneumatic compression devices or subcutaneous heparin or both is planned because of the typically longer surgery and postoperative recovery times and the increased VTE risk associated with cancer (Table 39-8) (Martino, 2006).
Bowel preparation with a polyethylene glycol-electrolyte solution (GoLYTELY) is no longer commonly used. Inadvertent bowel injury is rare unless extenuating circumstances are identified. However, it may be helpful to empty the colon to limit fecal spill if extensive pelvic adhesions are anticipated due to prior infection, endometriosis, or radiation therapy.
Suitable perioperative antibiotic prophylaxis to prevent most surgical site infection is found in Table 39-6. Typically, a third-generation cephalosporin is given intravenously at spaced intervals. Compared with simple hysterectomy, the high-volume blood loss during radical hysterectomy clears antibiotics more rapidly from the operative site, and longer surgery may extend past the antibiotic half-life. Both necessitate the additional doses (Bouma, 1993; Sevin, 1991).
Early-stage cervical cancer most frequently spreads via the lymphatics. Thus, adjunctive lymph node removal seeks to identify occult metastases. Pelvic lymphadenectomy is typically completed just before or immediately after radical hysterectomy, and paraaortic lymphadenectomy may also be indicated in some circumstances (Angioli, 1999).
Spread to the adnexa is much less common than via the lymphatics. Thus, the decision for BSO depends on a woman’s age and potential for metastases (Shimada, 2006). If ovaries are preserved, then salpingectomy alone is recommended to reduce future risk of some epithelial ovarian cancers (Society of Gynecologic Oncology, 2013). In candidates for ovarian preservation, transposition of ovaries out of the pelvis may be considered in young women if postoperative radiation is anticipated. However, ovarian function may be short-lived. Also, in transposed ovaries, symptomatic periadnexal cysts are commonplace (Buekers, 2001). Oocyte and ovarian cryopreservation techniques have advanced and may soon be a more widespread option (Chap. 20).
General anesthesia is mandatory, but epidural placement may be considered for postoperative pain control (Leon-Casasola, 1996). Bimanual examination is performed in the operating room before scrubbing to reorient a surgeon to the patient’s individual anatomy. The patient is positioned supine. After anesthesia administration, hair in the path of the planned incision is clipped if needed; a Foley catheter is placed; and abdominal preparation is completed.
A midline vertical abdominal incision provides excellent exposure, but typically prolongs hospital stays and increases postoperative pain. Alternatively, Cherney or Maylard incisions offer postoperative advantages found with transverse incisions and allow access to the lateral pelvis (Chap. 43). However, upper paraaortic nodes are not readily accessible through these transverse incisions. A Pfannenstiel incision offers limited exposure and is reserved only for selected patients (Orr, 1995).
After abdominal entry, a surgeon first thoroughly explores the abdomen for obvious metastatic disease. Firm, enlarged lymph nodes and any other suspect lesions are removed or biopsied. Confirmation of metastases or pelvic tumor extension leads to a decision on whether to proceed or abort an operation based on overall intraoperative findings and clinical situation (Leath, 2004).
The uterus is placed on traction with curved Kelly clamps at the cornua. The round ligament is sutured with 0-gauge delayed-absorbable suture as laterally as possible, and the tie is held on tension to aid entry into the retroperitoneal space. Lateral round ligament transection later aids excision of the parametrium out to the pelvic sidewall. Once the round ligament is divided, the broad ligament beneath separates into thin anterior and posterior leaves that contain loose areolar connective tissue between.
Similar to simple hysterectomy, the anterior leaf of the broad ligament is placed on traction and is sharply dissected to the vesicouterine fold. The posterior leaf of the broad ligament is then placed on traction and sharply dissected along the pelvic sidewall parallel to the infundibulopelvic (IP) ligament.
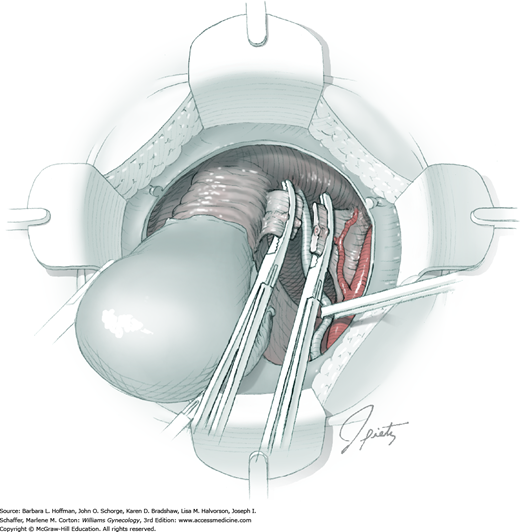
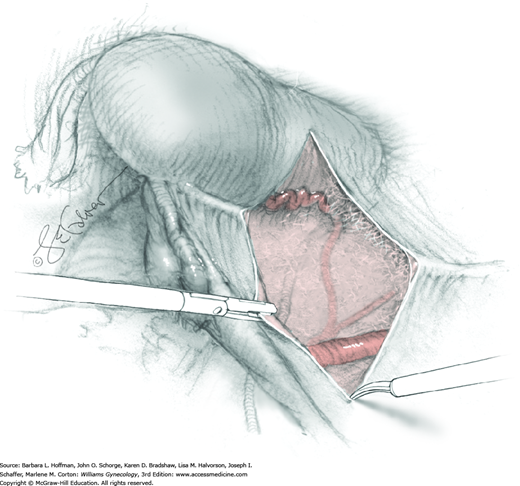
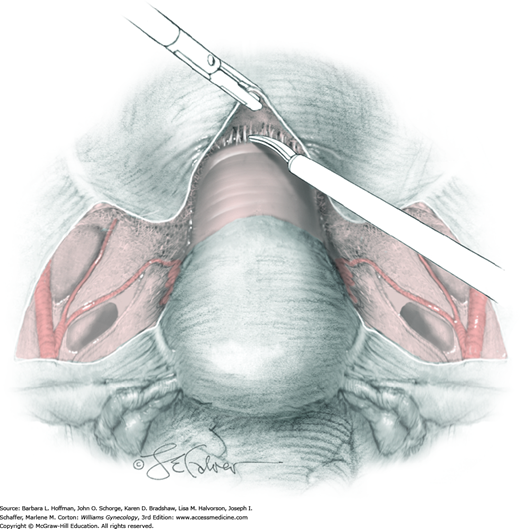
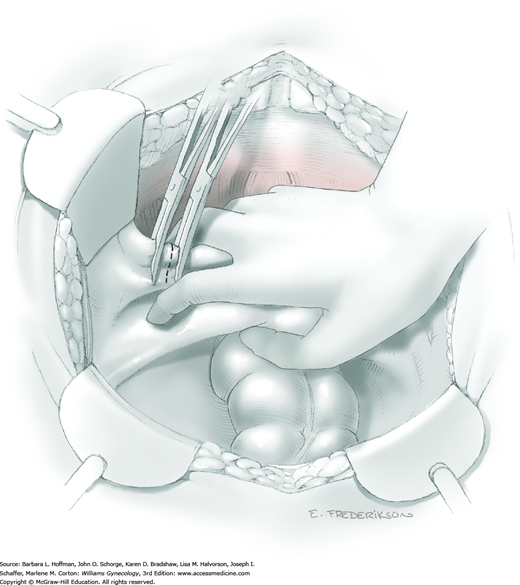
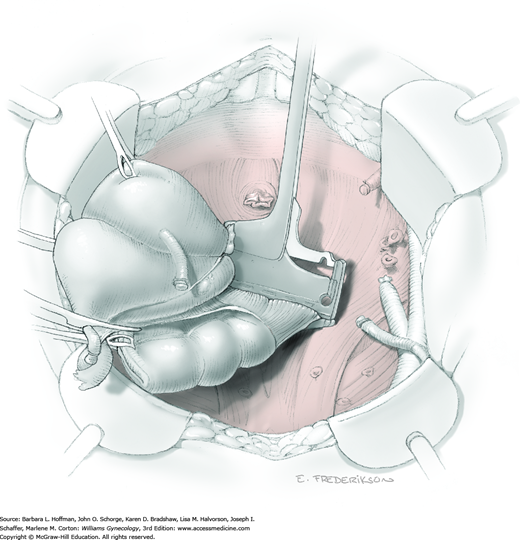
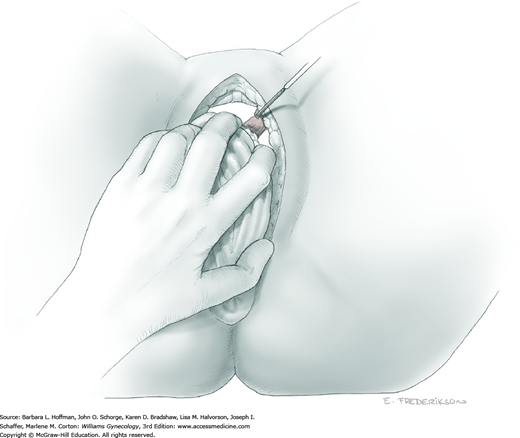
Loose areolar connective tissue of the retroperitoneal space is bluntly dissected in the area lateral to the IP until the external iliac artery is palpated just medial to the psoas major muscle. The index and middle fingers are placed on either side of the artery, and the areolar connective tissue is bluntly finger dissected toward the patient’s head using a backward “walking” motion (Fig. 46-1.1).
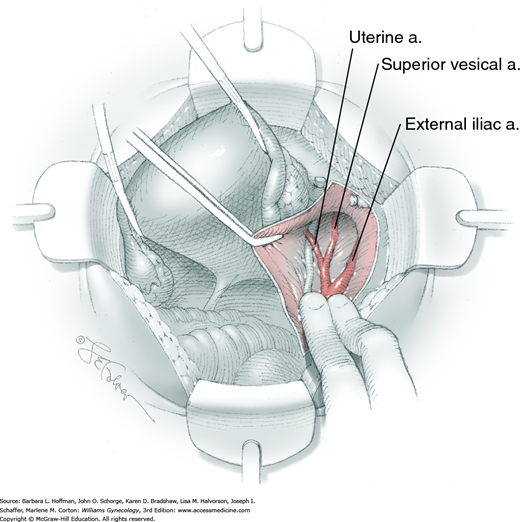
To permit further cephalad inspection, the medial portion of the broad ligament’s posterior leaf is elevated. This permits direct identification of the common iliac artery bifurcation and origins of the external and internal iliac arteries. Here, the ureter crosses over the bifurcation. To isolate the ureter at this site, the surgeon bluntly dissects with a finger or suction tip in a sweeping motion from top to bottom along the medial peritoneal leaf to identify and sufficiently mobilize the lateral surface of the ureter.
To free the medial surface, a Babcock clamp grasps the ureter, and Mixter right-angle clamp tips are opened and closed parallel to the ureter to develop an avascular space between it and its medial peritoneal attachment. Through this space, clamp tips are then passed beneath the ureter to grasp a quarter-inch-wide Penrose drain. The drain is then pulled through this space to surround and isolate the ureter. This assists in identifying its location throughout the remainder of surgery.
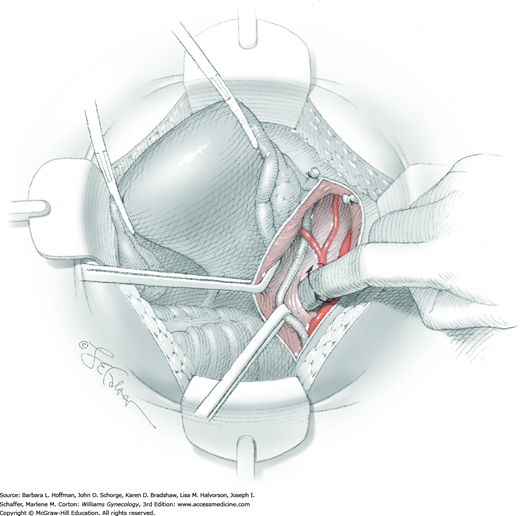
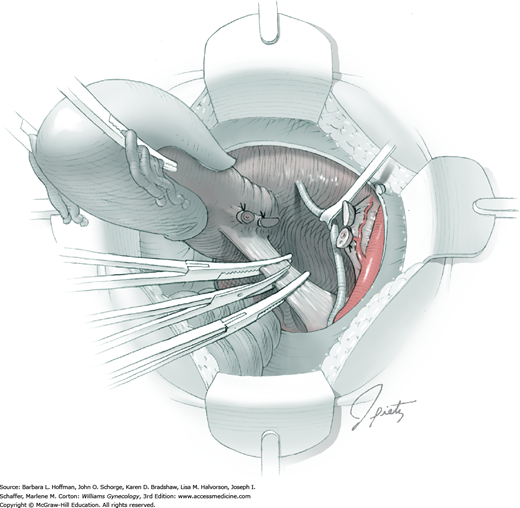
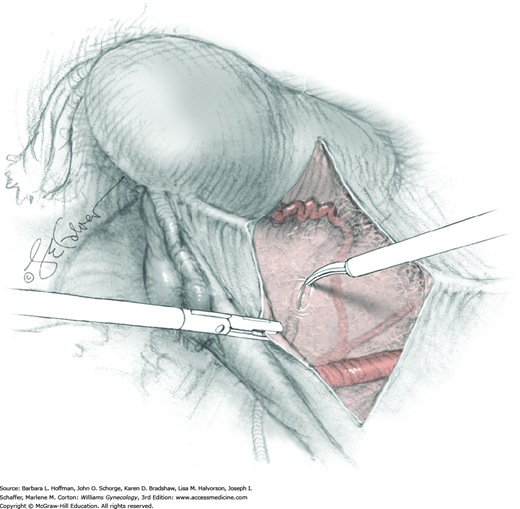
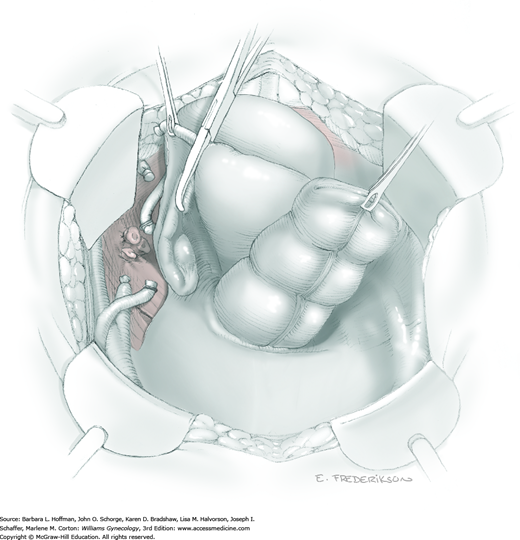
The parametrium that will be removed with the hysterectomy specimen lies between the paravesical and pararectal spaces. Thus, creation of these spaces is needed to isolate the parametrium for transection. The pararectal space is developed by gently placing the right index finger lateral to the IP and between the internal iliac artery and ureter. The finger tracks in a gentle swirling motion at a 45-degree angle downward toward the midline and aiming for the coccyx (Fig. 46-1.2). Once formed, this space is bordered by the rectum and ureter medially, internal iliac artery laterally, cardinal ligament anteriorly, and the sacrum posteriorly.
In contrast, the paravesical space is formed by holding the lateral tie of the round ligament and bluntly following the external iliac artery caudally to the pubic ramus. The index and middle finger of the right hand then sweep intervening avascular areolar tissue deeply and medially toward the midline. The developed paravesical space is bounded by the bladder and superior vesical artery medially, the external iliac vessels laterally, the pubic symphysis anteriorly, and the cardinal ligament posteriorly. Once paravesical and pararectal spaces are created, the parametrium is now isolated between these two openings.
With hysterectomy, ovaries may be retained or removed. If uninvolved with cancer, indications are similar to those for benign hysterectomy (Chap. 43). If ovarian preservation is planned, the surgeon performs salpingectomy by serially clamping, cutting, and ligating the mesosalpinx (Section 43-6). The uteroovarian ligament is then clamped, cut, and ligated close to the uterus. The ovary is tucked laterally during hysterectomy completion. Alternatively, if BSO is planned, the IP ligament is doubly clamped, cut, and ligated. The uteroovarian ligament is left intact and the adnexa are ultimately removed with the uterine specimen.
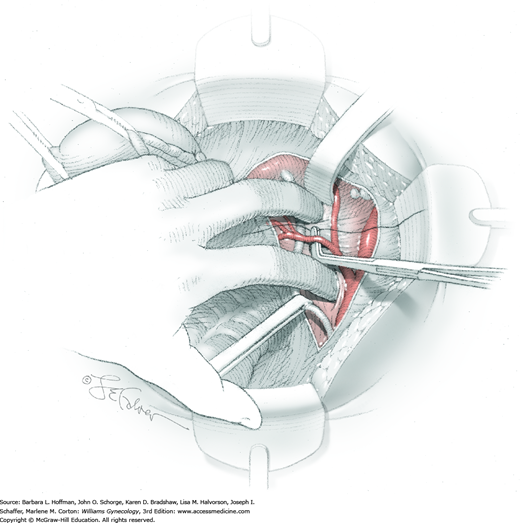
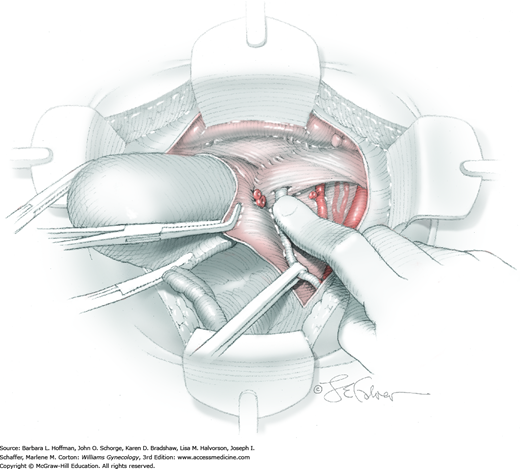
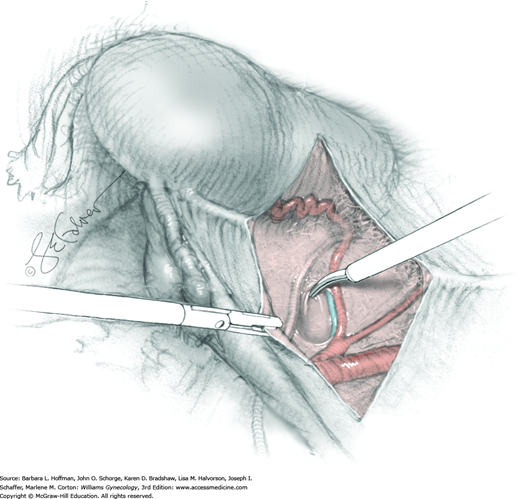
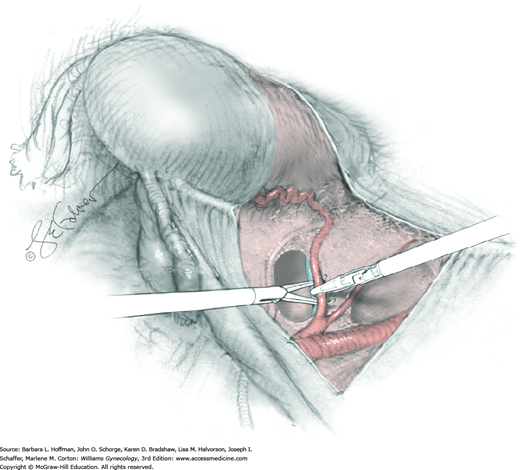
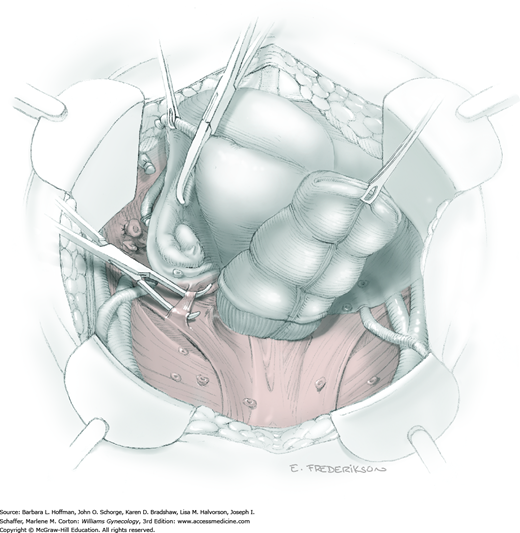
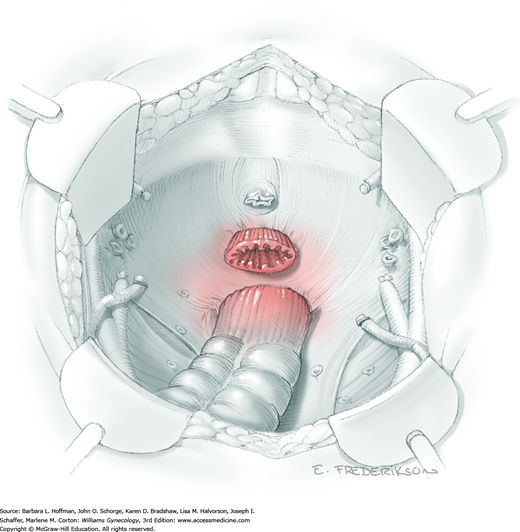
For this step, lateral reflection of the broad ligament’s lateral leaf just distal to the round ligament will reveal the superior vesical artery. This vessel is bluntly dissected to better define its location and is grasped with a Babcock clamp and placed on lateral traction. A right-angle clamp is used to develop an avascular space beneath the vessel that should accommodate a narrow curved Deaver retractor. Lateral traction on the superior vesical artery prevents its inadvertent ligation and aids in identification of the uterine artery (Fig. 46-1.3).
Next, a surgeon’s left hand is inserted into the pelvis with the middle finger placed in the paravesical space, the index finger in the pararectal space, and the uterus with attached Kelly clamps cupped in the palm. The uterus is held on firm medial traction to expose the lateral pelvic sidewall. To visualize the uterine artery, a surgeon sharply dissects parametrial attachments and intervening areolar connective tissue beginning at the internal iliac artery and continuing caudad to the superior vesical artery. The origin of the uterine artery is found during this caudal dissection.
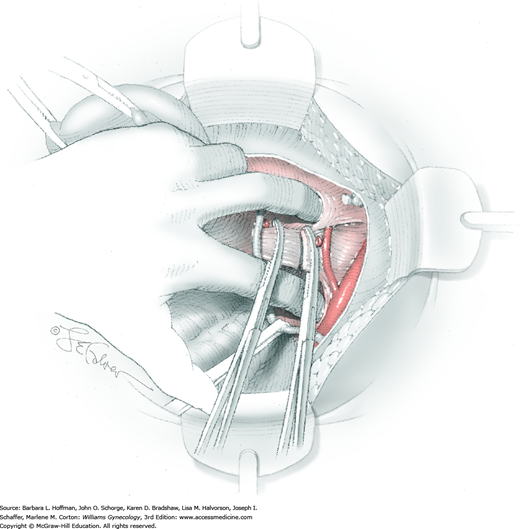
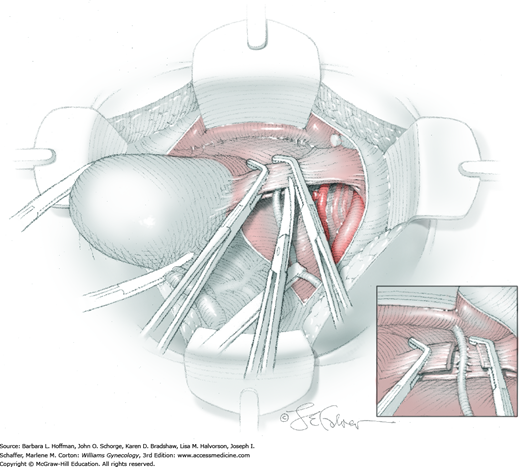
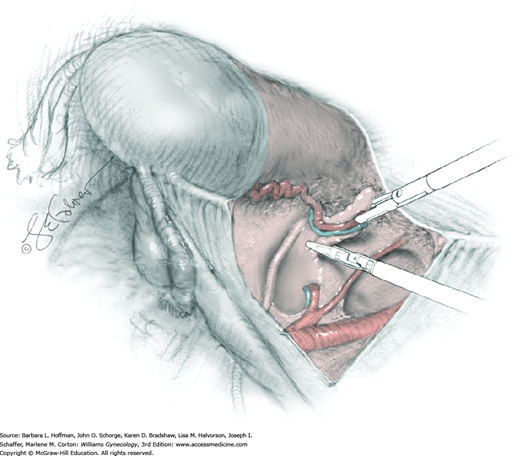
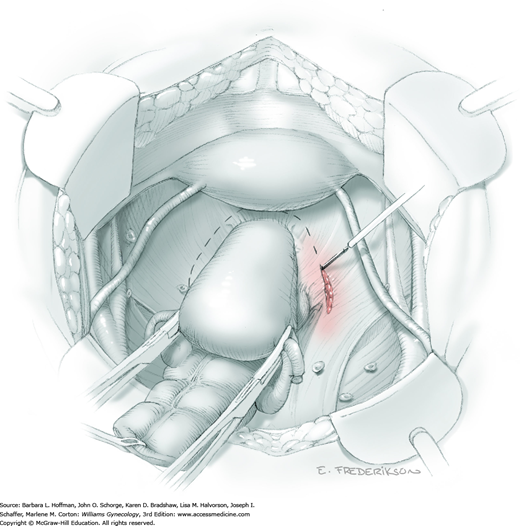
Tissues surrounding the uterine artery are bluntly dissected, and a right-angle clamp is placed beneath this artery to retrieve a 2-0 gauge silk suture. The uterine artery tie is placed as close as possible to its origin from the internal iliac artery. The process is repeated to place a separate silk suture far enough medial to enable vessel transection. Black silk ties help identify the proximal and distal portions of the uterine artery throughout the remainder of the operation. A small vascular clip (Hemoclip) can also be placed lateral to the silk tie on the proximal uterine artery for additional security of hemostasis. The uterine artery is then cut. The underlying uterine vein may also then be isolated, clipped or tied, and cut.
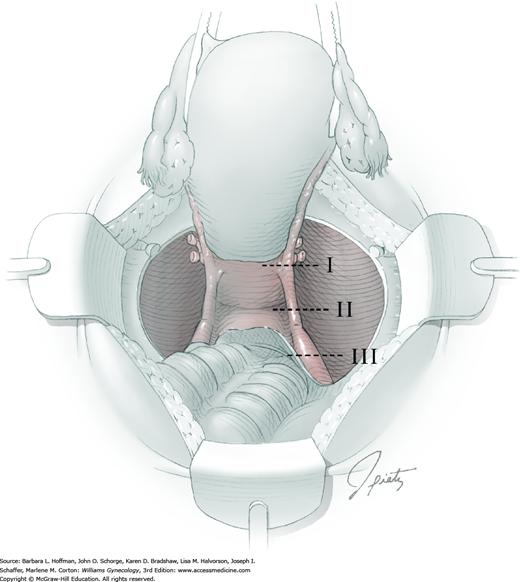
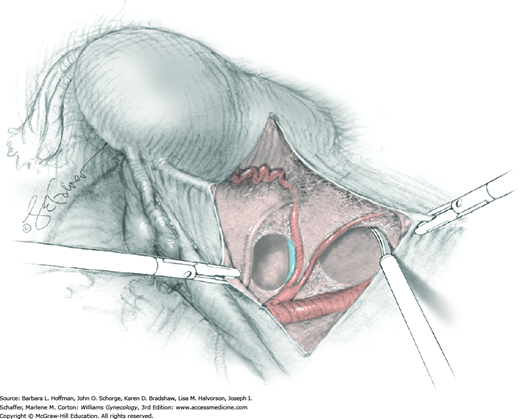
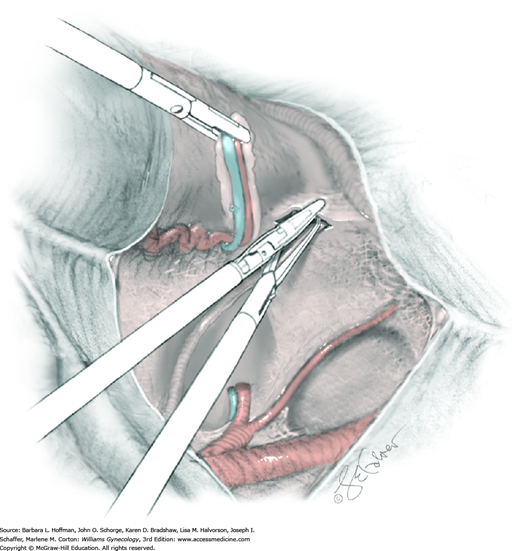
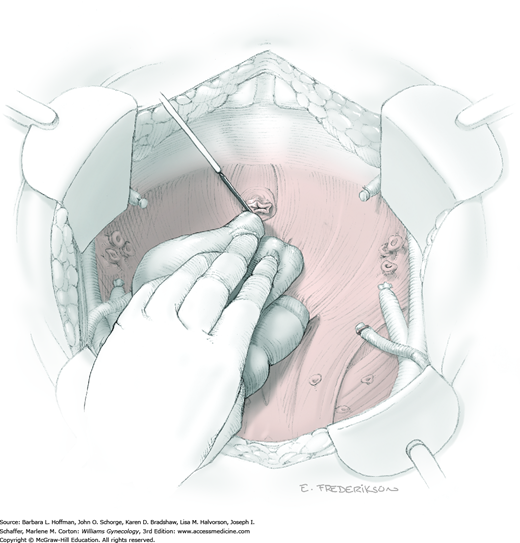
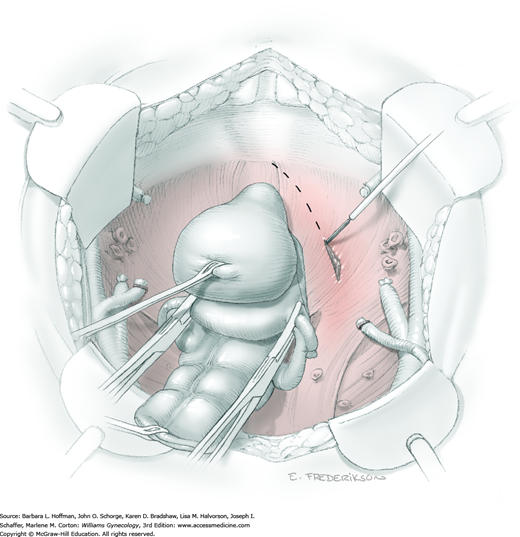
The parametrial tissues have been pressed together by development of the paravesical and pararectal spaces. Parametrial resection to unite the upper (ventral) portion of these spaces begins near the sidewall, moves medially, and can be performed by several methods. These include: (1) clamping, cutting, and suturing, (2) stapling with gastrointestinal anastomosis (GIA) stapler, (3) electrosurgical blade dissection in which a right-angle clamp elevates and isolates parametrial tissue, or (4) use of an electrothermal bipolar coagulator (LigaSure) (Fig. 46-1.4). Dissection is continued until the parametrium overlying the ureter is mobile.
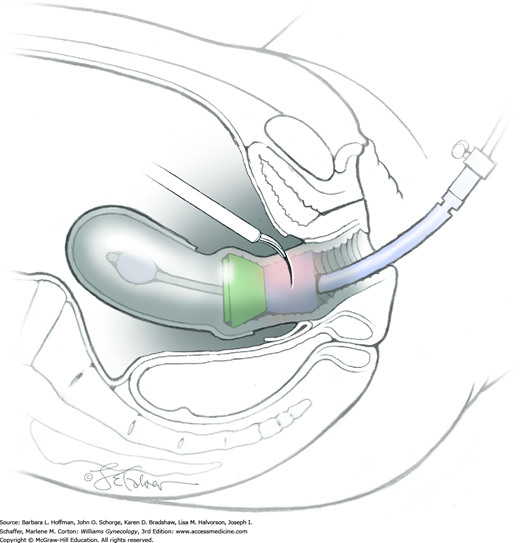
In this same area of the pelvis, tips of a right-angle clamp are positioned between the ureter and peritoneal leaf. As previously described, opening and closing the tips downward and parallel to the ureter develops an avascular plane to bluntly dissect the ureter from the medial peritoneal leaf. The ureter is placed on gentle lateral traction by grasping the previously placed Penrose drain with the left hand. The right index finger carefully sweeps the ureter downward and laterally until a “tunnel” through the paracervical tissue can be palpated ventromedially as the ureter enters this tissue (Fig. 46-1.5). Additional parametrial dissection is often required to ensure that the uterine artery and surrounding soft tissue has been lifted medially and off the ureter.
Electrosurgical dissection is performed to free the bladder distally from the cervix and onto the upper vagina. This may need to be repeated several times as the tunnel is progressively unroofed and the ureter is more directly visible. To allow adequate vaginal margins, the bladder will eventually need to be dissected so that it lies several centimeters distal to the cervical portio and onto the upper vagina.
The uterus is placed on lateral traction, and the proximal ureter is held on traction to straighten it by gently pulling on the Penrose drain. The previously created tunnel opening is palpated. Concurrently, a right-angle clamp is inserted with its tips directed upward, while direct visualization of the underlying ureter is confirmed. The tips are then directed medially toward the cervix, “pop” through the paracervical tissue, and create a new distal opening (Fig. 46-1.6). One tip of a second clamp is placed through the tunnel and then through the new distal opening. The clamp then closes around the paracervical tissue that lies above and lateral to the ureter.
Within the tunnel, the ureter is bluntly dissected and pushed posteriorly toward the tunnel floor. It should be visible below before cutting the overlying paracervical tissue. Delayed-absorbable 3–0 suture ties are used to secure the paracervical tissue pedicles that are held by the right-angle clamps, but significant bleeding is commonplace during these steps. The same procedure may be repeated several times caudally to completely unroof the tunnel and expose the ureter. The dissection proceeds in a proximal to distal fashion with direct visualization of the ureter at all times to prevent injury. After being unroofed, the ureter is retracted upward, and filmy attachments between the it and tunnel bed are sharply divided.
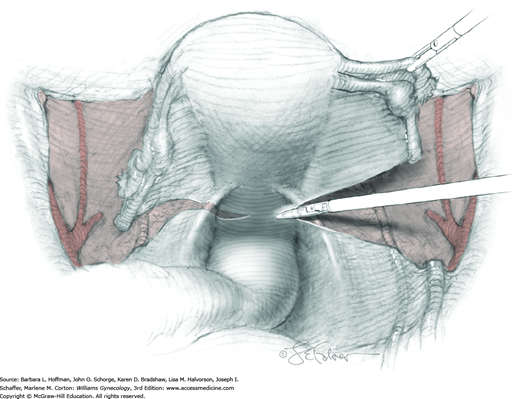
Posterior radical dissection is often best performed near the operation’s end because exposed retroperitoneal tissues typically ooze until the vaginal cuff is closed. The cervical external os is palpated, and at this level, the electrosurgical blade is used to superficially incise or “score” the peritoneum between the uterosacral ligaments. This score line joins the incision line of the previously cut posterior broad ligament peritoneum.
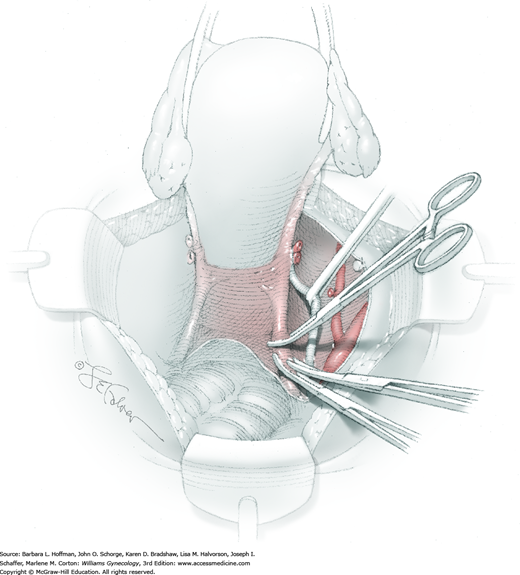
Between the uterosacral ligaments, a plane is developed by gently pressing a finger toward the vaginal wall without poking through and into the vaginal vault. This rectovaginal plane is developed by gentle pressure toward the sacrum and enlarged laterally until three fingers can be comfortably inserted. This maneuver frees the rectosigmoid from the uterosacral ligaments and prevents inadvertent bowel injury. Remaining peritoneal attachments are sharply dissected to fully expose the rectovaginal space. The exposed uterosacral ligaments can be visualized, palpated, clamped at the pelvic sidewall, then cut, and ligated with 0-gauge delayed-absorbable suture (Fig. 46-1.7). This procedure may need to be repeated to complete transection of the uterosacral ligament and adjacent supportive tissues.
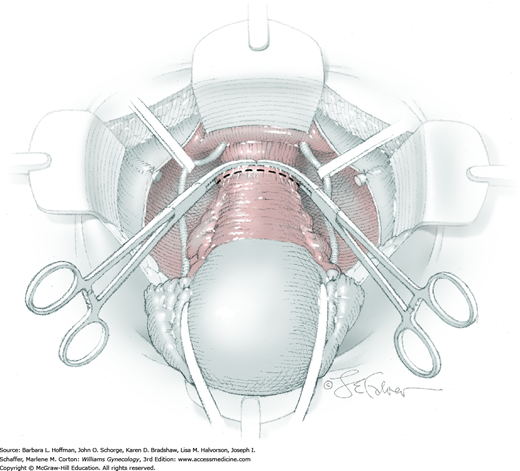
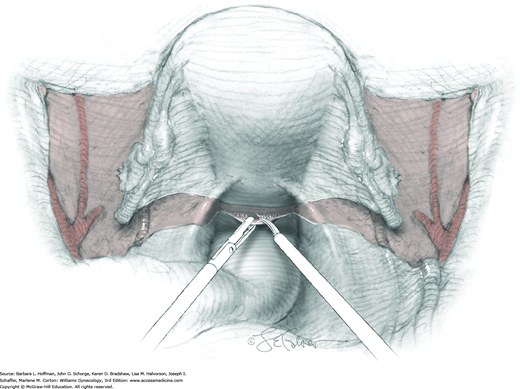
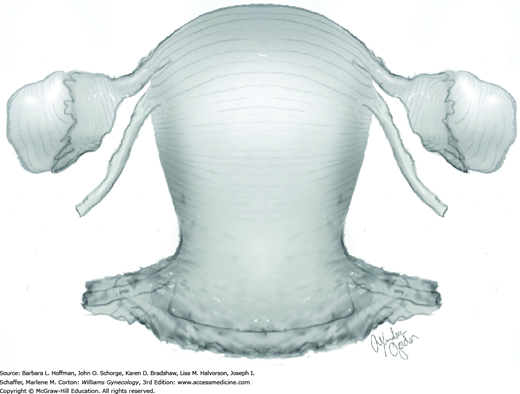
At this point in the operation, the radical hysterectomy specimen is held in place only by the paracolpium and vagina. The bladder and ureters are further bluntly and sharply dissected free until at least 3 cm of upper vagina will be included with the resected specimen. Curved clamps are placed on the lateral paracolpium. The ureter should be lateral and directly visible. Tissue is then cut and suture ligated with 0-gauge delayed-absorbable suture.
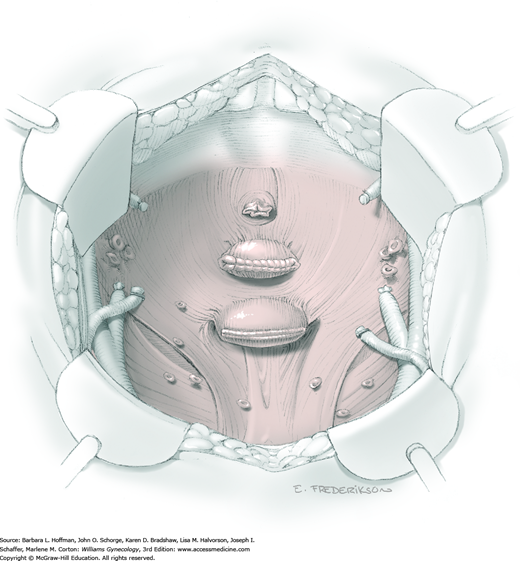
The upper vagina can then be: (1) clamped, cut, and suture ligated, (2) stapled, or (3) sharply transected with electrosurgical blade and suture ligated (Fig. 46-1.8). The specimen is carefully examined to ensure an adequate upper vaginal segment and grossly negative margins.
This catheter may aid postoperative voiding trials in carefully selected, motivated patients (Pikaart, 2007).
For those in whom ovarian function preservation is desired, transposing adnexa out of the anticipated pelvic radiation field is an option. A distal portion of the ovary is grasped with a Babcock clamp. Using traction, dissection is performed to mobilize the IP ligament so that the ovary can be lifted into the upper abdomen. For future radiography or CT interpretation, a large vascular clip is placed on the residual uteroovarian ligament stump to serve as an ovarian location marker. For transposition, a 0-gauge silk suture is placed at this stump site and tied. Its needle is covered but remains attached to the suture.
A handheld abdominal retractor is then used to expose an area of the lateral posterior peritoneum as high as possible in the abdomen. The silk suture needle is then uncovered and placed through the peritoneum, and the ovary is elevated by this “pulley-stitch” and tied. The lateral pelvic defect is closed with a continuous running stitch using 0-gauge delayed-absorbable suture to prevent internal herniation, that is, entrapment of bowel within the peritoneal defect. Ovaries are inspected before abdominal closure to exclude vascular compromise by transposition.
Active bleeding should be immediately controlled when the radical hysterectomy specimen has been removed. A dry laparotomy sponge may be held firmly deep in the pelvis for several minutes to tamponade raw surfaces. Topical hemostatic agents may be employed (Table 40-5). With bleeding controlled, a surgeon then assesses the vascular support to the ureter and other sidewall structures. To structures that appear particularly devascularized, an omental J-flap may provide additional blood supply (Section 46-14) (Fujiwara, 2003; Patsner, 1997). Routine pelvic suction drainage and closure of the peritoneum are not necessary (Charoenkwan, 2014; Franchi, 2007).
Immediate postoperative care following radical hysterectomy in general follows that for laparotomy. Early ambulation after radical hysterectomy is especially important to prevent thromboembolic complications (Stentella, 1997). Moreover, following laparotomy for cancer, anticoagulants are continued for 2 to 4 weeks postoperatively (American College of Obstetricians and Gynecologists, 2013). Early feeding, including rapid initiation of a clear liquid diet, may also shorten the hospital stay (Kraus, 2000).
Bladder tone returns slowly, and a major cause is thought to be partial sympathetic and parasympathetic denervation during radical dissection (Chen, 2002). Thus, Foley catheter drainage is commonly continued until a patient is passing flatus because improving bowel function typically accompanies resolving bladder hypotonia. Removal of the catheter or clamping of the suprapubic tube should be followed by a successful voiding trial (Chap. 42). A voiding trial may be attempted prior to hospital discharge or at the first postoperative visit. Patients with adequate function are instructed to press gently on the suprapubic area for several days afterward to help completely empty the bladder during voiding and prevent retention. Successful voiding may take several weeks to achieve. In addition to urinary retention, tenesmus and constipation are frequent immediate symptoms that should improve significantly over months or years (Butler-Manuel, 1999; Sood, 2002). Postoperative stool softeners are often prescribed.
Nerve-sparing radical hysterectomy is a method demonstrating improved postoperative bladder function (Raspagliesi, 2006). However, many patients have preexisting abnormal urodynamic findings that are simply exacerbated by radical hysterectomy (Lin, 1998, 2004). In the 3 percent of women who develop long-term bladder hypotonia or atony, intermittent self-catheterization is preferred to indwelling urinary catheterization (Chamberlain, 1991; Naik, 2005).
For cervical cancer patients undergoing BSO, estrogen replacement therapy is not contraindicated and may be initiated in the hospital at the discretion of the treating oncologist. Cervical cancer survivors treated with radical hysterectomy have much better sexual functioning than those who receive radiation therapy. Despite this, more than half of surgical patients postoperatively report a worse sex life (Butler-Manuel, 1999). Severe orgasmic problems, uncomfortable intercourse due to reduced vaginal length, and severe dyspareunia may develop but often resolve within 6 to 12 months. However, persistent lack of sexual interest and poor lubrication may be long-term or permanent changes (Jensen, 2004). Disturbed vaginal blood flow response during sexual arousal may account for much of the reported constellation of symptoms (Maas, 2004). Eventually, patients treated by surgery alone can expect a quality of life and overall sexual function similar to peers without a history of cancer (Frumovitz, 2005).
Modified Radical Abdominal Hysterectomy (Type II)
Four procedural differences distinguish a modified radical hysterectomy (type II) hysterectomy from the more radical type III procedure (Section 46-1). First, the uterine artery is transected where it crosses the ureter (rather than at its origin from the internal iliac artery). Second, only the medial half of the cardinal ligament is resected (instead of division at the sidewall). Additionally, the uterosacral ligament is divided halfway between the uterus and sacrum (rather than at the sacrum). And last, a smaller margin of upper vagina is removed. These modifications serve to reduce surgical time and associated morbidity, while still enabling complete resection of smaller cervical tumors (Cai, 2009; Landoni, 2001).
Clear indications for modified radical hysterectomy are few and controversial (Rose, 2001). Stage IA1 (with lymphovascular space invasion) or IA2 cervical cancer are the most common diagnoses (Koh, 2015). Type II hysterectomy is also performed on occasion for: (1) preinvasive or microinvasive disease when a more invasive lesion cannot be excluded, (2) selected stage IB1 disease with <2 cm lesions, and (3) small central postirradiation recurrences (Cai, 2009; Coleman, 1994; Eisenkop, 2005). In addition, a variation of this operation may be performed if more extensive dissection is required for known benign disease. Anatomic landmarks that distinguish a type II hysterectomy are somewhat vague, and thereby allow a surgeon to sculpt the procedure to a patient’s specific situation (Fedele, 2005). Similar to the type III radical procedure, modified radical hysterectomy is increasingly being performed using a minimally invasive approach.
Preparation for surgery should proceed with the same care and discretion that is essential for the success of radical (type III) abdominal hysterectomy (Section 46-1).
Modified radical hysterectomy is performed under general anesthesia with the patient supine. Bimanual examination is performed in the operating room before scrubbing to reorient a surgeon to a patient’s individual anatomy. The abdomen is surgically prepared, and a Foley catheter is placed.
Modified radical hysterectomy may be safely performed through a midline vertical or low transverse incision (Fagotti, 2004).
The initial steps of modified radical (type II) hysterectomy mirror those of the type III procedure. The retroperitoneum is opened to identify structures, the ureter is mobilized, and the paravesical and pararectal spaces are developed to exclude the possibility of parametrial tumor extension before proceeding with this less radical operation (Scambia, 2001). As with radical hysterectomy, adnexa may be spared or removed.
At this point, type II hysterectomy begins to differ from the radical type III procedure. The superior vesical artery does not have to be identified, nor does the entire extent of the internal iliac artery need to be dissected free of adventitial tissue. The ureteral tunnel opening is palpated, and the uterine vessels divided at that location (Fig. 46-2.1). Ligation of the uterine artery as it crosses the ureter allows preservation of distal ureteral blood supply.
The bladder is mobilized distally off the cervix and onto the upper vagina. Parametrial tissue at the sidewall does not require mobilization over and off the ureter (as in a type III hysterectomy). Posterolateral attachments of the ureter remain intact, and only the medial halves of the cardinal ligaments are resected by successive clamping, cutting, and suture ligation of the paracervical tissue that lies medial to the ureter (Fig. 46-2.2). In contrast to the type III hysterectomy, the ureter is not dissected out of the tunnel bed, but is rolled laterally to expose the medial cardinal ligament.
Posterior dissection is also modified. Uterosacral ligaments are only clamped halfway to the pelvic sidewall (instead of “at” the pelvic sidewall) and transected (Fig. 46-2.3). The uterus and adjacent parametrium can then be lifted well out of the pelvis and any additional tissues also clamped, cut, and ligated.
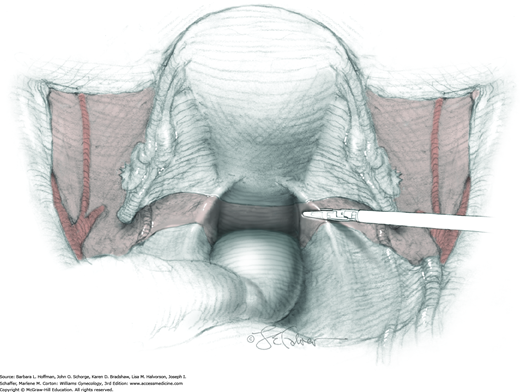
At this point, the modified radical hysterectomy specimen is held in place only by the paracolpium and vagina. The bladder and ureters are further bluntly and sharply dissected free until at least 2 cm of upper vagina will be included in the specimen (instead of 3 to 4 cm). Curved clamps are placed on the lateral paracolpium, cut, and suture ligated.
The upper vagina can then be: (1) clamped, cut, and suture ligated, (2) stapled, or (3) sharply transected with electrosurgical blade and suture ligated. The specimen is carefully examined to ensure an adequate upper vaginal segment and grossly negative margins.
In general, postoperative care follows that for radical hysterectomy, but the incidence of complications is lower (Cai, 2009). Partial sympathetic and parasympathetic denervation should be much less extensive with a modified radical hysterectomy. Thus, bladder dysfunction is much less likely than following a type III radical hysterectomy, and successful voiding begins much earlier (Landoni, 2001; Yang, 1999). Foley catheter drainage may be discontinued on the second postoperative day and is followed by a voiding trial (Chap. 42). In addition, bowel and sexual dysfunction should also be less pronounced.
Minimally Invasive Radical Hysterectomy
Since the 1990s, experience with this procedure has accrued, and rates of both laparoscopic and robotic radical hysterectomy have increased (Wright, 2012). Compared with laparotomy, a minimally invasive surgery (MIS) approach appears to offer comparable cancer survival rates and has similar rates of most surgical complications (Lee, 2010; Yan, 2011). With MIS, less intraoperative blood loss and shorter hospital stays are noted, but operative times can be longer depending on surgeon proficiency (Soliman, 2011).
Whether radical hysterectomy with pelvic lymphadenectomy is completed via laparotomy or with MIS, the cancer indications and surgical steps are the same. Thus, compared with simple hysterectomy (type I), greater resection of parametrial and paracolpium tissue and their lymphatics is essential to help ensure tumor-free surgical margins. This degree of resection requires significantly more retroperitoneal dissection, during which the ureter and major vessels must be identified to aid resection and avoid injury.
Thorough preoperative pelvic examination reveals factors that help determine the optimal surgical approach for a given patient. For example, a large broad or bulky uterus may be difficult to manipulate during MIS, may block views, and may be too large for vaginal removal. Importantly, morcellation is avoided with any gynecologic malignancy.
General challenges to MIS, such as obesity, are described in Chapter 41. That said, laparoscopy can be a successful option for many obese patients and offers lower rates of postoperative wound infection, which is often a major complication after laparotomy in these patients (Park, 2012). Once a patient is deemed eligible for an MIS approach, the same preoperative evaluation as for an open procedure applies.
Risks of MIS radical hysterectomy mirror those listed for radical abdominal hysterectomy. Patient factors that contribute include older age, previous abdominal surgery, and prior radiotherapy (Chi, 2004).
General complications related to MIS are discussed in Chapter 41. With minimally invasive radical hysterectomy specifically, there is also increased concern for nerve injury from a longer operation in lithotomy and steep Trendelenburg position. Additionally, the risk of conversion to an open procedure is discussed. This risk may be increased if exposure and organ manipulation are limited.
Preoperative preparation is the same as for an open procedure. Thus, antibiotics and VTE prophylaxis are warranted (Tables 39-6 and 39-8). Benefits of mechanical bowel preparation can be debated and are individualized. If considered, an evacuated rectosigmoid may improve colon manipulation and pelvic anatomy visualization. Options are found in Chapter 39.
Pelvic lymphadenectomy is typically completed just before or immediately after radical hysterectomy, and paraaortic lymphadenectomy may also be indicated in some circumstances. An MIS approach to lymph node removal in these areas is described in Section 46-12.
Planned oophorectomy should depend on a woman’s age and potential for metastases (Hu, 2013). Ovarian metastasis is rare with early-stage cervical cancer, and particularly with squamous cell carcinoma. Thus, if preservation is chosen, the ovary can be transposed with MIS techniques to the upper abdomen. This is done to help extend ovarian function if later radiotherapy is required. However, ovarian longevity may be shortened postoperatively, and symptomatic ovarian cysts are common. Moreover, advancements in oocyte and ovarian cryopreservation may soon provide suitable alternatives.
Regardless of ovarian preservation, salpingectomy is now encouraged for all women undergoing hysterectomy (Society of Gynecologic Oncology, 2013). As explained in Chapter 35, this practice is hoped to lower rates of high-grade ovarian and peritoneal serous carcinomas.
Basic MIS tools for laparoscopic or robotic surgery are required. Important instruments for radical hysterectomy include 5- and 12-mm trocars, combined irrigation/suction device, vaginal probe, and energy devices for cutting and vessel sealing. For the latter, several electrosurgical and ultrasonic energy-based devices are adapted for either laparoscopic or robotic cases. These include Harmonic scalpel, electrosurgical monopolar instruments, and electrothermal bipolar coagulator devices (LigaSure, ENSEAL, PK Dissecting Forceps). For laparoscopy, the argon-beam coagulator is another option. While operating in the pelvis, a 0-degree laparoscope can be used, although a laparoscope with a 30-degree lens system may also be advantageous in certain circumstances to provide superior lateral views.
The patient is initially supine for general endotracheal anesthesia induction. For VTE prophylaxis, lower extremity compression devices are placed. Legs are then positioned in adjustable booted support stirrups in low lithotomy to permit adequate perineal access. Positioning should permit a transvaginal uterine manipulator to move easily in all directions. As described in Chapter 41, appropriate positioning of legs within the stirrups and arms at the side is crucial to reduce nerve injury risks.
Bimanual examination is performed in the operating room before scrubbing to reorient a surgeon to the patient’s individual anatomy. The abdomen, perineum, and vagina are then surgically prepared, and a Foley catheter is inserted. To avoid stomach puncture by a trocar during primary abdominal entry, an orogastric or nasogastric tube is placed to decompress the stomach.
During MIS radical hysterectomy, a manipulator is frequently placed to aid uterine repositioning and help acquire adequate vaginal surgical margins. Several uterine manipulators are described and illustrated in Chapter 44. Popular options include a RUMI manipulator/KOH ring combination or a V-Care device. However, in cervical cancer cases, if a bulky cervical lesion is present, a blunt vaginal probe in the vaginal fornix may be all that can be inserted.
An illustrated description of MIS entry into the abdominal cavity is found in Chapter 41. Suitable entry methods include the open technique, direct trocar insertion, or transumbilical insertion of a Veress needle. For gynecologic oncology cases, the open technique is often used to minimize vascular or bowel puncture risk. With primary entry, an umbilical or supraumbilical site is preferred. Following entry, a 10- or 12-mm Hassan trocar with a blunt obturator is placed into the abdominal cavity and is secured to the fascia. Through the trocar, the obturator is removed and replaced by a 10-mm laparoscope.
After abdominal insufflation, the abdomen and pelvis are thoroughly inspected to assess the extent of disease and adhesions. At this point, confirmation of metastatic disease or pelvic tumor extension should prompt a surgeon to decide whether to proceed or abort the operation based on intraoperative findings and clinical situation. Moreover, the decision is made to proceed laparoscopically or convert to laparotomy.
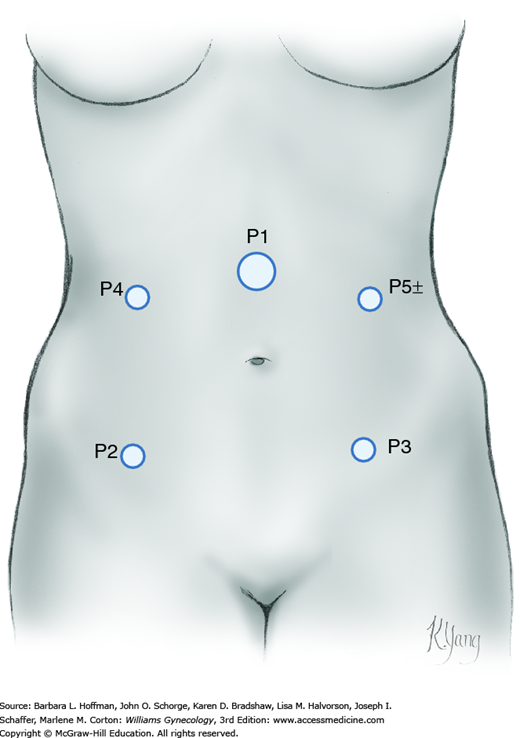
For laparoscopy, the surgeon stands on one side of the patient, whereas one assistant occupies the opposite side and another stands between the patient’s legs. To proceed, other ports are placed under direct laparoscopic visualization. Anatomic landmarks are identified to guide port placement and avert vascular puncture injuries. For complex MIS gynecologic procedures, four port sites are preferred (Fig. 46-3.1). Additional ports are placed according to surgeon preference. These ideally have a minimum of 8 cm between them to allow ample range of motion and for robotic cases, to avoid arm collision.
This is the initial step to opening the paravesical and pararectal spaces bilaterally and identifying the ureter. Development of these spaces allows the parametrial tissue to be isolated and later resected.
First, the assistant angles the uterus to the contralateral side of dissection using a uterine manipulator and/or a grasper holding one cornu. This creates tension across the round ligament, which is divided at its midpoint. Transection may be accomplished using any of the energy-based devices previously listed.
Once the round ligament is transected, the broad ligament beneath it separates into thin anterior and posterior leaves, with loose areolar connective tissue between them. The anterior leaf is tented upward by graspers and sharply incised with monopolar scissors or other energy-based device. Incision extends caudally and medially toward the vesicouterine fold and halts near the midline.
To further expand the retroperitoneal opening, the drape of peritoneum lying between the divided round ligament and infundibulopelvic (IP) ligament is elevated with smooth graspers. Incision of this tented peritoneum is extended cephalad toward the pelvic brim but remains lateral and parallel to the IP (Fig. 46-3.2). This exposes the external iliac vessels and provides access to the ureter.
This is accomplished by precise sharp and blunt dissection just lateral to the medial leaf of the opened peritoneum. For this, a blunt probe or the closed tips of a grasper may be selected. Dissection is advanced downward, medially, and slightly cephalad with gentle back-and-forth cephalad-caudad strokes into the gauzy retroperitoneal tissue and over the presumed ureter path (Fig. 46-3.3). The ureter is identified and traced along the medial leaf of the peritoneum.
The uterus remains deviated to the contralateral side to develop the pararectal space. This avascular space is bounded by the rectum and ureter medially, the internal iliac artery laterally, the cardinal ligament and uterine artery caudally, and sacrum cephalad. Within these borders, the tips of closed scissors or other blunt tip push downward and medially through loose connective tissue (Fig. 46-3.4). The surgeon directs dissection downward toward the midline, aims for the pelvic floor, and stops once the levator ani muscles are reached.
For the paravesical space, boundaries are the external iliac vessels laterally, the bladder and obliterated umbilical ligament medially, the pubic symphysis caudally, and the cardinal ligament cephalad. To open this space, the previously incised edge of the broad ligament’s anterior leaf is lifted at a point between the bladder and pelvic sidewall. Superficial loose connective tissue lies medial to the external iliac vessels and is bluntly dissected with closed scissors or grasper (Fig. 46-3.5). Staying medial to the external iliac vein and lateral to the superior vesicle/obliterated umbilical artery, dissection is directed caudally until the curve of the pubic ramus is reached.
Once the paravesical and pararectal spaces are opened, the parametria is now isolated between these two spaces for later resection. This dissection also helps to mobilize the bladder, discussed next, and to expose the external iliac vessels, which will aid later pelvic lymphadenectomy.
During radical hysterectomy, the bladder is dissected free from the cervix and upper vagina. The mobile bladder is moved caudad and protected during final vaginal transection. To mobilize the bladder, the peritoneum at the vesicouterine fold is grasped with atraumatic graspers and elevated to create tension between it and the underlying cervix (Fig. 46-3.6). The vesicouterine space, the potential space between the bladder and cervix, is opened using sharp and blunt dissection. Only loose connective tissue fibers lie in this space and are easily cut. Incision of these bands is kept close to the cervix to avoid cystotomy. Dissection in the midline minimizes laceration of vessels that course within the vesicocervical ligaments, colloquially termed bladder pillars. Once the correct plane is entered, the pearly white cervix and anterior vaginal wall below are clearly differentiated from the more opaque bladder.
Ultimately, the bladder is moved sufficiently caudad to permit excision of up to 3 cm of proximal vagina at the procedure’s end. This aids acquisition of tumor-free surgical margins. Generous dissection also avoids incorporating bladder fibers into the cuff closure, which could lead to bladder injury or to later genitourinary fistula.
For this step, the pelvic sidewall vessels are exposed. By visually moving from the common iliac artery toward its bifurcation, a surgeon can identify the internal iliac artery. The first anterior branch of the internal iliac artery is the umbilical artery. The uterine artery is the second branch and courses medially and over the ureter.
Alternatively, to isolate the uterine artery, the superior vesical artery is identified by blunt dissection on the medial border of the paravesical space. The vessel is followed cephalad to identify the uterine artery origin. In most instances, the uterine artery originates from the internal iliac artery and is identified by its medial course toward and over the ureter.
To isolate the uterine artery for ligation at its origin from the internal iliac artery, tips of a grasper are positioned beneath the vessel. Opening and closing the grasper tips, while directing dissection downward, develops an avascular plane around the artery. Importantly, the uterine vein lies just beneath the artery, and its injury can compromise visibility from brisk bleeding. Once isolated, the uterine artery is coagulated using a vessel-sealing device and divided (Fig. 46-3.7). The artery ends are then elevated to identify the uterine vein, which is similarly isolated, coagulated, and divided.
Ultimately, during a radical procedure, the ureter is freed in stages from surrounding tissue until its insertion into the bladder is reached. This dissection allows the ureter to be reflected laterally and protected during the wide parametrial excision required for radical hysterectomy.
During early dissection, atraumatic graspers tent up the medial posterior peritoneal leaf to which the ureter is attached. The tips of a right-angle grasper are then positioned between the ureter and peritoneum. Opening and closing the tips downward and parallel to the ureter develops an avascular plane to dissect the ureter free.
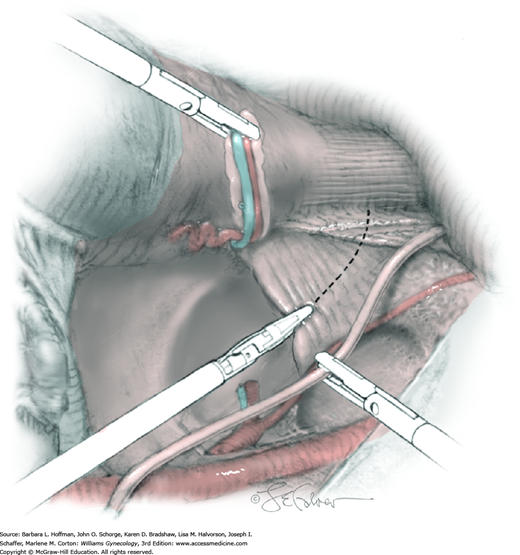
Such dissection continues caudally until parametrial tissue surrounding the ureter is met. This tissue is confined between the paravesical and pararectal spaces, contains the divided uterine vessels, and will be dissected medially and up and off the ureter. For this, connective tissue around the medial coagulated end of the uterine artery is grasped laterally and then lifted up and medially (Fig. 46-3.8). Loose connective tissue bands holding the artery and vein and surrounding parametria to the pelvic floor are coagulated and sharply transected. Dissection is continued medially until the lateral border of the ureter is reached.
For ureterolysis, caudally directed tips of a Maryland grasper are insinuated and opened within the avascular space overlying the ureter. This exposes tissue pedicles on the ureter’s lateral aspect, which are then coagulated and cut. The uterine vessels and parametrium are then pulled medially and reflected off the ureter. They will be removed with the final specimen.
During continued caudal ureterolysis, the ureter is seen to enter a “tunnel” within the pubocervical ligament (Fig. 46-3.9). To open this tunnel and free the ureter, the ureter is retracted downward and laterally. Within the tunnel, caudally directed grasper tips are insinuated and opened within the space overlying the ureter. Tips of an energy-based tool then elevate the tunnel roof above and away from the ureter. This pubocervical ligament roof and the veins within it are then transected. The roof is divided in small increments caudally until completely opened. At this point, the ureteral insertion into the bladder can be identified. The ureter can then be bluntly rolled off the tunnel “floor” and moved laterally with an atraumatic tool to allow later cardinal ligament transection without ureteral injury.
The IP ligament or the uteroovarian ligament will be transected depending on whether the ovary is removed or retained, respectively. Steps for both mirror those with benign hysterectomy and are fully illustrated in Section 43-12. For these steps, a window is made in the posterior broad ligament below the IP ligament. The window can be made bluntly or with an energy-based tool, and the window is then enlarged. The incision is opened parallel to the IP ligament and is extended cephalad toward the pelvic brim and medially toward the uterosacral ligament. The ureter should be clearly identified to avoid its injury.
For adnexectomy, the IP ligament is divided with a vessel-sealing device followed by cutting. In contrast, if the ovary is to be preserved, then salpingectomy alone is first completed. For this, the mesosalpinx is divided with a vessel-sealing and cutting device, and resection progresses from the fimbria to its union with the uterus. Next, the uteroovarian ligament is transected with the same device, and the ovary is tucked over to the sidewall until hysterectomy completion.
If ovarian preservation is chosen, the ovary can be transposed laparoscopically. With this, the IP ligament is further dissected cephalad by extending the peritoneal incision on both the medial and lateral sides of the IP ligament. This mobilizes the ovary, whose uteroovarian ligament stump is then sutured to the lateral peritoneum in the upper abdomen as described on page 1138. Importantly, following transposition, the ovary is inspected to confirm adequate blood supply. A clip can be placed at the uteroovarian stump so that it can be delineated on future imaging studies.
At this point, steps 3 through 9 are completed on the contralateral side.
Developing this potential space moves the rectum downward to isolate the uterosacral ligaments for wide resection. It also permits adequate excision of the proximal vagina for tumor-free margins without rectal injury. First, the uterus is retracted upward in the midline, and the peritoneum between the uterosacral ligaments is incised at the level of the external cervical os (Fig. 46-3.10). The peritoneal edge closer to the rectum is then grasped and tented outward with atraumatic graspers, and the rectovaginal space is open with a blunt dissector moved side to side. This exposes connective tissue bands and small vessels between the rectum and vagina. These bands are cauterized and transected close to the vagina with an energy-based device (Fig. 46-3.11). Dissection continues 4 cm caudally to ultimately allow a 3-cm vaginal resection.
The uterosacral ligaments, which are now isolated, can then be ligated as close to the sacrum as possible with an energy-based tool (Fig. 46-3.12). Before division of the ligament, the ureter is retracted laterally for protection.
Next, the lateral attachments of the cervix to the pelvic sidewalls are coagulated and transected with an energy-based device in a caudal direction (Fig. 46-3.13). During this step, the deep uterine vein is usually encountered and should be sufficiently sealed and divided. Also, the plane of transection stays at or slightly below the level of the ureter. This avoids extensive autonomic pelvic plexus damage, which exacerbates bladder and possibly bowel and sexual dysfunction.
With complete mobilization of the bladder and rectum, the anterior and posterior vagina should be easily identified. The radical hysterectomy specimen is now held in place only by the paracolpium and vagina. The goal of radical hysterectomy resection is to remove approximately 3 cm of the upper vagina. For this, transverse anterior and posterior colpotomy incisions are made and extended circumferentially around the cervix (Fig. 46-3.14). Delineating marks on the uterine manipulator can help direct colpotomy.
The uterus, cervix, vaginal margin, and parametrial tissue are then freed. The specimen is removed intact through the vagina. The final specimen is labeled “radical hysterectomy specimen” and includes cervix, uterus, vaginal margin, and parametrial tissue (Fig. 46-3.15).
Closure of the vaginal cuff can be performed by multiple methods. As noted earlier, one option is cuff closure from a vaginal approach as done during simple vaginal hysterectomy (Section 43-13). Alternatively, suitable endoscopic closure techniques are described and detailed in Section 44-11. Following cuff closure, lymphadenectomy is begun and is described in Section 46-12.
Both the ureters and bladder can be injured during these procedures. If injury is suspected, cystoscopy at the end of the procedure can aid injury recognition (Section 45-1).
Once procedures have been completed, an inspection for hemostasis is performed. Ports are then removed under direct visualization. All fascial defects larger than 10 mm are closed with 0-gauge delayed-absorbable suture to avoid hernia development at the site. Various methods of skin closure are described in Chapter 40.
Immediate postoperative care following minimally invasive radical hysterectomy in general mirrors that for other minimally invasive procedures. Diet is advanced more quickly than with open procedures, and most patients will tolerate a regular diet early on postoperative day 1. Patients are often discharged home on postoperative day 1 or 2 since their pain is well controlled. As with open radical procedures, the same principles for retaining a Foley catheter do apply. Therefore, many patients will be sent home with the Foley catheter and return to clinic for a voiding trial (Chap. 42).
Following minimally invasive radical hysterectomy, patients may be at increased risk for vaginal cuff dehiscence compared with an open approach. In one series, the rate was 1.7 percent and was similar whether surgery was completed laparoscopically or robotically (Nick, 2011). The closure technique of the vaginal cuff is the suggested cause. Thus, many advocate vaginal rather than endoscopic cuff closure to decrease this risk (Fanning, 2013; Uccella, 2011).
Total Pelvic Exenteration
Total pelvic exenteration removes the bladder, rectum, uterus (if present), and surrounding tissues. It is generally indicated for curative situations when less radical surgery, chemotherapy, or radiation options have been exhausted. The most common indication is centrally persistent or recurrent cervical cancer after radiation therapy. Less frequent indications include some instances of recurrent endometrial adenocarcinoma, uterine sarcoma, or vulvar cancer; locally advanced carcinoma of the cervix, vagina, or endometrium when radiation is contraindicated such as prior radiotherapy or malignant fistula; and melanoma of the vagina or urethra (Berek, 2005; Goldberg, 2006; Maggioni, 2009). Palliative exenterations may be of benefit on rare occasions when selected patients have severe, unrelenting symptoms (Guimarães, 2011).
Because exenteration commonly follows radiation therapy, the uterus and cervix usually have lost their distinct tissue architecture and boundaries. As a result, traditional hysterectomy steps and anatomic landmark identification are typically not possible. Minimally invasive exenterative procedures have been reported and may rarely be indicated in highly selected patients (Martinez, 2011; Puntambekar, 2006).
Total pelvic exenterations are subclassified based on the extent of pelvic floor muscle and vulvar resection (Table 46-4.1) (Magrina, 1997). Supralevator (type I) exenteration may be indicated when a lesion is relatively small and does not involve the lower half of the vagina. Most total pelvic exenterations will be infralevator (type II). This type is selected if vaginal contracture, prior hysterectomy, or the inability to otherwise achieve adequate margins is present. Rarely, tumor extension warrants an infralevator exenteration with vulvectomy (type III).
| Pelvic Structure | Degree of Resection | ||
| Type I | Type II | Type III | |
| Viscera | Above levator | Below levator | Below levator |
| Levator ani muscles | None | Limited | Complete |
| Perineal membrane | None | Limited | Complete |
| Vulvoperineal tissues | None | None | Complete |
Initially, biopsy confirmation of recurrent invasive disease is performed. With confirmation, the single most important preoperative challenge is to search for metastatic disease that would abort plans for surgery. Chest radiography is mandatory. Abdominopelvic CT is also routinely indicated, but a positron emission tomography (PET) scan may be particularly helpful (Chung, 2006; Husain, 2007). Hydroureter and hydronephrosis are not absolute contraindications unless they are due to obvious pelvic sidewall disease.
Patients often initially reject the entire concept of this operation even when faced with the knowledge that it represents their only chance for cure. Counseling is essential, and overcoming denial may take several visits. Regardless, not all eligible women will wish to proceed.
The consenting process is the ideal time to finalize plans for the type and location of urinary conduit, plans for colostomy or low rectal anastomoses, and need for vaginal reconstruction or other ancillary procedures. A patient is also advised that the procedure may need to be aborted based on intraoperative findings.
For those who undergo exenteration, the perioperative mortality rate approaches 5 percent (Marnitz, 2006; Sharma, 2005). However, the mortality rate from progressive cancer would otherwise be 100 percent. Patients should be prepared for admission to an intensive care unit (ICU) postoperatively. Infection, wound breakdown, bowel obstruction, and venous thromboembolic events are common short-term complications. Additionally, intestinal fistulas or anastomotic leaks or strictures may develop. Reoperation may be required. Most women will experience significant morbidity and unforeseen complications (Berek, 2005; Goldberg, 2006; Maggioni, 2009). Preexisting medical problems, morbid obesity, and malnutrition increase these risks.
Long-term effects on sexual function and other body functions are candidly reviewed. Patients with two ostomies have a lower quality of life and poorer body image. However, in those who retain vaginal capacity, quality of life and sexual function is reportedly improved compared with those without reconstruction. Thus, counseling regarding vaginal reconstruction is part of the preoperative dialogue (Section 46-9). In general, a woman returns to baseline functioning within a year postoperatively, but quality of life is often affected by worries regarding tumor progression (Hawighorst-Knapstein, 1997; Rezk, 2013). Patients should be aware that more than half will develop recurrent disease despite exenterative surgery (Benn, 2011; Westin, 2014).
Prior to surgery, stoma sites are marked, the consent form is reviewed, and final questions are answered. To minimize fecal contamination during bowel excision, aggressive bowel preparation such as with a polyethylene glycol with electrolyte solution (GoLYTELY) is mandatory. Ileus is common following exenteration and nutritional demands are increased. Thus, total parenteral nutrition (TPN) is often initiated as early as possible when needed. In addition, routine antibiotic prophylaxis has been shown to decrease infectious complications (Goldberg, 1998). Pneumatic compression devices or subcutaneous heparin is particularly important due to the anticipated long operation and extended postoperative recovery. Patients are typed and crossmatched for potential blood product replacement. Critical care team consultation may be indicated, and an ICU bed is requested.
To prepare for complicated resections, a surgeon should have access to all types and sizes of bowel staplers. These include end-to-end anastomosis (EEA), gastrointestinal anastomosis (GIA), and transverse anastomosis (TA) staplers. Additionally, an electrothermal bipolar coagulator (LigaSure) may speed pedicle ligation while decreasing blood loss (Slomovitz, 2006).
General anesthesia with or without epidural placement for postoperative pain management is mandatory. An arterial line for monitoring is typically added as a necessary precaution. Bimanual examination is performed to reorient a surgeon to a patient’s individual anatomy. The abdomen, perineum, and vagina are surgically prepared, and a Foley catheter is inserted. Legs should be positioned in low lithotomy in booted support stirrups to permit adequate perineal access.
The type of abdominal entry may be dictated by an intended rectus abdominis flap, which requires a low transverse incision. Otherwise, a midline vertical incision is ideal. A less commonly employed option is to initially assess by laparoscopy a patient’s suitability for exenteration. This minimally invasive approach may avoid unnecessary laparotomy in up to half of candidate patients (Kohler, 2002; Plante, 1998).
The most common reason that exenterations are aborted is the presence of metastatic peritoneal disease (Miller, 1993). Thus, following positioning of an abdominal self-retaining retractor, a surgeon thoroughly explores for disseminated disease that may not have been suspected preoperatively. Typically, numerous adhesions must also be lysed to inspect and palpate abdominal contents. Suspicious lesions are removed or biopsied.
A significant number of exenterations will be aborted intraoperatively due to identification of lymph node metastases (Miller, 1993). For this reason, pelvic and paraaortic node sampling and frozen section analysis is performed to exclude metastatic disease before proceeding. Additionally, retroperitoneal dissection provides a surgeon with a sense of the degree of pelvic sidewall fibrosis, which may render the vessels, ureters, and other important structures virtually indistinguishable from the surrounding soft tissue.
As described in Section 46-1, the retroperitoneum is entered and the external iliac and internal iliac artery bifurcation is bluntly dissected free of overlying areolar connective tissue. The ureter is placed on a Penrose drain for identification. The paravesical and pararectal spaces are developed.
Parametrial tumor extension is the third most common reason for aborting exenteration (Miller, 1993). Thus, the pelvic sidewall should be verified to be clinically free of disease by inserting one finger into the paravesical space, another into the pararectal space, and palpating the intervening tissue down to the levator plate. There must be a grossly negative margin at the pelvic sidewall to proceed. Tissues may be biopsied and frozen section analysis performed to confirm this impression. Often, it is difficult to know with absolute certainty whether the margins are clear due to the varying extent of retroperitoneal fibrosis encountered.
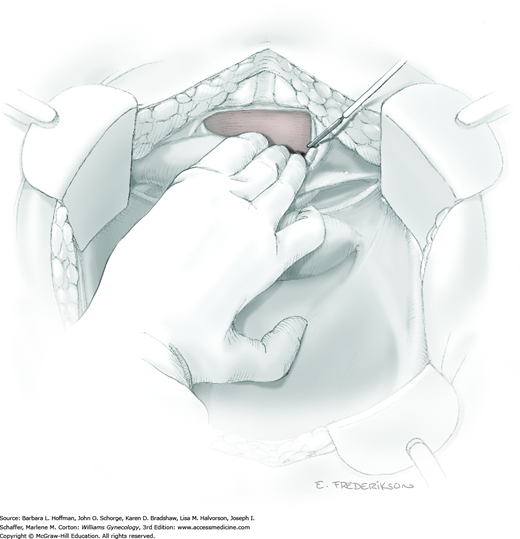
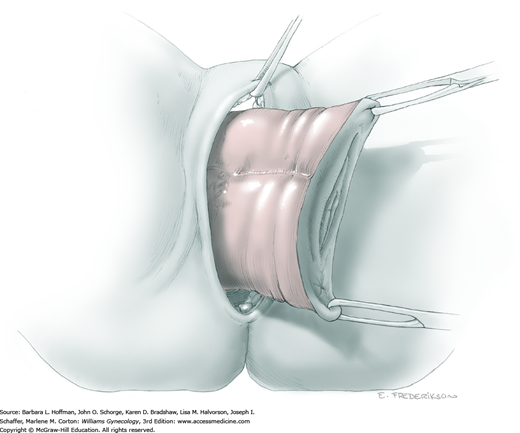
The bladder blade is removed from the self-retaining retractor to permit entry into the space of Retzius and blunt reflection of the bladder from the back of the pubic symphysis. To achieve this, downward traction on the bladder and urethra will expose filmy attachments that may be electrosurgically incised (Fig. 46-4.1). Laterally positioned false ligaments of the bladder are divided between clamps or transected with an electrothermal bipolar coagulator. This joins the retropubic and paravesical spaces. The bladder should be floppy in the pelvis from loss of its supporting pelvic attachments and is completely freed ventrally. However, the urethra is still attached to the bladder.
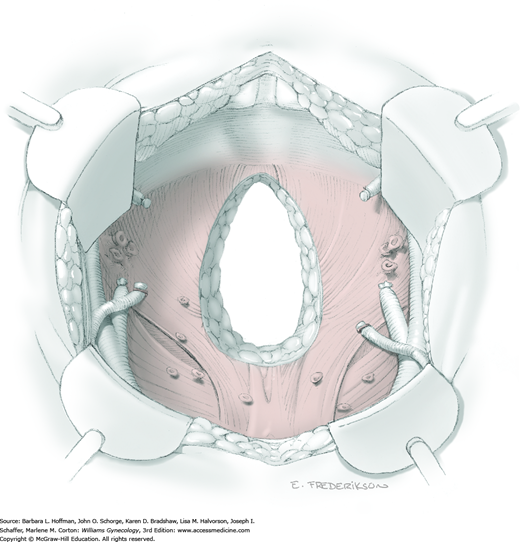
Following mobilization of the bladder, the ureters are held laterally, and the overlying peritoneum at the pelvic brim is divided on each side in a medial direction up to the sigmoid colon mesentery. By inserting a finger into each pararectal space and sweeping medially, it should be possible to develop the avascular plane between the rectosigmoid and the sacrum (retrorectal space).
Surgeons should be confident that there is no sacral tumor invasion and that they will be able to lift the rectosigmoid out of the pelvis to achieve a posterior margin that is tumor free. This is the last decision to be made before dividing the bowel and beginning steps of the operation that are irreversible.
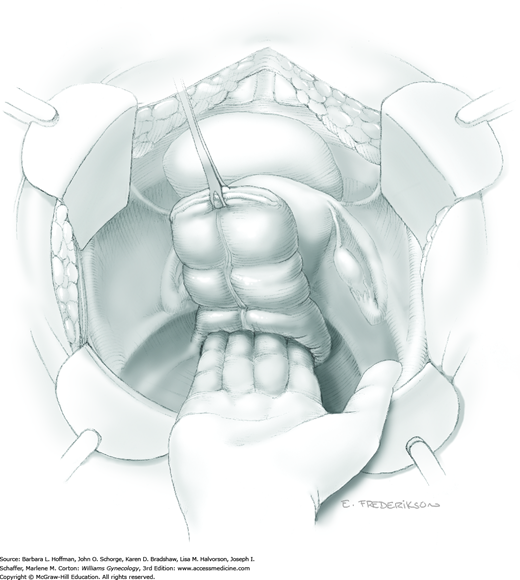
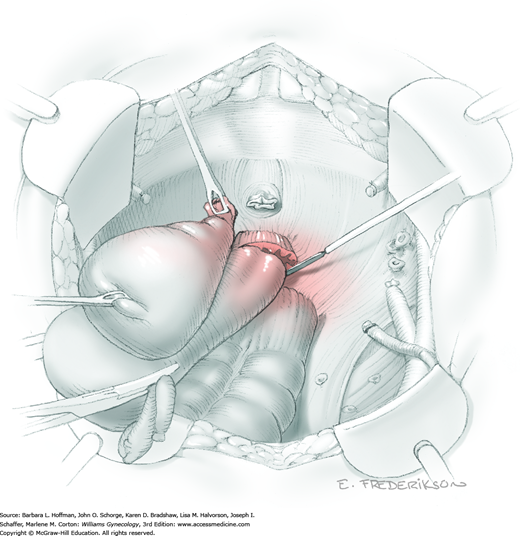
Once all the tumor boundaries have been assessed, exenteration proceeds by dividing the sigmoid colon with a GIA stapler and dividing the intervening mesenteric tissue (Section 46-21). The proximal sigmoid colon is then packed into the upper abdomen. The distal rectosigmoid is held ventrally and cephalad while a hand is inserted posteriorly to bluntly dissect the adventitial tissue between the rectum and sacrum in the midline (Fig. 46-4.2). This maneuver is continued distally to the coccyx to develop the retrorectal space and isolate the laterally located rectal pillars.
The mobilized bladder and distal rectum with uterus (if present) are held together on contralateral traction, while a hand is placed with one finger in the paravesical space and the other in the pararectal space to isolate the lateral pelvic attachments. The cardinal ligaments, internal iliac vessels, and ureter are often not distinguishable in a typically radiated field, but lie within this tissue. Beginning anteriorly, these fibrous attachments are serially divided at the pelvic sidewall (Fig. 46-4.3). Vascular clips should be available in case of tissue slippage or inadvertent bleeding.
As the pelvic sidewall dissection continues dorsally, the anterior branches of the internal iliac artery, venous channels, and distal ureter ideally are individually located and ligated to optimize hemostasis (Fig. 46-4.4). However, blood vessels and ureters frequently will lie within fibrous tissue and may be relatively indistinguishable. Thus, clamps or the electrothermal bipolar coagulator are placed around smaller pedicles to minimize the possibility of inadvertent blood loss. At minimum, the ureter is located, isolated, and divided as distally as possible to provide extra length for reaching the urinary conduit. Later, any damage at the distal tip can be trimmed as needed to ensure healthy tissue for urinary conduit creation. A large vascular clip is placed on the proximal end of the ureter to distend the lumen and aid later anastomosis into the planned conduit. Dissection is then repeated on the contralateral side, and any remaining lateral attachments along the levator ani muscles are divided as the pelvic floor curves toward the perineum.
The exenteration specimen is now chiefly tethered by the rectal stalks and distal mesenteric attachments posteriorly. These can be skeletonized with a right-angle clamp and divided along the pelvic floor (Fig. 46-4.5). This maneuver is continued distally to expose the entire posterior pelvic floor. The exenteration specimen is then circumferentially inspected and additional dissection is performed to completely release it from all attachments leading through the levator ani muscles. At this point, steps diverge depending on whether supralevator or infralevator exenteration is planned.
Removal of the specimen above the levator muscles begins by posterior traction on the bladder. The Foley catheter should be palpable within the urethra, and all surrounding tissue should already be dissected away. An electrosurgical blade is used to transect the distal urethra (Fig. 46-4.6). The distal opening does not require closure and may function as a natural orifice drain postoperatively. Next, the vagina is transected and then closed with 0-gauge delayed-absorbable suture in a running fashion. The transverse anastomosis (TA) or curved cutter stapler (Contour) is placed across the distal rectum and fired (Fig. 46-4.7). This completes detachment of the specimen, which includes bladder, uterus, rectum, and surrounding tissue. The pelvic floor is then carefully assessed to identify bleeding points (Fig. 46-4.8). A laparotomy pad is packed firmly into the pelvis to tamponade any surface oozing, while the exenteration specimen is inspected to confirm grossly negative margins.
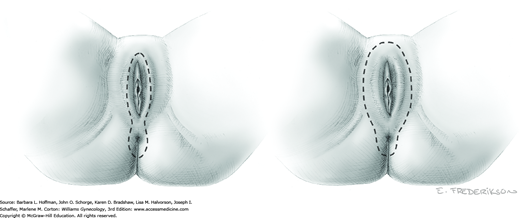
With infralevator exenteration, once abdominal dissection reaches the levator muscles, a second surgical team begins the perineal phase. The use of two teams typically shortens operative time and reduces bleeding. The planned perineal resection is outlined to encompass the tumor. As shown in Figure 46-4.9, resection may require infralevator exenteration with or without vulvectomy.
The perineal incision ideally begins concomitantly with division of the levator muscles by the abdominal team. At the perineum, a skin incision is first performed, followed by use of an electrosurgical blade to dissect through the subcutaneous tissues surrounding the urethra, vaginal opening, and anus.
Within the abdomen, the primary surgical team places the specimen on traction. Electrosurgical blade dissection is used to circumferentially incise the levator muscles lateral to the area of tumor extension (Fig. 46-4.10). The dissection proceeds distally toward the perineum.
After the perineal incision has reached the fascial plane, four spaces are developed: subpubic space, left and right vaginal spaces, and retrorectal space. It is helpful to have the abdominal surgeon place a hand deep into the pelvis and guide the electrosurgical dissection by the perineal team (Fig. 46-4.11). Five pedicles are identified that separate these avascular spaces: two pubourethral pedicles, two rectal pillar pedicles, and the midline posterior anococcygeal pedicle. Electrosurgical dissection that is directed by the abdominal surgeon’s finger is performed to open the intervening spaces. From below, the five vascular pedicles are divided and ligated using the electrothermal bipolar coagulator.
Circumferential dissection will result in complete detachment of the specimen that can be removed either vaginally or abdominally (Fig. 46-4.12). Hemostasis is then achieved with a series of sutures, vascular clips, or clamps and ties. Finally, the pelvic floor and pedicle sites are carefully reinspected (Fig. 46-4.13).
If vaginal reconstruction in not planned, the most straightforward and quickest way to close the perineum is for the second team to perform a layered closure of the deep tissues with 0-gauge delayed-absorbable suture (Fig. 46-4.14). The perineal skin is closed with the same type of delayed-absorbable suture in a running fashion.

A dry laparotomy pad may be held firmly deep in the pelvis to tamponade surface oozing, while the conduit, colostomy or bowel anastomosis, other surgical procedures, or vaginal reconstruction are performed. In some instances, intraoperative radiation therapy may be a useful adjunct for an obviously positive or clinically suspicious resection margin (Backes, 2014; Foley, 2014; Koh, 2015). An omental J-flap may provide additional blood supply to the irradiated, denuded pelvic floor (Section 46-14). The type of postoperative suction drainage may be dictated by these ancillary procedures but should be used judiciously (Goldberg, 2006).
The morbidity of total pelvic exenteration depends on various factors, which include preoperative health of the patient, intraoperative events, extent of the procedure, ancillary procedures, and postoperative vigilance. Hospitals that treat a relatively high volume of such patients report lower surgical in-hospital mortality rates (Maggioni, 2009). However, unlike a few decades ago, few institutions perform this operation on a regular basis.
The immediate life-threatening concerns are massive bleeding, acute respiratory distress syndrome, pulmonary embolism, and myocardial infarction (Fotopoulou, 2010). Every effort is made to encourage early ambulation as soon as the patient is stable. A prolonged ileus or partial small bowel obstruction will typically respond to expectant management but may require TPN for weeks. Intestinal fistulas and leaks are more common when using mesh to cover the pelvic floor or when performing low rectal anastomoses. Omental pedicle grafts and rectus abdominis or gracilis myocutaneous flaps may prevent such complications. Pelvic abscess and septicemia are additional subacute complications that develop commonly (Berek, 2005; Goldberg, 2006; Maggioni, 2009).
Anterior Pelvic Exenteration
Removal of the uterus, vagina, bladder, urethra, distal ureters, and parametrial tissues with preservation of the rectum is meant to be a less morbid operation than total pelvic exenteration (Section 46-4). Patients are carefully selected for this more limited procedure to still achieve negative surgical margins. Women who have previously had a hysterectomy are not usually good candidates, because a complete resection of a central recurrence involving the vaginal cuff would typically require removal of both bladder and rectosigmoid colon. The most common indications include small recurrences confined to the cervix or anterior vagina after pelvic radiation. In gynecologic oncology, up to half of all exenterations performed are anterior (Berek, 2005; Maggioni, 2009).
The preoperative evaluation is similar to that described for total pelvic exenteration (Section 46-4). Although preservation of the rectum is planned, patients are advised that potentially unforeseen clinical circumstances may dictate bowel resection and colostomy or low rectal anastomosis. Accordingly, a complete bowel preparation is still mandatory.
Anterior exenteration is technically similar to total pelvic exenteration, described earlier. Patients are positioned in low lithotomy in booted support stirrups, the appropriate skin incision is made, the abdomen is explored, lymph nodes are removed, and spaces are developed to exclude metastatic or unresectable disease. The procedure begins to differ after the bladder has been mobilized. A surgeon then makes the final decision to leave the rectum intact and proceed with anterior pelvic exenteration.
Instead of mobilizing the rectum and dividing the sigmoid colon, the rectovaginal space is developed much as in a type III radical hysterectomy. The uterosacral ligament and the entire length of the rectal pillars are divided to free the exenteration specimen posteriorly.
The mobilized bladder and uterus are held medially to aid in isolation of the cardinal ligaments, internal iliac vessels, and ureter. These structures are successively divided with an electrothermal bipolar coagulator (LigaSure) or clamped, cut, and individually ligated.
After the anterior pelvic exenteration specimen has been completely mobilized, the urethra and vagina are divided (Figs. 46-5.1 and 46-5.2). The urethra is left open, and the vaginal cuff is closed with 0-gauge delayed-absorbable suture in a running fashion.
Typically, the lesion is small and lies above the levator ani muscles, thus a perineal phase is not required. For this reason, placement of a myocutaneous flap for vaginal reconstruction may be more problematic in these patients due to limited space in the pelvis.
Morbidity of anterior pelvic exenteration is comparable with that of total pelvic exenteration (Section 46-4) (Sharma, 2005). Ideally, the operation is shorter and restoration of bowel function is more rapid. Some patients will experience tenesmus or long-term rectal symptoms that likely stem from interruption of the autonomic nervous system in surrounding tissue.
Posterior Pelvic Exenteration
Removal of the uterus, vagina, rectum, and parametrial tissues with preservation of the ureters and bladder is meant to be a less morbid operation than total pelvic exenteration (Section 46-4). Patients are carefully selected for this more limited procedure to still achieve negative surgical margins. For this reason, women who have previously had a hysterectomy are not usually good candidates. The most common indications include small postirradiation recurrences primarily involving the posterior vaginal wall or coexisting with a rectovaginal fistula. In gynecologic oncology, fewer than 10 percent of exenterations are posterior (Berek, 2005; Maggioni, 2009).
Preoperative evaluation is largely identical to that described for total pelvic exenteration (Section 46-4). A surgeon’s judgment and experience are critical in deciding to proceed with a more limited operation. However, patients are advised that potentially unforeseen clinical circumstances may dictate resection of the ureters and bladder with formation of a urinary conduit.
Posterior pelvic exenteration is technically similar to a type III radical hysterectomy but with the addition of rectosigmoid resection and a more extended vaginectomy (Section 46-1). The operation begins as a total pelvic exenteration. Patients are positioned in low lithotomy in booted support stirrups, the appropriate skin incision is made, the abdomen is explored, lymph nodes are removed, and spaces are developed to exclude metastatic or unresectable disease (Section 46-4). A surgeon then makes the final decision to leave the bladder intact and proceed with posterior exenteration.
As with type III radical hysterectomy, the retroperitoneum is entered, ureters are mobilized, uterine arteries are ligated at their internal iliac artery origin, and parametrial tissue is divided at the pelvic sidewall. The bladder is then mobilized away from the cervix and vagina, and ureters are unroofed from the paracervical tunnels. The lateral attachments are then divided all the way to the levator ani muscles. However, typically these steps are much more tedious in a previously irradiated field because of tissue fibrosis and scarring.
The sigmoid colon is divided with the mesentery and peritoneal attachments, as described for low anterior resection. The retrorectal space is bluntly dissected to mobilize the rectum and enable transection of the rectal pillars and uterosacral ligaments.
The entire specimen may then be placed on traction to aid placement of the transverse anastomosis (TA) or curved cutter stapler (Contour) and division of the rectum. The rectum is divided below the tumor to leave grossly negative margins.
To encompass the tumor for removal, dissection is continued circumferentially to (or through) the levator ani muscles (Fig. 46-6.1). The distal vagina is transected and sewn closed in a running fashion with 0-gauge delayed-absorbable suture. The specimen is removed.
Typically, the lesion is small and lies above the levator ani muscles, and thus a perineal phase is usually not required. As a result, placement of a myocutaneous flap for vaginal reconstruction may be more problematic in such patients due to limited space in the pelvis.
Morbidity of posterior pelvic exenteration is comparable with that of total pelvic exenteration (Section 46-4) (Sharma, 2005). Ideally, the operation is shorter and urinary complications are less frequent. However, posterior exenteration in a previously irradiated patient frequently results in a contracted bladder and intractable urinary incontinence.
Incontinent Urinary Conduit
Removal of the bladder during total or anterior exenteration is the main indication for an incontinent urinary conduit. Less commonly, an otherwise irreparable postirradiation vesicovaginal fistula may warrant urinary diversion. Following cystectomy, an isolated resected segment of bowel that maintains its mesenteric connection and vascular supply is used as the new urine reservoir. A stoma is crafted using one end of the bowel segment and an opening in the anterior abdominal wall. Ureters are reimplanted into the opposite end of this isolated bowel segment.
Various techniques are available to create such urinary conduits, and these are categorized as incontinent diversions or continent diversions. An incontinent diversion is the simplest to create, but postoperatively a patient must continuously wear an ostomy bag. These conduits are often preferable for medically compromised patients, the elderly, and anyone with a short life expectancy. Alternatively, a continent urinary reservoir can be created that is emptied by intermittent patient self-catheterization of the bowel stoma.
Of incontinent diversions, an ileal conduit has historically been the most common urinary diversion used in gynecologic oncology (Goldberg, 2006). However, this bowel segment and distal ureters invariably lie within a previously irradiated field. Conduit construction with radiation-damaged bowel may lead to higher rates of stenosis or leakage at the ureteral anastomotic sites (Pycha, 2008). More recently, the transverse colon conduit has proven to be a very successful alternative for previously irradiated patients (Segreti, 1996b; Soper, 1989). Sigmoid conduits are generally less desirable due to preexisting radiation damage and proximity to a concurrent colostomy site. The jejunal conduit is another rarely used option that typically lies outside the radiation field.
The basic principles of constructing an incontinent urinary conduit are the same, regardless of the intestinal segment used. First, healthy-appearing bowel with a good blood supply is selected. Second, wide-caliber ureterointestinal anastomoses and stenting are essential to minimize the risk of anastomosis stenosis. Third, sufficient mobility of the ureters and bowel segment is important to prevent tension that might lead to anastomotic leaks. Fourth, creation of a straight tunnel through the abdominal wall helps prevent bowel kinking and obstruction.
The preoperative evaluation is usually dictated by the preceding exenterative procedure. The specific decision is whether to plan for an incontinent or continent urinary conduit. Patients are extensively counseled regarding the differences. The type of conduit selected should be considered permanent, although later conversions are possible (Benezra, 2004).
Patients are advised that intraoperative findings may dictate revision of an original surgical plan. Postoperatively, urinary infections with or without pyelonephritis are very common with any type of conduit. Anastomotic leaks are less frequent with routine ureteral stent placement but can contribute to a prolonged ileus, the need for CT-guided drainage, or potentially, surgical reexploration with revision. Episodes of small bowel obstruction are possible and often develop at the site where the bowel segment was harvested and the remaining bowel ends were reanastomosed. In the long term, ureteral strictures or stenosis may compromise renal function. Infrequently, reoperation is necessary for complications that do not respond to conservative management (Houvenaeghel, 2004).
Bowel preparation is mandatory, but preparation is typically dictated by the preceding exenterative surgery (Section 46-4). Ideally, an enterostomal therapist is available to mark a conduit stoma site, typically on the patient’s right side, that is unobstructed in the supine, sitting, and standing positions.
To avoid unnecessary traction on its anastomoses, the incontinent urinary conduit is constructed as the last major intraabdominal step during exenterative surgery. Hemostasis is achieved before beginning the conduit. Anesthesia, patient positioning, and skin incisions are typically dictated by the preceding operation.
The bowel segment for the planned conduit is carefully inspected. It must be healthy appearing, not tethered, and lie close to the distal ureters. The final decision is now made regarding which type of incontinent conduit is best for the circumstances. If the distal ileum has the typical leathery, pale, mottled appearance of radiation injury, a conduit should be prepared from the transverse colon. Overlooking the importance of this decision can lead to various otherwise preventable complications intraoperatively and postoperatively.
The ileocecal junction is located, and the ileum is elevated to identify a bowel segment with the most mobility to reach the right side of the anterior abdominal wall where the stoma will be located. Ideally, the proximal end of the segment lies 25 to 30 cm from the ileocecal valve. At the selected site, the mesentery is scored on each side with an electrosurgical blade to aid insertion of a hemostat directly beneath the bowel loop. A Penrose drain is pulled through to mark this proximal end along the ileum that will eventually become the distal part of the conduit and will form the abdominal wall stoma.
The conduit length depends on subcutaneous tissue depth and ileum mobility but should measure approximately 15 cm. The conduit’s butt end will house the ureteral anastomoses and is selected by measuring the ileum that lies distal to the Penrose drain, and again the mesentery is scored. The gastrointestinal anastomosis (GIA) stapler is then inserted to divide the distal bowel segment (Fig. 46-7.1). The point of division should ideally be at least 12 cm from the ileocecal valve. The conduit is remeasured prior to dividing the proximal ileum, to account for possible shrinkage of the intervening segment and to again ensure sufficient length.
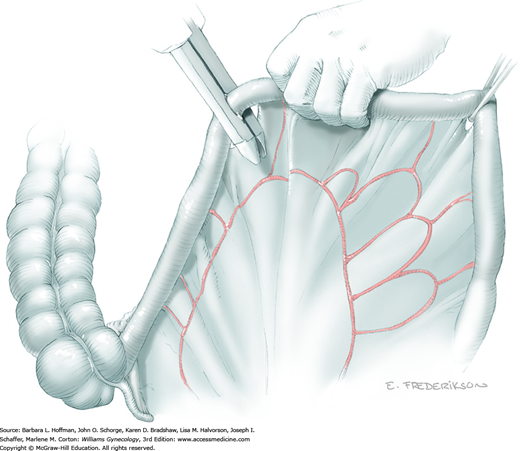
Once the bowel is stapled and divided, the conduit mesentery is also carefully divided on each end of the segment. This tissue division is angled inward and toward the base of the mesentery near its insertion to the posterior abdominal wall. This provides adequate mobility. The vasculature may be compromised if too much mesentery is divided, whereas too little will result in tension on the conduit. A perfect balance is required.
When convenient, intestinal continuity, minus the excised segment, is reestablished anterior to the conduit. This is completed by end-to-end small-bowel reanastomosis using the GIA and TA staplers as described in Section 46-20.
The staple line is excised from the stomal end of the conduit, and the conduit is irrigated into a basin. The ureters should now be engorged from the vascular clips placed earlier during exenteration. The distal end of the ureters should have a stay suture placed for traction. To prevent focal necrosis that may impede successful anastomosis, ureters are never directly grasped with forceps or roughly handled. They are sharply freed from their retroperitoneal attachments so that they easily reach past the point of their planned anastomosis into the conduit. The left ureter is brought under the inferior mesenteric artery (IMA) to prevent acute angulation and kinking. This ureter ultimately exits from beneath the base of the sigmoid colon mesentery to reach the conduit.
Adson forceps are used to grasp a small section of the ileal serosa to which the left ureter will reach. This site is ideally approximately 2 cm from the butt end of the conduit on the anterior side of the antimesenteric surface. Metzenbaum scissors remove a small, full-thickness section of bowel wall (Fig. 46-7.2). The ileal mucosa should be easily visible.

The distal tip of the left ureter is cut at a 45-degree angle just behind the vascular clip placed during exenteration. If the distal ends of the ureters exhibit fibrosis, they are trimmed to reach healthy-appearing tissue. The prior distal stay-suture is removed with this trimming. Urine will drain into the abdomen while a 4–0 delayed-absorbable stay suture is placed outside-to-in through the ureter’s distal tip. The needle is left on this traction stitch since it will be the final suture in the anastomosis. Fine tip scissors are used to spatulate the ureter for approximately 1 cm, but the length is customized depending on the caliber of the ureteral lumen (Fig. 46-7.3). This maneuver helps to reduce the possibility of future ureteral stenosis.
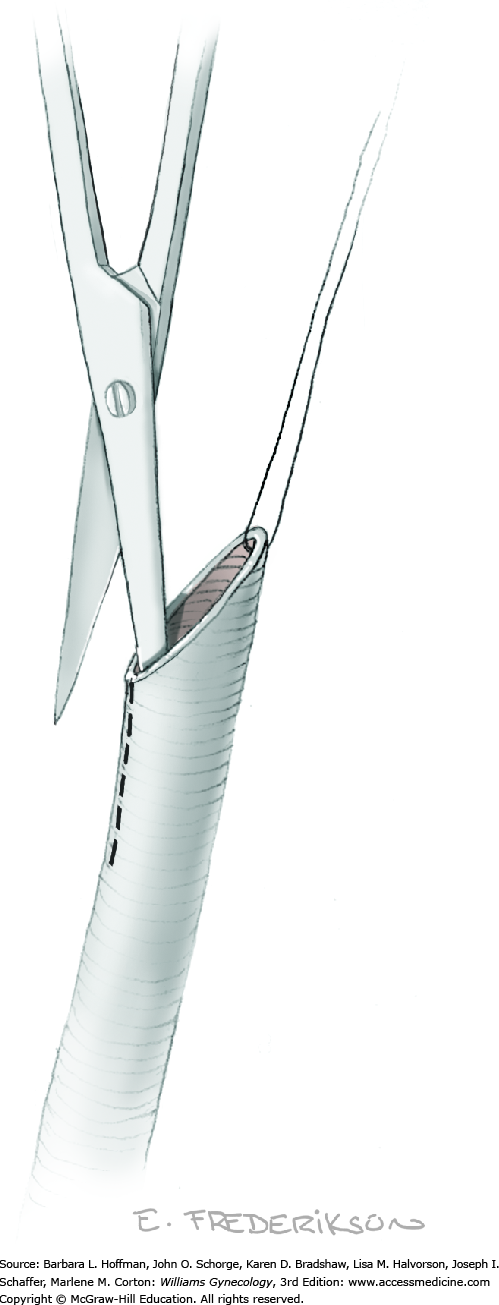
The first suture is placed at the apex of the spatulation with a full-thickness bite through the ureteral wall and bowel mucosa (Fig. 46-7.4). Two or three adjoining mucosa-to-mucosa sutures are placed. A 7F ureteral stent is then placed through the stomal end of the conduit and advanced through the anastomosis into the left renal pelvis. The stent is held against the wall of the midsection of the conduit with one hand and secured with a 3–0 or 4–0 gauge chromic catgut suture through the entire bowel wall and around the stent to hold it in place. The left ureteral anastomosis is completed with additional circumferential sutures to achieve a watertight closure (Fig. 46-7.5).
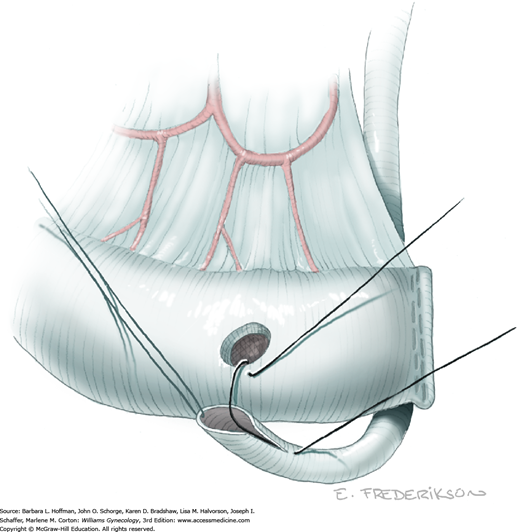
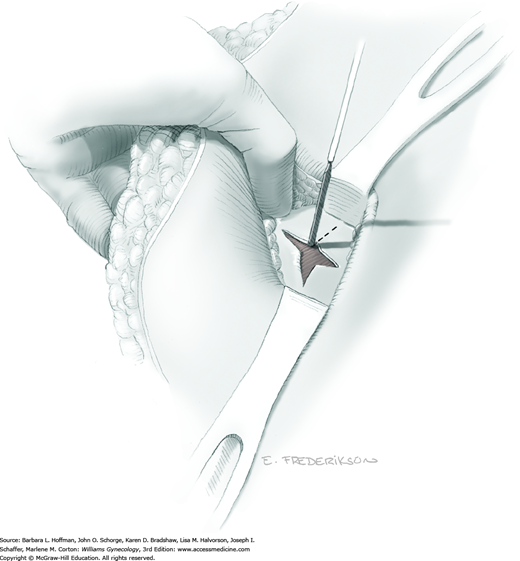
The anastomotic site for the right ureter is selected at least 2 to 3 cm distal to that of the left along the length of the conduit. The entire procedure is then repeated. Saline with methylene blue dye is used to fill the conduit and observe for watertight integrity. Any anastomotic leaks must be reinforced with additional sutures and retested. If leakage persists or if there is concern about the mucosa-to-mucosa apposition, then the entire anastomosis should be redone.
This butt end of the conduit is next secured to the sacral promontory, iliopsoas muscle, or posterior peritoneum with two or three delayed-absorbable sutures through the seromuscular layer of the conduit. Stabilizing the conduit in this way will prevent undue tension on the ureteral anastomoses when the patient is upright and gravity allows the intestines to slide into the pelvis.
The skin at the proposed stoma site is elevated with a Kocher clamp. An electrosurgical blade, set on cutting mode, is used to excise a small circle of skin. The subcutaneous fat is separated by blunt dissection until the fascia is visible. A cruciate incision is made with an electrosurgical blade (Fig. 46-7.6). The rectus abdominis muscle is split longitudinally and another cruciate incision is created in the peritoneum. The opening is bluntly expanded until it easily accommodates two fingers.
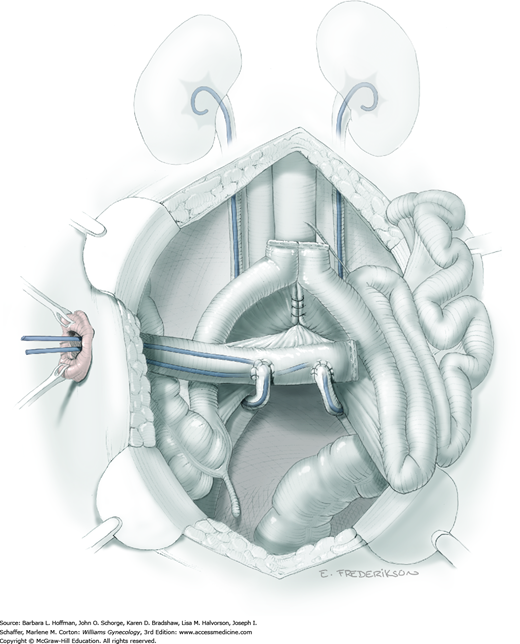
The stoma and stents are carefully pulled through the incision until at least 2 cm of ileum protrudes through the skin. The mesentery may need to be trimmed or the abdominal wall opening further dissected to accommodate the conduit. The mucosal edge of the bowel is everted. The stoma is completed with 3–0 gauge delayed-absorbable “rosebud” stitches that include the ileal mucosa, intervening bowel serosa, and skin dermis (Fig. 46-7.7). Circumferential sutures are placed. Both stents are trimmed to fit in the stoma bag. To enable correct identification postoperatively, the right ureteral stent is cut at a “right” angle. Individual silk sutures placed through each stent may be secured at the skin to prevent stent dislodgment over the first few postoperative days.
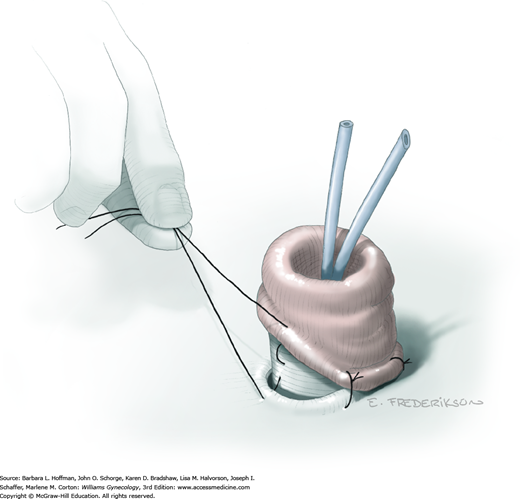
For this type of conduit, the hepatic and splenic flexures of the transverse colon are fully mobilized. In addition, the omentum is detached. Division points are marked with Penrose drains and transected (Fig. 46-7.8). The transverse mesocolon is then divided, as shown by the dotted lines, to provide sufficient mobility while preserving the middle colic artery. When performed in the usual setting of an exenteration with left lower quadrant colostomy, the bowel segment must measure approximately 20 cm to reach the right lower quadrant. Often, this requires incorporation of the hepatic flexure into the conduit and yields an antiperistaltic orientation, that is, urine ultimately flows through the conduit in the opposite direction that fecal waste would normally be propelled. Thus, the proximal bowel segment (nearest the cecum) will be the end of the conduit that eventually is brought through the abdominal wall.
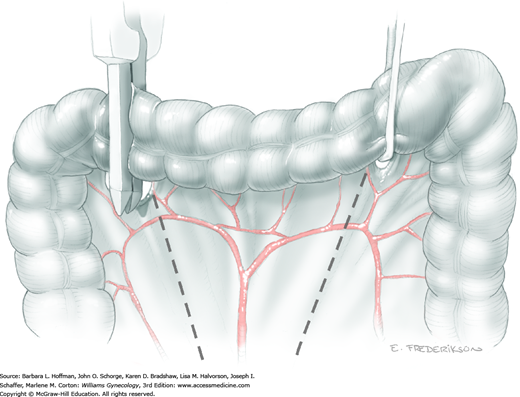
Ureters are sufficiently mobilized in the retroperitoneal space, and both are brought out through a commodious peritoneal opening to reach the conduit. The left ureter will need to be brought across the aorta proximal to the IMA (unlike the ileal conduit). The ureteral anastomoses are then completed, ideally at the teniae coli, over stents. To prevent postoperative sliding and tension on the anastomoses, the conduit’s butt end is secured to the sacrum, iliopsoas muscle, or posterior peritoneum with interrupted delayed-absorbable suture. Intestinal continuity is reestablished anterior to the conduit by a functional end-to-end anastomosis using EEA and TA staplers, as described in Section 46-18. The stoma can be made at the preselected site, but it can be repositioned almost anywhere that the conduit will comfortably reach. The stomal end of the conduit is brought through the anterior abdominal wall and secured (Fig. 46-7.9).
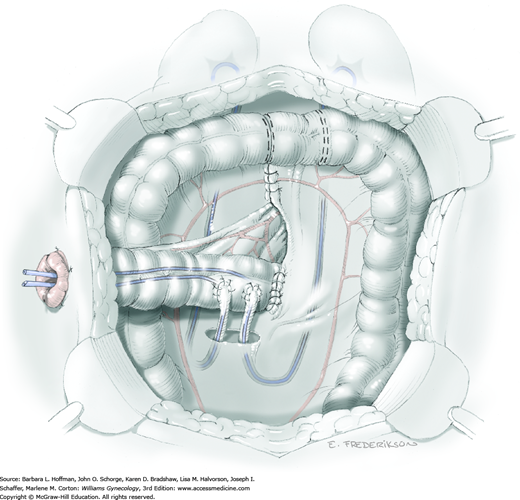
Mesenteric defects require closure to prevent internal hernias but not so tightly as to compromise blood supply. A suction drain may be placed if integrity of the anastomoses and leakage is a concern. If the stoma appears dusky, the abdominal wall tunnel may be too tight, the mesentery may be twisted or placed on too much tension, or the blood supply may not be sufficient. The last circumstance is the worst, and it generally requires trimming of the distal end of the bowel or occasionally redoing the entire conduit. Either is preferable to avoid problematic retraction, stricture, or necrosis.
The stoma is regularly checked for viability during the immediate postoperative recovery period. Both stents should be functioning. A dry stent that does not respond to irrigation should prompt an imaging study to exclude ureteral obstruction. Urinary fistulas and ureteral obstruction are uncommon but are potentially life-threatening if not addressed with percutaneous drainage or reoperation. Prolonged bowel dysfunction may indicate an anastomotic urine leak or small-bowel obstruction.
Patients often are readmitted within a few weeks of surgery due to partial small bowel obstruction, urinary infection, wound separation, or other relatively minor complications of exenteration. These typically resolve with targeted supportive care. Long-term complications include ureteral stenosis and renal loss. Renal function may deteriorate due to chronic infection and reflux. When patients cannot be otherwise managed, they may require long-term percutaneous nephrostomy tubes, indwelling stents, or reoperation and conduit or stoma revision.
Predictably, the overall morbidity of creating an incontinent conduit is much higher in previously irradiated patients (Houvenaeghel, 2004). Tissue quality and mobility are especially important in these patients.
Continent Urinary Conduit
Removal of the bladder during total or anterior exenteration is the main indication for a continent urinary conduit. Vesicovaginal fistulas and disabling incontinence following radiation therapy are other less common reasons. Following cystectomy, urine is diverted into a reservoir created from a resected bowel segment. Depending on their construction, these diversions may render a woman continent or incontinent. An incontinent conduit reservoir chronically drains into an ostomy bag, whereas that of a continent conduit does not leak urine. Patients empty the reservoir by intermittent self-catheterization.
Continent conduits, however, may not be appropriate for all patients. The operation is more complex than an incontinent diversion procedure and may lead to more postoperative complications (Karsenty, 2005). It also requires a highly motivated patient who is capable of long-term self-catheterization. An ideal candidate for a continent conduit is a young, otherwise healthy woman without a colostomy.
There are several continent diversion methods. In gynecologic oncology, the continent ileocolonic urinary reservoir (Miami pouch) has become the most popular choice (Salom, 2004). This pouch is technically straightforward to construct and uses tissues that characteristically lie in nonirradiated areas (Penalver, 1998).
A Miami pouch includes a distal ileum segment, the ascending colon, and a portion of transverse colon. The basic steps involve opening the colon segment along the length of the tenia and folding it onto itself. The walls of the ascending and transverse colon are then sewn together to achieve a reservoir with low intraluminal pressure. The ileal segment is tapered and purse-string sutures are placed at the level of the ileocecal valve to achieve continence. The free ileal segment end is then exteriorized as a stoma to allow catheterization (Penalver, 1989).
Preoperative evaluation is usually dictated by the preceding exenterative procedure. The specific decision is whether to plan for an incontinent or continent urinary conduit. Patients are extensively counseled regarding the differences. The presence of a permanent colostomy removes the apparent advantage of a continent conduit and an abdominal wall without draining stomas. Catheterization may be more problematic in very obese women. In addition, some patients with prior high-dose radiation or chronic bowel disease may also not be good candidates due to poor tissue quality and increased associated risks of anastomotic leaks, ureteral stricture, or fistula.
Patients are advised that intraoperative findings such as poor bowel appearance and dense adhesions may dictate a change in surgical plans. In addition, complications are common and should be reviewed. Even in experienced centers, half of patients will have one or more early pouch-related complications: ureteral stricture with obstruction, anastomotic leak, fistula, difficulty in catheterization, pyelonephritis, or sepsis. One third will develop late complications beyond 6 weeks. Ten percent of patients will ultimately require reoperation to revise the Miami pouch (Penalver, 1998). As a result, many patients would not choose the continent urinary conduit again (Goldberg, 2006).
Bowel preparation is mandatory but generally is dictated by the preceding exenterative surgery. Ideally, an enterostomal therapist is available to mark a conduit stoma site in the right lower abdomen that is unobstructed in the supine, sitting, and standing positions.
To avoid unnecessary traction on anastomoses, the continent urinary conduit is constructed as the last major intraabdominal procedure during exenterative surgery. Before beginning the conduit, hemostasis should be achieved. Anesthesia, patient positioning, and skin incisions are typically dictated by the preceding operation.
The conduit bowel segment is carefully inspected. It must be healthy appearing and lack severe radiation injury. At this point, the final decision to proceed with creation of a Miami pouch is made.
The right colon is freed along the white line of Toldt from the cecum, around the hepatic flexure, to the proximal transverse colon. The white line of Toldt marks the lateral attachment of ascending and descending colon’s peritoneum to the posterior abdomen’s parietal peritoneum. The conduit will require approximately 25 to 30 cm of colon and at least 10 cm of ileum. With these measurements in mind, a surgeon selects sites to divide the bowel.
The mesentery is scored with an electrosurgical blade, and a Penrose drain is placed around the sections to be divided. Within the mesentery, the underlying vasculature is reviewed to ensure sufficient conduit blood supply. A gastrointestinal anastomosis (GIA) stapler is used to divide the bowel at both sites marked with the Penrose drains (Fig. 46-8.1).
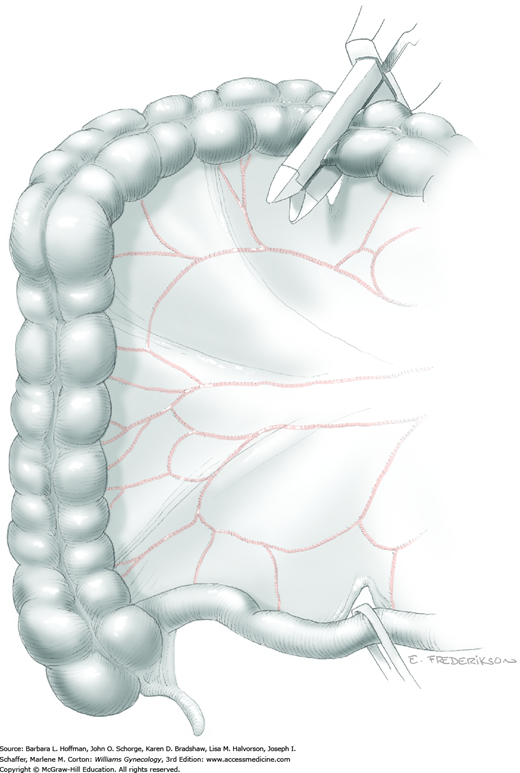
The mesenteries are incised down through the avascular areas to the posterior peritoneum. At this point, intestinal continuity is reestablished by a functional end-to-end stapled ileotransverse enterocolostomy using the GIA and transverse anastomosis (TA) staplers. The mesenteric defect is closed with 0-gauge delayed-absorbable suture in a running fashion to prevent internal herniation.
The conduit staple lines on both ends of the bowel segment are removed with Metzenbaum scissors, and the bowel is irrigated into a basin. Of this bowel segment, the entire colonic portion is opened with an electrosurgical blade along the tenia of the antimesenteric border to “detubularize” the bowel (Fig. 46-8.2). This is extended to remove the appendix.
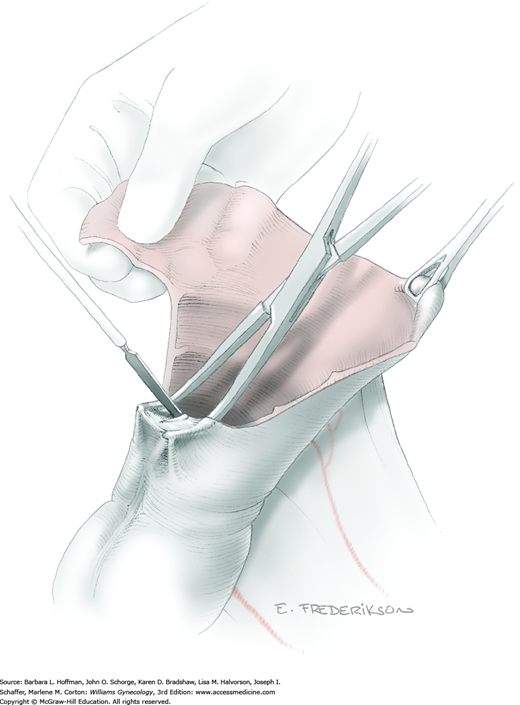
The colon segment is folded in half and four delayed-absorbable stay sutures are placed at the corners to begin creation of the pouch. The lateral edge is closed in two layers with 2–0 and 3–0 gauge delayed-absorbable suture in a running fashion (Fig. 46-8.3).
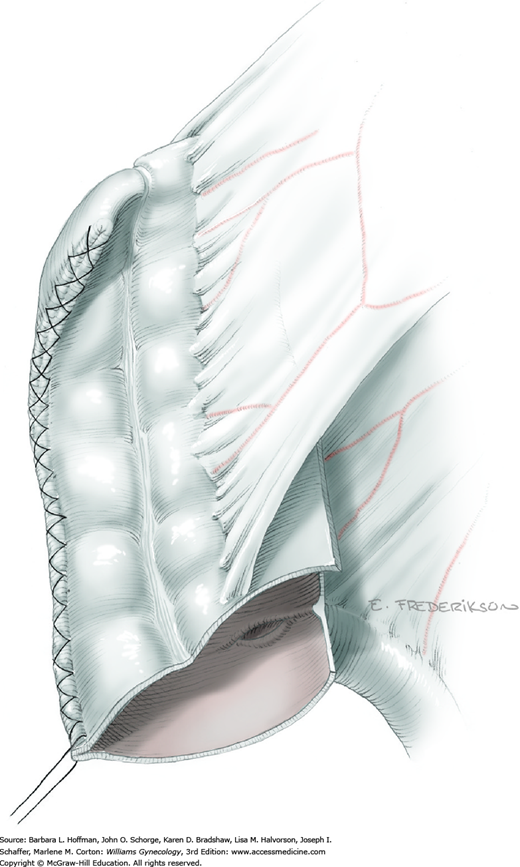
A 14F red rubber catheter is inserted through the terminal ileum segment into the pouch. Two purse-string, 0-gauge delayed-absorbable sutures are placed 1 cm apart at the ileocecal junction. The ileum is elevated with Babcock clamps, and a GIA stapler is used to taper the terminal ileum on its antimesenteric border over the catheter (Fig. 46-8.4). An anterior abdominal wall opening is made in the right lower quadrant so that the ileal segment of the conduit can be pulled through to approximate its final position.
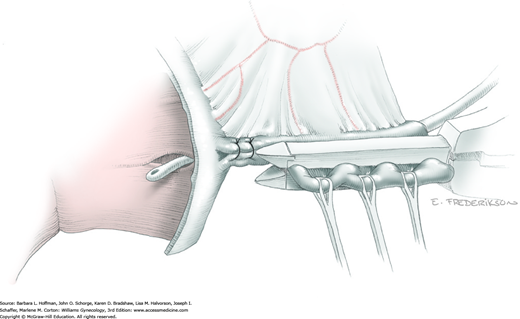
Both ureters are further mobilized from their retroperitoneal attachments and brought into position under the ascending mesocolon using a 4–0 gauge delayed-absorbable stay suture at the tip. Manipulation with this suture avoids crush injury by forceps and subsequent necrosis. As in the transverse colon conduit, the left ureter is brought over the aorta and above the origin of the inferior mesenteric artery (IMA).
The ureteral anastomotic sites to the pouch are selected based on ureter length and their ability to have a straight course to the pouch. One ureter is usually brought through on either side of the pouch suture line. The ureters are trimmed and spatulated (see Fig. 46-7.3). In creating the openings for the ureters, the bowel mucosa is incised at sites away from the suture line. A hemostat is poked through the bowel wall, grasps the ureteral stay suture, and thereby pulls 2 cm of each ureter into the pouch.
Each ureter is secured to the bowel mucosa with interrupted stitches of 4–0 gauge delayed-absorbable suture (Fig. 46-8.5). Single-J ureteral stents (7F) are inserted and sutured to the bowel wall with 3–0 gauge chromic to stabilize their placement. To enable correct identification postoperatively, the right ureteral stent is cut at a “right” angle.
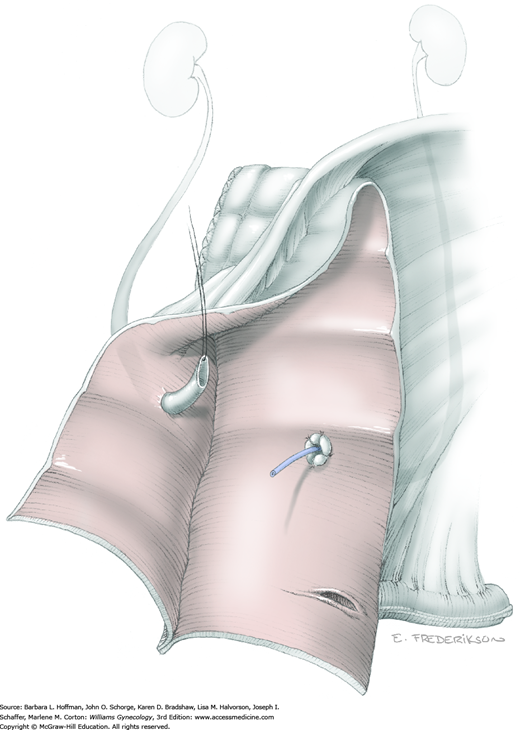
A large Malecot catheter is brought into the pouch through an incision made away from the ileocecal valve. The ureteral stents are brought out through the pouch next to the Malecot (Fig. 46-8.6). Here, where the catheters exit the pouch, a watertight purse string using 3–0 plain catgut suture is placed. Absorbable suture is used for this purse string, as the Malecot catheter will be removed only 2 to 3 weeks postoperatively.
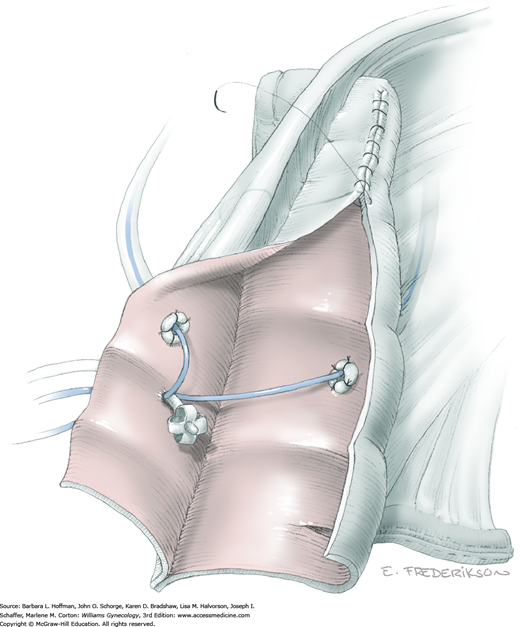
The remaining edges of the pouch are closed with two layers of 2–0 and 3–0 gauge delayed-absorbable suture in a running fashion. Continence may be tested by inserting a red rubber catheter through the plicated ileum, filling the pouch with 250 to 300 mL of saline, removing the red rubber catheter, and gently squeezing the pouch. Additional purse-string sutures may be placed at the ileocecal valve if incontinence is demonstrated. The completed pouch (Fig. 46-8.7) is now ready to be brought to the abdominal wall.
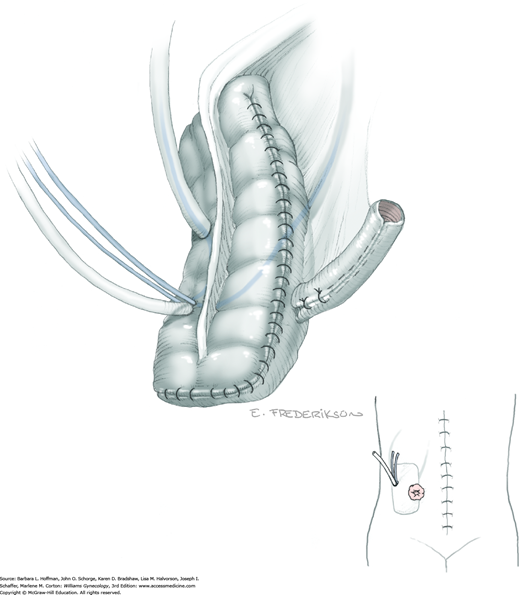
The two stents and Malecot drain are brought out through a separate stab wound on the abdominal wall away from the stoma site. The Malecot drain is individually fixed to the skin with nylon sutures. The ileal segment is pulled through the abdominal wall and may require trimming to sit flush. The pouch is stabilized by suturing it to the undersurface of the abdominal wall, and the stoma is created by placing interrupted stitches of 3–0 gauge delayed-absorbable suture between the dermis and ileal mucosa as described in Section 46-7, Step 6. A red rubber catheter is inserted and withdrawn to make sure that the pouch can be easily accessed. A Jackson-Pratt (JP) drain is then placed near the pouch to monitor for urine leakage and is brought out through a separate stab wound away from the stoma.
The Miami pouch initially requires more care than an incontinent urinary conduit. Mucus will be produced by the colonic bowel segment. Therefore, the Malecot catheter is irrigated every few hours to permit urine drainage. In contrast, the ureteral stents are irrigated only if one of the catheters becomes obstructed. Two to 3 weeks postoperatively, an intravenous pyelogram (IVP) and gravity pouchogram are performed. The IVP excludes anastomotic leaks, ureteral stricture, and fistulas. The pouchogram involves retrograde filling of the conduit to search for leaks. If these tests are normal, the ureteral stents, Malecot catheter, and JP suction drainage tube may all be removed. The hole in the conduit that housed these tubes will heal secondarily.
A patient is taught self-catheterization using an 18F to 22F red rubber catheter and antiseptic technique. The interval between catheterizations is progressively increased over weeks to reach 6 hours during the day and span sleep hours at night. In addition, the pouch requires periodic irrigation to remove mucus. An IVP, pouchogram, and serum electrolyte and creatinine level measurement are performed at 3 months postoperatively and then every 6 months to evaluate the pouch, renal function, and upper urinary tracts.
More than half of patients will have a conduit-related complication postoperatively. Fortunately, most may be successfully managed conservatively without the need for reoperation (Ramirez, 2002). The most common urinary complications are ureteral stricture or obstruction, difficult catheterization, and pyelonephritis (Angioli, 1998; Goldberg, 2006). The gastrointestinal complication rate attributed to Miami pouch is less than 10 percent and includes fistulas (Mirhashemi, 2004).
Vaginal Reconstruction
Patients undergoing exenterative surgery are typical candidates for creation of a new vagina. Other less common indications include congenital absence of the vagina, postirradiation stenosis, and total vaginectomy. There are innumerable ways to perform the procedure, and the type of reconstruction is typically determined by both the surgeon’s personal experience and the patient’s clinical circumstances.
Vaginal reconstruction at the time of exenteration is a very personal choice. Not every woman will desire a new vagina, and others will be unhappy with the functional result (Gleeson, 1994a). Moreover, reconstruction may significantly prolong an already lengthy operation and lead to additional perioperative morbidity (Mirhashemi, 2002). However, proponents suggest that filling the large pelvic defect and bringing in a new source of blood supply may actually prevent postoperative fistula or abscess formation (Goldberg, 2006; Jurado, 2000).
To create a functional neovagina, one of the following is performed: (1) surrounding skin and subcutaneous tissue is mobilized and positioned into the defect (skin flap), (2) skin from another part of the body is harvested and transferred to replace the vaginal mucosa (split-thickness skin graft), or (3) skin and underlying tissue outside the radiated field are mobilized on an attached section of muscle with its dominant blood supply (myocutaneous flap). Of the three choices for vaginal reconstruction, skin flaps, such as rhomboid flaps, pudendal thigh fasciocutaneous flaps, and advancement or rotational flaps, are technically the easiest to perform (Burke, 1994; Gleeson, 1994b; Lee, 2006). Split-thickness skin grafts (STSG) provide the ability to cover large surfaces if primary closure is not possible. However, these require that most of the native subcutaneous tissue has been retained at the neovagina site and require months of stenting with a vaginal mold to prevent stricture (Kusiak, 1996). Rectus abdominis myocutaneous (RAM) flaps and gracilis myocutaneous flaps are technically more challenging and take longer to perform, but they demonstrate the most satisfying functional results (Lacey, 1988; Smith, 1998). Importantly, RAM flaps may be inappropriate in those with a prior Maylard incision or any other procedure that resulted in ligation of the inferior epigastric artery, which is the dominant blood supply to this type of flap.
Regardless of reconstruction technique, sexual function is often significantly impaired in women after pelvic exenteration (Hockel, 2008; Ratliff, 1996). Other techniques are used less commonly and are not covered in this section.
The surgeon should have an open discussion with the patient regarding the risks and benefits of vaginal reconstruction. Some women may have unrealistic expectations that are important to address preoperatively. Others may not wish to incur additional morbidity. The patient should also be aware that intraoperative complications may dictate a change of plans and the need to abort reconstruction.
The potential morbidity of the neovagina depends on the type of reconstruction. Flap necrosis, prolapse, wound separation, or other complications may require reoperation and/or lead to an unsatisfying end result. Postoperative patient concerns are expected and include self-consciousness about being seen in the nude by their partner and vaginal dryness or discharge (Ratliff, 1996).
The preceding exenterative surgery typically dictates preoperative preparation. Modifications may be required, depending on the type of neovaginal reconstruction. For example, the legs may need to be surgically prepped beyond the knees for a gracilis flap or a suitable donor site identified for STSG.


