Diagnostic and Operative Cystoscopy and Urethroscopy
During gynecologic surgery, the lower urinary tract may be injured. Thus, diagnostic cystoscopic evaluation is often warranted following procedures in which the bladder and ureters have been placed at risk. Additionally, operative cystoscopy is within the scope of many gynecologists for the passage of ureteral stents, lesion biopsy, and foreign-body removal. Of these, ureteral stenting may be indicated to delineate the ureter’s course during cases with abnormal pelvic anatomy or to assess ureteral patency following gynecologic surgery.
Rigid and flexible cystoscopes are available, although in gynecology, a rigid scope is typically used. A cystoscope is composed of an outer sheath, bridge, endoscope, and obturator. The sheath contains one port for fluid infusion and a second port for fluid egress. For office cystoscopy, a sheath measuring 17F affords greater comfort. However, for operative cases, a 21F or wider-diameter cystoscope is preferred to allow rapid fluid infusion and easier instrument and stent passage. The sheath’s end tapers, and in women- with a narrow urethral meatus, an obturator can be placed inside the sheath to create a rounded tip for smooth introduction. In selected instances, gentle dilation of the external urethral opening using narrow cervical dilators is needed prior to sheath introduction. The next piece, the bridge, attaches to the proximal portion of the sheath and allows coupling between the endoscope and sheath. Additional ports are present on the bridge and are generally used to introduce stents or instruments.
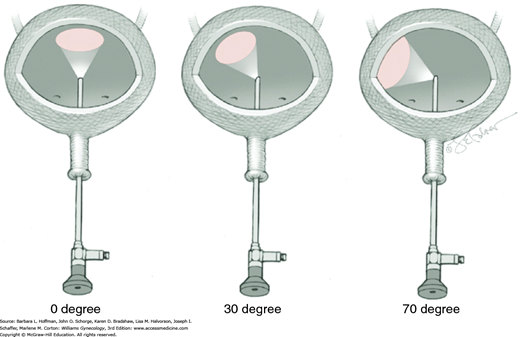
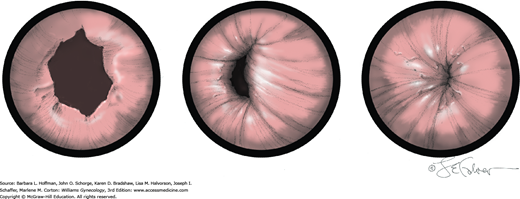
Several endoscope viewing angles are available and include 0-, 30-, and 70-degree optical views (Fig. 45-1.1). Zero-degree endoscopes are used for urethroscopy. For cystoscopy, a 70-degree endoscope is superior for providing the most comprehensive view of the lateral, anterior, and posterior walls; trigone; and ureteral orifices. To achieve a comparable view, a 30-degree endoscope requires additional manipulation. However, a 30-degree endoscope does offer advantages and allows surgeons greater flexibility as it can be used for either urethroscopy or cystoscopy during a given examination. For operative cystoscopic cases in which instruments are passed down the sheath, a 30-degree endoscope should be used because with 0- and 70-degree endoscopes, operative instruments generally lie outside the field of view.
Prior to office cystoscopy, urinary tract infection (UTI) is excluded to avoid upper tract infection. If diagnostic cystoscopy is performed properly, complications are rare. Of these, infection is the most common and results from the significant incidence of bacteriuria following cystoscopy.
Cystoscopy may be performed in low or standard lithotomy position with the legs positioned in stirrups. For office cystoscopy, 2-percent lidocaine jelly is instilled into the urethra 5 to 10 minutes prior to cystoscope insertion. For operative procedures, an additional 50 mL of 4-percent lidocaine solution may be instilled via catheter into the bladder. The perineum and urethral meatus are surgically prepared prior to urethral manipulation.
The bladder must be adequately distended to fully visualize all surfaces, and for diagnostic purposes, saline or sterile water is suitable. To ensure adequate medium flow, an infusion bag is elevated significantly above the level of the symphysis. The volume needed may vary but is reached when bladder walls are not collapsing inward. Overdistending the bladder is also avoided as it may result in temporary urinary retention. If the bladder is distended beyond its capacity, excess fluid will leak out the urethral meatus and around the cystoscope rather than rupturing the bladder, which is rare.
If intraoperative cystoscopy is performed to document ureteral patency, ½ to 1 ampule of indigo carmine is administered intravenously prior to the procedure to aid visualization of urine jets. Less commonly, methylene blue may be used instead but carries the risk of methemoglobinemia in patients with glucose-6-phosphate dehydrogenase deficiency. However, its use may increase given current shortages of indigo carmine (American Urogynecologic Society, 2014a).
The anterior urethral wall is sensitive, and discomfort may result if the sheath’s tapered edge is directed anteriorly. Thus, the sheath is inserted into the urethral meatus with the bevel directed posteriorly. Immediately following insertion into the external urethral opening, medium flow is begun.
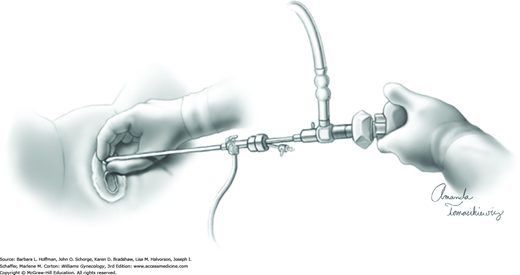
The cystoscope is advanced toward the bladder under direct visualization. Often, in women with anterior wall prolapse, the urethra slopes downward, and the scope tip is similarly directed. During the procedure, the cystoscope can be steadied with one hand holding the sheath near the urethral meatus (Fig. 45-1.2).
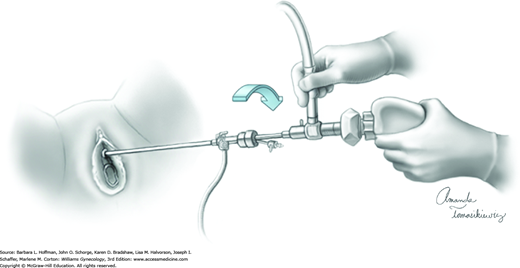
Upon entry into the bladder, the cystoscope is slowly withdrawn until the bladder neck is identified. The cystoscope is then advanced and rotated 180 degrees so that the light-source cable is pointing down. In this position, an air bubble is noted at the dome, which provides orientation for the remainder of the cystoscopic examination. When a 70- or 30-degree scope is used, the cystoscope is angled upward to view this bubble. To maintain orientation during rotation, the camera is held static while the light cord and cystoscope are rotated (Fig. 45-1.3).
As the distended bladder assumes a spherical shape, it is systematically inspected on each side from apex to internal urethral opening. First, to view the entire left side of the bladder, the cystoscope and light cable are rotated approximately 90 degrees in a clockwise fashion. The surgeon’s left hand is used to prevent awkward hand crossing. To examine the bladder wall from 12 to 3 o’clock positions, the cystoscope is initially angled upward and then pans down to the 3 o’clock position, at which point the scope is parallel to the floor. Next, inspection from 3 to 6 o’clock requires gradual downward angling of the cystoscope. The left ureteral orifice is generally found at the 5 o’clock position, approximately 3 to 4 cm proximal to the internal urethral opening. During bladder inspection, especially the base or posterior wall, digital elevation of the anterior vaginal wall to lift the bladder floor and orifices to a more anatomically correct position is beneficial if pelvic organ prolapse is present. Moreover, accentuated angling may be needed. Once the left orifice is noted, further subtle clockwise rotation of the cystoscope along the interureteric ridge permits isolation of the right ureteral orifice.
The cystoscope is again rotated so that the light-source cable is again pointing downward and the bubble at the dome is again identified. For the right side, counterclockwise movement of the cystoscope and light cord with the surgeon’s right hand averts awkward hand crossing. The right wall of the bladder is then similarly examined.
While horizontal to the floor, the cystoscope is withdrawn to the bladder neck and then angled downward to provide a second view of the trigone and both ureteral orifices and to document ureteral patency. Brisk urine flow, with or without indigo carmine, should be seen from each orifice. Peristalsis of the ureteral orifice alone, without flow, is insufficient to document patency. Moreover, scant flow may indicate partial ureteral obstruction and merits further evaluation.
The average time to efflux approximates 10 minutes but can be longer. After 20 minutes, absent jets bilaterally more often reflect hypovolemia and resolve with fluid bolus. Following this bolus, 10 to 20 mg of furosemide (Lasix) can be added as needed to promote diuresis. Underlying renal disease may also delay efflux. During inspection, a unilateral jet is more concerning for ureteral injury. To evaluate, the surgeon can attempt to thread a stent through the ureteral orifice and into the ureter, as described in Step 8. Repair of ureteral injury is described in Chapter 40.
For this procedure, the operative instrument (biopsy or grasping forceps or scissors) is introduced through the operating port, until viewed at the end of the cystoscope. Prior to instrument insertion, a rubber adapter cap is positioned over the operating port to create a watertight seal with the operative instrument. Once in view, the instrument and cystoscope are moved together as a unit toward the area of interest.
Ureteral stents may be placed at several junctures during surgery. They may be inserted at the beginning of surgery and left through its duration to define anatomy in cases in which the ureter is at high surgical risk of injury. Alternatively, they may be threaded intraoperatively to document ureteral patency and exclude injury. Finally, ureteral stents may be positioned and left in place at the conclusion of surgery if ureteral injury is suspected or identified. Duration of postoperative stenting is variable and based on indications.
Ureteral stents are available in various sizes, and those ranging from 4 to 7 F are commonly used. Stents vary in length from 20 to 30 cm, and a 24-cm length is appropriate for most adults. Generally, open-ended or whistle-tip stents are used to delineate anatomy or to exclude obstruction. Double- or single-pigtail stents are used in situations that require prolonged ureteral drainage.
A 4F to 6F open-ended or whistle-tip stent is threaded through the operating channel of a 30-degree cystoscope and into the field of view. By advancing both the stent and cystoscope toward the orifice, the stent is passed into the ureteral orifice. After the stent has entered the opening, it is manually threaded and advanced. Alternatively, an Albarrán bridge may be used. This specialized bridging sheath allows deflection and guidance of a stent into an orifice.
Once inserted, a stent is advanced past the level of suspected obstruction. If a stent threads easily, obstruction is excluded. In most gynecologic surgery, this would not be higher than the pelvic brim, which should be 12 to 15 cm from the ureteral orifice in adults. When passing a stent, undue pressure is avoided during advancement to avoid ureteral perforation. Efflux should be documented after stent removal.
If ureteral transection or stricture is suspected from the above steps, a cone-tip ureteral catheter is inserted, and dye is injected into the distal ureter to locate extravasation or point of narrowing. This is done intraoperatively with fluoroscopic guidance. If dye flows to the renal pelvis easily and no extravasation noted, ureteral injury is unlikely.
If gross blood issues from an orifice prior to ureteral manipulation, the ureter may be partially transected. Even if good efflux is noted, many insert and maintain a double-J stent for approximately 4 weeks. In such cases, a computed tomography (CT) urogram or renal sonogram is completed 4 to 12 weeks after stent removal to exclude stricture.
After the above interrogations, absent efflux from one orifice may uncommonly reflect a long-standing unilateral nonfunctioning kidney. For this, postoperative CT and nuclear scan can be selected.
For this purpose, the stent is advanced until resistance is met, which indicates that the renal pelvis has been reached. The stent is tied securely to the transurethral catheter and drains into the cystoscopy drape. At the conclusion of surgery, the stent is removed.
In cases in which a ureteral stent is required postoperatively, a double-pigtail stent is used. The proximal coil of the stent prevents renal pelvis injury, and the distal coil secures placement in the bladder.
For placement, a guide wire is first threaded into the ureteral orifice and passed to the renal pelvis. The pigtail stent is then placed over the guide wire and advanced by a pusher device until the distal end enters the bladder. The guide wire is removed, allowing the ends to coil in the renal pelvis and bladder, respectively. Correct upper coil positioning is confirmed intraoperatively using fluoroscopy or plain film radiograph. Stents are usually kept for 2 to 8 weeks depending on the injury identified or suspected. They are generally removed in the office with cystoscopic guidance.
Mucosal lesions can be biopsied with minimal risk or discomfort to the patient. A biopsy instrument is introduced into the cystoscope’s operating port and brought into the operative field. With the instrument in view, the cystoscope is moved directly to the lesion. Biopsy is performed, and the cystoscope and instrument are withdrawn through the urethra together. In this way, a biopsy specimen is not pulled through the sheath and possibly lost. Bleeding is usually minor and will stop by itself. For brisk bleeding, electrosurgical coagulation can be used if a nonconducting solution was selected as the distention medium. As described in Chapter 41, electrolyte solutions such as saline cannot be used with monopolar electrosurgery. These solutions conduct current, thus dissipating the energy and thereby rendering the instrument useless.
Foreign bodies, such as stones, are removed using the same technique as biopsy. The instrument is used to grasp the foreign body and then removed together with the cystoscope.
This is a technique used to visualize the bladder through an abdominal approach. We have found suprapubic teloscopy to be valuable when the ureters must be assessed during a difficult cesarean delivery or during a laparotomy in which a woman has not been positioned to allow easy cystoscopic access to the urethra.
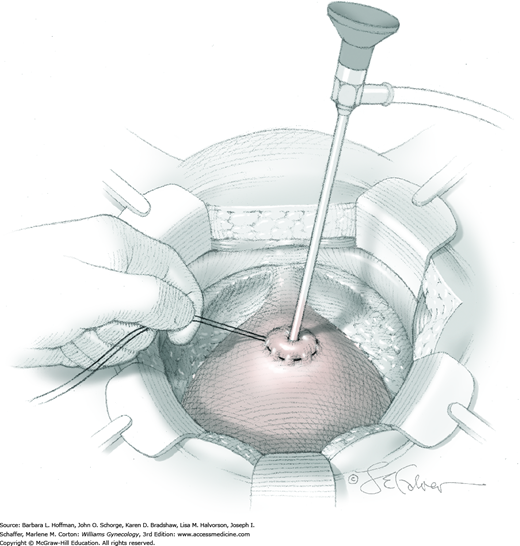
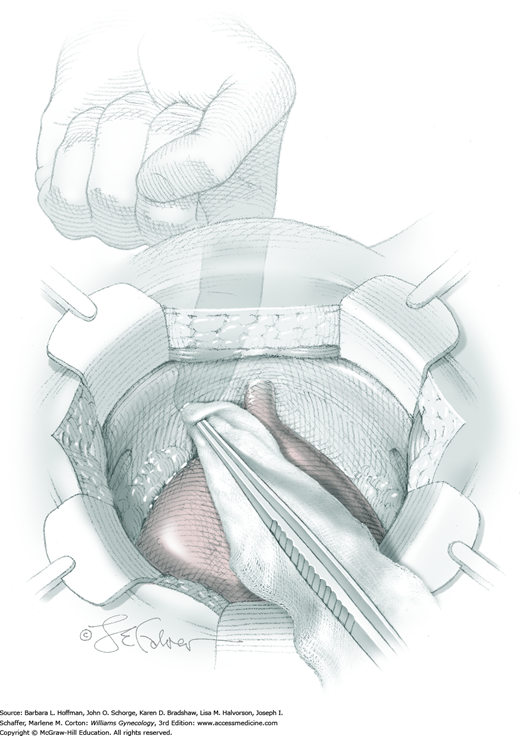
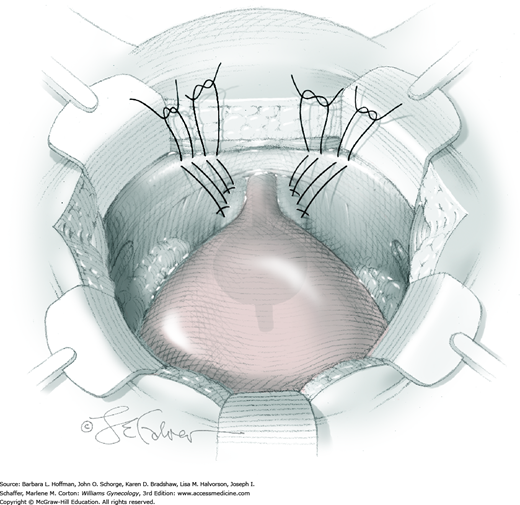
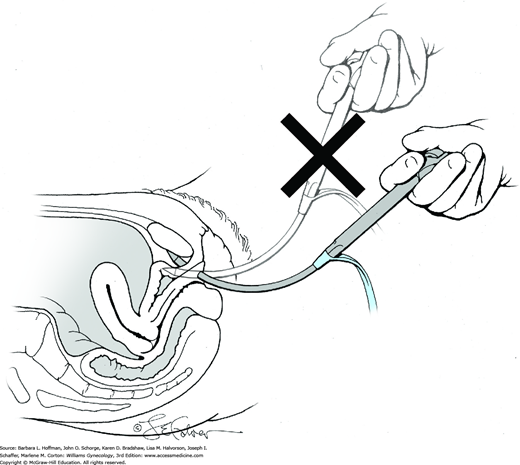
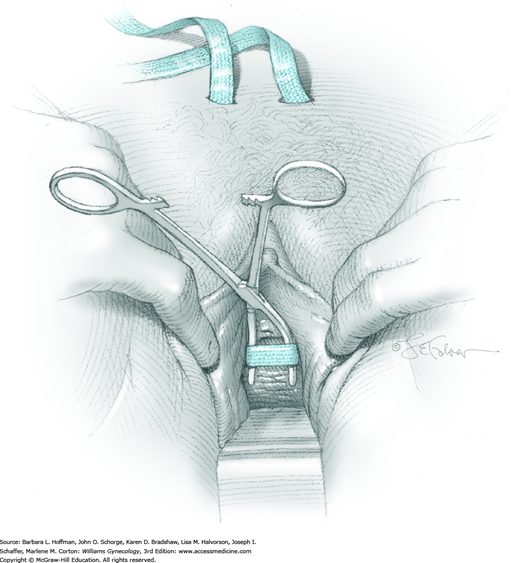
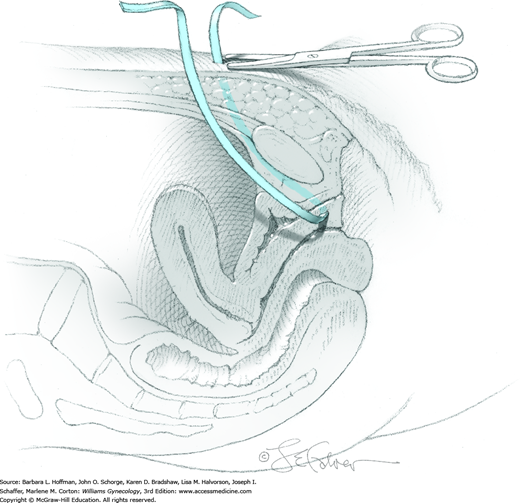
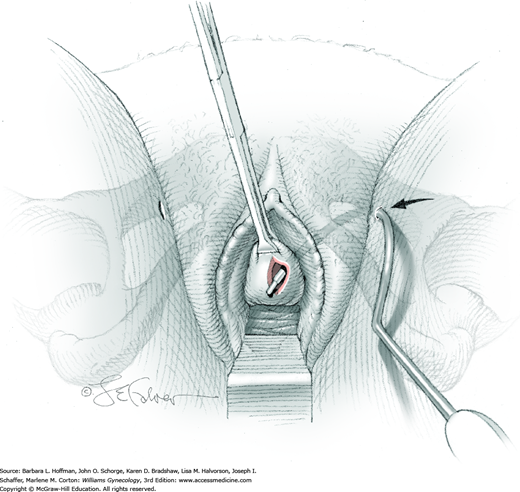
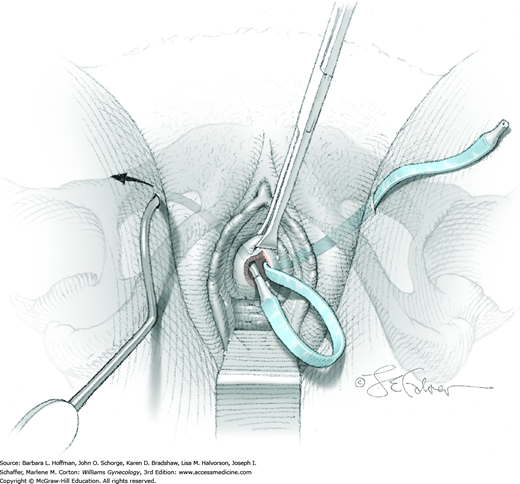
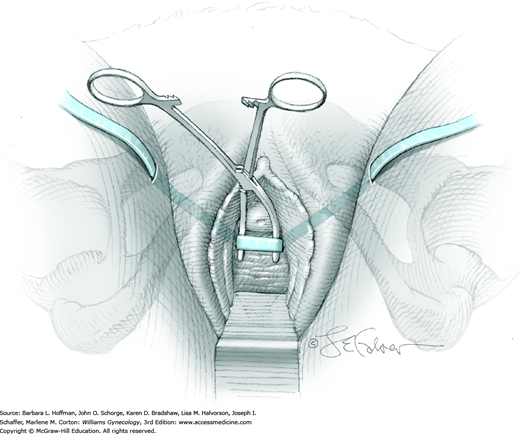
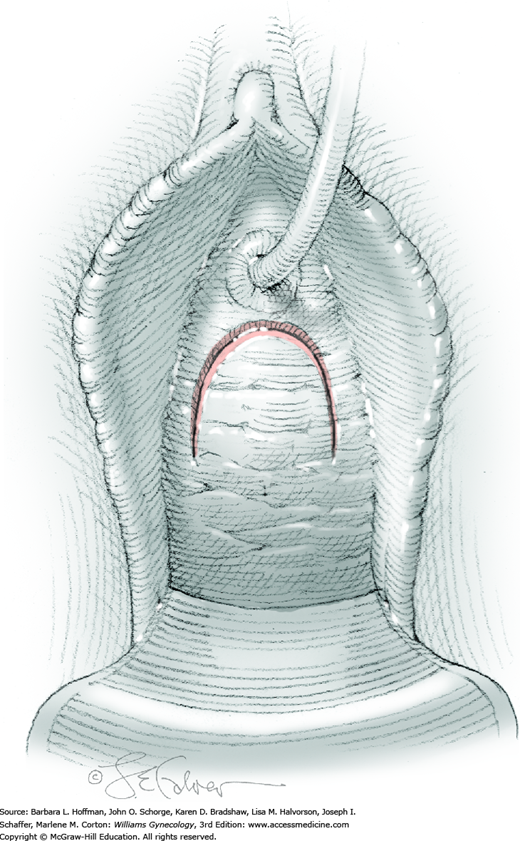
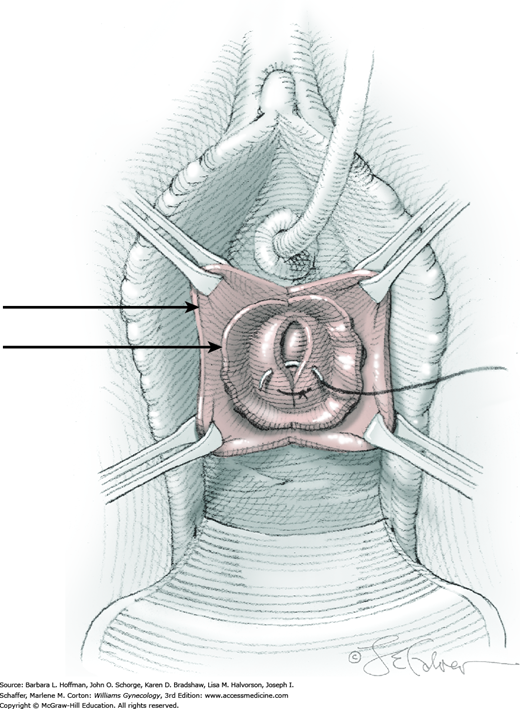
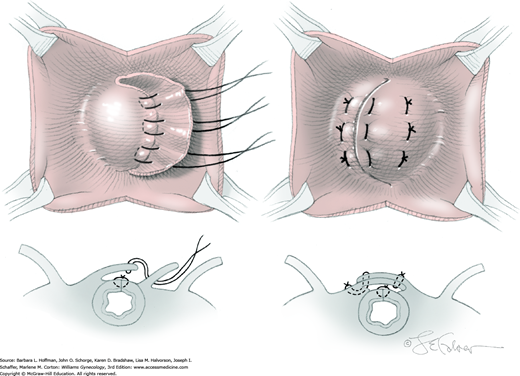
The bladder is distended using the transurethral Foley catheter until the bladder wall is tense. A wide purse-string using 2-0 gauge absorbable suture is then placed at the bladder dome, taking deep bites into the bladder muscularis (Fig. 45-1.4). The two suture ends are elevated but held loosely. A small stab incision is then made in the purse-string’s center, and a cystoscope is introduced into the bladder. This incision is preferably made in the retropubic or extraperitoneal portion of the bladder dome to minimize risk of fistula formation. For suprapubic teloscopy, a 30-degree cystoscope is most effective. The two suture ends are then pulled up and held tightly to prevent the escape of distending fluid. To allow visualization of the trigone and ureteral orifices, the Foley bulb is deflated but left in place. Indigo carmine or methylene blue is given if necessary to document ureteral efflux. If the ureteral orifices still cannot be visualized, the bladder incision is extended inferiorly into the retropubic portion to allow direct visualization. At the conclusion of teloscopy, the cystoscope is removed, and the purse-string suture is tied, closing the cystotomy.
Office cystoscopy does not require specific postoperative management except for prophylactic antibiotics to cover common urinary tract pathogens. At our institution, we prescribe a single perioperative dose. With operative cystoscopy, hematuria may develop, but it generally clears within a few days and is considered significant only if associated with symptomatic anemia. With long-term ureteral stenting, additional complications may include ureteral spasm, which typically presents as back pain. Stone formation and stent fragmentation are less common but can occur if length of catheterization exceeds 8 weeks.
Burch Colposuspension
Abdominal antiincontinence procedures attempt to correct stress urinary incontinence (SUI) by stabilizing the anterior vaginal wall and urethrovesical junction in a retropubic location. Specifically, the Burch procedure, also known as retropubic urethropexy, uses the strength of the iliopectineal ligament (Cooper ligament) to stabilize the anterior vaginal wall and anchor the wall to the musculoskeletal framework of the pelvis (Fig. 38-24).
The Burch colposuspension is usually performed through a Pfannenstiel or Cherney incision. In the past 20 years, some have introduced laparoscopic approaches that use suture or mesh to affix the paravaginal tissues to Cooper ligament (Ankardal, 2004; Zullo, 2004). Compared with open Burch colposuspension, laparoscopic approaches offer similar postoperative rates of subjective cure, despite some evidence for poorer objective outcomes (Carey, 2006; Dean, 2006). Longer-term results will also define its role.
Prior to surgery, patients undergo complete urogynecologic evaluation. Although not required for uncomplicated demonstrable SUI, urodynamic testing can help differentiate stress and urgency incontinence and assess bladder capacity and voiding patterns (Chap. 23).
Many women with SUI may also have associated pelvic organ prolapse. For this reason, other indicated pelvic reconstructive surgeries commonly accompany Burch colposuspension. A required hysterectomy does not appear to improve or worsen Burch procedure success rates (Bai, 2004; Meltomaa, 2001).
For most women with SUI, Burch colposuspension offers a safe, effective long-term treatment for incontinence. In one systematic review, overall continence rates ranged from 85 to 90 percent at 1 year and declined to 70 percent by 5 years (Lapitan, 2012). Surgical risks compare similarly with other surgeries for SUI (Green, 2005; Lapitan, 2003). Intraoperative complications are rare and may include ureteral injury, bladder or urethral perforation, and hemorrhage (Galloway, 1987; Ladwig, 2004).
Complications following surgery, however, are not uncommon and may include urinary tract or wound infection, voiding dysfunction, de novo urinary urgency, and pelvic organ prolapse—primarily enterocele formation (Alcalay, 1995; Demirci, 2000, 2001; Norton, 2006). Overcorrection of the urethrovesical angle has been suggested as a cause of these long-term urinary and prolapse complications.
The American College of Obstetricians and Gynecologists (2014) recommends antibiotic prophylaxis prior to urogynecologic surgery, and appropriate choices mirror those for hysterectomy (Table 39-6). For all patients undergoing major gynecologic surgery, thromboprophylaxis is also recommended (Table 39-8). Bowel preparation is based on surgeon preference and on concurrent surgeries planned.
Burch colposuspension may be performed under general or regional anesthesia as an inpatient procedure. The patient is placed supine with legs in booted support stirrups in low lithotomy position. The abdomen and vagina are surgically prepared, and a Foley catheter is inserted.
A low Pfannenstiel or Cherney incision is performed (Section 43-2). Surgery in the space of Retzius (retropubic space) is easier to accomplish if the incision is placed low on the abdomen, approximately 1 cm above the upper border of the pubic symphysis. If hysterectomy, culdoplasty, or other intraperitoneal procedure is planned, the peritoneum is entered and concurrent surgery completed prior to colposuspension. If the procedure is done in isolation, fascia of the anterior abdominal wall muscles and then transversalis fascia are incised, but entry into the peritoneal cavity is not required to reach the retropubic space.
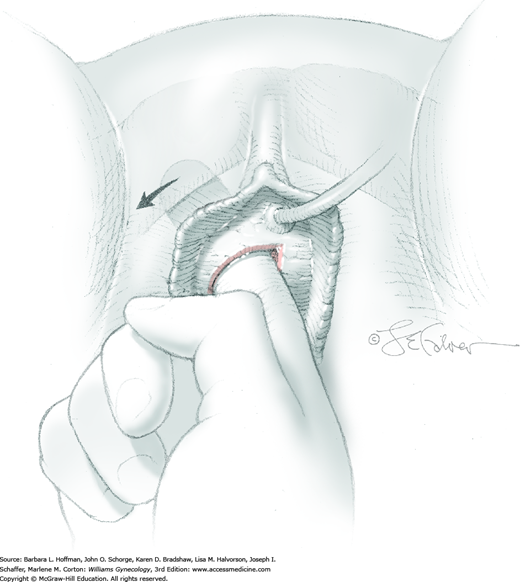
Between the lower anterior abdominal wall peritoneum and pubic bone lies an avascular plane, that is, the space of Retzius. To enter this retropubic space, the fingers of one hand gently dissect along the cephalad surface of the pubic bone. Alternatively, gentle sponge dissection can be used to open this space (Fig. 45-2.1). Loose areolar tissue is found behind the symphysis within this space and easily separates from the bone. However, entry into the wrong tissue plane risks bleeding and bladder injury. Direct exposure of the back of the pubic bone ensures that the correct space has been entered. The bladder and urethra are gently pulled downward and away from the pubic bone, and the space of Retzius opens.
In those with prior surgery, sharp dissection is generally required. Dissection begins with the curved tips of Metzenbaum scissors placed directly on the pubic bone and progresses dorsally until the space is exposed. Sutures can be used to control bleeding from torn paravaginal vessels.
During space of Retzius dissection, the obturator canal is identified early to avoid neurovascular injury to the obturator vessels and nerves. The canal is typically found 1.5 to 2.5 cm below the upper border of the iliopectineal ligament and approximately 5 to 7 cm from the midline of the upper border of the symphysis pubis (Drewes, 2005). Accessory obturator vessels that commonly pass over Cooper ligament to enter the obturator canal are also identified. These can be lacerated during pronounced retraction to expose Cooper ligament.
After opening this space, fingers of the surgeon’s nondominant hand are placed intravaginally at the vagina’s midlength and just behind the pubic bone. With one on each side, the finger pads straddle the urethra and push the vagina ventrally. Working within the retropubic space and beginning at the lateral borders of the urethra, gentle downward and lateral pressure against the finger pad bluntly dissects away fat. This exposes the pearly white periurethral tissue between the arcus tendineus fascia pelvis (ATFP), which lies laterally, and urethra, which is medial. If necessary, a surgeon can use a Kittner (peanut) sponge or gauze sponge stick. Importantly, to protect the delicate urethral musculature, this dissection remains lateral to the urethra.
Aggressive dissection or Burch sutures may lacerate vessels within the Santorini plexus of paravaginal veins and risk significant bleeding (Fig. 38-24). This is easily controlled with upward pressure from the vaginal fingers. Identified vessels can then be ligated.
Identifying this site aids correct suture placement. To isolate the urethrovesical junction, the surgeon’s vaginal hand positions the Foley catheter balloon at the bladder neck. Undue tension on the Foley catheter is avoided as this can drag the bladder into the operative field and increase the risk of sutures entering the bladder.
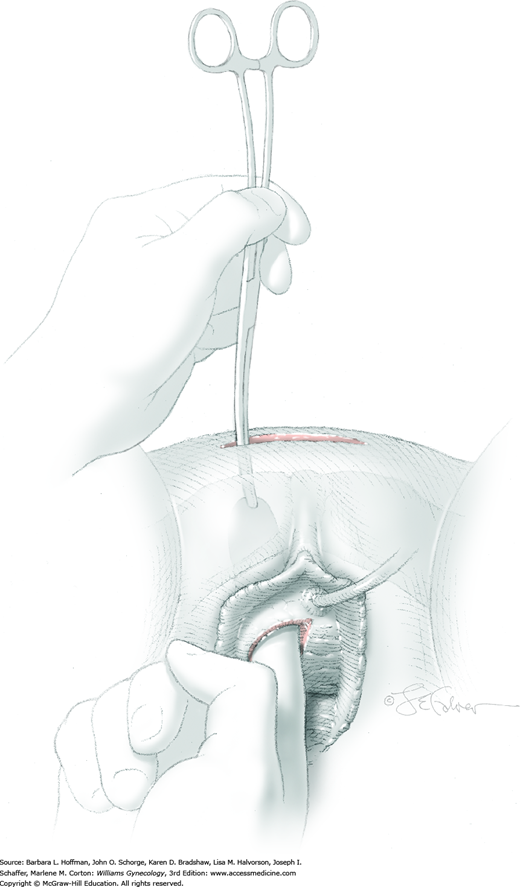
For exposure, the surgeon’s vaginal finger presses upward, and the bladder neck is gently displaced by an assistant to the contralateral side by a narrow retractor. To suspend tissue, a double-armed suture of 2-0 gauge nonabsorbable material is placed laterally on each side of the urethra. A first suture is placed 1.5 to 2 cm lateral to the proximal third of the urethra. The needle point is directed toward the vaginal finger, and a thimble may be used to avoid needle-stick injury. For this suturing, a figure-of-eight stitch is used and incorporates vaginal wall while excluding epithelium. A second suture is then placed 1.5 to 2 cm lateral to the urethrovesical junction. Identical sutures are placed on the opposite side of the urethra (Fig. 45-2.2).
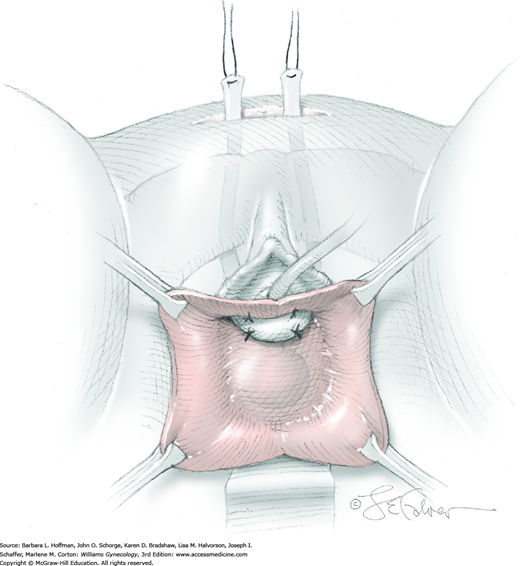
Both ends of each suture are then placed through the nearest point of the ipsilateral iliopectineal ligament. Slack is removed from each suture, and knots are tied above the ligament. With knot securing, suture bridges are expected, and these should stabilize but not elevate the anterior vaginal wall and urethrovesical junction. The vaginal wall is stabilized approximately at the level of the distal portion of the ATFP and not significantly higher. Greater elevation of the bladder neck risks postoperative voiding dysfunction.
Following suture ligation, cystoscopy is performed. This allows identification and removal of any errant sutures that may traverse the bladder or urethral mucosa. Moreover, it enables a surgeon to inspect the ureteral orifices and document efflux.
After colposuspension, the Foley catheter may remain to drain the bladder. Alternatively, a suprapubic catheter may be placed. Investigators comparing the two have found no differences in antiincontinence procedure success rates, length of hospitalization, or rates of infection. Urethral catheterization, however, was linked with a shorter duration of catheterization but also greater patient discomfort (Dunn, 2005; Theofrastous, 2002).
The anterior abdominal wall peritoneum is generally closed to prevent displacement of small bowel into the retropubic space. The remaining abdominal wall incision is closed as described in Section 43-2.
In general, recovery follows that associated with laparotomy and varies depending on concurrent surgeries and incision size. A voiding trial as described in Chapter 42 (is performed prior to hospital discharge.
Tension-Free Vaginal Tape
The tension-free vaginal tape procedure (TVT) is the most commonly performed operation worldwide for stress urinary incontinence. The procedure is one of the most widely studied incontinence operations, and cure rates up to 17 years approximate 80 percent (Holmgren, 2005; Nilsson, 2013; Song, 2009). The TVT procedure has also become the prototype for a host of other incontinence operations, which include the TOT (transobturator tape), TVT-O (tension-free vaginal tape obturator), and single-incision midurethral slings (“mini-slings”). These are all considered midurethral slings (MUS) and are based on the concept that midurethral support is vital to continence.
Tension-free vaginal tape placement is indicated for SUI that is secondary to urethral hypermobility or intrinsic sphincteric deficiency (Chap. 23). It is used for primary cases and for women who have had prior antiincontinence procedures.
During TVT, a permanent sling material is placed underneath the midurethra, traverses the periurethral tissue, passes behind the pubic bone through the space of Retzius, and exits through the anterior abdominal wall. Once positioned, tissue ingrowth ultimately holds the mesh in place. During placement, the TVT needle is directed blindly through the space of Retzius and can lacerate vessels there to create significant bleeding. A modification of the TVT, the TOT was developed to avoid hemorrhage in this space and to decrease bladder and bowel perforation risks. However, the TVT remains the primary standard operation for SUI.
The TVT device consists of a permanent polypropylene mesh covered with a plastic sheath that is removed after the mesh is positioned. The plastic sheath is believed to prevent bacterial contamination of the mesh as it passes through the vagina and to protect the mesh from being damaged during passage. Once these plastic sheaths are removed, the mesh remains fixed in position. The mesh is attached to two metal disposable needles that are connected to a reusable metal introducer during placement. A metal catheter guide is used to displace the urethra away from the needle during the procedure.
Prior to TVT procedures, a diagnosis of SUI must be made as described in Chapter 23. Importantly, in some women, SUI can be occult and masked by pelvic organ prolapse that kinks and partially obstructs the urethra. Accordingly, prolapse replacement to reestablish more normal anatomy during urodynamic testing may help unmask this potential SUI. Also of note, caution is exercised in patients who are Valsalva voiders. These women void with abdominal straining rather than with detrusor contraction and urethral relaxation. Most incontinence procedures prevent leakage by closing the urethra during cough or Valsalva maneuver. Therefore, these surgeries, when performed in women who rely on the Valsalva maneuver to urinate, will often result in voiding dysfunction. This tenet applies to all midurethral sling procedures.
The consenting process for TVT should include an honest discussion of outcomes. At best, the 5-year cure rate is 85 percent, with another 10 percent significantly improved. However, some patients will develop postoperative urgency incontinence, and others will develop bothersome voiding dysfunction. Additionally, with time and aging, incontinence may recur secondary to factors not related to urethral support.
As for all antiincontinence procedures, prior to surgery, the patient is provided surgical success rates from the literature and those of the individual surgeon. Moreover, the definition of “outcome success” varies from woman to woman. For example, in a patient with severe incontinence and 20 leakage episodes per day, improvement to one leakage episode every other day would be considered successful. However, in a woman with rare leakage, it may be more difficult to achieve an outcome considered satisfactory. Therefore, patient’s expectations are discussed prior to surgery.
The short-term complications of the TVT procedure include incomplete bladder emptying requiring drainage with Foley catheter or intermittent self-catheterization for several days. A small percentage of patients will develop long-term urinary retention requiring reoperation for tape division or excision. In these women, continence rates decrease. The TVT procedure is associated with a learning curve, and urinary retention rates decline as the number of cases a physician performs accrues. Postoperatively, vaginal mesh erosion may develop as an early or late complication. This is managed by simple excision of the piece of eroding tape and vaginal wall revision. Of note, the American Urogynecologic Society (2014b) considers the mesh used for this sling to be safe and effective.
Intraoperative complications include hemorrhage, bladder perforation, and rarely, bowel injury. Major vessels are injured in less than 1 percent of cases.
The American College of Obstetricians and Gynecologists (2014) recommends antibiotic prophylaxis prior to urogynecologic procedures, and appropriate choices mirror those for hysterectomy (Table 39-6). For all patients undergoing major gynecologic surgery, thromboprophylaxis is recommended (Table 39-8). Bowel preparation is based on surgeon preference and mainly on concurrent surgeries planned.
The procedure was initially described as an ambulatory surgical procedure performed under local anesthesia. However, it can also be performed with regional or general anesthesia. If performed solely, TVT in most cases is a day-surgery operation. The procedure is performed in standard lithotomy position. The vagina is surgically prepared, and an 18F Foley catheter, which allows passage of a rigid catheter guide, is inserted to assist in deflection of the urethra during needle passage.
To begin, two ½-cm skin incisions are made at the level of the upper border of the symphysis, and each lies no further than 2 cm from the midline. More lateral placement risks ilioinguinal nerve injury (Geis, 2002).
A midline incision is made sharply in the vaginal epithelium and superficial vaginal muscularis beginning 1 cm proximal to the external urethral opening and is extended 1.5 to 2 cm cephalad. Allis clamps are placed on the edges of the vaginal incision for traction. Using Metzenbaum scissors, bilateral periurethral tunnels are created beneath the vaginal epithelium on either side of the urethra. These tunnels extend several centimeters toward the inferior pubic rami to allow placement of the TVT needle just behind the pubic bone.
A rigid guide is placed through the 18F Foley catheter. During passage of TVT needles, a surgical assistant uses the catheter guide to deflect the urethra to the contralateral side to lower urethral injury risks.
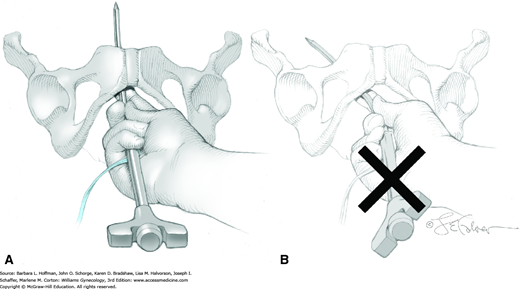
The TVT needle and mesh are attached to the introducer. The needle is placed through one of the periurethral tunnels so that its point touches the front surface of the ipsilateral pubic ramus (Fig. 45-3.1). A hand placed in the vagina then carefully guides the needle around the back of the ramus. The needle is then curved upward toward the ipsilateral abdominal incision, perforates the periurethral tissue just behind the pubic bone, and enters the retropubic space (Rahn, 2006). During this, the needle is always directly behind the pubic bone. Pressure is applied to the introducer handle with the other hand, but the vaginal hand controls the needle’s direction. The handle of the introducer always remains parallel to the ground to avoid lateral excursion into major vessels and obturator nerve (Fig. 45-3.2). Additionally, after the needle passes around the pubic ramus and behind the symphysis, its tip is always directed toward the abdominal wall incisions. The bladder may be perforated if excessive pressure is applied and if the needle is aimed cephalad rather than toward the abdominal wall (Fig. 45-3.3). Small changes in the position of the hand applying handle pressure can lead to bladder perforation.
After the needle perforates the abdominal wall, the Foley and catheter guide are removed, and cystourethroscopy is performed with a 70-degree cystoscope. The bladder is distended with 200 to 300 mL of fluid, and inspection for cystotomy is completed. Generally, perforation will be obvious, and the TVT needle will be seen entering and exiting the bladder. In this situation, the needle is removed and redirected, and correct placement is confirmed by cystoscopy. Inspection of the urethra is also essential and can be performed with the same 70-degree angle scope. Alternatively, a 0-degree or 30-degree endoscope may be used. Iatrogenic trocar bladder injury, if identified intraoperatively does not appear to influence continence outcomes or increase postoperative voiding dysfunction or infection rates (Zyczynski, 2014).
In contrast to bladder perforation, urethral perforation theoretically carries a risk of urethrovaginal fistula. Thus, if urethral perforation is noted, most surgeons abort the procedure and postpone until several months later.
After cystoscopy, the introducer is unscrewed from the needle. The needle is brought through the abdominal wall. The needle is then cut from the mesh, and the mesh is held with a hemostat. Next, the other TVT needle is attached to the introducer and is placed on the other side of the urethra in a similar fashion. Cystourethroscopy is then repeated.
A hemostat or similar instrument is placed between the suburethral tissue and the tape to act as a spacer and create distance between the mesh and urethra (Fig. 45-3.4). This spacing avoids excessive mesh tension and lowers the risk for postoperative urinary retention and voiding dysfunction. Prior to sheath removal, the vaginal sulci are inspected to exclude perforation of the vaginal epithelium occurring during needle guidance. If perforated mesh is seen, the tape is removed, and the TVT needle is again passed through a newly created periurethral tunnel that lies slightly medial to the original. The vaginal perforation defect is repaired with one or two simple interrupted delayed-absorbable sutures.
Once the tape is satisfactorily positioned, an assistant then removes the plastic covering around the mesh, while the surgeon holds the mesh at the desired distance from the urethra using the spacer instrument. The plastic covering is lifted away from both sides with minimal tension to avoid mesh stretching or undue urethral elevation. With ideal positioning, a few millimeters of free space separate the suburethral tissue and mesh. The mesh is trimmed just below the skin at the abdominal incisions (Fig. 45-3.5).
The vaginal incision is closed in a running fashion with 2-0 gauge delayed-absorbable suture. The abdominal incisions may be closed with Dermabond or with a single interrupted 4-0 gauge delayed-absorbable skin suture.
Prior to discharge from a day-surgery unit, an active voiding trial is performed (Chap. 42). If the patient fails this trial, a Foley catheter is replaced and kept for 1 to 3 days prior to a second voiding trial. Alternatively, a patient can be taught self-catheterization. This is continued until postvoid residual volumes fall below about 100 mL.
Normal diet and activity can resume during the first postoperative days. Intercourse, however, is postponed until the vaginal incision is healed, usually at 6 weeks. The time to resumption of exercise and strenuous physical activity is controversial. A standard recommendation has been to delay these at least 2 months, although there are no data supporting this. However, logic would suggest that this is reasonable for adequate healing.
Transobturator Tape Sling
The transobturator tape (TOT) sling procedure is a variation of the midurethral sling procedures, which began with tension-free vaginal tape (TVT). With the TOT procedure, a permanent sling material is inserted bilaterally through the obturator foramen and extends underneath the midurethra. As a result, the space of Retzius is avoided and thereby minimizes the potential for associated bladder and bowel injuries. Bleeding in the space of Retzius is a primary TVT complication, and avoiding this space is an attractive TOT feature. Additionally, in patients who have had prior incontinence procedures and have scarring in the space of Retzius, bladder perforation may be averted by avoiding dissection in this space.
The procedure has several important differences from TVT, and there are also several modifications of the TOT procedure itself. Several companies produce kits containing required mesh and placement needles for TOT. The two major types of TOT procedures are defined by whether needle placement begins inside the vagina and is directed outward, termed an in-to-out approach, or starts outside the vagina and is directed inward, called an out-to-in approach. Limited data do not show superiority of one over the other (Debodinance, 2007). Currently, the out-to-in technique is more commonly performed and is described here.
Generally, TOT is indicated for primary SUI secondary to urethral hypermobility (Chap. 23). In patients with SUI secondary to intrinsic sphincteric deficiency, the value of TOT is unclear, as results are conflicting and data are limited (Rechberger, 2009; Richter, 2010).
Evaluation and preparation prior to TOT mirrors that for TVT.
As with other surgeries for incontinence, the major risks of this procedure are voiding dysfunction, urinary retention, development of urgency incontinence, and failure to correct SUI. Groin and thigh pain appear to be another potential postoperative problem. Long-term complications may be associated with the supporting mesh and include mesh erosion (Schimpf, 2014).
Intraoperatively, there is some risk of bladder or urethral perforation, although this is believed to be significantly less than that with TVT. Inappropriate TOT trocar placement rarely can lead to significant hemorrhage or neurologic deficits if obturator nerve and vessel branches are damaged in the thigh compartment.
A TOT kit will contain two TOT needles and synthetic mesh tape. The TOT needle is designed to navigate the path from the entry point around the pubic rami to the midurethral vaginal wall incision. A plastic sheath surrounds the mesh tape and allows the mesh to be pulled into position smoothly. However, once these plastic sheaths are removed, the mesh remains fixed in position.
If performed solely, a TOT procedure in most cases is a day-surgery procedure. It is performed in standard lithotomy position under general, regional, or local anesthesia. The vagina is surgically prepared, and a Foley catheter is placed to assist in determination of urethral location.
A midline incision is made sharply in the vaginal epithelium and superficial muscular layer beginning 1 cm proximal to the external urethral opening and is extended 2 to 3 cm cephalad. Allis clamps are placed on the edges of the vaginal incision for traction. Using Metzenbaum scissors and blunt finger dissection, bilateral periurethral tunnels are created beneath the vaginal epithelium on either side of the urethra. These tunnels extend up to and behind the ischiopubic rami.
A 0.5- to 1-cm entry incision is made bilaterally in the thigh-crease skin (genitocrural fold), 4 to 6 cm lateral to the clitoris, and at the point where the adductor longus insertion can be palpated. This muscle arises from the superior ramus of the pubis and inserts medially at the midlength of the femur.To summarize the needle’s path, insertion starts along the lateral edge of the ischiopubic ramus just below the insertion of the adductor longus tendon and arches around the ramus. During this arc, the needle sequentially penetrates the gracilis, adductor brevis, and obturator externus muscles, obturator membrane, obturator internus muscle, and periurethral endopelvic fascia and exits through the vaginal incision.
The TOT needle is grasped, and the tip is placed in one of the thigh incisions (Fig. 45-4.1). The tip is directed cephalad until the obturator membrane is perforated, and a “popping” sensation is felt. A vaginal finger is placed in the ipsilateral vaginal tunnel and is positioned up to and behind the ischiopubic ramus. Using the curve of the TOT needle, the surgeon then directs the needle tip to the end of his finger and passes the needle into the vagina (Fig. 45-4.2). At this time, the vaginal sulcus is inspected to exclude perforation. If the needle has perforated the sulcus epithelium, it is removed and reinserted correctly. Next, the TOT covered mesh is attached to the needle end, and the needle retraces its original path as it is withdrawn back through the thigh incision. With this, the covered mesh is threaded into position. The mesh is then removed from the needle. The procedure is repeated on the other side (Fig. 45-4.3).
A hemostat or similar instrument is placed and opened between the urethra and mesh to act as a spacer and create distance between the mesh and the urethra (Fig. 45-4.4). This spacing avoids excessive urethral elevation and lowers postoperative urinary retention risks. Prior to sheath removal, the vaginal sulci are again inspected to exclude perforation. If mesh is seen in a sulcus, the tape is removed and reinserted on the affected side.
An assistant surgeon then removes the plastic covering of the mesh from each of the thigh incisions. Concurrently, the surgeon holds the mesh at the desired distance from the urethra using the spacer instrument. The plastic covering is removed with minimal tension to avoid mesh stretching. The mesh is trimmed just inside thigh incisions.
The vaginal incision is closed in a running fashion with 2-0 gauge delayed-absorbable suture. The thigh incisions may be closed with a single interrupted subcuticular suture with 4-0 gauge delayed-absorbable suture or with other suitable skin closure methods (Chap. 40).
The procedure is marketed as one in which cystoscopy is not necessary. However, because the bladder and urethra can be injured, we recommend postprocedural cystoscopy.
Prior to discharge from a day-surgery unit, an active voiding trial is performed (Chap. 42). If significant residuals persist, a Foley catheter remains. A second voiding trial can be repeated in a few days or at the surgeon’s discretion. Alternatively, a patient can be taught self-catheterization. This is continued until postvoid residuals fall below approximately 100 mL.
Normal diet and activity can resume during the first postoperative days. Intercourse, however, is delayed until the vaginal incision is healed. The time to resumption of exercise and strenuous physical activity is controversial. A standard recommendation delays these at least 2 months. Data to support this are lacking, however, logic would suggest that this is reasonable to allow adequate healing.
Pubovaginal Sling
Pubovaginal sling is a standard procedure for SUI. It has traditionally been used for SUI stemming from intrinsic sphincteric deficiency (Chap. 23). In addition, this procedure may also aid patients with prior failed antiincontinence operations. It is generally not employed in a woman having her first surgery for incontinence.
In the past, different materials had been used for the sling, however, autologous fascia is currently preferred. Generally, this fascia is obtained from the patient’s rectus sheath, although fascia lata from the thigh may alternatively be harvested. With this surgery, a strip of fascia is placed at the proximal urethra through the space of Retzius, and ends are secured either to each other or to the rectus fascia above the rectus abdominis muscle.
In contrast to midurethral slings, which generally employ premade kits and standardized procedural steps, the technical aspects of autologous fascia pubovaginal slings have greater variability. These include size and location of harvested tissue, anchoring method of the sling to the rectus fascia, and technique for determining mesh tension across the proximal urethra. Steps for the rectus fascial sling are described here.
As with other antiincontinence procedures, patients require urogynecologic evaluation, including urodynamic testing to confirm SUI and intrinsic sphincteric deficiency. Additionally, SUI often accompanies pelvic organ prolapse. Thus, the need for concurrent repair of associated prolapse is assessed prior to surgery (Chap. 24).
In addition to general surgical risks, patients are counseled regarding the risk of recurrent incontinence, urinary retention, and voiding dysfunction following surgery (Albo, 2007). Overall, traditional slings seem to be as effective as minimally invasive slings but have higher rates of adverse effects (Rehman, 2011).
Antibiotics and thromboprophylaxis are given as outlined in Tables 39-6 and 39-8.
Bowel preparation is based on surgeon preference and mainly on concurrent surgeries planned.
Pubovaginal sling may be performed under general or regional anesthesia as an inpatient procedure. The patient is placed in standard lithotomy position, with lower extremities positioned in candy-cane or booted support stirrups. The abdomen and vagina are surgically prepared, and a Foley catheter is inserted.
A transverse skin incision is made 2 to 4 cm above the symphysis and is large enough to allow removal of a transverse fascial strip that measures, at minimum, 1.5 cm wide × 6 cm long. The incision is carried down through subcutaneous tissue to the fascia.
The fascia to be harvested is outlined and then incised, sharply dissected away from the underlying rectus muscle bellies, and removed. Following removal, the strip is cleaned of fat and adventitial tissue. A helical stitch using 0-gauge polypropylene suture is then placed through the fascia at each end of the strip. This stitch is repeated at the other end. These sutures are not tied. The fascial incision is then closed in a running fashion with 0-gauge delayed-absorbable suture.
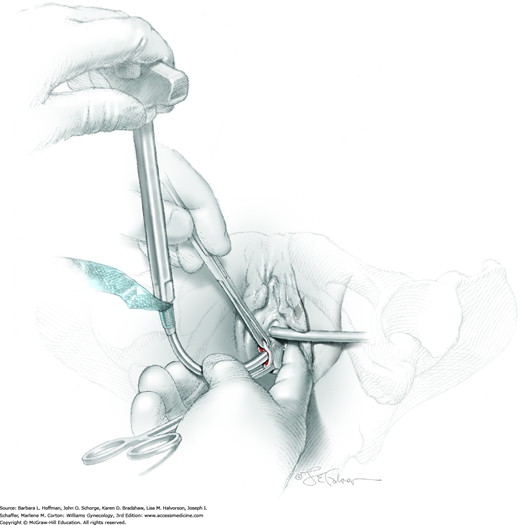
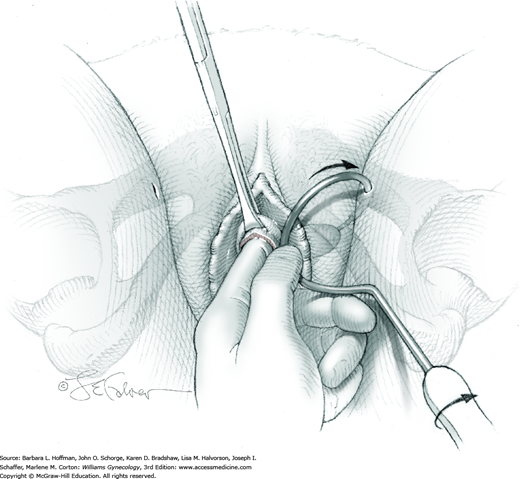
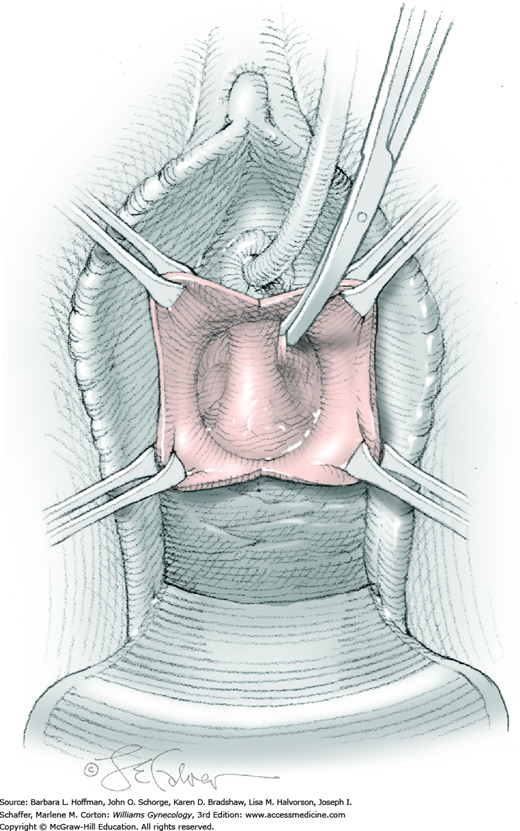
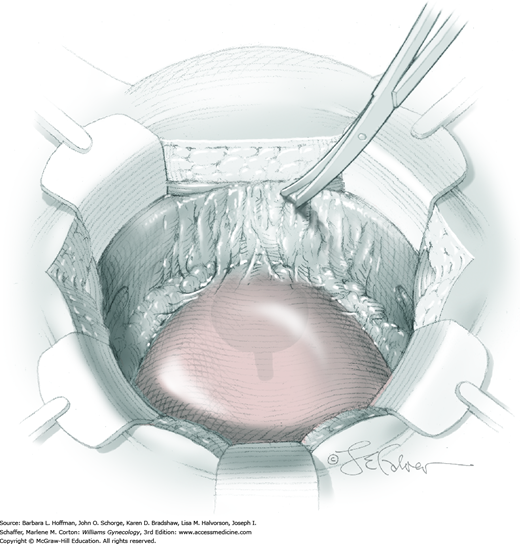
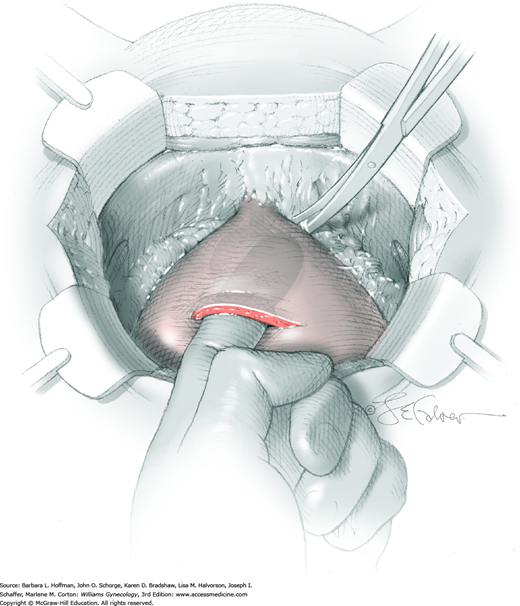
At a point 2 cm proximal to the external urethral orifice, a 3- to 5-cm midline vertical incision is made sharply in the anterior vaginal wall and extended cephalad. Alternatively, a U-shaped incision is made at the level of the bladder neck. Sharp and blunt dissection is used to separate the vaginal epithelium from the underlying fibromuscular layer. The space of Retzius is then entered with a combination of sharp and blunt dissection bilaterally by penetrating the periurethral connective tissue (Fig. 45-5.1). Entry into this space is confirmed by the surgeon’s finger palpating the dorsal surface of the pubic bone (Fig. 45-5.2). During entry, Santorini’s venous plexus can be lacerated, and bleeding is controlled with compression or stitches of 2-0 gauge absorbable suture.
A 0.5- to 1-cm long fascial incision is made no further than 2 cm from the midline on each side. These are placed caudal to the prior harvest incision and just above the pubic bones. A long dressing or packing forceps or needle ligature carrier is placed into one of these incisions and from above, perforates the rectus tendon. The instrument is placed against the back of the pubic bone and advanced toward the vagina. Concurrently, the surgeon guides the instrument to his finger within the space of Retzius and advances it into and through the vaginal incision (Fig. 45-5.3). At this time, cystourethroscopy is performed to exclude bladder or urethral perforation.
The suture ties at one end of the fascial strip are grasped with the perforating forceps and threaded up through the abdominal incision on one side of the urethra. With the other end of the sling, this step is repeated on the other side of the urethra. As a result, the fascial sling lies positioned below the bladder neck (Fig. 45-5.4). Usually four 2-0 gauge delayed-absorbable sutures may be used to fix the proximal and distal edges of the sling beneath the bladder neck to prevent displacement during sling positioning. Stitches are placed lateral to the urethra.
Within the laparotomy incision, sutures attached to the sling ends from each side meet and are tied together above the rectus sheath. During knot tying, a space of two to three fingerbreadths is left between the knot and fascia to prevent bladder neck obstruction and urinary retention. In addition, a hemostat is placed between the suburethral tissue and the fascial sling to create distance between the sling and urethra (see Fig. 45-4.4). After the knot is secured, there should be no upward angulation of the urethra or bladder neck, and a few millimeters of free space should be noted between the fascial sling and the bladder neck.
Cystoscopy is again performed to exclude bladder or urethral perforation. In addition, excessive resistance noted during passage of the cystoscope into the bladder may suggest undue sling tension, which can lead to postoperative obstructive symptoms. If such resistance is noted, the sling is loosened.
The vaginal incision is closed with 2-0 gauge delayed-absorbable suture in a running fashion. A Foley catheter is left in place. In the past, suprapubic tube insertion was common practice. However, with a trend toward tying the fascial sling with less tension, the risk of prolonged urinary retention is lowered, and suprapubic drainage is therefore not typically required.
The two prior 1-cm fascial incisions are closed with an interrupted stitch of delayed-absorbable suture. The remaining abdominal incision is closed as described in Section 43-2.
In general, recovery follows that associated with laparotomy and is heavily dependent on incision size. A voiding trial as described in Chapter 42 is performed prior to hospital discharge.
Urethral Bulking Injections
Injection of bulking agents into the urethral submucosa is one method available to treat SUI that results from intrinsic sphincter deficiency (ISD) (Chap. 23). Although mechanisms are not completely clear, effectiveness may result from expansion of the urethral walls, which allows them to better approximate or coapt. As a result, intraluminal resistance to flow is increased and continence is restored. Alternatively, injections elongate the functional urethra, and this may allow more even distribution of abdominal pressures across the proximal urethra to resist opening during stress (Monga, 1997).
Although traditionally recommended for treatment of SUI solely due to ISD, some evidence suggests it can be used to treat SUI resulting from combined ISD and urethral hypermobility (Bent, 2001; Herschorn, 1997; Steele, 2000).
Urethral injection offers a cystoscopically assisted, minimally invasive treatment of SUI. It can be performed in an office under local anesthesia and is associated with a low risk of complications. For these reasons, it is often chosen for women who wish to avoid surgery or who are not surgical candidates due to other comorbidities. Urethral injections can be performed both peri- and transurethrally. The transurethral approach is more often used and allows for more accurate placement of the bulking agent (Faerber, 1998; Schulz, 2004). Currently available agents in the United States approved for use include autologous fat and several synthetic agents described later.
Complex urodynamic testing with assessment of urethral structure and function is completed. To assess for ISD, maximum urethral closure pressure or leak point pressure are specifically evaluated (Chap. 23). Additionally, urethral mobility is assessed.
Procedure efficacy is discussed, and success rates in general are lower than those for surgery. Specifically, 1-year rates of curing or improving SUI range from 60 to 80 percent (Bent, 2001; Corcos, 2005; Lightner, 2002, 2009; Monga, 1995). Continence rates diminish with time, as would be intuitive, with the breakdown of collagen and fat. However, Chrouser (2004) found similar rates of decline with time even when synthetic material was compared with collagen. Accordingly, these injections are viewed as a nonpermanent treatment of SUI, and sustained continence is found in only 25 percent of patients at 5 years following injection (Gorton, 1999).
One major advantage to urethral injection is its low associated risk of complications. Side effects of injection are generally transient and may include vaginitis, acute cystitis, and voiding symptoms. Of these, urinary retention for a few days postprocedure is the most frequent. Long-term retention, however, is not a significant risk. A more serious complication is persistent de novo urgency, which may develop in as many as 10 percent of women following injection (Corcos, 1999, 2005).
Prior to urethral injection, UTI and anatomic pathology such as urethral diverticula are excluded. Anecdotally, we have seen bulking agent migration into such diverticula. As noted, UTI can commonly follow urethral injection. Therefore, a single dose of an antibiotic to cover uropathogens is administered orally after procedure completion. Thromboprophylaxis is not typically required for this brief office procedure.
In the United States, currently used agents for urethral injection are carbon-coated synthetic microspheres (Durasphere), calcium hydroxylapatite particles (Coaptite), and polydimethylsiloxane (Macroplastique). These synthetic agents are effective. However, no randomized trials compare results among these three, and long-term data are lacking (Shah, 2012; Zoorob, 2012).
Of agents no longer used, autologous fat provided limited success for SUI due to rapid degradation and reabsorption (Haab, 1997; Lee, 2001). A bovine collagen product (Contigen) was commonly selected, but manufacturing ceased due to an inadequate supply of medical-grade collagen. Ethylene vinyl alcohol copolymer (Uryx/Tegress) was withdrawn due to urethral erosion complications.
Urethral injection for most patients can be performed in an office setting with cystoscopic capability. The patient is placed in the dorsal lithotomy position, the vulva is prepared and draped, and the bladder drained. Two-percent lidocaine jelly is instilled into the urethra 10 minutes prior to the procedure. If necessary, topical 20-percent benzocaine can be used as an analgesic on the vulva, and 4 mL of 1-percent lidocaine can be injected in divided doses at the 3 and 9 o’clock positions of the external urethral orifice.
A cystoscope is positioned within the distal urethra, so that the midurethra, proximal urethra, and bladder neck are viewed simultaneously. A 22-gauge spinal needle attached to a syringe carrying the bulking agent is introduced through the cystoscopic sheath. With the bevel pointing toward the urethral lumen, the needle is directed at a 45-degree angle to the lumen and inserted through the urethral wall at the 9 o’clock position and at the level of the midurethra. After the needle tip penetrates the urethral wall, the bevel is no longer seen. The needle is then advanced parallel to the urethral lumen for 1 to 2 cm. This positions the needle at the level of the proximal urethra.
The bulking agent is injected under constant pressure, and the submucosal lining begins to rise (Fig. 45-6.1). The needle is withdrawn slowly to bulk the proximal and midurethra. Bulking agent is administered until coaptation of the mucosa has developed (Fig. 45-6.2). In general, 1 to 2 syringes (2.5 to 5 mL) of agent are used per procedure. These steps are then repeated at the 3 o’clock position.
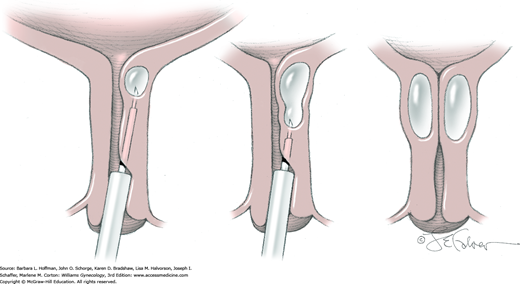
FIGURE 45-6.2
Corresponding cystoscopic views of urethral coaptation as bulking agent is injected, as shown in Figure 45-6.1.
Ideally, the number of needle holes made into the urethral wall is minimized to avoid leakage of bulking agent through these punctures. Thus, if a second syringe of agent is required to achieve coaptation, the originally positioned needle remains in place, and a second syringe of agent is attached.
Once coaptation of the mucosa is achieved, the cystoscope is removed, taking care not to advance proximal to the injection site. This avoids forceful compression of the deposited agent by the cystoscope tip and loss of coaptation.
Women are discharged home following their first postinjection void, and single-dose oral antibiotic prophylaxis is prescribed. Women abstain from intercourse for 10 days following injection but may otherwise resume usual activities.
If urinary retention develops, then intermittent self-catheterization is begun and continued until retention resolves. For those unable to self-catheterize, a temporary Foley catheter is placed. However, catheter placement can potentially compress deposited bulking agent and diminish urethral coaptation.
Two weeks following injection, we assess treatment success. If a patient fails to achieve desired degrees of continence, additional injections are planned to improve urethral coaptation.
Urethrolysis
Urethrolysis is the loosening or release of a prior urethral suspension repair. This release is used in women with urethral obstruction symptoms including urinary retention and voiding dysfunction following suspension. It can be performed either vaginally or abdominally. A vaginal approach is predominantly used. An abdominal approach, however, may afford a better opportunity to mobilize the bladder from the pubic symphysis and may also be selected in instances in which the initial surgery was performed via laparotomy.
Debate exists as to the need of a concurrent antiincontinence procedure to compensate for urethral support lost with urethrolysis. However, in many cases, residual scarring prevents SUI, and our belief is to avoid repeating a second potentially obstructing procedure. Accordingly, this decision is individualized.
In women with bladder neck obstruction, symptoms usually begin soon after initial surgery. Objective assessment with urodynamic testing is performed to determine the cause of voiding dysfunction and differentiate between a hypotonic bladder and obstruction. Obstruction may result from bladder neck obstruction or pelvic organ prolapse. Thus, a thorough examination for prolapse is completed.
In addition to usual surgical risks, bleeding may be a significant complication due to vascularity in the space of Retzius. Additionally, dissection of dense scarring around the urethra and bladder may place these structures at risk of laceration.
Due to scar tissue reformation, initial obstruction improvement can worsen over time, as scar tissue may variably reform. In contrast, postoperative incontinence may follow deconstruction of prior antiincontinence support or from denervation injury during extensive periurethral dissection.
As with all genitourinary procedures, UTI is excluded prior to surgery. Antibiotic prophylaxis is administered prior to surgery to decrease risks of postoperative wound and urinary tract infection (Table 39-6). Thromboprophylaxis is provided as outlined in Table 39-8.
Urethrolysis may be performed under general or regional anesthesia. The patient is placed in standard lithotomy position with lower extremities in candy-cane or booted support stirrups. The vagina is surgically prepared, and a Foley catheter is inserted into the bladder.
Traction is placed on the Foley catheter to identify the bladder neck and assess the degree of scarring. A 2- to 3-cm long incision, either vertical midline or U-shaped, is made in the anterior vaginal wall. The incision site will vary along the vaginal length depending on the location of the original sling or sutures (Fig. 45-7.1). Sharp dissection is used to separate the vaginal epithelium from underlying fibromuscular tissue and is extended bilaterally toward the inferior edge of each pubic rami.
Dissection frees the urethra by dividing scar tissue or prior sling material or sutures that lie between the urethra and pubic rami (Fig. 45-7.2). If prior supporting material is identified, it may be incised or if necessary, excised. Bleeding is frequently encountered and can be controlled with direct pressure or vessel ligation.
After this lateral dissection, the periurethral tissue is perforated, and the space of Retzius is entered. Careful blunt dissection within this space and at the back of the pubic symphysis will additionally mobilize the proximal urethra. Dissection is kept close to the dorsal surface of the pubic bone to avoid cystotomy in a bladder that is generally densely adhered to the pubic bone.
Following adequate mobilization of the urethra, the vaginal incision is reapproximated with a running closure using 2-0 gauge delayed-absorbable suture.
As with a vaginal approach, urethrolysis may be completed under general or regional anesthesia. For an abdominal approach, booted support stirrups and low lithotomy positioning are preferred. This positioning allows vaginal access for the surgeon’s hand during dissection and for cystoscopy. The abdomen and vagina are surgically prepared, and a Foley catheter is inserted into the bladder.
A low transverse incision is typically preferred for this procedure to permit easy access to the space of Retzius. Either Pfannenstiel or Cherney incisions are usually selected (Sections 43-2 and 43-3). If the procedure is done in isolation, fascia of the anterior abdominal wall muscles and then transversalis fascia are incised, but entry into the peritoneal cavity is not necessary to reach the space of Retzius.
The correct plane of dissection to enter the space of Retzius lies directly behind the pubic bone. Loose areolar tissue is gently dissected downward in a mediolateral fashion with fingers or sponge, beginning immediately behind the pubic bone. If the correct plane is entered, this potential space opens easily. However, women requiring urethrolysis have typically had prior surgery within this space. As a result, tissue can be densely adhered and sharp downward dissection along the dorsal surface of the symphysis may be preferred to enter this space (Fig. 45-7.3).
The bladder is also typically densely adhered to the back of the symphysis. Sharp dissection with the curved surface of scissors facing the symphysis is directed against the symphysis to minimize cystotomy risk. At times, however, an intentional cystotomy may be required so that a finger can be placed inside the bladder to aid dissection (Fig. 45-7.4).
Sharp dissection is continued inferiorly and laterally down the inner surface of the symphysis and pubic bones to free the bladder and eventually also the proximal urethra. Bleeding is common during dissection and may be controlled with absorbable sutures.
The abdomen is closed in a standard fashion (Sections 43-2 or 43-3).
An active bladder test is performed following catheter removal. If large residual volumes are found, intermittent self-catheterization or Foley catheter replacement is required. If cystotomy was performed, the duration of catheterization is dependent on cystotomy size and location. For example, small cystotomies in the bladder dome typically require drainage for 7 days or less. For larger cystotomies at the bladder base, however, drainage for several weeks may be needed. Antibiotic suppression is not required with this catheter use.
Normal diet and activity can resume during the first postoperative days. With a vaginal approach, however, intercourse is postponed until the vaginal incision is well healed. Recovery from an abdominal approach follows that for laparotomy (Section 43-1).
Midurethral Sling Release
Symptoms of voiding obstruction may develop following urethral sling procedures, specifically TVT and TOT procedures. For most patients, postoperative urinary retention resolves in days or 1 to 2 weeks. However, voiding dysfunction requiring surgery develops in up to 3 percent and generally is identified days to weeks after surgery (Jonsson Funk, 2013; Nguyen, 2012; Richter, 2010). If obstruction is diagnosed soon after the index procedure, surgical release is performed and involves simple cutting of the sling material.
Inability to fully empty the bladder may stem from urethral obstruction or a hypotonic bladder. New-onset urinary retention after a midurethral sling procedure (TVT or TOT) is usually due to sling tightness. However, other factors can be involved, such as preexisting or de novo bladder hypotonia. Thus, prior to TVT urethrolysis, urodynamic testing is often performed to prove that symptoms are due to obstruction rather than to bladder hypotonicity. Additionally, tape may erode into the bladder or urethra in cases of obstruction, and cystoscopy allows exclusion of this complication.
Perioperatively, no specific patient preparation is required, as midurethral sling release is a minor surgical procedure.
Associated with midurethral sling release, the risks of incontinence recurrence, failure to adequately relieve retention, fistula formation, and intraoperative bladder or urethral injury are discussed during consenting.
This surgery can be performed with local, regional, or general anesthesia as an outpatient procedure. A patient is placed in standard lithotomy position within candy-cane or booted support stirrups. The vagina is surgically prepared, and a Foley catheter is inserted.
A midline suburethral incision that follows the prior primary surgical incision is made sharply. Careful dissection is used to expose the sling material and to define the urethral borders. Alternatively, with prior TOT, tight tissue bands may be palpated in the sulci. In this case, the vagina can be incised at one sulcus, and the tape transected or partially excised here.
Often because of increased sling tension, sling material is stretched and measures only half its expected width. Additionally, there is usually extensive tissue ingrowth into the sling material, and identification and mobilization can be difficult. Occasionally, a sling may migrate to the proximal urethra. In these instances, the vaginal incision may require cephalad extension.
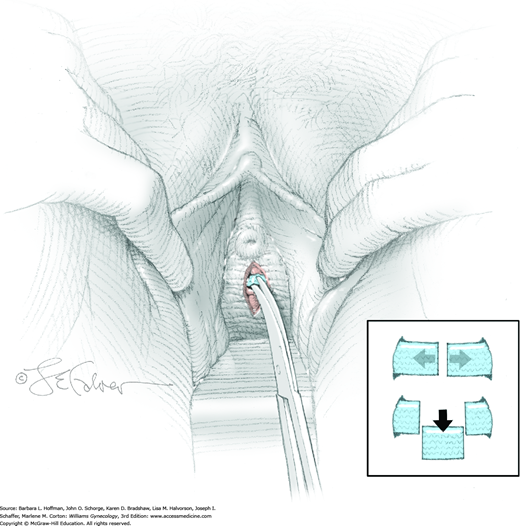
Following mobilization of the material, a hemostat is opened between the sling and urethra. Metzenbaum scissors are used to cut the sling material. In general, incision leads to immediate retraction of sling ends (Fig. 45-8.1, top inset). If retraction does not follow, a 1-cm segment of material is then excised (see Fig. 45-8.1, bottom inset). If the sling is deeply embedded and near the urethral lumen, one to two imbricating layers are placed through the vaginal muscularis following sling excision using 2-0 or 3-0 gauge delayed-absorbable suture.
After vigorous irrigation, the vaginal epithelium is closed in a continuous running fashion using 2-0 gauge delayed-absorbable suture.
Prior to discharge, an active voiding trial is performed (Chap. 42). If a Foley catheter remains, a second voiding trial can be repeated in a few days or at the surgeon’s discretion. If a woman is performing self-catheterization, this is continued until postvoid residuals fall below approximately 100 mL. Normal diet and activity can resume during the first postoperative days. Intercourse, however, should be postponed until the vaginal incision is healed.
Urethral Diverticulum Repair
The approach to urethral diverticulum repair varies and depends on diverticular sac location, size, and configuration. For those near the bladder neck, partial ablation is often chosen to avoid damage to the bladder neck and continence mechanism. For midurethral diverticula, simple diverticulectomy is typically performed. For those located at the external urethral orifice, again, simple diverticulectomy is preferred to the Spence procedure. The latter is rarely performed and can alter final urethral orifice anatomy. Last, for those with a complex diverticulum that may surround the urethra, a combination of techniques may be necessary. Of these options, complete vaginal excision of the urethral diverticulum is preferred (Antosh, 2011).
As described in Chapter 26, urethral diverticula can be difficult to diagnose due to their often varied and nonspecific presentations. Once identified, accurate information regarding diverticular anatomy is essential to surgical planning and patient counseling. Compared with transvaginal sonography or voiding cystourethrography, magnetic resonance (MR) imaging is a superior radiographic study to delineate diverticular configuration, especially with complex diverticula (Ockrim, 2009).
Additionally, cystoscopy is valuable in locating sac openings along the urethral length and demonstrates high specificity, as transurethral visualization of an ostium is unlikely to be associated with other diagnoses. That said, our frequency of urethral diverticulum detection (sensitivity) was only 39 percent (Pathi, 2013).
Women with diverticulum can present with urinary incontinence. In such cases, we typically perform baseline urodynamic testing but generally defer antiincontinence procedures until after postoperative reevaluation.
With diverticular repair, damage to urethral continence mechanism may lead to postoperative incontinence. Alternatively, urethral stricture or stenosis or urinary retention may develop depending on the extent and location of surgery. Additionally, urethrovaginal fistula and bladder injury can result. Recurrence rates of 10 to 25 percent have been reported, especially with a horseshoe or circumferential configuration or previous surgical intervention (Antosh, 2011; Ingber, 2011). Failures are believed secondary to incomplete diverticulum excision. Moreover, urethral pain can persist or arise after diverticulectomy (Ockrim, 2009). Recurrent UTI can also persist. Last, with the Spence marsupialization technique, a distal diverticulum and urethral orifice are sharply opened together to form a large single meatus. Thus, external urethral orifice anatomy is usually altered, and a spraying pattern with urination may result.
Any acute diverticular infection or cystitis is treated prior to surgery. Preventatively, antibiotic and venous thromboprophylaxis are given as outlined in Tables 39-6 and 39-8.
Diverticulum excision is typically performed as an inpatient procedure under general or regional anesthesia. A patient is placed in standard lithotomy position within candy-cane or booted support stirrups. The vagina is surgically prepared, and a Foley catheter containing a 10-mL balloon is placed in the bladder to assist in identifying the bladder neck.
This procedure is performed at the procedure’s onset to attempt diverticular opening identification and exclude other abnormalities.
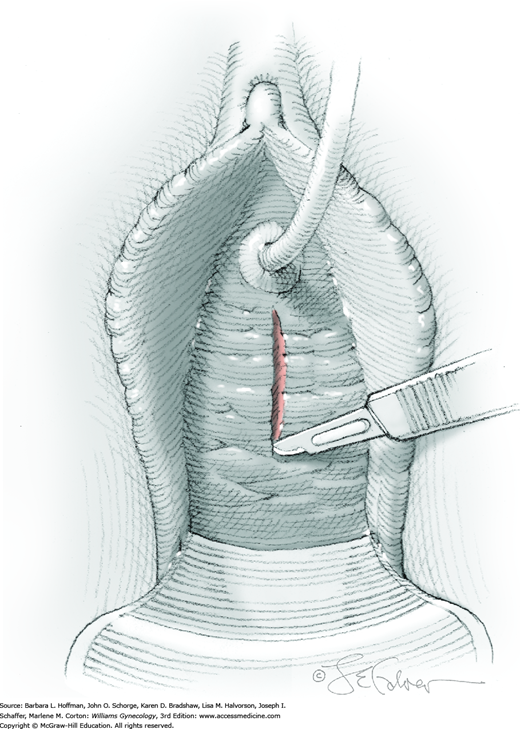
To begin, a midline or U-shaped incision is made on the anterior vaginal wall over the diverticulum, and the vaginal epithelium is dissected sharply off the fibromuscular layer of the vaginal wall (Fig. 45-9.1). Ample epithelium is freed to allow adequate exposure and to permit final tissue approximation without suture-line tension.
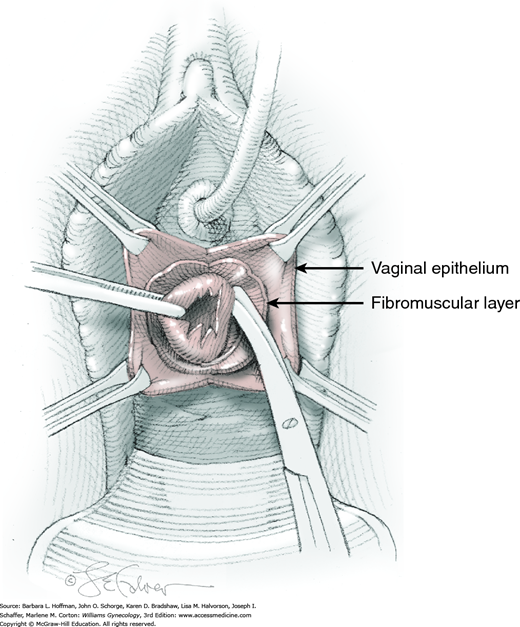
Next, the fibromuscular layer of the vagina and urethra is incised with a longitudinal or transverse incision to reach the diverticular sac. Anatomically, the distal vaginal and urethral walls are fused, and it may be difficult or impossible to separate tissue planes. Thus, sharp dissection is needed to completely mobilize the diverticular sac away from the vaginal and urethral fibromuscular layer and to the level of the diverticular sac neck (Fig. 45-9.2). During dissection, the sac may be inadvertently or intentionally entered. With this, the diverticular walls can be grasped with Allis clamps to create tension across the connective tissue fibers between the diverticular walls and the vaginal fibromuscular layer to aid dissection. Similarly, an index finger placed within the sac can recreate sac fullness to stretch these same connective tissue fibers. Dissection is then continued until the diverticulum’s communication with the urethra is isolated. Caution and awareness of urethral location are essential to avoid damage.

At its neck, the diverticulum is excised from the urethra (Fig. 45-9.3).
The urethral defect is closed with interrupted 4-0 gauge delayed-absorbable sutures over the Foley catheter (Fig. 45-9.4). Fibromuscular layers of the urethra and vagina are then reapproximated off tension in two or more layers. For this closure, a vest-over-pants method with 2-0 gauge delayed-absorbable suture is preferred when possible to avoid overlapping suture lines (Fig. 45-9.5). Redundant vaginal epithelium is trimmed, and the epithelium is closed in a running fashion with 2-0 gauge delayed-absorbable suture.
If extensive dissection is required around the trigone, consideration is given to leaving the proximal portion of the sac in place to avoid direct injury or denervation injury. In addition, ureteral stents may be beneficial during the dissection.
Again, a midline or U-shaped incision is made on the anterior vaginal wall over the diverticulum, and the vaginal epithelium is dissected sharply off the fibromuscular layer of the vaginal wall. Ample epithelium is freed to allow adequate exposure and later defect closure off tension. The Foley catheter and balloon can be placed on gentle tension to aid in identifying the bladder and bladder neck to avoid injury.
A longitudinal incision is made through the fibromuscular layer to the diverticular sac, and sharp dissection is used to completely mobilize and expose the sac. The diverticulum is opened, and the communication with the urethra is identified. To avoid injury to the proximal urethra and bladder neck, the diverticular sac, but not the neck of the diverticulum, is sharply excised. As much of the sac as can be accessed is removed.
The base of the sac is then sutured side to side with 3-0 gauge delayed-absorbable suture to cover the urethral defect. A second, and possibly a third, imbricating layer using the vaginal muscularis is created with similar suture. Excess vaginal epithelium that had previously covered the diverticulum is excised. The vaginal epithelium is closed in a running fashion with a 2-0 gauge delayed-absorbable suture.
Tips of Metzenbaum scissors are inserted into the urethral orifice and vagina. An incision is made that incorporates and simultaneously incises the posterior urethral wall, entire thickness of the diverticulum, and distal anterior vaginal wall. By this incision, the external urethral orifice ring is opened and its communication into the diverticular sac is enlarged.
For marsupialization, cut edges of the diverticular sac are reapproximated to the vaginal epithelium in a running pattern using 4-0 gauge delayed-absorbable suture. Ultimately, the urethral orifice is widened by this incorporation of the diverticular sac diameter.
Catheter management is an important aspect of postoperative care. Although no consensus guidelines exist, most experts recommend catheter placement for 5 to 7 days. Surgeries of increasing complexity may require longer duration. Antibiotic suppression is not required with this catheter use. Normal diet and activity can resume during the first postoperative days. Intercourse, however, is postponed until the vaginal incision is well healed.
Vesicovaginal Fistula Repair
Vesicovaginal fistulas may be repaired either vaginally or abdominally. A vaginal approach is preferred for most fistulas seen in the United States, which are posthysterectomy, apical fistulas. This approach offers comparable success rates, lower morbidity, and faster patient recovery. Of vaginal methods, the one most commonly performed by gynecologists is the Latzko technique. With this, surrounding vaginal epithelium is reflected away from the fistulous tract. The tract is then resected, but the portion into the bladder is not excised. This avoids a large bladder defect, which can develop with resection of even relatively small fistulas. Following excision, layered closure of the vaginal incision seals the leak. If performed for fistulas at the vaginal apex, then both anterior and posterior vaginal wall epithelia are reflected for tract access. In this location, the final layered closure simulates the steps of colpocleisis, and thus the Latzko technique for apical fistulas is often likened to a proximal partial colpocleisis.
Alternatively, in some cases, the fistulous tract can be completely excised vaginally, and a layered repair of the bladder and then vaginal wall follows. This is preferred by many if the fistulous opening is less than 5 mm in diameter and distant from ureteral orifices.
At times, an abdominal approach may be necessary for women in whom fistula location prohibits effective surgical access or in whom prior vaginal repairs have been unsuccessful. The most commonly described abdominal approach, termed the O’Conor technique, is outlined here and involves bisecting the bladder wall to enter the fistulous tract. Modifications to this as well as an extravesical approach have been described, especially during laparoscopic or robotic routes to fistula repair (Miklos, 2015). With any abdominal approach, omentum or peritoneum can be mobilized and interposed between the bladder and vagina in an attempt to prevent recurrence.
One principle of fistula repair dictates that a repair be performed in noninfected and noninflamed tissues. A second states that tissue must be approximated without excess tension. Last, a multilayer, watertight closure aids reestablishment of bladder integrity. If these guidelines are followed, success rates are typically good and approximate 95 percent (Rovner, 2012). In the United States, most fistulas follow hysterectomy for benign causes, and repair of these fistulas is associated with high cure rates. In contrast, fistulas associated with gynecologic cancer and radiation therapy may require adjunctive surgical procedures such as vascular or myocutaneous flaps. These flaps provide supportive blood supply to defects that develop in poorly vascularized or fibrotic tissue. Even with these measures, success rates are lower.
Prior to repair, a fistula should be well characterized, and complex fistulas with multiple tracts or a primary or concomitant ureterovaginal fistula should be identified. Proper evaluation typically includes cystoscopy and imaging that displays the upper and lower urinary tract such as CT urography (pyelography) or intravenous pyelography (IVP) (Fig. 26-2). Ureterovaginal fistulas are usually associated with upper tract abnormalities such as hydroureter and hydronephrosis. Therefore, normal IVP or CT findings are reassuring that ureteral involvement is absent. Additionally, this imaging complements cystoscopy in ascertaining the proximity of ureters relative to a fistula for surgical planning. In general, routine posthysterectomy vesicovaginal fistulas develop midline at the vaginal apex and usually away from the ureters, which enter the bladder at the midlength of the vagina. However, lateral fistulas raise concern for ureteral involvement or proximity.
Whether or not surgery can be performed vaginally largely depends on the ability to adequately expose the fistula. Thus, during physical examination, a surgeon assesses if a fistula can be brought down into the surgical field and if a patient’s pelvis affords adequate space. Some degree of prolapse of the vaginal apex is helpful for fistula repair. However, a final decision on the repair route is sometimes made intraoperatively, when muscle relaxation from anesthesia allows better assessment of access.
Additionally, tissue infection or inflammation is sought, and if it is identified, fistula repair is delayed until resolution. Fistulas recognized within a few days following hysterectomy may be repaired immediately, prior to the brisk inflammatory response. However, if surgical repair is not undertaken within a few days following the initial surgery, a delay of approximately 6 weeks is recommended to permit tissue inflammation abatement.
Fistulas may redevelop following repair, and patients are counseled that initial surgery may not be curative. With the Latzko procedure, the vagina is moderately shortened in most cases. Thus, the risk of postoperative dyspareunia is included during surgical consenting. However, a recent study showed that fistula repair improves sexual function and quality of life, with no attributed difference between vaginal and abdominal routes (Mohr, 2014).
Immediately prior to surgery, intravenous antibiotics and thromboprophylaxis are commonly administered (Tables 39-6 and 39-8). The necessity of bowel preparation for this procedure is unclear, and administration is individualized.
In most cases, repair is performed with general or regional anesthesia, and postoperative hospitalization is individualized. The patient is placed in standard dorsal lithotomy position, and the vagina is surgically prepared. If ureters lie close to a fistula, ureteral stents are placed. Cystoscopy is required during the procedure to document ureteral patency and assess bladder integrity.
Initially, the course of a fistulous tract is identified. If a tract is wide enough to accept a pediatric catheter, the tube is threaded through the fistulous tract, and the balloon is inflated within the bladder. If a tract cannot be delineated in this manner, then lacrimal duct probes, ureteral stents, or other suitable narrow dilators are used to trace the tract course and direction. Subsequently, attempts are made to dilate the tract and place a pediatric catheter.
For repair, the fistula is brought into the operative field. If catheterization of the tract is possible, tension on the catheter will allow this. Alternatively, four sutures can be placed in the vaginal wall surrounding the fistula and used to pull the fistula into the operative field (Fig. 45-10.1). Some advocate performing a mediolateral episiotomy to gain exposure, although this is not our practice.
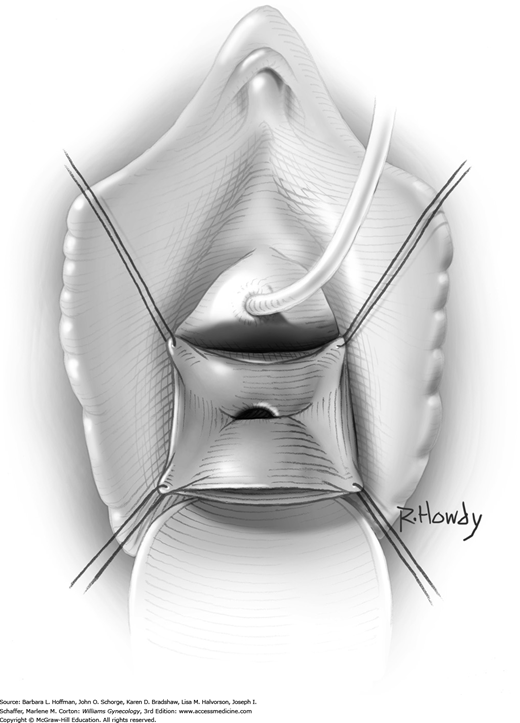
A vaginal incision is made circumferentially approximately 1 to 2 cm around the fistulous tract (Fig. 45-10.2). Vaginal epithelium surrounding the tract is sharply mobilized laterally and away from vaginal fibromuscular wall and then excised with Metzenbaum scissors.
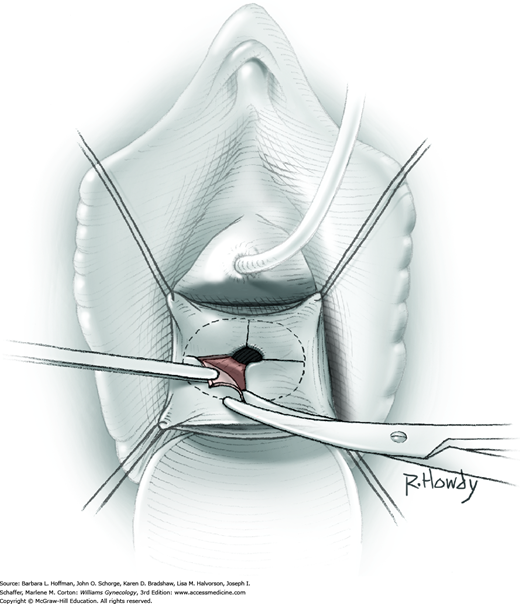
The fistula tract may or may not be totally excised to the level of the bladder. As noted earlier, complete tract excision creates a larger bladder defect for repair. Also, we prefer not to excise a fistulous tract lying near a ureteral orifice to avert potential ureteral injury and need for reimplantation (Blaivas, 1995).
If a tract is totally excised, the bladder mucosa is reapproximated with 3-0 gauge delayed-absorbable suture in an interrupted or running fashion. Following this closure, the bladder is retrograde filled with at least 200 mL of fluid to exclude leaks. If a defect is found, additional reinforcing sutures are placed until a watertight repair is achieved.
Regardless of whether the tract is completely or partially excised, anterior and posterior bladder and vaginal muscular layers are then approximated over the fistula site. For this, an interrupted or running suture line of 3-0 or 2-0 gauge delayed-absorbable sutures is created (Fig. 45-10.3). Beginning proximally and adding distally, sequential suture lines are layered (Fig. 45-10.4).
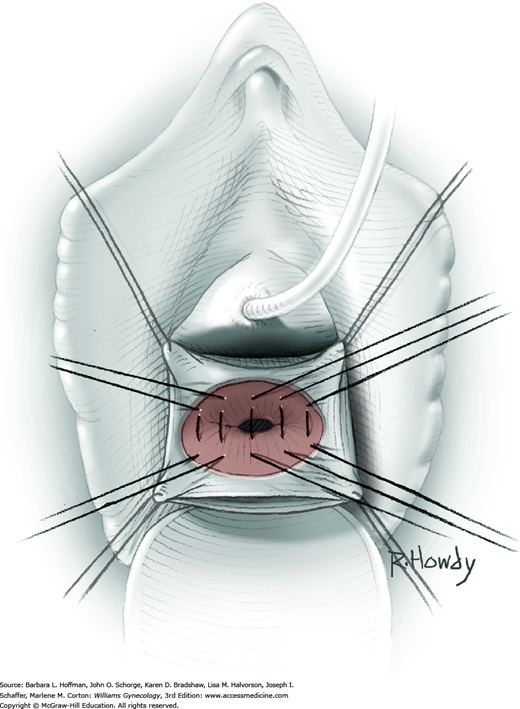
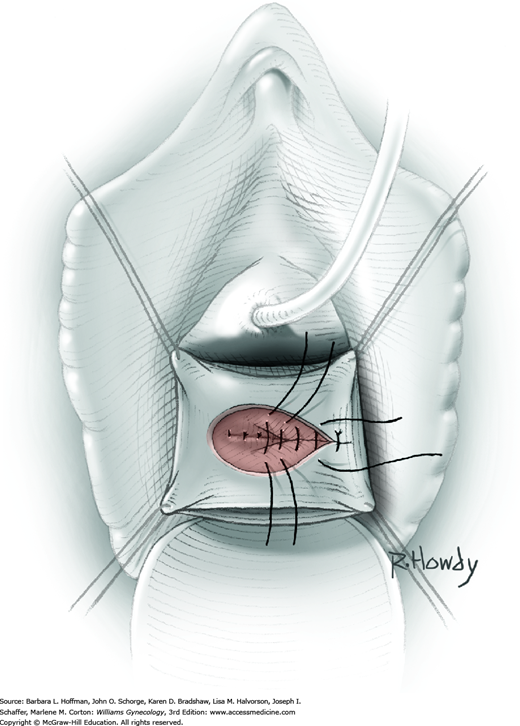
After muscular layers of the bladder and vaginal walls are closed, the vaginal epithelium is closed in a continuous running fashion using 3-0 or 2-0 gauge delayed-absorbable suture.
Cystoscopy is again performed to document ureteral patency and to inspect the incision site.
In most cases, abdominal repair is performed under general anesthesia. The patient is placed in low lithotomy position within booted support stirrups. With the patient’s thighs parallel to the ground and the legs separated, access to the vagina is maximized. The abdomen and vagina are surgically prepared, and a Foley catheter is inserted.
A low transverse or midline abdominal entry incision can be used. If mobilization of the omentum is anticipated, a vertical midline incision can provide greater access to the upper abdomen. A Maylard or Cherney incision may alternatively be selected (Section 43-3). After the peritoneum is entered, the abdomen is explored, bowel is packed from the operating field, and a self-retaining abdominal wall retractor is placed. The space of Retzius is opened using the technique described on page 1061. Next, a vertical midline extraperitoneal incision is made into the bladder dome. Prior to this incision, pushing the Foley balloon up or filling the bladder helps avoid grasping and then cutting the posterior bladder wall.
After cystotomy, the fistula and ureteral orifices are seen from within the bladder. If the fistulous tract is near the orifices, ureteral stents are placed. From the dome, the cystotomy incision is extended over the top and then back of the bladder to reach the circular fistulous opening (Fig. 45-10.5). A lacrimal probe or catheter may be placed into the fistulous tract to delineate its course. The tract is then excised.
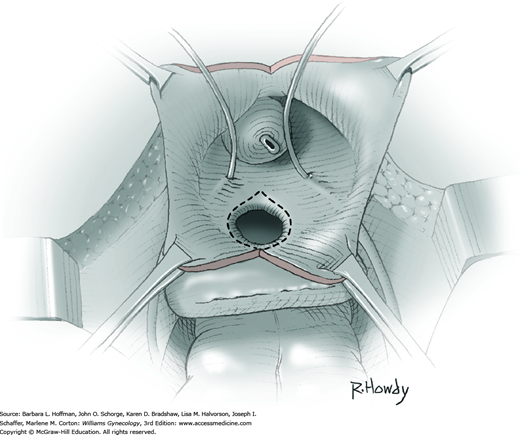
In contrast and less commonly, if a fistula tract lies close to the trigone, extension of the bladder incision to the fistulous tract may not be desired, as the resulting bladder defect would be extensive. In these cases, the entire fistulous tract is directly excised using only the bladder dome incision. However, vascular flap interposition with this approach is limited as the bladder wall is not significantly dissected off the vaginal wall.
In cases with bladder bisection, sharp dissection is used to separate the vagina away from the bladder in the area of the fistula (Fig. 45-10.6). Scarring may be extensive, and sharp rather than blunt dissection is preferred. To assist, the rounded tip of an end-to-end anastomosis (EEA) sizer can be placed in the vagina to manipulate and accentuate the dissection plane (Fig. 46-21.4). The vagina is widely separated from the bladder to allow omentum or peritoneal flap placement between the two.
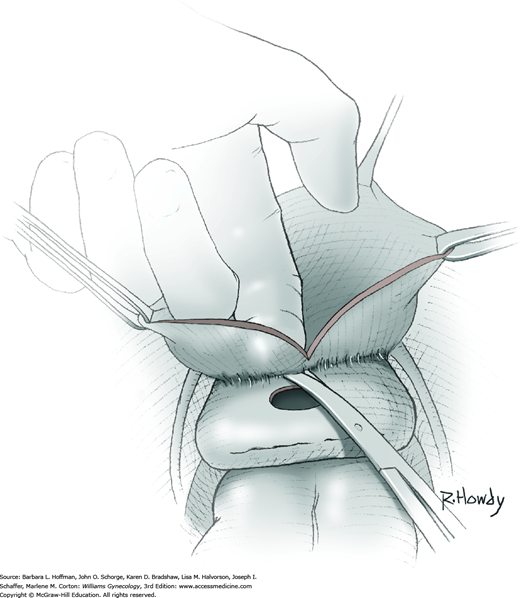
The vagina is closed in one or two layers with 2-0 gauge delayed-absorbable suture and running or interrupted stitches (Fig. 45-10.7). The EEA sizer or fingers within the vagina can accentuate the vaginotomy margins to aid closure.
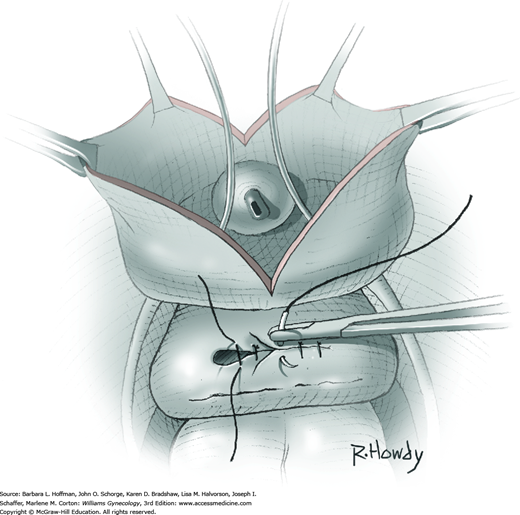
The entire bisecting bladder incision is closed in two or three layers using running sutures of 3-0 gauge absorbable suture (Fig. 45-10.8). As with the vaginal approach, after the first layer, the bladder is retrograde filled with at least 200 mL, and incision-line leaks are sought. If defects are noted, additional reinforcing sutures are placed to achieve a watertight repair. During bladder closure, each subsequent layer is imbricated such that the preceding suture line is covered and tension is released (Fig. 45-10.9).
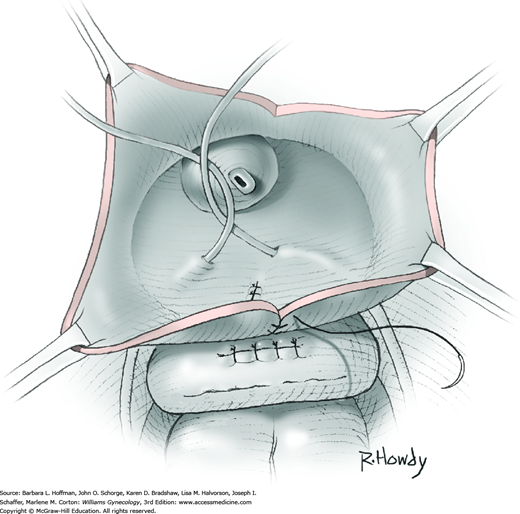
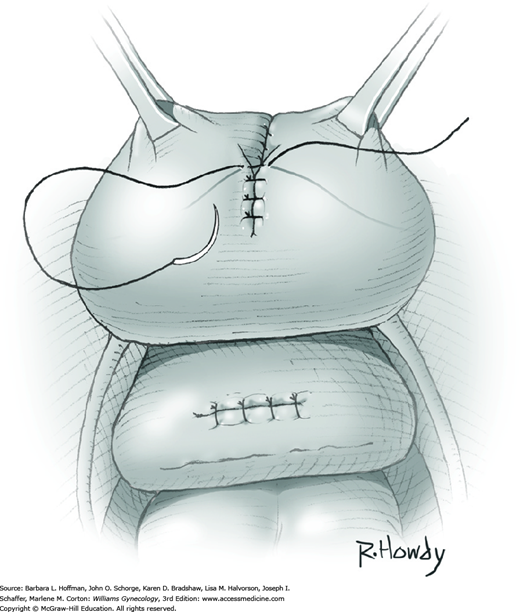
If the bladder is not bisected and the fistulous tract is directly excised solely through the bladder dome cystotomy, then the muscular wall of vagina is first repaired in one or two layers as in Step 5. Second, the bladder wall at the fistula excision site is closed in one or two layers using a running stitch of 3-0 absorbable suture. Next, the bladder mucosa is reapproximated with a single-layer running stitch of 3-0 absorbable suture. Last, the entry bladder dome incision is closed similarly, except the bladder mucosa is reapproximated first and followed by bladder wall closure in layers.
As described in Section 46-14, the omentum can be mobilized to create a J-flap. The omentum is then sutured to the anterior wall of the vagina to cover the incision line (Fig. 45-10.10). This provides a tissue layer between vagina and bladder, increases vascular flow to the area, and may improve tissue healing. Alternatively, if the omentum cannot be mobilized, peritoneum, although less vascular, can be interposed and creates another barrier layer between the bladder and vagina (Fig. 45-10.11).
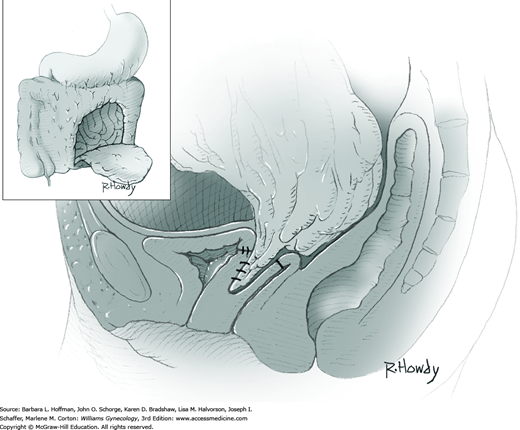
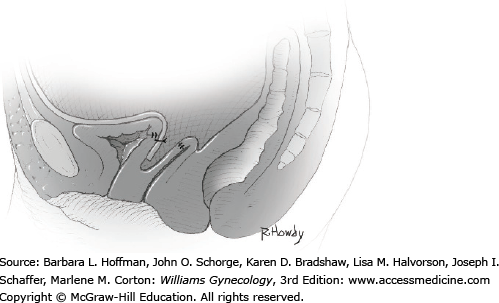
Cystoscopy is performed to document ureteral patency and inspect the incision site.
The abdominal incision is closed as described in Chapter 43.
The bladder is drained postoperatively to prevent overdistention and suture disruption. Either transurethral or suprapubic catheter placement will ensure adequate drainage in the immediate postoperative period. At our institution, we generally continue catheterization for at least 2 weeks following vesicovaginal fistula repair. Antibiotic suppression is not required with this catheter use.
Martius Bulbocavernosus Fat Pad Flap
This vascular graft contains the fat pad overlying the bulbospongiosus (formerly called bulbcocavernosus) muscle and brings a supportive blood supply to repairs involving avascular or fibrotic tissue. As such, this graft is commonly used in complex urethral diverticulum excisions or in complex rectovaginal or vesicovaginal fistula repairs. However, of these indications, there is some evidence supporting successful repair of certain recurrent fistulas without vascular graft interposition (Miklos, 2015; Pshak, 2013).
During graft placement, one end of the bulbocavernosus fat pad is dissected free and subsequently brought to the repair site through the primary vaginal incision. Thus, due to its anatomic origin and limited length, this fat pad, when indicated, is selected for defects involving the low to mid-vagina.
In most instances, graft placement is anticipated for those with prior radiation or with fistula recurrence. Thus, preoperative planning includes assessment of tissue vascularity, connective tissue strength, and ability to adequately mobilize vaginal tissues to create a multilayered repair closure. For this procedure, a woman must have adequate labial fat, which is also assessed prior to surgery.
During consenting, women are informed of the potential for postoperative vulvar numbness, pain, paresthesias, or hematoma. Because one of the labia majora is repositioned as the graft, patients are counseled regarding the cosmetic consequences.
Because of the risk of poor wound healing in these complicated repairs, antibiotic prophylaxis listed in Table 39-6 is warranted. Thromboprophylaxis is given as outlined in Table 39-8. The necessity of bowel preparation for this procedure is unclear, and administration is individualized based on concomitant procedures.
In most cases, a Martius flap graft and fistula repair can be performed with general or regional anesthesia, and the need for postoperative hospitalization is individualized. The patient is positioned in standard lithotomy position, the vagina is surgically prepared, and a Foley catheter is inserted.
The specific defect is repaired as outlined in its respective section of this chapter.
After repair completion, the lateral margin of one labium majus is incised (Fig. 45-11.1). The length of the incision is tailored to specific labial anatomy and graft size needed. In many cases, a 6- to 8-cm incision is made beginning below the level of the clitoris and is extended inferiorly.
FIGURE 45-11.1
Labial incision.


