Diagnostic Laparoscopy
Diagnostic laparoscopy provides a minimally invasive surgery (MIS) option for thorough evaluation of the peritoneal cavity and pelvic organs. It is often performed to evaluate pelvic pain or causes of infertility, to diagnose endometriosis, or to ascertain the extent of adhesive disease or qualities of a pelvic mass. Importantly, systematic evaluation of the peritoneal cavity is performed during every laparoscopy, either diagnostic or operative.
During the consenting process for diagnostic laparoscopy, a surgeon reviews procedure goals, including diagnosis and possible treatment of identified pathology. Among, others, this includes permission for lysis of adhesions, peritoneal biopsy, and excision or ablation of endometriosis. Importantly, a patient is counseled that diagnostic laparoscopy may not reveal any apparent pathology.
Laparoscopy is typically associated with few complications. Of these, organ injuries caused by puncture or by electrosurgery tools are the most common major complications and are summarized in Chapter 41. Patients are also counseled regarding possible need to complete the diagnostic evaluation via laparotomy. Reasons for conversion during diagnostic laparoscopy include failure to gain abdominal access, organ injury during entry, or extensive adhesions. Overall, the conversion risk to laparotomy is low and approximates 5 percent.
In general, laparoscopy is associated with lower rates of postoperative infection and venous thromboembolism (VTE) compared with laparotomy. For diagnostic laparoscopy, antibiotics are typically not required, and VTE prophylaxis is implemented for those with risk factors (Table 39-8). In addition, for most patients, bowel preparation is not administered. However, if extensive adhesiolysis is anticipated and the risk of bowel injury is thereby increased, bowel preparation can be considered.
Several instruments are especially helpful during diagnostic laparoscopy, and most are found in a standard laparoscopy instrument set. Of these, a blunt probe and atraumatic grasper are valuable to manipulate abdominal organs. A uterine manipulator that allows for chromopertubation is also considered if performing diagnostic laparoscopy for infertility evaluation. If this is planned, indigo carmine dye or methylene blue can be diluted and used. However, current indigo carmine shortages may favor methylene blue use. Either agent is diluted into 50 to 100 mL of sterile saline for injection through the cervical cannula.
Most laparoscopic surgery is performed in an operating room and requires general anesthesia. Much less commonly, in-office microlaparoscopy using 2- to 3-mm microlaparoscopes has been reported for second-look evaluation of cancer treatment, sterilization, and pelvic pain and infertility evaluation (Franchi, 2000; Mazdisnian, 2002; Mercorio, 2008; Palter, 1999).
In most cases, following anesthesia induction, the patient is placed in low dorsal lithotomy position in booted support stirrups to permit manipulation of the uterus. The patient’s arms are tucked at her sides. Correct patient positioning is critical to avoid nerve injury and is discussed in Chapter 41. A bimanual examination is completed to determine uterine inclination. Inclination will direct positioning of the uterine manipulator, if used. The vagina and abdomen are surgically prepared, and the bladder is drained. If a longer procedure is anticipated, a Foley catheter may be required as a full bladder can obstruct the operating view or increase the risk of bladder injury.
Although not mandatory, a uterine manipulator may be placed to move the uterus during evaluation of the pelvis. Examples are shown in Chapter 41. For manipulator placement, a surgeon is gowned and doubly gloved. A Graves speculum or vaginal retractors are used to display the cervix. To stabilize the cervix, a single-tooth tenaculum is placed on the anterior cervical lip. A Cohen or other uterine manipulator is then inserted into the external os. Alternatively, after measurement of the uterine cavity with a uterine sound, the balloon end of an endometrial cavity manipulator may be threaded into the endometrial cavity, and the balloon inflated. The outer pair of surgical gloves is removed, and the surgeon moves to either side of the patient.
Abdominal access may be attained by any of the four basic techniques described in Chapter 41. These include Veress needle insertion, direct trocar insertion, optical-access insertion, or open entry methods. For diagnostic laparoscopy, no one method is superior to the others. The umbilicus is usually chosen as the site for abdominal entry. However, if a patient’s history suggests periumbilical adhesions, then entry at Palmer point may be preferred. A 5-mm or 10-mm umbilical port will house a suitable laparoscope for diagnostic examination. Generally, starting with a 5-mm incision and laparoscope will allow for adequate visualization of the abdominopelvic cavity. Should improved optics be desired, this can be easily changed to a 10-mm size. Once safe initial entry is confirmed, the abdomen is insufflated to reach an intraabdominal pressure of 15 mm Hg or less.
Often during diagnostic laparoscopy, additional operative cannulas are needed. If minimal tissue manipulation is required, a suprapubic port may suffice. However, bilateral lower quadrant ports may be desired if lysis of adhesions or greater tissue manipulation is required. These are placed under direct laparoscopic visualization as described in Chapter 41.
All laparoscopic procedures begin with a systematic and thorough diagnostic inspection of the entire peritoneal cavity, including the pelvis and upper abdomen. Once safe initial entry is confirmed, the area directly below the primary trocar entry site is evaluated for bleeding or other signs of entry trauma. Prior to Trendelenburg positioning, the upper abdomen is examined. Specifically, the liver surface, gallbladder, falciform ligament, stomach, omentum, and right and left hemidiaphragms are inspected. The ascending, transverse, and descending colon are also viewed. During inspection of the ascending portion, the appendix is identified. After Trendelenburg positioning, bowel and omentum fall toward the upper abdomen to expose the retroperitoneal structures. Now free of intestines, the area directly beneath the initial entry site is examined again. Previously unappreciated trauma to this area from initial abdominal entry might then be seen.
After examination of the upper abdomen, attention is turned to the pelvis. First, the uterus is retroflexed with the aid of the uterine manipulator to provide clear viewing of the anterior cul-de-sac. Then, the manipulator tilts the uterus up and to the right to permit left pelvic sidewall inspection. The uterus is then anteflexed to provide access to the posterior cul-de-sac. Last, the uterus is tilted to the left, and the right pelvic sidewall is viewed. Peritoneal surfaces are thereby sequentially and methodically inspected. During this, endometriotic implants, peritoneal defects or windows, adhesions, fibrosis, or studding concerning for malignancy are sought.
Next, both ureters are visualized coursing from the pelvic brim, along the pelvic sidewall, and to the cervix. Both peristalsis and caliber are assessed. Uterine size, shape, and texture are also noted. To examine both fallopian tubes and ovaries, a surgeon may place a blunt probe into the cul-de-sac and sweep the probe forward and laterally. In doing so, the tubes and ovaries are lifted from the posterior cul-de-sac or ovarian fossa for inspection.
After visual assessment of the pathology found, indicated procedures are then performed. If adhesions are encountered, they may be divided as described in Chapter 41.
At laparoscopy completion, carbon dioxide (CO2) insufflation is halted, and the gas tubing is disconnected from the primary cannula. The gas ports on all cannulas are opened to deflate the abdominal cavity. To prevent diaphragmatic irritation from retained CO2, manual pressure is placed on the abdomen to help expel remaining gas. During this process, all secondary cannulas are removed using laparoscopic visualization. This allows exclusion of bleeding from punctured vessels that may have been tamponaded by these cannulas. Additionally, it prevents herniation of bowel or omentum up through the cannula track and into the anterior abdominal wall. Of note, pneumoperitoneum can also act as an intraoperative tamponade. Accordingly, potential bleeding sites are reinspected as the pneumoperitoneum is released. Next, the primary cannula is removed while leaving the laparoscope in the abdomen. Last, the laparoscope is slowly removed to visualize the abdomen and entry site for any evidence of bleeding and to prevent viscera from being pulled into the port site.
Depending on their size, incisions may require deep fascial stitches. To prevent incisional hernia formation, fascial closure is often recommended whenever trocars measuring ≥10 mm are employed (Lajer, 1997). Nonbladed trocars may decrease this risk (Liu, 2000). For closure, interrupted or running suture line using 0-gauge delayed absorbable suture is suitable.If open entry was used, then sutures originally placed in the fascia are unthreaded from the trocar. Each of these sutures then is brought to the midline of the incision, and square knots are tied to close the fascial defect.
Skin incisions are closed with a subcuticular stitch of 4-0 gauge delayed-absorbable suture. Alternatively, the skin may be closed with cyanoacrylate tissue adhesive (Dermabond Topical Skin Adhesive) or skin tape (Steri-Strips) (Chap. 40).
After incision closure, the uterine manipulator is removed.
Depending on the procedure performed, most patients can be discharged home on the same day as surgery. For most, physical activities and diet can be resumed according to patient comfort.
Laparoscopic Sterilization
Approximately 650,000 tubal sterilization procedures are performed annually in the United States. Approximately half of these follow pregnancy delivery or termination, but the others are performed independent of pregnancy and are termed interval sterilization (Chan, 2010). Most interval procedures are performed laparoscopically, and most frequently they involve tubal occlusion by electrosurgical coagulation, by mechanical clips, by Silastic bands, or by suture ligation (Pati, 2000).
Current sterilization practices will likely change with recommendations now encouraging consideration of prophylactic salpingectomy at the time of sterilization, abdominal or pelvic surgery, or hysterectomy for women at average risk of ovarian cancer (American College of Obstetricians and Gynecologists, 2015). The rationale for this practice change to help decrease rates of certain epithelial ovarian cancers is described in Chapter 35.
Several preventive steps can avoid sterilization procedures in women with early, undiagnosed pregnancies. Providing contraception well in advance of surgery, scheduling surgery in the follicular phase of the menstrual cycle, and preoperative serum β-human chorionic gonadotropin (β-hCG) level testing are effective methods to prevent or detect early pregnancy (American College of Obstetricians and Gynecologists, 2013a).
Patients who require treatment of advanced cervical epithelial abnormalities and who desire sterilization may choose hysterectomy rather than tubal occlusion as a means to serve both needs. For this reason, women ideally have cervical cancer screening results reviewed prior to surgery.
During the consenting process, patients are counseled regarding other reversible methods of contraception; other permanent methods, such as male sterilization; and the possibility of future regret (American College of Obstetricians and Gynecologists, 2009). Tubal sterilization is effective and should be considered a permanent procedure by the patient. Tubal sterilization is safe and associated complications are few. In general, the risks of laparoscopic sterilization mirror those of laparoscopy (Chap. 41).
Sterilizing clips and bands routinely fall from around the tube once occluded ends necrose and fibrose (Fig. 44-2.1). Most ectopic clips are incidental findings without untoward patient effects, but less commonly they can incite local foreign body reactions. Rarely, cases of clip migration to sites such as the bladder, uterine cavity, and anterior abdominal wall have been reported (Gooden, 1993; Kesby, 1997; Tan, 2004).
Contraceptive failure and pregnancy rates related to each procedure are also discussed with the patient (Chap. 5). Overall, these rates are low, and tubal sterilization is an effective method of contraception. If pregnancy does occur, however, there is a greater risk of ectopic pregnancy. Bipolar coagulation has the highest risk for this complication compared with that of clips or bands (Malacova, 2014; Peterson, 1996). Accordingly, amenorrhea following any sterilization procedure should prompt serum β-hCG testing to aid in identifying ectopic pregnancies.
For sterilization procedures, antibiotics and bowel preparation are typically not administered. VTE prophylaxis is implemented only for those at increased risk as listed in Table 39-8.
Most laparoscopic tubal sterilization procedures are performed using general anesthesia.
To reduce postoperative pain, investigators have evaluated the adjunctive use of bupivacaine solution injected or dripped onto the tubal serosa or delivered transcervically through balloon uterine manipulators into the fallopian tube lumen. Though results have varied, one metaanalysis suggests some benefit in diminishing immediate postoperative pain with these practices (Brennan, 2004; Harrison, 2014; Schytte, 2003; Wrigley, 2000).
To begin, the patient is placed in the low dorsal lithotomy position, and patient arms are tucked at the side. A bimanual examination is completed to determine uterine size and inclination. Uterine size will affect placement of the accessory trocar, and inclination will direct positioning of the uterine manipulator, if used. The vagina and abdomen are surgically prepared, and the bladder is drained. Most sterilization procedures are brief, and a Foley catheter is seldom required. Often, a uterine manipulator or sponge stick is then placed to provide uterine anteflexion or retroflexion during evaluation of the pelvis (p. (Chap. 41).
For all of the sterilization procedures described, the initial steps of laparoscopic abdominal entry are performed as described in Chapter 41. In most instances, one accessory port is required and is placed suprapubically in the midline to provide an equal reach to both fallopian tubes. For a normal-sized uterus, this port is placed 2 to 3 cm above the symphysis pubis. However, for a larger uterus, this position is moved cephalad as needed to access both tubes. Once ports are in place, inspection of the abdomen and pelvis is completed prior to the planned procedure.
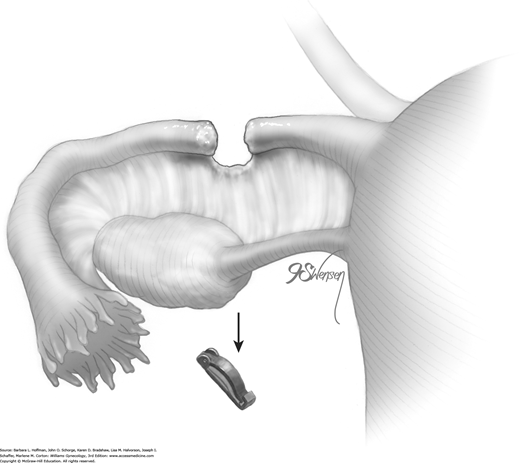
The titanium Filshie clip is applied with the aid of a customized metal applicator that houses the clip within its single-action jaw. The applicator requires an 8-mm port for insertion into the abdominal cavity. As the jaw is closed, the shorter upper rim of the clip is forced beneath the longer lower clasp, and the clip is thereby locked into place around the fallopian tube.
To begin, a blunt probe or atraumatic grasping forceps is placed through the accessory port. To aid clip positioning, the surgeon stretches the fallopian tube out horizontally and laterally. Concurrently, a uterine manipulator can be used to tilt the uterus laterally and in the opposite direction. The blunt probe is then removed from the single port for insertion of the clip applicator.
At the beginning of clip application, a Filshie clip is held within its applicator and inserted through the accessory cannula into the abdomen. A surgeon half closes the applicator’s upper jaw to insert it and the clip through the cannula. The handle of the applicator is not gripped tightly, as this may prematurely close and lock the clip (Penfield, 2000).
Once the Filshie clip emerges through the cannula, the applicator is opened slowly. The jaw of the applicator has the potential to spring open more quickly than the clip can open. This can result in the clip falling off the applicator and into the abdomen. Fallen clips are preferably retrieved, but if an open clip becomes lost and hidden by loops of bowel, laparotomy is typically not required for retrieval.
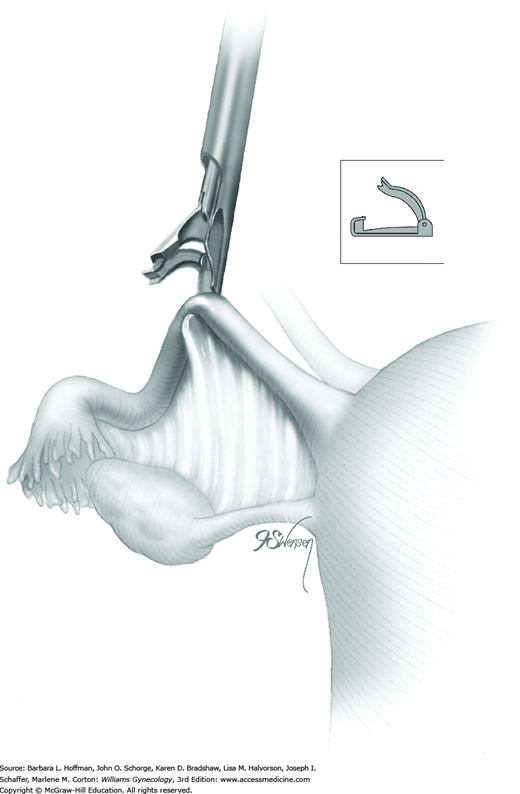
After the clip is completely open, the clip and applicator are positioned with one jaw above and one below the fallopian tube at a site along the isthmic portion of the tube and 2 to 3 cm from the uterine cornu (Fig. 44-2.2). The entire width of the tube should lie across the base of the clip. The distal hooked end of the lower jaw should be visible through the mesosalpinx.
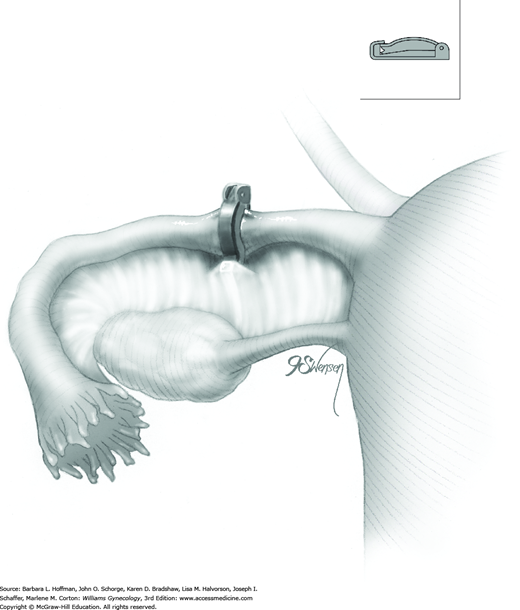
Once satisfied that the clip is positioned correctly, a surgeon slowly squeezes the finger bar handle to its full limit, back toward the handle backstop. With this action, the upper ridge of the clip is slowly compressed and locked under the lower hooked end of the clip (Fig. 44-2.3). This flattens the entire tube within the clip (Fig. 44-2.4). As the applicator jaws are slowly opened, the clip releases automatically from the applicator as it has locked onto the tube. These steps are repeated on the opposite fallopian tube. If there is any doubt regarding proper clip placement, a second clip is applied correctly to the same tube.

Rarely, a fallopian tube may be transected by the clip. This is usually associated with a large fallopian tube, which has been clipped too quickly. For sterilization completion, a clip is applied to both ends of the transected tube.
For this method, the fallopian tube is identified and grasped in the isthmic region at least 2 to 3 cm lateral to the cornu (Fig. 44-2.5). Placement here is important as pressure from retrograde menstrual flow against a coagulated stump that has been placed too close to the cornu can increase the risk of stump recanalization and fistula formation. Leaving a 2- to 3-cm segment allows ample space for absorption of intrauterine fluid without creating excess pressure against the stump.
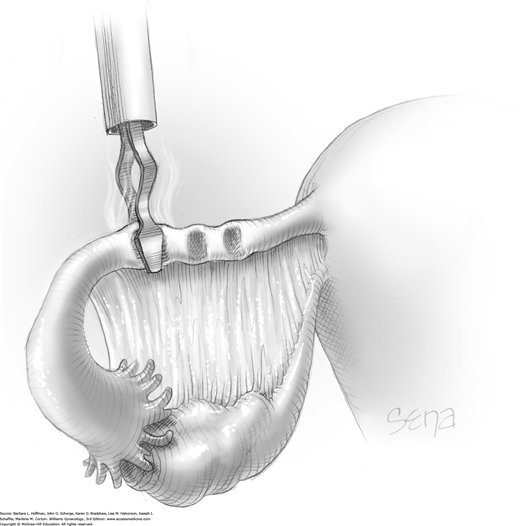
The coagulating paddles of the bipolar forceps should span the tube. Overextending their grasp may lead to partial coagulation of the mesosalpinx and incomplete coagulation of the entire tube width. Before current is applied, the tube is slightly elevated and pulled away from other adjacent structures to prevent thermal injury to these. As current is applied, the tube swells and fluid often bubbles and pops from the tissue. Current is delivered until the tube is completely desiccated. Failure to reach this end point has been linked with higher contraceptive failure rates (Soderstrom, 1989). Because visual inspection of the tube is typically inadequate to assess complete desiccation, an ammeter is incorporated with most bipolar generators. Water conducts current through tissues. Thus, completely desiccated tissues are unable to conduct current. For this reason, current is maintained during coagulation until zero current flow across the tube is registered by the ammeter. The tube is then released.
A second site that is lateral but contiguous with the first coagulated segment is grasped and similarly coagulated. A total of three contiguous sites are serially coagulated. This occludes a total span of 3 cm along the tube’s length (see Fig. 44-2.5). Coagulation of shorter distances along the tube can lead to recanalization and contraceptive failure (Peterson, 1999). These steps are then repeated on the opposite fallopian tube.
Occasionally following coagulation, the tube may stick to the bipolar paddles. To free the tube, the paddles are slowly opened and gently twisted to the right and then the left. Additionally, gentle fluid irrigation of the desiccated area may help release the tube.
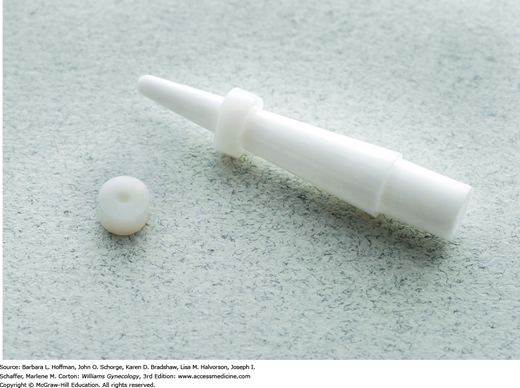
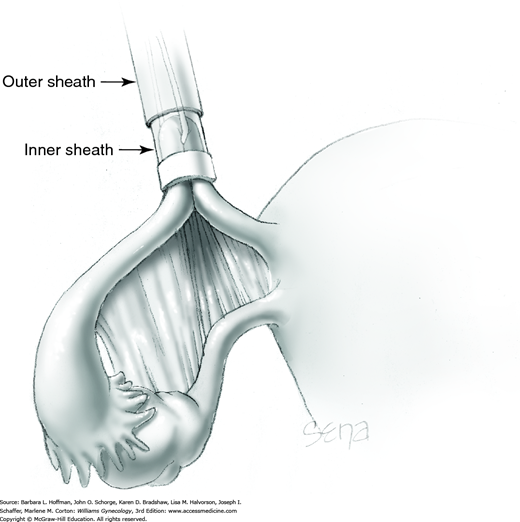
With this method, a Silastic Falope ring is applied with the aid of a custom metal applicator. To summarize the process, applicator tongs draw a portion of tube up into an inner sheath, and an outer sheath then pushes a Silastic band off the inner sheath and onto the fallopian tube loop.
Prior to its insertion into the abdomen, a Falope ring is stretched around the distal tip of the inner applicator sheath by means of a special ring loader and ring guide (Fig. 44-2.6).
Once inserted through the accessory port, the applicator’s tongs are opened and placed completely around the fallopian tube approximately 3 cm from the cornu. Tongs grasp the mesosalpinx directly at its attachment to the tube. This prevents excess mesosalpinx from being drawn into the inner sheath (Fig. 44-2.7).

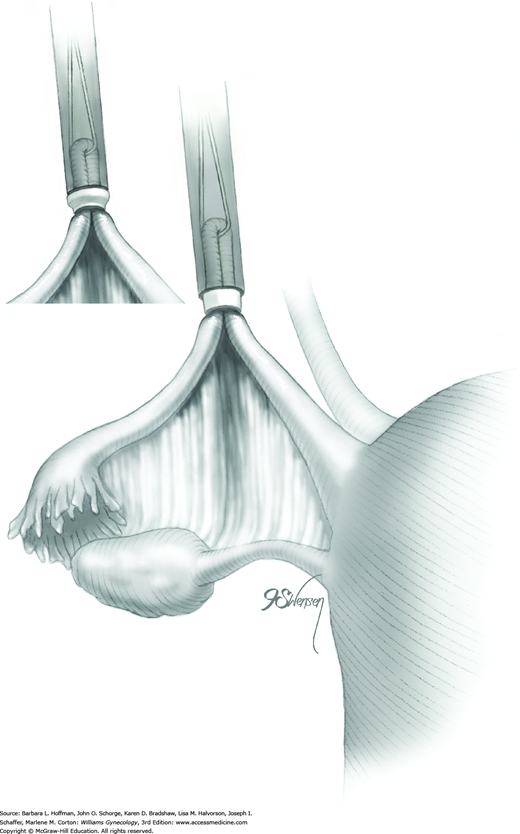
A trigger on the applicator retracts the tongs and draws a loop of tube approximately 1.5 cm into the inner sheath. The total length of tube contained within the inner sheath is thus 3 cm (Fig. 44-2.8).
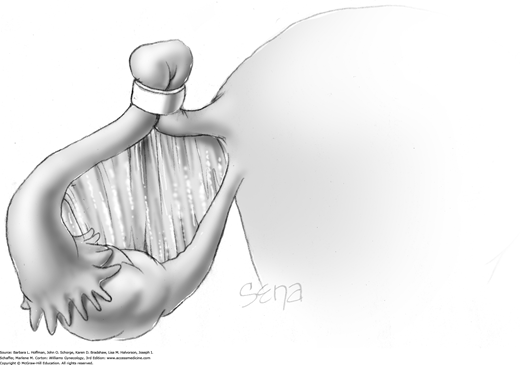
The outer sheath is then advanced toward the loop’s base. This outer sheath pushes the Silastic band off the inner sheath and onto the loop base (Fig. 44-2.9). The loop base will blanch from ischemia following band placement (Fig. 44-2.10). These steps are repeated on the opposite fallopian tube.
Tubal transection is uncommon, and a Falope ring can be applied to each of the divided segments. Vessels of the mesosalpinx can occasionally tear and bleed as the tongs and tube are drawn into the inner sheath. The Silastic band, once applied to the loop base, will control bleeding in most instances. Thus, electrosurgical coagulation to achieve hemostasis is infrequently needed.
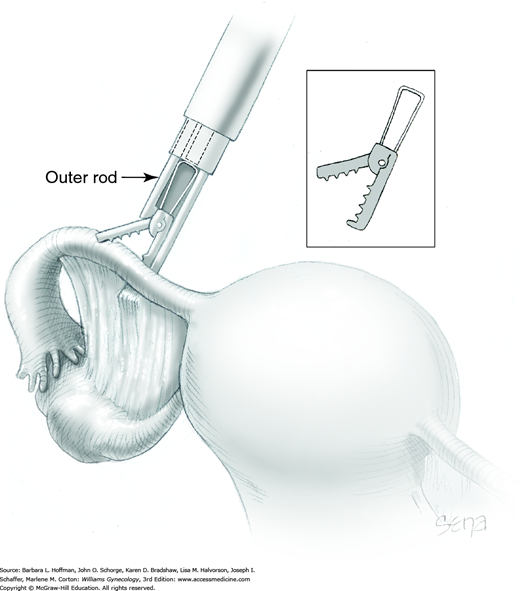
The plastic Hulka clip is also generically known as a spring clip because of the stiff outer metal spring that locks the clip into place. Required equipment includes the clips themselves and a custom metal applicator, which holds the clip during application.
To be‑gin, a blunt probe or atraumatic grasping forceps is placed through the accessory port. The fallopian tube is outstretched horizontally and laterally to aid clip application. Concurrently, a uterine manipulator can be used to tilt the uterus laterally and in the opposite direction.
Before the applicator and its clip are inserted through the accessory trocar, the trigger of the applicator is gently squeezed by the surgeon’s thumb. This action advances the outer rod of the applicator down and over the top of the clip. This closes the jaws of the clip to within 1 mm of each of other. This is an unlocked position yet allows the clip and applicator to be threaded down the accessory cannula.
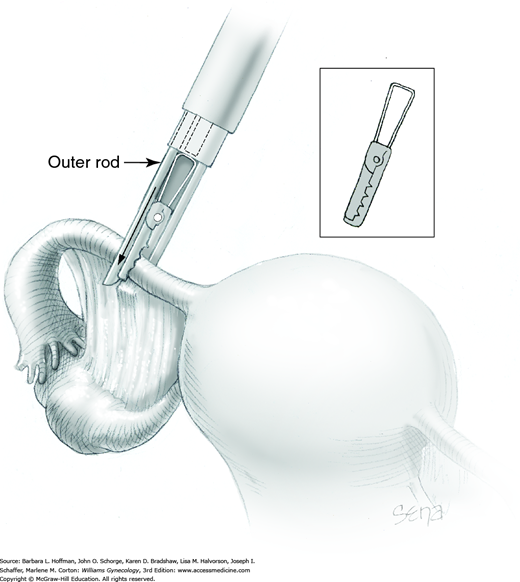
Once inside the abdomen, the applicator trigger is drawn backward, the outer rod retracts, and the upper jaw of the clip reopens. Held within the applicator jaws, the open clip is positioned across the narrow isthmic portion of the fallopian tube, 2 to 3 cm from the cornu, and perpendicular to the long axis of the tube (Fig. 44-2.11). The jaws are positioned around the tube in a manner that directs the tube deeply into the crux of the clip jaws. This aids in total occlusion of the tube as it is flattened across the base of the closing clip. Additionally, the applicator tip and clip are positioned such that when closed, the clip incorporates a small portion of adjacent mesosalpinx.
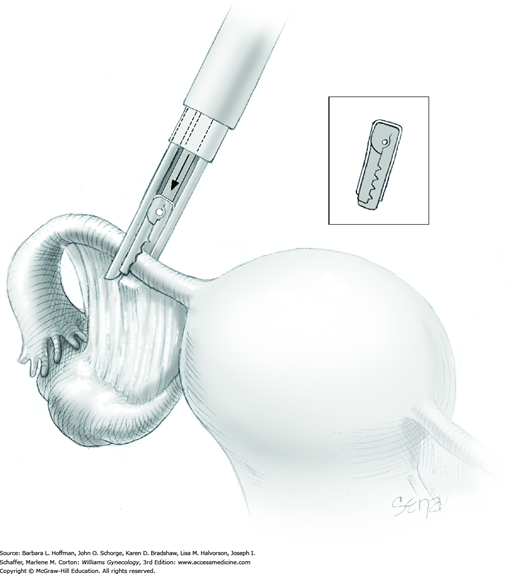
Once the applicator jaws are appropriately positioned, the thumb-action trigger is slowly squeezed to push forward the outer rod of the applicator and close the clip around the tube (Fig. 44-2.12). The clip application is inspected to ensure that it has completely encompassed the tube.
If placement is deemed correct, the trigger is fully depressed. This forces the center rod of the applicator forward against the butt of the clip’s stiff metal spring (Fig. 44-2.13). The spring is pushed out and around the plastic frame of the clip to compress and lock the upper and lower clip jaws in place. One clip is placed on each tube. If a clip is misapplied, a second clip can be placed lateral to the first.
This procedure can be used as a sterilization technique but is more commonly used to excise fallopian tube ectopic pregnancies. A description and figures can be found in Section 44-3.
Subsequent surgery completion steps follow those of diagnostic laparoscopy.
Postoperatively, patients are given instructions similar to those following diagnostic laparoscopy. Sterilization is immediate, and intercourse may resume at the patient’s discretion.
Laparoscopic Salpingectomy
With surgical treatment of ectopic pregnancy, goals include hemodynamic support of the patient, removal of all trophoblastic tissue, repair or excision of the damaged tube, and preservation of fertility in those who desire it. For most women, the preferred surgical approach for ectopic pregnancy management is laparoscopic. It provides a safe and effective treatment of the affected fallopian tube while offering the advantages of laparoscopy. For some, laparoscopic salpingostomy is desired to treat and retain the affected tube. However, if fertility is not a consideration or if tubal damage or bleeding does not permit fallopian tube salvage, then laparoscopic salpingectomy may be selected due to its lower risk of persistent trophoblastic tissue.
Salpingectomy may also be used to remove hydrosalpinges in women undergoing in vitro fertilization. In this case, pregnancy rates are improved if such tubes are excised (Chap. 9). Total salpingectomy can be used as a method of sterilization. This may be especially attractive if a primary sterilization technique has failed or if an ovarian cancer risk-reducing strategy is adopted. Last, in women with BRCA gene mutations, early bilateral salpingectomy followed by postmenopausal oophorectomy is one strategy to lower epithelial ovarian cancer risks yet provide extended estrogen benefits (Chap. 35).
The general risks of laparoscopic surgery are discussed in Chapter 41. With salpingectomy, injury to the ipsilateral ovary is possible. Thus, the potential for oophorectomy and its effects on fertility and hormone function are discussed. Prior to cases for ectopic pregnancy, a patient’s desire for future fertility is investigated. If she has completed her childbearing or has failed a prior sterilization procedure, then contralateral tubal ligation or bilateral salpingectomy may be acceptable at the time of surgery.
Following any surgical treatment of ectopic pregnancy, trophoblastic tissue can persist. The risk of this is lower with salpingectomy compared with salpingostomy and is discussed more fully on page 1013.
Baseline complete blood count (CBC), β-hCG level, and Rh status are routinely assessed. If salpingectomy is performed in the setting of an ectopic pregnancy, substantial bleeding may be encountered. Thus, the patient is typed and crossmatched for packed red blood cells and other blood products as indicated. Salpingectomy is associated with low rates of infection. Accordingly, preoperative antibiotics are usually not administered. For those undergoing laparoscopic salpingectomy for ectopic pregnancy, VTE prophylaxis is typically indicated due to the hypercoagulability associated with pregnancy (Table 39-8). For prophylaxis in those with active bleeding, intermittent pneumatic compression devices are preferred.
Most instruments required for salpingectomy are found in a standard laparoscopy instrument set. However, a suction irrigation system is commonly needed during salpingectomy to remove blood from a ruptured ectopic pregnancy. Depending on the size of the ectopic pregnancy or hydrosalpinges, an endoscopic retrieval bag may also be needed. For salpingectomy, the fallopian tube and mesosalpinx require ligation and excision. This may be accomplished using bipolar instruments, Harmonic scalpel, or laparoscopic suture loop (Endoloop). These may not be readily available in all operating suites, and desired tools are requested prior to surgery.
The patient is prepared and positioned for laparoscopic surgery (Chap. 41).
The abdomen is entered with laparoscopic techniques, and typically two or three accessory trocar sites are added (Chap. 41). Depending on the size of the ectopic pregnancy, at least one 10-mm or larger accessory port may be needed to allow specimen removal at surgery’s end. Once ports are in place, inspection of the abdomen and pelvis is completed prior to the planned procedure.
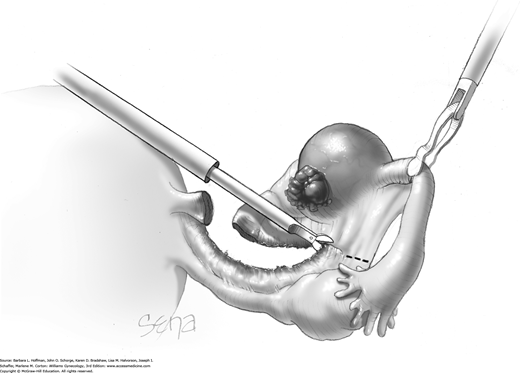
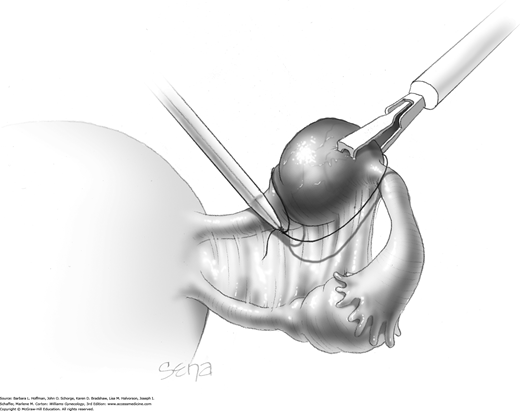
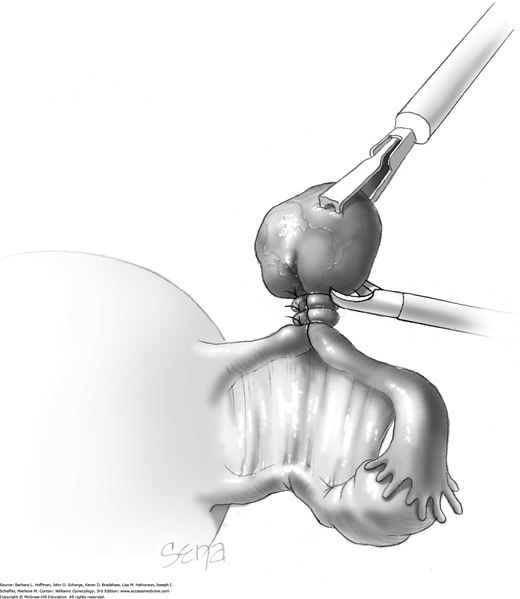
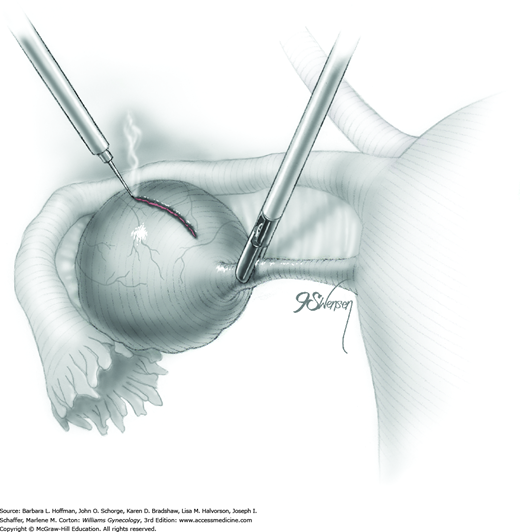
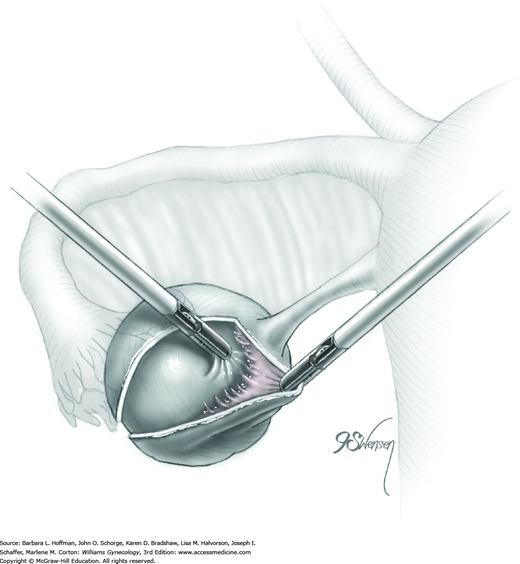
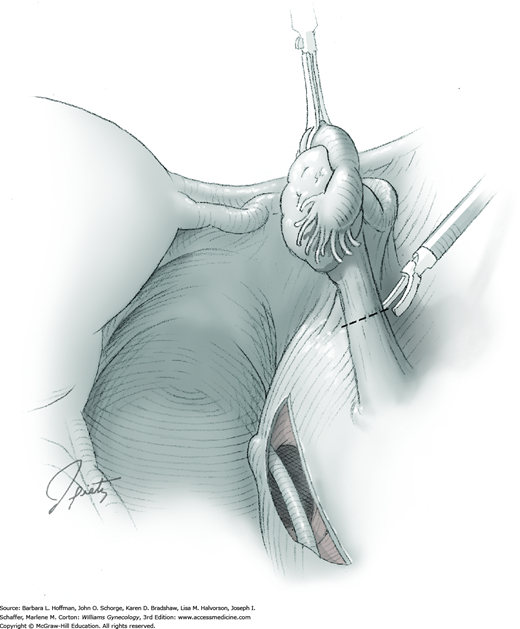
The affected fallopian tube is lifted and held with an atraumatic grasping forceps. Kleppinger bipolar electrode forceps are placed across a proximal portion of the fallopian tube. A cutting current at 25 W should suffice (Fig. 44-3.1). When zero amperage of flow is noted, scissors can then cut the desiccated, blanched tube (Fig. 44-3.2).

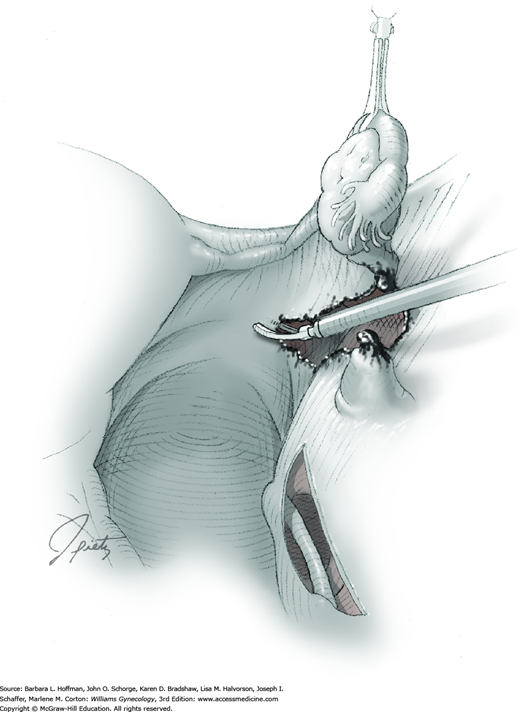
The Kleppinger forceps are then advanced across the most proximal portion of mesosalpinx. Similarly, current is applied, and the desiccated tissue cut. This process serially moves from the proximal mesosalpinx to its distal extent under the tubal ampulla. As the distal mesosalpinx is cut, the tube is freed.
Other energy sources also work well. Monopolar scissors themselves may be attached to current. In this technique, vessels within the mesosalpinx are first electrosurgically coagulated and then cut. Advanced bipolar technologies (LigaSure, ENSEAL), laser energy, and Harmonic scalpel are suitable options. A surgeon’s expertise with a particular modality dictates selection. One or more of these may be preferred based on the surrounding pelvic pathology or adhesions. The major concern with any of these tools is the amount of thermal spread to surrounding tissues.
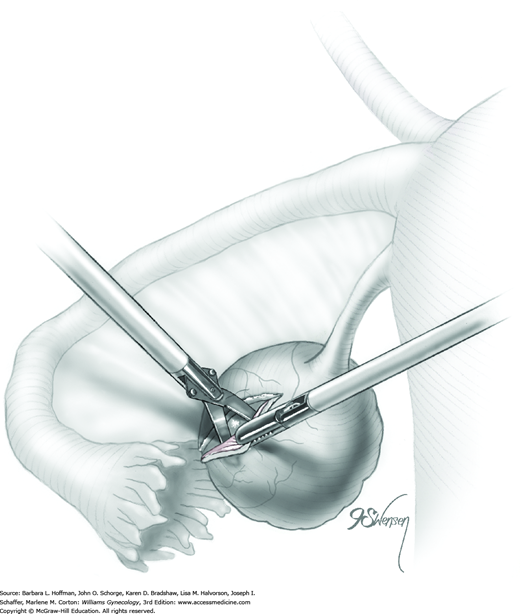
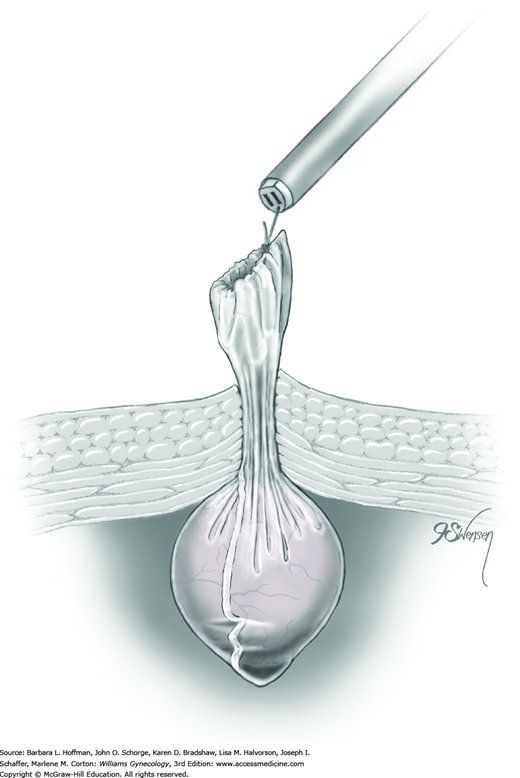
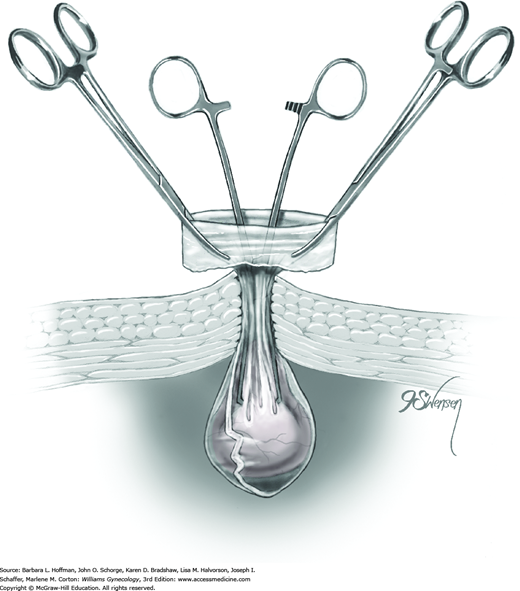
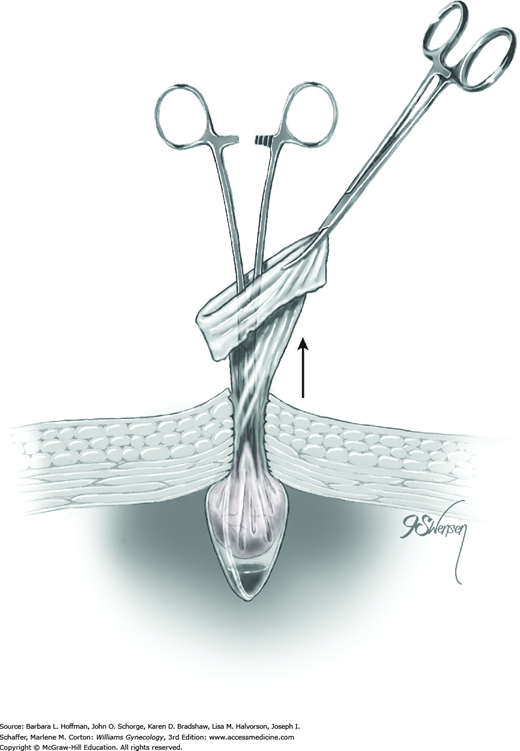
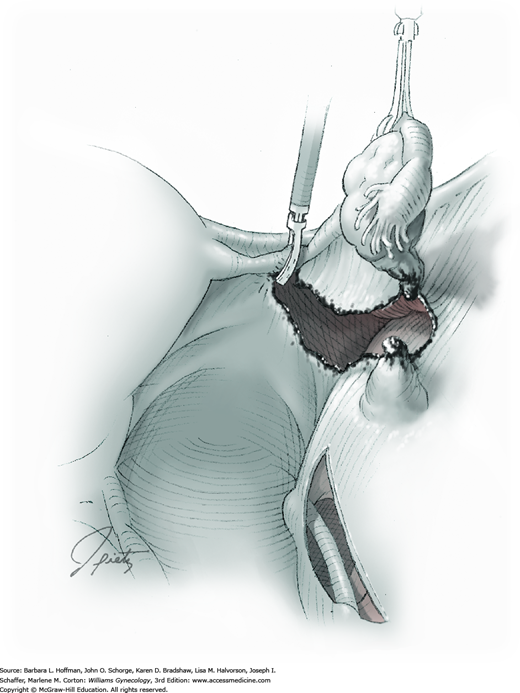
Alternatively, the vascular supply to the fallopian tube within the mesosalpinx can be ligated. Figure 44-3.3 shows an endoscopic suture loop encircling a loop of fallopian tube that contains an ectopic pregnancy. Absorbable and delayed-absorbable suture loops are available, and either is suitable for ligation. Two or three suture loops are sequentially placed, and the tube distal to these ligatures is then cut free with scissors (Fig. 44-3.4).
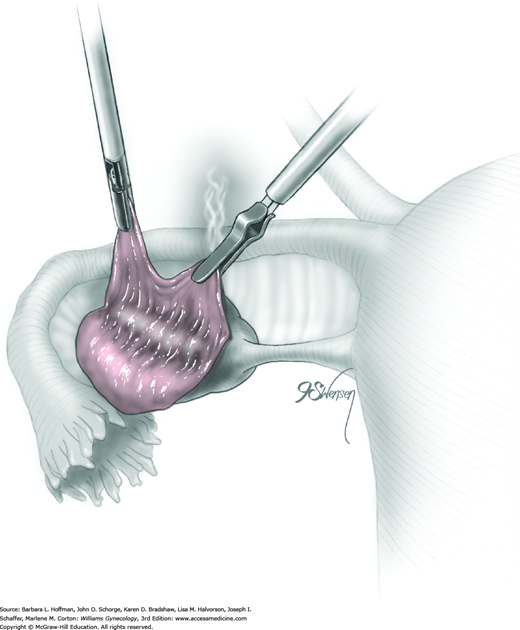
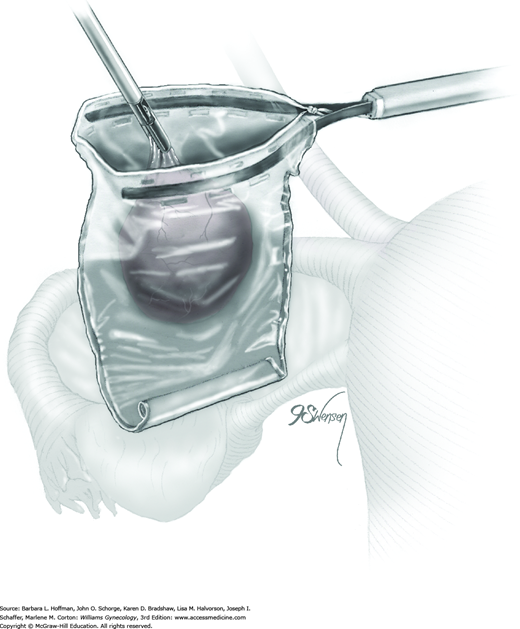
Most tubal ectopic pregnancies are small and pliant. Thus, they can be held firmly by grasping forceps and drawn up into one of the accessory site cannulas. The cannula, grasping forceps, and ectopic tissue can then be removed together. Larger tubal ectopic pregnancies may be placed in an endoscopic sac to prevent fragmentation as they are removed through the laparoscopic port site. Alternatively, larger ectopic pregnancies can be morcellated with scissors within an enclosed bag. Tissue removal techniques are presented on page 1019 and are also illustrated in Chapter 41.
To remove all trophoblastic tissue, the pelvis and abdomen are irrigated and suctioned free of blood and tissue debris. Slow and systematic movement of the patient from Trendelenburg positioning to reverse Trendelenburg can also assist in dislodging stray tissue and fluid, which is then suctioned and removed from the peritoneal cavity.
Subsequent surgery completion steps follow those of diagnostic laparoscopy.
As with most laparoscopic surgeries, patients can resume presurgical diet and activity levels according to their comfort, typically within days. If salpingectomy is performed for ectopic pregnancy, Rh-negative patients are given a single 50- or 300-μg (1500 IU) Rh0(D) immune globulin dose intramuscularly within 72 hours. To identify patients in whom trophoblastic tissue may persist, serial serum β-hCG levels are monitored until undetectable (Seifer, 1997). Spandorfer and associates (1997) compared serum β-hCG levels 1 day postoperatively with those drawn prior to surgery. They found a significantly lower percentage of persistent trophoblastic tissue if the β-hCG level fell more than 50 percent and noted no cases if the level declined by greater than 77 percent. Until levels are undetectable, contraception is used to avoid confusion between persistent trophoblastic tissue and a new pregnancy. Ovulation may resume as early as 2 weeks after an early pregnancy ends. Therefore, if contraception is desired, methods are initiated soon after surgery. Last, patients are counseled regarding their increased risk of future ectopic pregnancy.
Laparoscopic Salpingostomy
For patients with ectopic pregnancy, laparoscopic linear salpingostomy offers the surgical advantages of laparoscopy and an opportunity to retain fertility by preserving the involved fallopian tube. Accordingly, suitable candidates are women with an unruptured isthmic or ampullary ectopic pregnancy and desiring future pregnancies. Success is mainly affected by the amount of bleeding, by the ability to control it, and by the degree of tubal damage.
Risks of laparoscopic salpingostomy mirror those for laparoscopic salpingectomy. Importantly, with salpingostomy, a patient is counseled regarding the possible need for salpingectomy if the tube is irreparably damaged or bleeding from the tube cannot be controlled. Also, rates of persistent trophoblastic disease are higher with salpingostomy compared with removal of the entire affected tubal segment.
Because trophoblastic tissue is vascular, disruption during ectopic pregnancy removal can lead to severe hemorrhage. The ability of tubal muscularis to contract is minimal, and thus, bleeding during salpingostomy must be controlled with external modalities such as electrosurgical coagulation. Many devices are appropriate, and the microbipolar device is effective for achieving hemostasis while creating minimal thermal spread. At times, bleeding may be extensive and persistent and necessitate salpingectomy.
To improve hemostasis, vasoconstrictive agents such as vasopressin have been evaluated. Dilutions of 20 U of vasopressin in 30 to 100 mL of saline are suitable. The mesosalpinx is then infiltrated with approximately 10 mL of solution. Because of the potential systemic vasoconstrictive effects of vasopressin, intravascular injection is avoided. Another approach is to inject the solution into the portion of the tube to be incised. This is dictated by surgeon preference. Additional complications and contraindications to vasopressin use are discussed on page 1023. Benefits to vasopressin include less frequent use of electrosurgery, shorter operating time, and lower conversion rates to laparotomy for surgery completion.
To avoid vasopressin’s cardiovascular complications, Fedele and colleagues (1998) diluted 20 U of oxytocin in 20 mL of saline and similarly injected the mesosalpinx. Oxytocin is purported to contract the smooth muscle fibers of the tube and cause vasoconstriction of mesosalpinx vessels. These researchers noted easier pregnancy enucleation, less bleeding, and less frequent use of electrosurgery.
During treatment of ectopic pregnancy, trophoblastic tissue can persist in as many as 3 to 20 percent of cases. Remnant implants typically involve the fallopian tube, but extratubal trophoblastic implants have been found on the omentum and on pelvic and abdominal peritoneal surfaces. Peritoneal implants typically measure 0.3 to 2.0 cm and appear as red-black nodules (Doss, 1998). Severe postoperative bleeding is the most serious complication of this persistent tissue (Giuliani, 1998).
The risk of persistent trophoblast tissue is highest following laparoscopic salpingostomy, especially in women in whom small, early pregnancies are removed. In these pregnancies, the cleavage plane between the invading trophoblast and tubal implantation site is poor. This may lead to a more difficult dissection and failure to completely remove all products of conception. For all cases, preventive recommendations include irrigation and complete suctioning of the abdomen, limitation of Trendelenburg position to limit blood and tissue flow to the upper abdomen, and use of endoscopic bags for removal of larger ectopic pregnancies (Ben-Arie, 2001).
Specific tools needed for salpingostomy mirror those for salpingectomy and should be available if salpingectomy is required.
The patient is prepared and positioned for laparoscopic surgery as described in Chapter 41.
The abdomen is accessed with laparoscopic techniques, and typically two or three accessory port sites are used. Depending on the ectopic pregnancy size, at least one 10-mm or larger accessory port may be necessary to allow specimen removal at surgery’s end. Once cannulas are in place, systematic inspection of the abdomen and pelvis is completed prior to the planned procedure.
The fallopian tube is lifted and held with atraumatic grasping forceps. By means of a 22-gauge needle through one of the accessory ports or through a separate abdominal wall needle puncture, a solution of vasopressin is injected into the mesosalpinx beneath the ectopic pregnancy. If the serosal layer overlying the ectopic tissue is injected instead, then a smaller 25-gauge needle may be used.
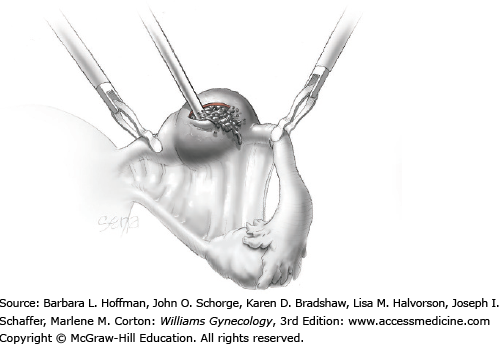
A monopolar needle tip electrode is set at a cutting voltage and used to create a 1- to 2-cm longitudinal incision (Fig. 44-4.1). The incision is positioned opposite the mesosalpinx and on the maximally distended portion of the tube that overlies the pregnancy. Laparoscopic scissors, CO2 laser, bipolar needle, and Harmonic scalpel have also been used.

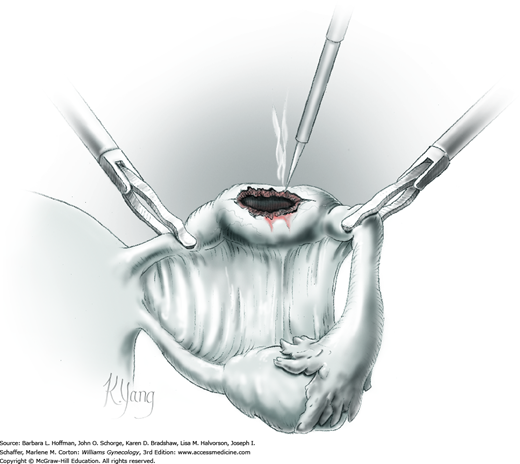
For this step, atraumatic grasping forceps hold one edge of the incision while a suction-irrigation probe tip is insinuated into the tissue plane between the tubal wall and ectopic pregnancy (Fig. 44-4.2). Hydrodissection is performed on one side of the tube and then the other. A combination of high-pressure hydrodissection and gentle blunt dissection with the suction irrigator tip is used to remove the entire conceptus from the tube. Alternatively, the pregnancy or its fragments may require extraction by smooth grasping forceps.
Bleeding points can be controlled with monopolar or bipolar electrosurgical coagulation (Fig. 44-4.3). The tubal incision is left open to heal by secondary intention. Tulandi and Guralnick (1991) found no differences in subsequent fertility and adhesion formation between salpingotomy with or without tubal suturing. Use of topical fibrin products for hemostasis has been evaluated in limited studies and warrants further investigation with regard to adhesion prevention and future pregnancy effects (Mosesson, 1992).
Most ectopic pregnancies are small and pliant. Accordingly, they can be held firmly by grasping forceps and drawn up into one of the accessory cannulas. The cannula, grasping forceps, and ectopic tissue can then be removed together. Larger ectopic pregnancies may be placed in an endoscopic sac to prevent fragmentation as they are removed through the laparoscopic trocar site.
To prevent persistent trophoblastic tissue postoperatively, the pelvis and abdomen are irrigated and suctioned free of blood and tissue debris.
Adjuvants are available that can be used for the prevention of postoperative adhesion formation. However, although adhesion formation is lessened, no substantial evidence documents that their use improves fertility, decreases pain, or prevents bowel obstruction (American Society for Reproductive Medicine, 2013).
Subsequent surgery completion steps follow those of diagnostic laparoscopy.
As with most laparoscopic surgeries, patients can resume presurgical diet and activity levels according to their comfort, typically within days. Postoperative topics specific to ectopic pregnancy include Rh0 [D] immune globulin administration, surveillance for persistent trophoblastic disease, provision of contraception if desired, and counseling on future ectopic pregnancy risk as described on page 1012.
Laparoscopic Ovarian Cystectomy
Many studies have attested to the efficacy and safety of laparoscopic cystectomy for the management of ovarian cysts. Moreover, because of recovery-associated benefits, a laparoscopic technique is advocated by many as the preferred approach in women with ovarian cysts and a low risk of malignancy (Chap. 9).
Sonography is the primary tool used to diagnose ovarian pathology, and the sonographic characteristics of a cyst aid in determining preoperatively the malignant potential of a given lesion (Chap. 9). In those patients with indeterminate ovarian cysts following sonography, magnetic resonance (MR) imaging may enhance discrimination.
The serum tumor marker cancer antigen 125 (CA125) is typically obtained preoperatively in postmenopausal patients and in any woman whose tumor displays other risk factors for ovarian epithelial cancer (Chap. 35). Additionally, serum alpha-fetoprotein (AFP), lactate dehydrogenase (LDH), inhibin, and β-hCG levels may be measured to exclude germ cell or sex cord-stromal ovarian neoplasms, if these are suspected (Chap. 36).
Prior to surgery, patients are informed of the unique complications associated with laparoscopy itself (Chap. 41). Specific to ovarian cystectomy, the risks of oophorectomy due to bleeding or extreme ovarian damage are discussed. Depending on the amount of oocyte-containing ovarian stroma that is stripped away with the cyst, diminished ovarian reserve is also a risk. Obviously, because many cysts are removed due to concerns of potential malignancy, patients should be familiar with the steps involved in the surgical staging of ovarian cancer.
Rates of pelvic and wound infection following ovarian cystectomy and laparoscopy are low, and antibiotic prophylaxis is typically not required. Bowel preparation is not usually required, but may be considered if extensive adhesions are suspected. VTE prophylaxis is typically not recommended for laparoscopic cystectomy. However, those with a greater risk of malignancy, with risks for VTE, or with an increased chance for conversion to laparotomy may benefit from these measures (Table 39-8).
Most instruments required for ovarian cystectomy are found in a standard laparoscopy instrument set. A suction irrigation system is commonly needed to remove cyst contents if rupture occurs. An endoscopic retrieval bag is also frequently used. Once contained in the sac, the cyst in some cases may be decompressed with a laparoscopic aspiration needle.
If oophorectomy is required, the infundibulopelvic ligament is ligated. This may be accomplished using bipolar instruments, Harmonic scalpel, laparoscopic suture loop, or stapler. These may not be readily available in all operating suites, and desired tools are requested prior to surgery.
The patient is prepared and positioned for laparoscopic surgery (Chap. 41). A bimanual examination is completed to determine ovarian size and position and uterine inclination. Ovarian information will affect placement of the accessory ports, and uterine inclination will direct positioning of the uterine manipulator if used. A uterine manipulator may assist with moving the uterus and adnexa. In anticipation of possible hysterectomy as a part of ovarian cancer staging, the vagina and abdomen are surgically prepared, and a Foley catheter is inserted. The patient is then draped to allow sterile access to the vagina and abdomen.
Primary and secondary trocars are placed as described in Chapter 41. For insertion of most endoscopic sacs, at least one 10-mm or larger accessory trocar may be necessary to allow specimen removal at surgery’s end. Typically, two or three accessory trocars are required for cystectomy.
Once the abdomen is entered, a diagnostic laparoscopy is performed, inspecting the pelvis and upper abdomen for signs of malignancy such as ascites and peritoneal implants or for evidence of endometriosis. Suspicious areas are biopsied, and those concerning for cancer are sent for intraoperative analysis. Prior to ovarian cystectomy, adhesions are divided to restore proper anatomic relationships.
A blunt probe is placed under the uteroovarian ligament and posterior ovarian surface to elevate the ovary. An atraumatic grasping forceps then steadies the ovary, and the blunt probe is removed (Fig. 44-5.1). A monopolar needle tip electrode set at a cutting voltage is used to incise the ovarian capsule that overlies the cyst. Other suitable devices for incision include a monopolar scissor blade or Harmonic scalpel. This incision is ideally on the antimesenteric surface of the ovary to minimize dissection into extensive vascularity at the ovarian hilum. The incision is extended into the ovarian stroma to the level of the cyst wall but ideally does not rupture the cyst.
A space between the ovary and cyst wall is created using blunt forceps or dissecting scissors (Fig. 44-5.2). Atraumatic grasping forceps are used to hold one edge of the incision, while a blunt probe or suction-irrigation probe tip is insinuated in the tissue plane between the ovarian capsule and cyst wall (Fig. 44-5.3).

Blunt or hydrodissection is performed on one side of the cyst and then the other. Depending on the adherence of the cyst to its surrounding ovarian tissue, cystectomy may at times require sharp dissection with scissors. During dissection, points of bleeding may be coagulated, or isolated vessels may be grasped and coagulated (Fig. 44-5.4).
Following enucleation from the ovary, the cyst is placed into an endoscopic bag (Fig. 44-5.5). The opening of the sac is closed and brought up to the anterior abdominal wall (Fig. 44-5.6). Depending on its size, the cyst and endoscopic bag may be removed in toto through one of the accessory cannulas. In this setting, the laparoscopic cannula is removed first, followed by the cyst contained within the sac.
Alternatively, with larger cysts, the cannula is removed, and the entire pursed opening of the bag is drawn up through the trocar incision and fanned out onto the skin surface. The open edges of the bag are pulled upward to lift and press the cyst up against the incision. A needle tip is then directed into the incision and pierces the cyst contained within the endoscopic bag. An attached syringe is used to aspirate contents. Alternatively, the cyst may be ruptured by a toothed Kocher clamp placed through the skin incision and into the sac (Fig. 44-5.7). Thereby, cyst fluid is retained within the endoscopic sac. The endoscopic sac and decompressed cyst wall are then removed together through the incision (Fig. 44-5.8). During removal, care is taken to ensure that the endoscopic bag is not inadvertently punctured or torn, and all measures are used to prevent spillage of cyst contents into the abdomen or port site.
Not uncommonly during the dissection of the cyst away from the ovary, the cyst may rupture. The cyst wall is then removed using a “stripping” technique (Fig. 44-5.9). With this, both the cyst wall and cyst capsule can be grasped near the dissection plane by atraumatic forceps. Traction and countertraction can separate filmy connective tissue between these to advance the dissection plane. As a result, the grasping forceps strip the cyst wall away from the underlying ovarian stroma. To prevent damage to the underlying healthy ovary, the dissection plane between the cyst and stroma should be clearly delineated by traction on each side to prevent tearing. Injection of dilute vasopressin into this space may also help delineate the dissection plane and minimize bleeding. Histologically, Muzii and colleagues (2002) showed that this technique in nonendometriotic lesions spared ovarian tissue and did not strip away normal ovarian tissue and follicles.
Because of increased adhesion formation risk, technical difficulty, and time associated with laparoscopic suturing, in general the ovarian capsule is not sutured closed following cyst removal. Several studies show that leaving the capsule open does not lead to increased adhesion formation (Marana, 1991; Wiskind, 1990). Application of an adhesion barrier such as oxidized regenerated cellulose may be considered to prevent adhesion formation (Franklin, 1995; Wiseman, 1999). However, no substantial evidence documents that their use improves fertility, decreases pain, or prevents bowel obstruction (American Society for Reproductive Medicine, 2013).
If concerning for malignancy, the specimen is submitted in most cases for immediate frozen section analysis. If benign findings are noted, then steps toward surgical closure begin. If malignancy is found, then surgical staging should ensue. Of note, if a large mass was removed and the port site was likely extended during the removal, one should consider fascial closure to prevent port-site hernias. The finishing laparoscopic steps are similar to those for diagnostic laparoscopy.
Following laparoscopic ovarian cystectomy, instructions similar to those for diagnostic laparoscopy are given.
Laparoscopic Salpingo-oophorectomy
Laparoscopy can be used to safely remove many adnexa and in most cases, offers a faster recovery and less postoperative pain compared with laparotomy. As discussed in Chapter 9, indications for adnexectomy vary but may include torsion, ovarian cyst rupture, suspicion of ovarian malignancy, and symptomatic ovarian remnant. In addition, prophylactic oophorectomy is often considered in women with or at genetic risk for cancers involving the breast, ovary, and colon (Chap. 35).
Laparoscopy is a preferred approach when possible and can be safely performed in pregnancy, preferably in the early second trimester. However, for all patients, laparotomy may be preferred is certain clinical settings. These include a high suspicion of cancer, anticipation of extensive pelvic adhesions, and large ovarian size.
Salpingo-oophorectomy is typically performed to remove ovarian pathology and sonography is the primary tool used for diagnosis. In cases in which anatomy may be unclear, MR imaging may add additional information. As discussed on page 1015, tumor markers may be drawn prior to surgery if malignancy is suspected.
Prior to surgery, patients are informed of the unique complications associated with laparoscopy (Chap. 41). Specific to salpingo-oophorectomy, the risk of ureteral injury is discussed. Many adnexa are removed due to concerns of potential malignancy, and patients should be familiar with the steps involved in the surgical staging of ovarian cancer.
Unless an ovarian abscess is identified, laparoscopic salpingo-oophorectomy does not require antibiotic prophylaxis (American College of Obstetricians and Gynecologists, 2014b). If hysterectomy is required during ovarian staging, antibiotics may be given intraoperatively. Bowel preparation is not usually required but may be considered if extensive adhesions are suspected. VTE prophylaxis is typically not recommended for laparoscopic cystectomy. However, those with a greater risk of malignancy, with underlying VTE risks, or with an increased chance for conversion to laparotomy may benefit from these measures (Table 39-8).
Most instruments required for ovarian cystectomy are found in a standard laparoscopy instrument set. However, a suction irrigation system is commonly needed to remove cyst contents if rupture occurs. An endoscopic retrieval bag is also frequently used. During oophorectomy, the infundibulopelvic ligament is ligated. This may be accomplished using bipolar instruments, Harmonic scalpel, laparoscopic suture loop, or stapler. These may not be readily available in all operating suites, and desired tools are requested prior to surgery.
The patient is prepared and positioned for laparoscopic surgery as described in Chapter 41. A bimanual examination is completed to determine ovarian size and position and uterine inclination. Ovarian information will affect placement of the accessory ports, and uterine inclination will direct positioning of the uterine manipulator if used. Because of possible hysterectomy as a part of ovarian cancer staging, the vagina and abdomen are surgically prepared, and a Foley catheter is inserted. A uterine manipulator may also be placed to assist with manipulation of the uterus and adnexa.
Primary and secondary trocars are placed as described in Chapter 41. Typically, two or three accessory ports are required. For insertion of most endoscopic sacs, at least one 10-mm or larger accessory port may be necessary to allow specimen removal at surgery’s end.
Once the abdomen is entered, a diagnostic laparoscopy is performed, inspecting the pelvis and upper abdomen for signs of malignancy such as ascites and peritoneal implants. Cellular washings from these areas are obtained and saved until frozen section analysis of the specimen has excluded malignancy. Similarly, identified peritoneal implants from these areas are biopsied and sent for intraoperative evaluation. Prior to adnexectomy, adhesions are divided to restore proper anatomic relationships.
The ureter lies close to the infundibulopelvic (IP) ligament, and its course should be noted. If the location of the ureter is not clear, the peritoneum lateral to the ureter is incised, and retroperitoneal isolation of the ureter is completed (Fig. 44-6.1).
Ligation of the ovarian vessels within the IP ligament can be completed with endoscopic loop ligatures, electrosurgical coagulating devices, Harmonic scalpel, or stapler depending on surgeon preference (see Fig. 44-6.1). Once these vessels are occluded, the IP is severed distally.
After transection of the IP, the fallopian tube and ovary are gently elevated with atraumatic forceps. Incision of the broad ligament’s posterior leaf is then extended to the round ligament (Fig. 44-6.2).
The uteroovarian ligament and proximal fallopian tube are identified posterior to the round ligament. Similarly to the IP, these may be coagulated, stapled, or ligated (Fig. 44-6.3). Distal to this occlusion, the uteroovarian ligament and fallopian tube are transected, and the adnexum is freed.
Various endoscopic bags are available for tissue removal (Chap. 41). The specimen is dropped into the sac, which is closed and brought up to the anterior abdominal wall. Depending on its size, the adnexum and endoscopic bag may be removed in toto through one of the accessory port sites. In this setting, the laparoscopic cannula is removed first, followed by the specimen contained within the sac.
Alternatively, with larger cystic ovaries, the cannula is removed, and the entire pursed opening of the bag is drawn up through the incision and fanned out onto the skin surface. As illustrated in Section 44-5, the open edges of the bag are pulled upward to lift and press the ovary against the incision. A needle tip is directed through the incision and into the sac. The ovary is pierced and aspiration drainage is completed by an attached syringe. Alternatively, the cyst may be ruptured by a toothed Kocher clamp placed through the skin incision and into the sac. Thereby, cyst fluid is retained in the endoscopic sac. The endoscopic sac and decompressed cyst wall are then removed together through the incision. During removal, care is taken to ensure that the endoscopic is bag is not inadvertently punctured or torn, and all measures are used to prevent spill of cyst contents into the abdomen or port site. Additionally, to prevent spill or to remove a larger solid mass, one may remove the adnexa through a minilaparotomy incision or a colpotomy incision as described on page 1031 and illustrated in Chapter 41.
If malignancy is suspected, the specimen is submitted for immediate frozen section analysis. If benign findings are noted, then steps toward surgical closure begin. If malignancy is found, then surgical staging should ensue. Of note, if a large mass was removed and the port site was likely extended during the removal, one should consider fascial closure to prevent port-site herniation.
Advantages to laparoscopy include a rapid return to normal diet and activities, and postoperative complication rates are low. If both adnexa are removed, then hormone replacement therapy is considered in appropriate candidates (Chap. 22).
Ovarian Drilling
Ovarian drilling is a technique of puncturing the ovarian capsule with a laser beam or an electrosurgical needle using a laparoscopic approach. Similar to ovarian wedge resection, this procedure’s end goal is to reduce the amount of androgen-producing tissue in women with polycystic ovarian syndrome (PCOS). However, in wedge resection, a long cortical incision is required for this degree of resection. As a result, infertility secondary to adhesions complicates many postoperative courses (Buttram, 1975; Toaff, 1976). To minimize this risk and avoid the need for laparotomy, ovarian drilling techniques using laparoscopy were developed in the early 1980s.
Compared with gonadotropin stimulation to achieve pregnancy, ovarian drilling has lower rates of ovarian hyperstimulation syndrome (OHSS) and of multifetal gestation (Farquhar, 2012). Disadvantages include the surgical risks of laparoscopy, risks of pelvic adhesion formation, and concerns regarding long-term effects on ovarian function (Donesky, 1995; Farquhar, 2012). For these reasons, ovarian drilling is viewed as a second-line therapy. It can be useful in patients who fail to ovulate with clomiphene citrate, who are at risk for OHSS, or who desire to minimize their risk for multifetal gestation.
There appear to be relatively few complications that arise immediately after ovarian drilling. Hemorrhage, infection, and thermal bowel injury are infrequent. Similarly, ovarian atrophy following drilling is rare but has been reported (Dabirashrafi, 1989).
Adhesion formation following this procedure, however, is common. Most of these adhesions at second-look laparoscopy have typically been graded as minimal or mild (Gürgan, 1991). Moreover, researchers have described only a minimal, if any, decline in fertility from these adhesions (Gürgan, 1992; Naether, 1993). This risk, however, is discussed with the patient prior to surgery.
Ovarian drilling has been described using monopolar or bipolar electrosurgical energy or using various lasers, all with the goal of causing focal damage to the ovarian stroma and cortex. Currently, no studies support the superiority of one modality (Strowitzki, 2005).
Punctures into the ovarian capsule are typically 2 to 4 mm wide and 4 to 10 mm deep. Although techniques using as few as four or as many as 40 punctures per ovary have been described, few studies have investigated the optimum number of punctures (Farquhar, 2004). For example, Malkawi and Qublan (2005) showed that five punctures per ovary compared with 10 resulted in equally improved pregnancy rates and similarly low rates of postprocedural OHSS and multifetal gestation.
Patient positioning and anesthesia mirror those for other laparoscopic procedures (Chap. 41).
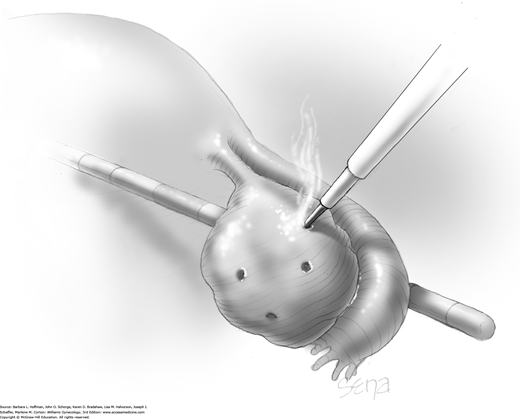
Three incisions are used for this laparoscopic procedure. In addition to an umbilical incision, two bilateral lower abdominal incisions are made. These incisions serve as entry sites for the electrosurgical needle tip and grasping forceps.
The ovary is elevated with a blunt grasper. The electrosurgical current is set at 30 to 60 W cutting mode. A monopolar electrosurgery needle tip is used to puncture the ovary perpendicular to the cortical surface and to pierce the follicular cysts that are characteristic of PCOS. Four to five punctures are placed symmetrically on the antimesenteric surface of the ovary (Fig. 44-7.1). Drilling is avoided on the lateral surfaces of the ovaries to minimize adhesions to the pelvic sidewall and is avoided at the ovarian hilum to limit bleeding risks. The needle is inserted to a depth of 4 to 10 mm. Electrical current is applied for 3 to 4 seconds. The ovarian surface can be irrigated with saline or lactated Ringer solution to cool it (Strowitzki, 2005).
Because of the risk for adhesion formation, some investigators use adhesion barrier products following ovarian drilling. Greenblatt and Casper (1993), however, showed no improvement in adhesion prevention following this procedure using Interceed adhesion barrier. No other studies have addressed the efficacy of other adhesion prevention products.
Subsequent surgery completion steps should follow those of diagnostic laparoscopy.
Postoperatively, patients are given instructions similar to those following diagnostic laparoscopy.
Laparoscopic Myomectomy
Myomectomy involves surgical removal of leiomyomas from their surrounding myometrium, and accepted indications include selected cases of abnormal uterine bleeding, pelvic pain, infertility, and recurrent miscarriage. Historically, removal of serosal and intramural tumors required laparotomy. However, laparoscopic excision may be performed by those with advanced skills in operative laparoscopy and laparoscopic suturing. Robotic myomectomy has also increased in popularity for this indication (Visco, 2008).
In general, removal of subserosal and intramural leiomyomas are most appropriate for a laparoscopic approach. Submucous leiomyomas are best treated via hysteroscopic resection. The choice of abdominal or laparoscopic myomectomy is based on various factors that include tumor number, size, and location. Surgical experience and comfort with laparoscopic dissection, tissue extraction, and suturing are other requisites.
Stay updated, free articles. Join our Telegram channel

Full access? Get Clinical Tree


