INTRODUCTION
Gynecologic surgery is used to treat a broad spectrum of underlying pathology. As a result, the list of surgical procedures is extensive, but in general, techniques maximize tissue healing and patient recovery. Successful outcomes depend on appropriate patient and procedure selection, sound intraoperative technique, and preparation for possible complications.
ANESTHESIA SELECTION
Many anesthetic options are available for patients undergoing gynecologic procedures and include general anesthesia, regional analgesia, or local paracervical blockade with or without conscious sedation. These anesthetic techniques are provided by clinicians who are skilled with their placement and capable of managing their side effects. Thus, paracervical blockade and intravenous sedation may be provided by gynecologists. General and regional anesthesia typically are delivered and managed by anesthesiology staff.
Anesthesia selection for gynecologic surgery is complex and influenced by the procedure planned, extent of disease, patient comorbidities, and personal preferences of the patient, anesthesiologist, and surgeon. Last, the providing hospital or clinic may further define options based on their practicing norms and availability of personnel or equipment. For example, an outpatient gynecology clinic may be equipped to provide paracervical blockade or intravenous conscious sedation, but may lack sophisticated equipment or expertise required for regional or general anesthesia.
In all cases, both the anesthesia provider and the surgeon communicate regarding patient and surgery progress and are prepared for potential problems. Difficult patient intubation may complicate general anesthesia, and regional anesthetic procedures may lead to higher than anticipated levels of blockade and respiratory muscle dysfunction. Cases using paracervical blockade may be complicated by inadequate levels of anesthesia, or conversely by anesthetic toxicity. Conscious sedation may also fail to provide adequate analgesia, or alternatively may lead to respiratory depression. Thus, no procedure is free of risk, and contingency plans for each should be in place.
Paracervical block is used most commonly during first-trimester pregnancy evacuation but also may be selected for cervical ablative or excisional procedures, transvaginal sonographically guided oocyte retrieval, and in-office hysteroscopy. Some studies have also described preemptive analgesia with paracervical block for vaginal hysterectomy (Long, 2009; O’Neal, 2003). Paracervical blockade is often combined with nonsteroidal antiinflammatory drugs (NSAIDs) or intravenous conscious sedation or both. Conscious sedation may be achieved with several agents, but intravenous midazolam (Versed) and fentanyl (Sublimaze) is a frequent combination (Lichtenberg, 2001).
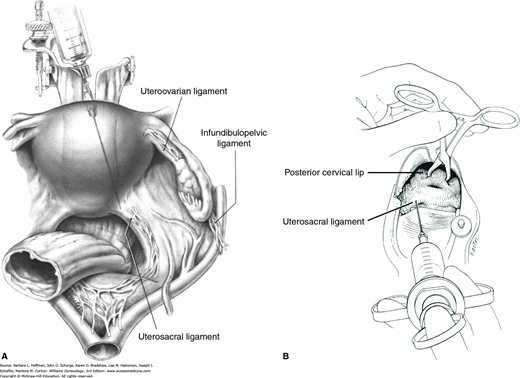
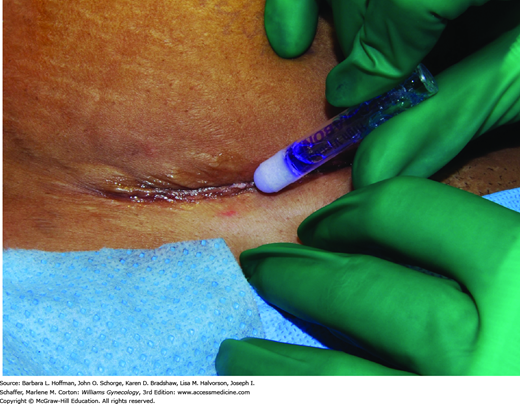
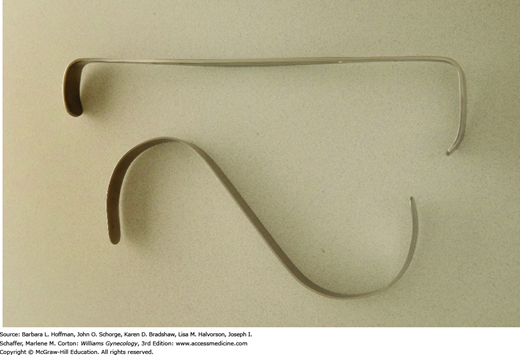
The cervix, vagina, and uterus are richly supplied by nerves of the uterovaginal plexus (Fig. 38-13). Also known as Frankenhäuser plexus, this plexus lies within the connective tissue lateral to the uterosacral ligaments. For this reason, paracervical injections are most effective if placed immediately lateral to the insertion of the uterosacral ligaments into the uterus (Rogers, 1998). Thus, divided doses are given at the 4 and 8 o’clock positions at the cervical base (Fig. 40-1).
FIGURE 40-1
Paracervical blockade. A. Abdominal view of a paracervical block. Local anesthetic is infiltrated near sensory innervation of the cervix, which lies near the uterosacral ligament. B. Vaginal view of the injection of local anesthetics into the cervical base at 4 and 8 o’clock. (Reproduced with permission from Penfield JA: Gynecologic Surgery under Local Anesthesia. Baltimore: Urban and Schwarzenberg; 1986.)
In most cases, total doses of 10 mL of 0.25-percent bupivacaine, 1-percent mepivacaine, or 1- or 2-percent lidocaine may be administered (Cicinelli, 1998; Hong, 2006; Lau, 1999). However, specific calculation of a maximum safe dose for each patient before injection is recommended (Dorian, 2015). The toxic dose of lidocaine approximates 4.5 mg/kg (Table 40-1). For a 50-kg woman, this would equal 225 mg. Thus, if a 1-percent lidocaine solution is used, the calculated allowed amount would be: 225 mg ÷ 10 mg/mL = 22.5 mL. Of note, for any drug solution, 1-percent = 10 mg/mL.
| Drug (Brand name) | Available Concentrations(%) | Maximum Dose (mg/kg) | Maximum Dose with Epinephrine (mg/kg) | Duration (hr) |
| Moderate-duration | ||||
| Lidocaine (Xylocaine) | 0.5, 1, 2 | 4.5 | 7 | 0.5–1 |
| Mepivicaine (Carbocaine) | 1, 1.5, 2 | 4 | 7 | 0.75–1.5 |
| Prilocaine (Citanest) | 0.5, 1 | 7 | 8.5 | 0.5–1.5 |
| Long-duration | ||||
| Bupivacaine (Marcaine) | 0.25, 0.5, 0.75 | 2.5 | 3 | 2–4 |
| Etidocaine (Duranest) | 0.5, 1 | 4 | 5.5 | 2–3 |
Anesthesia is presumed to result from pharmacologic nerve conduction blockade by the local anesthetic agent (Chanrachakul, 2001). The injection itself may have an immediate anesthetic effect by swelling surrounding tissue and exerting mechanical pressure on nerves to disrupt neural transmission (Phair, 2002; Wiebe, 1995). Addition of epinephrine to these solutions leads to local vasoconstriction, which enhances analgesia quality, prolongs duration of action, and decreases toxicity. Thus, higher maximum doses may be used. Return of neural function is spontaneous as the drug is metabolized.
In general, increased doses of local anesthetics may lead to clinically significant conduction blockade within the central nervous system (CNS) and heart. Signs range from drowsiness, tinnitus, perioral tingling, and visual disturbances to confusion, seizure, coma, and ventricular arrhythmia. Monitoring patients for the subtle symptoms of CNS toxicity is important because the therapeutic-to-toxic ratios are often narrow with these agents.
When toxicity develops, cardiac effects are potentiated by acidosis, hypercapnia, and hypoxia. Thus, treatment typically includes intravenous access, adequate oxygenation, and seizure control. A benzodiazepine such as diazepam (Valium) given intravenously is effective anticonvulsant therapy (Naguib, 1998). For treatment, diazepam, 2 mg/min, is administered until seizures stop or a total dose of 20 mg is delivered.
Injection of local anesthetic solutions through a catheter into the uterine cavity has been reported to safely lower pain scores in women undergoing in-office hysteroscopy or endometrial biopsy (Cicinelli, 1997; Trolice, 2000). The presumed mechanism is anesthetic blockade of nerve endings within the endometrial mucosa. Studies have used 5-mL doses of 2-percent lidocaine or of 2-percent mepivacaine. For first-trimester abortion procedures, Edelman and coworkers (2004, 2006) evaluated instillation of 5 mL of 4-percent lidocaine combined with paracervical blockade. However, for this indication, a significant number of women reported symptoms attributed to lidocaine toxicity.
Anesthesiologists are employing multimodal strategies intraoperatively to reduce postoperative pain. Gabapentin and ketorolac are now in common use (Alayed, 2014; De Oliveira, 2012). The transversus abdominis plane (TAP) block has been studied in abdominal and laparoscopic hysterectomy with promising results (Carney, 2008; De Oliveira, 2014). The surgeon may also improve postoperative analgesia by implanting suprafascial wound soaker catheters to administer local anesthesia (Iyer, 2010; Kushner, 2005). Additionally, local infiltrative analgesia, using a long-acting medication such as liposomal bupivacaine, may be injected into the incision by the surgeon (Barrington, 2013).
SURGICAL SAFETY
Communication between all members of the team is vital to the success of an operation and avoidance of patient harm. The Joint Commission established the Universal Protocol for Preventing Wrong Site, Wrong Procedure, and Wrong Person Surgery (Joint Commission, 2009). This protocol encompasses three components: (1) preprocedural verification of all relevant documents, (2) marking the operative site, and (3) completion of a “time out” prior to procedure initiation. The “time out” requires attention of the entire team to assess that patient, site, and procedure are correctly identified. Important interactions also include introduction of the patient care team members, verification of prophylactic antibiotics, anticipated procedure length, and communication of anticipated complications such as potential for large blood loss. Additionally, requests for special instrumentation are addressed preoperatively to prevent potential patient compromise that may accompany lacking an instrument at the time it is needed. Breakdowns in communication are common across pre-, intra-, and postoperative phases of care and are linked to adverse events and patient harm (Greenberg, 2007; Nagpal, 2010). Specifically, the transfer of a patient to a new care team or new location has been identified as a time particularly vulnerable to communication breakdowns (Greenberg, 2007).
SURGICAL ASSISTANT
A gynecology resident may sometimes feel that the role of assistant is unimportant. However, an experienced surgeon knows the critical difference that good assistance can provide. Assistants should anticipate surgeon needs and aid smooth progress of the operation. Therefore, an assistant must be familiar with the planned procedure’s steps, relevant anatomy, and clinical patient details.
Maintaining exposure by proper retraction and keeping the operative field clear of obstruction are primary functions. Laparotomy sponge or suction use is timed to avoid interfering with the surgeon, and a sponge is used to blot rather than wipe. Immediate pressure is placed on bleeding surfaces until the situation can be assessed systematically. Clamps are released slowly to avoid tissue slippage. Attention must be fixed on the procedure. Thus, if music or conversation is distracting, they are avoided.
NERVE INJURY PREVENTION
Anesthetized patients who undergo prolonged gynecologic procedures are at risk for peripheral neuropathy of their upper or lower extremities. These neuropathies are uncommon, and cited incidences approximate 2 percent of gynecologic cases (Cardosi, 2002). Neurologic deficits typically are mild, transient, and resolve spontaneously. Infrequently, prolonged or permanent disability may result.
During gynecologic surgery, lower extremity injuries can involve nerves of the lumbosacral plexus. Mechanisms of injury include surgical nerve transection, rupture following increased stretch, or nerve ischemia. Ischemia may result from compression of perineural vessels during prolonged or pronounced nerve stretch or compression. Although any patient may develop postoperative neuropathy, higher rates are noted in patients who smoke, who have anatomic abnormalities, or who are thin, diabetic, or alcoholic. Use of self-retaining retractors and prolonged surgical duration are additional factors (Warner, 2000).
Symptoms reflect functional loss of the affected nerve. Motor loss typically manifests as muscle weakness, whereas sensory loss may be noted as anesthesia, paresthesia, or pain in the nerve’s sensory distribution (Fig. 40-2 and Table 40-2). Therefore, a detailed neurologic examination allows clinical identification of most peripheral neuropathies. Electrodiagnostic testing is indicated if motor function is diminished (Knockaert, 1996). Generally, electromyography is most useful after a 2- to 3-week delay to permit denervational changes to fully develop within affected muscles (Winfree, 2005).
| Nerve | Origin | Motor Function | Sensory Function |
| Ilioinguinal | L1 | None | Inferior abdominal wall, mons pubis, labia majora |
| Iliohypogastric | L1 | None | Inferior abdominal wall, upper lateral gluteal region |
| Genitofemoral | L1–2 | None | Labia majora, anterior superior thigh |
| Femoral | L2–3 | None | Anterolateral thigh |
| Cutaneous femoral | L2–4 | Hip flexion, adduction; knee extension | Anterior and inferomedial thigh, medial calf |
| Obturator | L2–4 | Thigh adduction, lateral rotation | Superomedial thigh |
| Pudendal | S2–4 | Muscles of perineum; external anal and urethral sphincters | Perineum |
| Sciatic | L4-S3 | ||
| Common peroneal | L4-S2 | Knee flexion; foot dorsiflexion, eversion; toe extension | Lateral calf, foot dorsum |
| Tibial | L4-S3 | Thigh extension; knee flexion; foot plantar flexion, inversion | Foot plantar surface, toes |
Treatment will vary depending on whether motor or sensory function is affected. If motor function is impaired, neurologic consultation is typically warranted. Physical therapy begins immediately to minimize contracture and muscle atrophy. Alternatively, for those with only mild sensory losses, observation for return of function is reasonable. For those with pain, treatments may include oral analgesics, gabapentin, biofeedback, and serial trigger point injection with local anesthetics.
This nerve perforates the psoas muscle early in its course and passes medially beneath the inguinal ligament before exiting the pelvis. It then enters the femoral triangle to lie lateral to the femoral artery and vein. This nerve can be compressed anywhere along its course but is particularly susceptible within the body of the psoas muscle and at the inguinal ligament. Improper placement of a self-retaining retractor is the most common cause of surgical femoral nerve injury, and rates following abdominal hysterectomy may reach 10 percent (Fig. 40-3) (Goldman, 1985; Kvist-Poulsen, 1982). In affected women, the patellar reflex is usually absent in addition to impaired sensory and motor function.

In prevention, lateral retractor blades are selected and positioned such that only the rectus abdominis muscle and not the psoas muscle is retracted (Chen, 1995). The retractor blades are evaluated when placed, to confirm that they are not resting on the psoas muscle. For thin patients, folded laparotomy towels may be placed between the retractor rim and skin to elevate blades away from the psoas muscle. Importantly, a small percentage of cases occur when a retractor has not been used.
The genitofemoral nerve pierces the medial border of the psoas muscle and traverses below the peritoneum on this muscle’s surface. Similar to the femoral nerve, the genitofemoral nerve may suffer injury during psoas muscle compression (Murovic, 2005). In addition, this nerve may be injured during removal of a large pelvic mass adhered to the sidewall or during pelvic lymph node dissection (Irvin, 2004).
The lateral femoral cutaneous nerve appears at the lateral border of the psoas major muscle just above the crest of the ilium. It courses obliquely across the anterior surface of the iliacus muscle and dips beneath the inguinal ligament laterally as the nerve exits the pelvis. This nerve may also be compressed or be injured during dissections (Aszmann, 1997). Painful neuropathy specifically involving the lateral femoral cutaneous nerve carries the specific name meralgia paresthetica.
Nerve injury during transverse abdominal entry is common and typically involves the ilioinguinal and iliohypogastric nerves or less frequently, genitofemoral nerve branches. The ilioinguinal and iliohypogastric nerves emerge through the internal oblique muscle approximately 2 to 3 cm inferomedial to the anterosuperior iliac spine (Whiteside, 2003). The iliohypogastric nerve extends a lateral branch to innervate the lateral gluteal skin. An anterior branch reaches horizontally toward the midline and runs deep to the external oblique muscle. Near the midline, this nerve perforates the external oblique muscle and becomes cutaneous to innervate the superficial tissues and skin in the region above the symphysis pubis. The ilioinguinal nerve extends medially to enter the inguinal canal and innervates the lower abdomen, labia majora, and upper thigh.
These are sensory nerves, and fortunately, most skin anesthesia or paresthesias that follow their injury resolves with time. Accordingly, injuries frequently are underreported by both patients and clinicians. Less often, pain can begin immediately or many years later and is usually sharp and episodic and radiates to the upper thigh, labia, or upper gluteal region. Later, sensations may become chronic and burning, as described in Chapter 11. To avoid compromising these nerves, a surgeon ideally avoids extending the fascial incision beyond the lateral border of the rectus abdominis muscles (Rahn, 2010).
The obturator nerve pierces the medial border of the psoas muscle and extends anteriorly along the lesser wall of the pelvis. The obturator nerve exits through the obturator foramen. Lymph node dissection, tumor excision, or endometriosis resection performed at the pelvic sidewall may injure the obturator or genitofemoral nerves. Moreover, the obturator nerve also can be injured during dissection within the space of Retzius during some urogynecologic procedures.
This surgical position is used for vaginal, laparoscopic, and hysteroscopic surgeries. It is modified and described as standard or low lithotomy positions (Fig. 40-4). Dorsal lithotomy may be associated with injury to several nerves derived from the lumbosacral plexus, including the femoral, sciatic, and peroneal nerves. For example, compression and ischemic injury of the femoral nerve beneath the rigid inguinal ligament can follow prolonged sharp flexion, abduction, and external hip rotation in dorsal lithotomy (Fig. 40-5) (Ducic, 2005; Hsieh, 1998). Ideal positioning as shown can minimize these injuries.
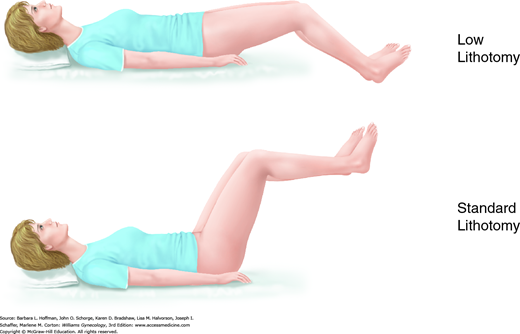
FIGURE 40-5
Lithotomy positioning. A. Hyperflexion of the hip can lead to compression of the femoral nerve against the inguinal ligament. (Redrawn from Anderton, 1988.) B. Ideal dorsal lithotomy positioning with limited hip flexion, abduction, and external rotation. (Adapted with permission from Irvin W, Andersen W, Taylor P, et al: Minimizing the risk of neurologic injury in gynecologic surgery. Obstet Gynecol 2004 Feb;103(2):374–382.)

The sciatic nerve, derived from the lower sacral plexus, exits the pelvis through the greater sciatic foramen. It extends down the posterior thigh and branches into the tibial nerve and common peroneal nerve above the popliteal fossa. The sciatic and common peroneal nerves are anatomically fixed at the sciatic notch and head of the fibula, respectively. For this reason, sciatic nerve injury may reflect impaired function of the entire sciatic nerve or only the common peroneal division. Sciatic nerve stretch injury can develop if a patient’s hips are placed in sharp flexion or pronounced external rotation or both. Moreover, even an appropriately positioned patient may be injured if a surgical assistant during vaginal surgery leans against the thigh and creates extreme hip flexion.
The common peroneal nerve, now termed the common fibular nerve, originates above the popliteal fossa and crosses the lateral head of the fibula before it descends down the lateral calf. At the lateral fibular head, this nerve is at risk for compression against leg stirrups. Therefore, the addition of cushioned padding or patient positioning that avoids pressure at this point is warranted (Philosophe, 2003).
This plexus derives from the ventral rami of C5-T1, traverses the neck and axilla, and supplies the arm and shoulder. Positioning injuries can follow hyperextension of the upper extremity, for example, when the arm is positioned at an angle to the body that exceeds 90 degrees. Additionally, even in situations in which the arm has been positioned appropriately, inadvertently leaning against the arm or placing the patient in steep Trendelenburg position may push the extremity into hyperextension. With injury, either motor or sensory function can be lost (Warner, 1998). Peripheral ulnar neuropathies can also develop by external compression if the arm is placed at the patient’s side. Padding the elbow may help avoid this (Warner, 1998).
SURGICAL INCISIONS
In women for whom laparotomy is selected, an ideal abdominal incision allows rapid entry, affords adequate exposure, permits early ambulation, promotes strong wound healing, does not compromise pulmonary function, and maximizes cosmetic results. These criteria form the foundation in choosing the best incision for each patient. In gynecology, opening the abdomen typically is achieved using a midline vertical incision or one of three low transverse incisions, the Pfannenstiel, Cherney, or Maylard incisions.
This incision is used frequently if access to the upper abdomen and generous operating space are required. It can be extended up and above the umbilicus and thus is preferred when the preoperative diagnosis is uncertain. Moreover, simple midline anatomy allows quick entry into the abdomen and low rates of neurovascular injury to the anterior abdominal wall (Greenall, 1980; Lacy, 1994). Moreover, because of decreased midline vascularity, Nygaard and Squatrito (1996) recommend this incision in patients who have coagulopathy, decline transfusion, or are administered systemic anticoagulation.
Its greatest disadvantage stems from increased tension on the incision when abdominal muscles contract. For this reason, compared with transverse incisions, midline vertical incisions are associated with higher rates of fascial dehiscence and hernia formation and poorer cosmetic results (Grantcharov, 2001; Kisielinski, 2004). Additionally, patients who have repeat vertical incisions for gynecologic indications tend to develop more adhesive disease than with low transverse incisions (Brill, 1995).
These incisions are used commonly in benign gynecologic surgery, provide several advantages, and are illustrated in the atlas. They follow Langer lines of skin tension and thus offer superior cosmetic results. They also carry low rates of incisional hernia (Luijendijk, 1997). Moreover, their placement in the lower abdomen is associated with decreased postoperative pain and improved pulmonary function compared with midline vertical incisions. Of low transverse incisions, Pfannenstiel incision is typically the simplest to perform, and for this reason, it is selected most often.
Despite these advantages, transverse incisions have limitations. These incisions limit access to the upper abdomen and offer smaller operating space compared with midline incisions. This is especially true of the Pfannenstiel incision and results from narrowing of the surgical field by intact rectus abdominis muscle bellies, which straddle the incision.
Consequently, Cherney and Maylard incisions were developed to overcome this restriction, and to some degree, they do improve exposure. The Cherney incision releases the rectus abdominis muscle at its inferior tendinous insertion. This approach affords greater exposure of pelvic organs and access to the space of Retzius. The Cherney incision may also be used if a Pfannenstiel incision has already been initiated, but then additional exposure is required.
The Maylard incision transects the rectus abdominis muscle and provides substantial operative space. However, it is technically more difficult because isolation and ligation of the inferior epigastric arteries are required. The incision is used infrequently because of concerns regarding operative pain, decreased abdominal wall strength, longer operating times, and increased febrile morbidity. Randomized studies, however, have not supported these concerns (Ayers, 1987; Giacalone, 2002). This incision is avoided in patients whose superior epigastric vessels have been interrupted and in those with significant peripheral vascular disease who may rely on the inferior epigastric arteries for lower-extremity collateral blood supply.
Entry into the abdomen begins with scalpel incision of the skin, and scars are excised to improve wound healing and cosmetic results. Although an electrosurgical blade may be used to incise the skin, faster healing and improved appearance in general follow scalpel incision (Hambley, 1988; Singer, 2002b).
For the remaining layers, scalpel or electrosurgical blade may be selected, with no differences in short- or long-term wound healing with either (Franchi, 2001). However, in evaluating surgical bleeding and postoperative pain, Jenkins (2003), in his review, noted an advantage with electrosurgical blade use. Regardless of type of incision or instrument used, adherence to proper technique is emphasized: obtaining meticulous hemostasis, minimizing devitalized tissue, and avoiding dead space creation.
WOUND CLOSURE
Following laparotomy, closure of a laparotomy incision must address the peritoneum, fascia, subcutaneous layer, and skin. Wound closure may be broadly categorized as either primary or secondary. With primary closure, materials are used to approximate tissue layers. In closure by secondary intention, wound layers remain open and heal by a combination of contraction, granulation, and epithelialization. Secondary closure is used infrequently in gynecologic surgery and typically is indicated if tissues planned for closure contain significant infection. The option of delayed primary closure is also available in these situations once infection has cleared.
Optimal closure of a laparotomy incision is the subject of much debate. Most data stem from general surgery and gynecologic oncology studies on midline abdominal incision closure and from research on cesarean delivery techniques. Ideally, closure avoids wound infection, adhesion formation, dehiscence, and hernia or sinus tract formation; minimizes patient discomfort; yet preserves cosmesis to the extent possible.
The peritoneum provides no abdominal wall strength, and closure of this layer has been suggested to prevent adhesions between the anterior abdominal wall and adjacent organs. However, evidence is conflicting, and several studies have shown that nonclosure of the peritoneum compared with closure decreases operating time without increasing adhesion formation, wound complications, or infection (Franchi, 1997; Gupta, 1998; Tulandi, 1988). However, few well-done randomized controlled trials have assessed long-term adhesion formation. Accordingly, closure of the visceral or parietal peritoneum is often provider dependent. Without closure, this layer typically regenerates within days following surgery (Lipscomb, 1996).
Thus in many cases, the first tissue closed is fascia. Many studies have supported the use of a continuous running-stitch closure of abdominal incisions compared with interrupted closure of the fascia (Colombo, 1997; Orr, 1990; Shepherd, 1983). Continuous closure usually is faster and associated with comparable rates of dehiscence, wound infection, and hernia formation. Suture material selection tends to favor delayed-absorbable suture compared with nonabsorbable. Delayed-absorbable sutures appear to afford adequate wound support yet lead to less pain and lower rates of sinus tract formation (Carlson, 1995; Leaper, 1977; Wissing, 1987). However, nonabsorbable suture is considered if a hernia is identified or if the incision has cut through previously placed mesh. A 0-gauge or no. 1 suture is suitable for closure of most fascial incisions. Sutures are placed approximately 1 cm apart and 1.2 to 1.5 cm from the fascial edge. Little additional security is attained beyond 1.5 cm (Campbell, 1989). Stitches ideally appose fascial edges and allow tissues to swell postoperatively without cutting through fascia or causing avascular necrosis.
Collections of blood and fluid serve as potential accelerants to bacterial growth. For this reason, to decrease rates of hematoma or seroma, investigators have evaluated subcutaneous layer suture closure or drains. In those with layers less than 2 cm thick, most studies have found no advantage to either practice. However, wound infection and fat thickness are the greatest risk factors for subcutaneous layer dehiscence (Soper, 1971; Vermillion, 2000). For patients with subcutaneous layers 2 cm or more thick, closing the subcutaneous layer is effective prevention (Gallup, 1996; Guvenal, 2002; Naumann, 1995). The ideal suture and technique for closure of this layer are unknown, but efforts ideally close dead space yet minimize suture burden and inflammatory reaction. A 2-0 gauge plain gut suture is one suitable choice.
Skin may be closed effectively with staples, subcuticular suturing, wound tape, or tissue adhesive. Thus, in most instances, surgeon preference influences closure method. Technically, the incision line is approximated without skin tension, and subcutaneous adipose or deep dermal suturing may assist with carrying tension loads.
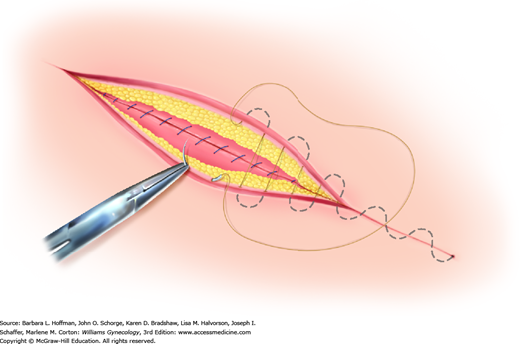
Of options, the running subcuticular suture is placed by taking horizontal bites through the dermis on alternating sides of the wound using absorbable suture (Fig. 40-6). Delayed-absorbable material such as polyglactin (Vicryl) or poliglecaprone (Monocryl) in a fine gauge, such as 3-0 or 4-0, is suitable. Advantages include decreased cost, effective skin approximation, and no required suture removal. However, this method typically requires the greatest amount of time and technical expertise.
FIGURE 40-6
During subcuticular suturing, stitches are placed with a needle horizontal to the dermis. Suturing is advanced by sequentially piercing just below the dermis on alternating sides. The spot where the first stitch exits the subcutis marks the site along the wound length that the needle should enter on the opposite side.
Automatic stapling devices are favored because of their fast application and secure wound closure. However, they do not allow as meticulous a closure as sutures, and wounds requiring accurate approximation of tissue are not ideal candidates for staple closure (Singer, 1997). Staples may be uncomfortable, may be associated with discomfort during removal, and require the patient to return for staple removal.
Before stapling, the wound edges are everted, preferably by a second operator. If the edges of a wound invert or if one edge rolls under the opposite side, a poorly formed, deep, noticeable scar will result. Additionally, pressing too hard against the skin surface with the stapler is avoided to prevent placing the staple too deep and causing ischemia within the staple loop. When placed properly, the crossbar of the staple is elevated a few millimeters above the skin surface (Lammers, 2004). Staples are removed in a timely fashion to avoid leaving “track mark” scarring.
Of topical skin adhesives, octyl-2-cyanoacrylate (Dermabond) is applied as a liquid and polymerizes to a firm, pliable film that binds to the epithelium and bridges wound edges (Fig. 40-7). It can be used for closure of skin incisions that carry minimal tension such as laparoscopy trocar or transverse laparotomy incisions, or as an adjunct protective layer in larger incisions. Tissue adhesives achieve results similar to those for traditional sutures (Blondeel, 2004; Singer, 2002a).
Following approximation of deeper incision layers, the adhesive is applied in three thin layers above apposed skin edges. The adhesive extends at least ½ cm on each side of the apposed wound edges. Placement of the liquid between skin edges is avoided because the adhesive may retard healing (Quinn, 1997). Although 30 seconds between layers for drying is required, application is fast. Moreover, adhesives create their own dressing and appear to afford some antibacterial protection (Bhende, 2002). The adhesive sloughs in 7 to 10 days. Showering and gentle washing of the site are allowed, but swimming is discouraged. Petroleum-based products on the wound can decrease adhesive tensile strength and are avoided.
The primary indication for tape closure is a superficial straight laceration under little tension. Thus, closure of laparoscopy trocar sites or laparotomy incisions in which deep layer closure has brought skin edges into close proximity are suitable cases. Moreover, skin edges ideally are thoroughly dry for proper adhesion. Thus, tape may not be appropriate for a wet or oozing wound, for concave surfaces such as the umbilicus, for areas of significant tissue tension, or for areas of marked tissue laxity.
Tape closure is fast, inexpensive, and associated with high patient satisfaction scores. Tapes typically are removed by the patient 7 to 10 days following surgery. They may also be used after staple removal to provide additional strength, as wounds have regained only approximately 3 percent of their final strength at 1 week. Adhesive tape strips are applied in a parallel, nonoverlapping fashion after coating the entire application area with adjuvant adhesive such as tincture of benzoin (Katz, 1999). Importantly, skin blistering may develop if tape is stretched excessively taut across the wound (Lammers, 2004; Rodeheaver, 1983).
INSTRUMENTS
Surgical instruments have been designed to extend the capability of a surgeon’s hands and thus are crafted to retract, cut, grasp, and clear the operative field. Tissue types encountered in gynecologic surgery vary, and accordingly, so too do the size, fineness, and strength of the tools used.
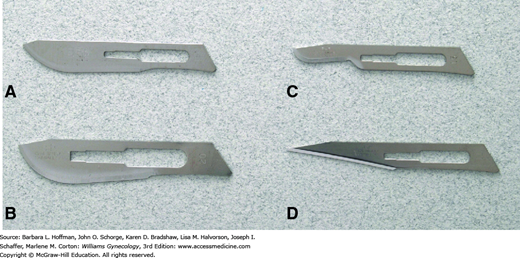
Of these tools, typical surgical blades used in gynecologic surgery are pictured in Figure 40-8 and include number 10, 11, 15, and 20 blades. Function follows form, and larger blades are used for coarser tissues or larger incisions, whereas a no. 15 blade is selected for finer incisions. The acute angle and pointed tip of a no. 11 blade can easily incise tough-walled abscesses for drainage, such as those of the Bartholin gland duct.
With a correct scalpel grasp, a surgeon can direct blade movement. Fingers may be positioned either to straddle the scalpel, termed the “power grip,” “violin grip,” or “bow grip,” which maximizes the use of the knife belly. Alternatively, the scalpel is held like a pencil, termed the “pencil grip” or “precision grip” (Fig. 40-9). With the no. 10 and no. 20 blades, the scalpel is held at a 20- to 30-degree angle to the skin and drawn firmly along the skin toward the surgeon using the arm with minimal wrist and finger movement. This motion aids cutting with the full length of the scalpel belly and avoids burying the tip. The initial incision penetrates the dermis, and the scalpel remains perpendicular to the surface to prevent skin edge beveling. Firm and symmetrical lateral skin traction keeps the incision straight and helps avoid multiple tracks and irregular skin edges.
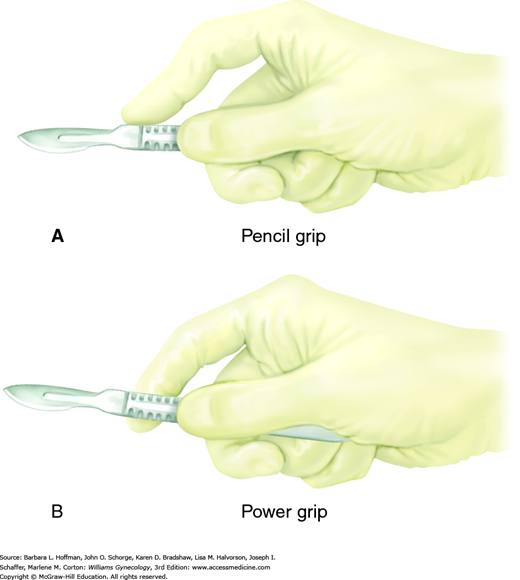
The no. 15 and 11 blades, in contrast, are typically held using the pencil grip to make fine, precise incisions. With the no. 15 blade, the scalpel is held approximately 45 degrees to the skin surface. Fine knife dissection is best controlled using the fingers, and the heel of the hand can be stabilized on adjacent tissue. The no. 11 blade scalpel is ideal for stab incisions and is held upright at nearly 90 degrees to the surface. Creating tension at the skin surface is important as it reduces the amount of force required for penetration. Omission of this can result in uncontrolled penetration of underlying structures. To lengthen the incision, a gentle in-and-out sawing motion is used.
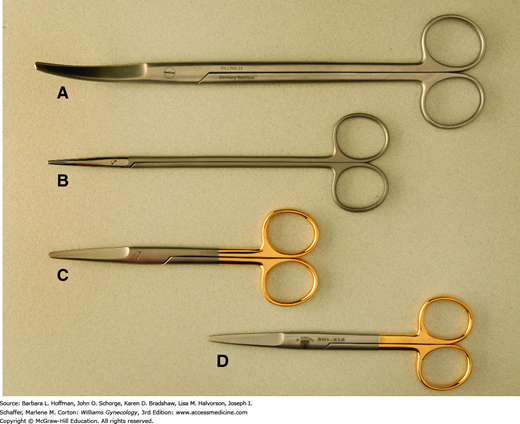
These are used commonly to divide tissues, and modification in blade shape and size allows their use across various tissue textures (Fig. 40-10). For correct positioning, the thumb and fourth finger are placed within the instrument’s rings, and the index finger is set against the crosspiece of the scissors for greater control. This “tripod” grip allows maximum shear, torque, and closing forces to be applied and provides superior stability and control. In general, surgeons cut away from themselves and from dominant to nondominant sides.
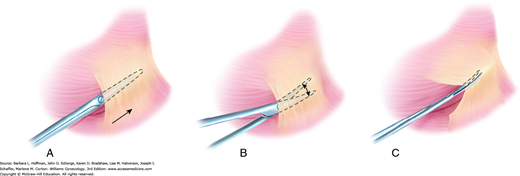
The fine blades of Metzenbaum or iris scissors are used routinely to dissect or define natural tissue planes such as dividing thin adhesions or incising peritoneum or vaginal epithelium. During dissection, traction on opposing poles of the tissue to be dissected typically simplifies the process, and a small nick is often necessary to enter the correct tissue plane. The blades are closed and inserted between planes, following the natural curves of tissues being dissected (Fig. 40-11). The blades are opened and then withdrawn. After turning both wrist and blades 90 degrees, the surgeon reinserts the lower blade, and tissues are divided. When dissecting around a curve, the scissors follow the natural curve of the structure. Dissection proceeds in the same plane to avoid burrowing into the structure or deviating away and toward unintended adjacent tissues.
FIGURE 40-11
Plane dissection. A. During development of tissue planes, the tips of closed Metzenbaum scissors are placed at the border between two tissues, and forward pressure is applied to advance the tips. B. Scissors are spread to expand the tissue plane. C. The scissors are retracted and rotated 90 degrees. The lower blade is reinserted into the newly created tissue plane, and tissues are divided.
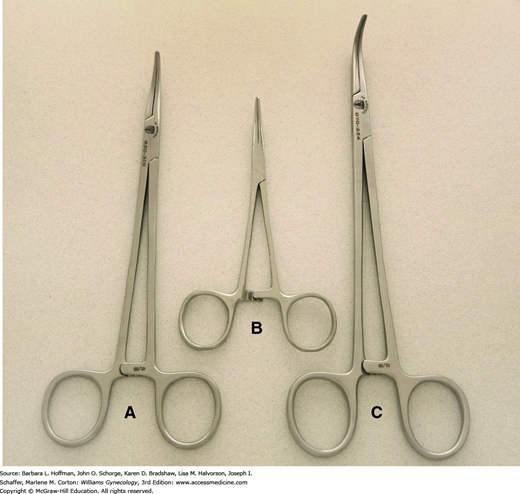
For thicker tissues, sturdier scissors such as curved Mayo scissors are used. Similarly, Jorgenson scissors have thick blades and tips that are curved at a 90-degree angle. These are used commonly to separate the vagina and uterus during the final steps of hysterectomy. Suture-cutting scissors have blunt, flat blades and are reserved for this function to avoid dulling tissue scissors.
These may be straight or curved, and commonly, one with straight, blunt jaws is chosen during routine tissue approximation and pedicle ligation. Needles ideally pierce tissues perpendicularly. Thus, in most cases, the needle holder grasps a needle at a right angle and at a site approximately two-thirds from the needle tip.
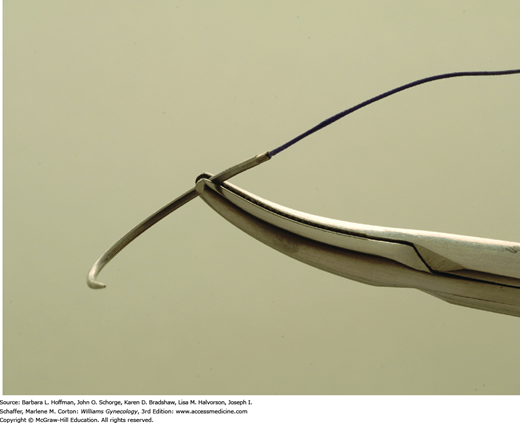
Alternatively, some needle holders, such as the Heaney needle holder, are curved and aid needle placement in confined or angled areas. If a curved holder is used, the needle is grasped similarly, and the inner curve of the holder typically faces the needle swage (Fig. 40-12).
Traditionally, the needle holder is held with the thumb and fourth finger in the rings. The greatest advantage of this grip is the precision afforded. The spring tension of the handles is relieved from the lock in a controlled fashion, thereby releasing and regrasping the needle more precisely. Alternatively, with the “palmar grip,” the needle holder is held between the ball of the thumb and the remaining fingers, and no fingers enter the instrument rings. This grip allows a simple rotating motion for driving curved needles through an arc. Its greatest advantage is the time saved during continuous suturing, as the needle can be released, regrasped, and redirected efficiently without replacing fingers into the instrument rings. Disadvantageously, this grip has the potential to lack precision during needle release. When unlocking the needle driver, release of the spring lock should be smooth and gradual. This avoids an abrupt release, which may suddenly pop the handles apart with potential for awkwardness, loss of needle control, and tissue injury.
Forceps function to hold tissue during cutting, retract tissue for exposure, stabilize tissue during suturing, extract needles, grasp vessels for electrosurgical coagulation, pass ligatures around hemostats, and pack sponges. Forceps are held so that one blade functions as an extension of the thumb and the other as an extension of the opposing fingers. Alternate grips may appear awkward and limit the full range of wrist motion, leading to suboptimal instrument use.
Heavy-toothed forceps, such as the Potts-Smith single-toothed forceps, Bonney forceps, and Ferriss-Smith forceps, are used when a firm grasp is more important than gentle tissue handling (Fig. 40-13A). These tools are often used to hold fascia for abdominal wound closure.
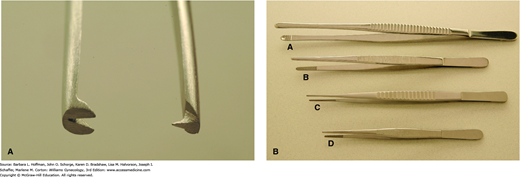
Light-toothed forceps, such as the single-toothed Adson, concentrate force on a tiny area and give more holding power with less tissue destruction. These are used for more delicate work on moderately dense tissue such as skin. Nontoothed forceps, also known as smooth forceps, exert their grip through serrations on the opposing tips (Fig. 40-13B). They are typically used for delicate tissue handling and provide some holding power with minimal injury. DeBakey forceps are another type of smooth forceps originally designed as vascular forceps but can be occasionally used for other delicate tissues. In contrast, the broader, shallow-grooved tips of Russian forceps and Singley forceps may be preferred if a broader or thicker area of tissue is manipulated.
Clear visualization is essential during surgery, and retractors conform to body and organ angles to allow tissues to be pulled back from an operative field. In gynecology, retractors may be grouped broadly as self-retaining or handheld and as vaginal or abdominal.
During abdominal surgery, retractors that by themselves hold abdominal wall muscles apart, termed self-retaining, are used commonly. Styles such as the Kirschner and O’Connor-O’Sullivan contain four broad, gently curved blades and retract in four directions. Blades pull the bladder caudally and the anterior abdominal wall muscles laterally and cephalad. The Balfour retractor retracts in three directions but can be made to retract in four with the addition of an upper arm attachment. Alternatively, ring-shaped retractors such as the Bookwalter and Denis Browne styles offer greater variability in the number and positioning of retractor blades. However, these styles usually require more time to assemble and place. With all of these retractors, deep or shallow blades can be attached to the outer metal frame according to the abdominal cavity depth. As discussed earlier, blades should be shallow enough to avoid femoral nerve compression.
In addition to these metal bladed styles, several disposable retractors consist of two equal-sized plastic rings connected by a cylindrical plastic sheath. One ring collapses into a canoe shape that can be threaded through the incision and into the abdomen. Once inside the abdomen, it springs again to its circular form. The second ring remains outside. Between these rings, the plastic sheath spans the thickness of the abdominal wall and creates 360-degree retraction. As shown in Figure 44-8.7, Alexis or Mobius brands can be ideal for minilaparotomy, but sizes are also available for laparotomy.
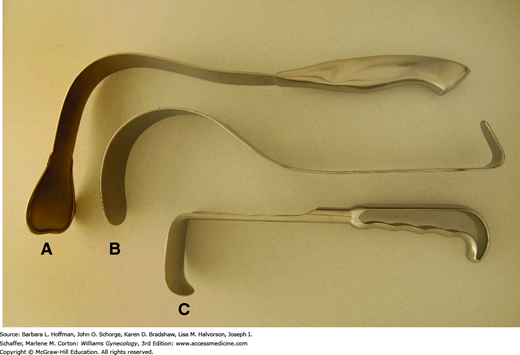
Handheld retractors may be used in addition to or in place of self-retaining styles. These instruments allow retraction in only one direction but can be placed and repositioned quickly. The Richardson retractor has a sturdy, shallow right-angled blade that can hook around an incision for abdominal wall retraction (Fig. 40-14). Alternatively, Deaver retractors have a gentle arching shape and conform easily to the curve of the anterior abdominal wall. Compared with Richardson retractors, they offer increased blade depth and are often used to retract bowel, bladder, or anterior abdominal wall muscles. A Harrington retractor, also called a sweetheart retractor, has a broader tip that also effectively holds back bowel.
In certain instances, such as during suturing of the vaginal cuff, a thin, deep retractor blade, termed a malleable retractor, may be required to retract or protect surrounding organs. Also called a ribbon retractor, this tool is a long, relatively flexible metal strip that can be bent to conform to various body contours for effective retraction. Narrow and wider sizes are available. These also may be used to cover and protect underlying bowel from needle-stick injury during abdominal wall closure.
For smaller incisions, the preceding retractors are too large, and those with smaller blades such as the Army-Navy retractor or S-retractor are selected. S-retractors offer thinner, deeper blades, whereas the sturdier blades of the Army-Navy style allow stronger retraction (Fig. 40-15). A Weitlaner self-retaining retractor may also be used for minilaparotomy incisions.
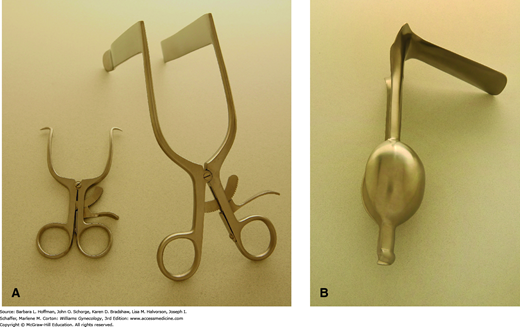
The vaginal walls can be separated using several self-retaining models. The Gelpi retractor has two narrow teeth that are placed distally against opposing lateral vaginal walls and is most appropriate for perineal procedures (Fig. 40-16A). The Rigby retractor, with its longer blades, effectively separates lateral vaginal walls, whereas a Graves speculum, shown in Figure 1-6, holds apart anterior and posterior walls. An Auvard weighted speculum contains a long, single blade and ballasted end, which uses gravity to pull the posterior vaginal wall downward (Fig. 40-16B).
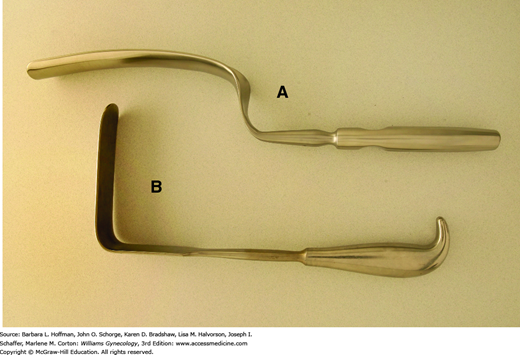
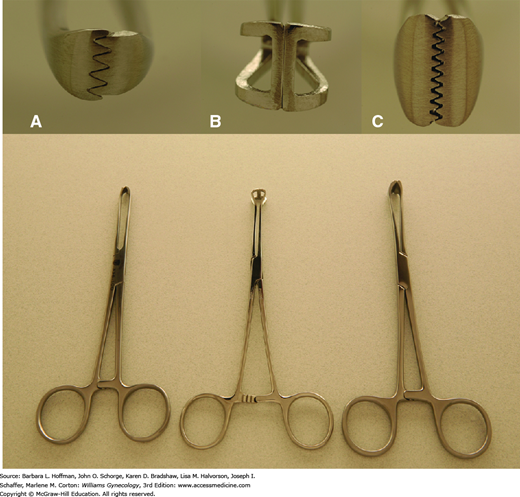
The degree of retraction offered by vaginal self-retaining retractors, however, at times may be limited. Therefore, handheld retractors are often required to augment or replace these instruments. Handheld retractors used in vaginal surgery include the Heaney right-angle retractor, the narrow Deaver retractor, and the Breisky-Navratil retractor (Figs. 40-17). Additionally, during vaginal procedures, the cervix often must be manipulated. Lahey thyroid clamps offer a secure grip during vaginal hysterectomy, but their several sharp teeth can cause significant trauma. These are therefore less than ideal in patients in whom the cervix will remain. In these patients, in whom curettage or laparoscopy is performed, a single-toothed tenaculum can afford a firm grip but with less cervical damage (Fig. 40-18).
Retraction is a fundamental requirement during most gynecologic surgery. As a result, various shapes, sizes, and strengths of clamps have been created to manipulate the different tissues encountered. For example, the smooth, cupped jaws of a Babcock clamp are ideal for gentle elevation of fallopian tubes, whereas the serrated teeth of the Allis and Allis-Adair clamps can provide a fine, firm grip on covering epithelia or serosa during dissection (Fig. 40-19).
Clamps are also used to occlude vascular and tissue pedicles during organ excision. Hemostats and Mixter right-angle clamps have small, slender jaws with fine inner transverse ridges to atraumatically grasp delicate tissue, especially vessels (Fig. 40-20).
Heavier clamps are required to grasp and manipulate stiffer tissues such as fascia and include Pean (also termed Kelly) and Kocher (also termed Ochsner) clamps. These clamps have finely spaced transverse grooves along their inner jaws to minimize tissue slippage. They may be straight or curved to fit tissue contours and like Kocher clamps, may contain a set of interlocking teeth at the tip for additional grip security. Another choice, the ring forceps, has large open circular jaws with fine transverse grooves. These effectively grasp broad, flat surfaces. Additionally, a folded gauze sponge can be placed between its jaws and used to absorb blood from the operative field or gently retract tissues.
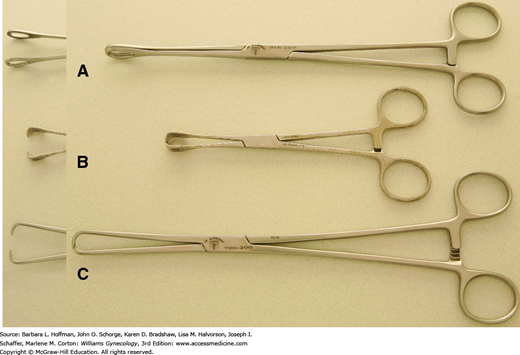
Ligaments that support the uterus and vagina are fibrous and vascular. Thus, a sturdy clamp that resists tissue slippage from its jaws is required during hysterectomy. Several clamps, including Heaney, Ballantine, Rogers, Zeppelin, and Masterson clamps, among others, are effective (Fig. 40-21). The thick, durable jaws of these clamps carry deep, finely spaced grooves or serrations arranged either transversely or longitudinally for secure tissue grasping. Additionally, some contain a set of interlocking teeth at the tip or heel or both. Although this modification improves grip, it also may increase tissue trauma. More acutely angled clamps are typically selected when available operating space is cramped.
Stay updated, free articles. Join our Telegram channel

Full access? Get Clinical Tree


