- General guidance
- Mask ventilation
- Endotracheal Intubation
- Cardiopulmonary resuscitation (CPR)
- Drainage of a pneumothorax
- Pericardial aspiration
- Umbilical vessel catheterization
- Exchange transfusion
- Peripheral arterial catheterization
- Blood sampling
- Insertion of a percutaneous long line
- Extravasation injury
- Collection of cerebrospinal fluid
- Collection of urine
Introduction
Where possible a procedure should be witnessed at least twice and then performed under supervision before doing it independently. Valuable experience in most of the procedures can be gained by practicing on manikins and simulators. Neonatal Life Support and similar courses offer the opportunity to gain practical skills in life saving procedures and those working with newborns should be encouraged to participate and update their skills. One should realize that in ill infants who are not stable, some of these procedures may be potentially harmful, even when performed by experienced staff.
General Guidance
Ensure that all equipment is prepared and that both the operator and assistants are familiar with the procedure. Maintain adequate thermal care during the procedure, as newborn babies are prone to lose heat fast, and ensure that adequate analgesia and anaesthesia have been provided except for emergency situations. Do not persist beyond two failed attempts – seek a colleague’s help or take a break and try again.
All procedures should be clearly documented in the notes and any complication arising from the procedure recorded in the critical incident report (CIR) which can be used for audit and practice development.
Adherence to strict aseptic measures is mandatory and operator should be aware of local policies regarding disposal of sharps and needles.
No procedure, unless an emergency, should be carried out without informed consent from the parents.
Mask Ventilation
It is important for any nurse, midwife or doctor who is involved in the delivery or care of newborn infants to learn how to use a face mask for emergency assisted ventilation. Traditionally the most commonly used bags on labour wards and in neonatal units were self-inflating bags with pressure-relief safety valves which can be overridden when necessary. However, most units now use a T-piece system (Tom Thumb circuits, Fig. 29.1a) which seems to be more effective in tidal volume delivery, and come with facilities to set up peak pressure and positive end expiratory pressure (PEEP.)
Figure 29.1 (a) T-piece (Fischer Pykell Health Care). (b) Face masks designed for use in face mask ventilation of term and preterm newborns. The masks shown are the Laerdal size 0/1, Armstrong size 1 (Large Infant), Fisher & Pakell 60 mm and Intersurgical size 1 Large Anatomical mask.
(Courtsey Dr Fiona Wood.)
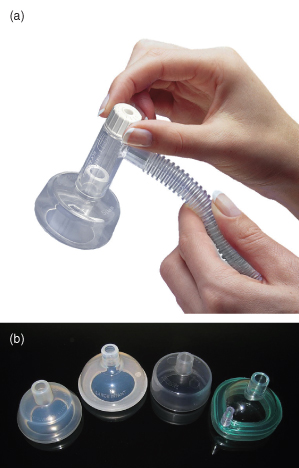
There are several different types of face mask in different sizes to suit premature and full-term infants (Fig. 29.1b). Choose a face mask that fits snugly over the baby’s mouth and nose but does not overhang the chin or cover the eyes. Round masks with a cushioned rim are preferable as it is easier to make a tight seal.
Technique
Make sure there is good chest wall movement, good air entry on auscultation of the lungs, and improvement in the infant’s colour and heart rate. If chest wall movement is poor, check position of the airway and that the airway is clear. You may need to reposition. Frequently, the application of a jaw thrust or the insertion of an appropriate infant oral pharyngeal airway (Guedel) will improve air entry. Once chest wall movement has been achieved, the lowest pressure to maintain lung inflation should be used. The infant’s lungs can be damaged by excessive inflation pressures. If there is no improvement in condition after effective lung inflation for 1–2 min, consider the need for intubation.
Endotracheal Intubation
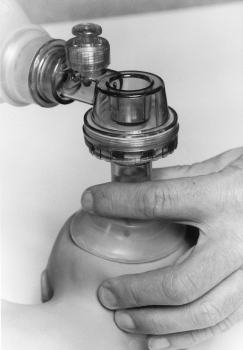
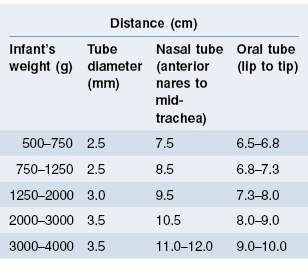
The ability to hand ventilate using a mask/T-piece system or bag-valve-mask is a more vital skill than intubation (Fig. 5.2 and Fig. 29.2). Endotracheal intubation is universally performed using an uncuffed tube (uniform-diameter tube). Use sizes 2.5, 3.0 and 3.5 mm for infants weighing 1.0, 2.0 and 3.0 kg, respectively. Premedication with suitable analgesia and sedation (such as short-acting opiate), should always be used except for emergency resuscitation. Neuromuscular paralysis can sometime be used as it makes intubation quicker and easier, but if it is already known that intubation in a particular baby is likely to be difficult, one should ensure that a suitably experienced person is present.
Orotracheal Intubation
Figure 29.3 Laryngoscopy. The laryngoscope blade displaces the tongue and lifts the epiglottis anteriorly to expose the cords.
(Reproduced with permission of Baillière Tindall.)
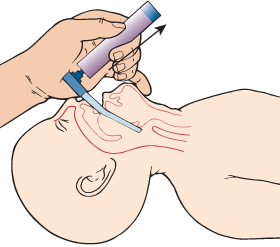
Figure 29.4 The stages of intubation. Visualization of the uvula and oropharynx (a). The epiglottis is seen with the oesophagus beyond it (b). The cords are also seen (c).
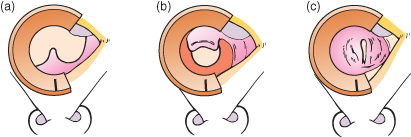
Table 29.1 Recommendations for neonatal intubation
Disposable end-tidal CO2 detectors are now available and should be used to confirm that the tube is in the trachea but this can give false results in infants under 1 kg and in low cardiac output states.
Nasotracheal Intubation
Nasal intubation is not normally used for emergency intubation but some units prefer this for long-term intubation (and ventilation) as fixation is more stable. Therefore, this is mostly carried out as an elective procedure. The overall preparation and procedure is similar to oral intubation.
Fixation of the Endotracheal Tube
Each unit has its own methods for securing an endotracheal tube (Fig. 29.5). It is most important that the tube is fixed securely on to the face to avoid accidental extubation, and also to ensure that the infant’s sensitive skin is not traumatized by the procedure.
Extubation Procedure
This should be a planned procedure and performed only after careful assessment of the baby’s suitability for extubation. Despite this careful judgement, a baby may not tolerate extubation and require reintubation, and hence there should be a resuscitation trolley at hand. Prophylactic treatment with caffeine, and postextubation switch to nasal continuous positive airway pressure (CPAP) (especially in low birthweight babies) may aid successful extubation and reduce the need for reintubation. Individual units must develop their own protocols.
Cardiopulmonary Resuscitation
Cardiopulmonary resuscitation (CPR) is necessary in cases of cardiac arrest or severe bradycardia not responding to airway opening, oxygenation and ventilation.
There are two methods for chest compressions. The most effective method is the two-handed approach but this can be difficult to do if space around the baby is limited, and vascular access is being obtained. To do this:
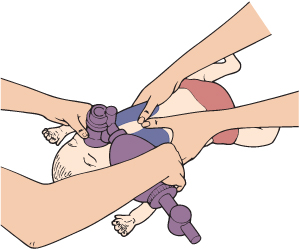
Figure 29.6 External cardiac massage over the lower third of the sternum. Simultaneous ventilation is also necessary as shown.
The second method is the one-handed technique:
Drainage of a Pneumothorax
If there is a sudden deterioration in an infant with respiratory distress, whether he/she is receiving mechanical ventilation or not, a pneumothorax should be considered and the following carried out.
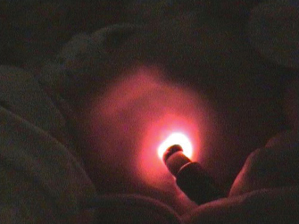
Figure 29.7 Transillumination of a large unilateral pneumothorax.
Placement of a Chest Drain
There are two positions for drainage insertion:
- anteriorly in the second intercostal space in the midclavicular line (Fig. 29.8a)
- laterally in the fifth or sixth intercostal space in the anterior to mid-axillary line (Fig. 29.8b).
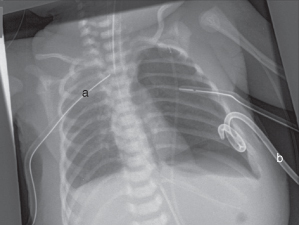
Figure 29.8 Two types of drains used for treating pneumothorax. This child required multiple drains. The top catheters (a), one on each side, are straight catheters whereas the lower one (b) is a pigtail catheter.
(Courtsey Dr Shalabh Garg.)
The anterior position appears to be the most successful in draining pneumothoraces, but it is important to avoid trauma to the infant’s nipples and unsightly scarring. In most units, the lateral position is the preferred position.
There are two main types of chest drain. The more common are the blunt dissection type. However, more modern pigtail chest drains are now often used with excellent results. Both techniques are described below.


