OR table: regular table with hand table extension
Positioning: supine
Fluoroscopy location (if necessary): along the foot of the bed, in the axilla
Equipment: standard wrist arthroscopy tower with finger traps (Linvatec, Largo, FL), 1.9 or 2.3 mm arthroscope, micro electrocautery device, arthroscopic shavers, arthroscopic biters, arthroscopic probe
Tourniquet: arm tourniquet, non-sterile
Diagnostic Wrist Arthroscopy of the Radiocarpal Joint
The appropriate anatomic landmarks of the wrist (Lister’s tubercle, extensor pollicis longus (EPL), extensor carpi ulnaris (ECU), ulnar head) should be marked at the beginning of the procedure. The 3–4 portal (between the EPL and EDC tendons) is the standard viewing portal. This portal is located approximately 1 cm distal to Lister’s tubercle. An 18-gauge needle on a 10-ml syringe is advanced into the joint, popping through the capsule. The needle should be angled slightly from distal to proximal due to the volar tilt of the distal radius. Once in the joint, a diagnostic injection of saline is performed. An intact radiocarpal joint will accommodate approximately 3 ml of fluid volume. After injecting 3–4 ml of saline, removing pressure from the syringe plunger will allow the examiner to observe the plunger travel backward due to the elastic intact capsule pushing back the injected fluid. If there is ligamentous compromise due to a soft-tissue injury such as TFCC tear or an intercarpal ligament tear, more than 3 ml of fluid will be injected via the 3–4 portal, and one may see fluid extravasation into the distal radioulnar joint (TFCC injury) or the midcarpal (SLIL or LTIL injury) joint. This is a sensitive test for wrist pathology, but not specific for any particular injury, as any capsular compromise will allow the joint to accommodate more fluid. False positives are also possible since there may be non-pathologic connections between the midcarpal or distal radioulnar joints and the radiocarpal joint.
After this injection, the skin is sharply incised using an 11 blade, followed by meticulous spreading down to the joint capsule using a small, curved hemostat. This spreading is essential to avoid injury to the surrounding structures (nerves, tendons). Once the dorsal capsule is palpated with the hemostat, light pressure is used to pop through the capsule. Care should be taken not to use too much force to avoid iatrogenic injury to the surrounding tendons or the cartilage of the scaphoid and lunate. The blunt trocar is then introduced following the same trajectory created by the small hemostat, and the arthroscope and camera are then inserted to confirm appropriate position in the radiocarpal joint. The camera focus should be adjusted until the outer ring of the field on the monitor is in focus. Even after adequate focus adjustment, the picture may be blurred due to blood, viscous joint fluid, or other intra-articular pathology. An 18-gauge needle is introduced into the 6R portal to allow for outflow of the arthroscopic fluid. The correct position of the 6R portal is just radial to the ECU tendon and more proximal than the 3–4 portal due to the natural radial inclination. In cases of Madelung’s deformity, extra care should be taken to correctly identify the portals as the radial inclination will be exaggerated. Once the outflow is established, the arthroscopist should have a clear view of the radiocarpal joint.
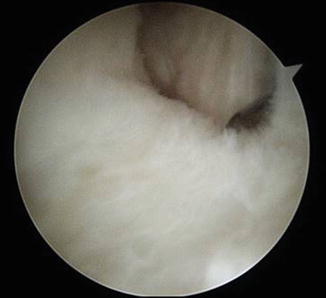
Once clear view of radiocarpal joint is established, diagnostic arthroscopy should be performed in sequential manner. The first structure to be identified is the ligament of Testut (radioscapholunate ligament, Fig. 1) as it lies directly in front of the 3–4 portal. Usually, the ligament of Testut is has a non-distinct, “fluffy” appearance. The ligament of Testut guides the arthroscopist to the scapholunate interosseous ligament (SLIL). The membranous portion is visualized and should be a continuous cleft between the lunate and scaphoid (Fig. 2). Any protuberance, fraying, or frank tear of the ligament indicates injury to the SLIL. Attention should then be directed toward the radial side of the wrist to identify the long radiolunate ligament (radioulnotriquetral ligament, Fig. 3). The Space of Poirier and the radioscaphocapitate ligament are then visualized (Fig. 4). Evaluation of the articular surfaces of the scaphoid, scaphoid facet, and radial styloid is performed. At this point, the arthroscope should be directed back toward the lunate, and in order to visualize ulnar side of the wrist, the arthroscope should be passed either volar or dorsal around the lunate to avoid scuffing the chondral surface. Typically, it is easier to pass the arthroscope volarly to identify the ulnolunate and ulnotriquetral ligaments (Fig. 5). The articular surfaces of the lunate and lunate facet are also visualized. The articular disk of the TFCC (Fig. 6) should be visible at this point, along with the ulnar pre-styloid recess (Fig. 7), a normal defect in the capsule that is often mistaken for a TFCC tear. The lunotriquetral interosseous ligament (LTIL, Fig. 8) is not well visualized from the 3–4 portal and is best visualized with the arthroscope in the 6R portal. The dorsal capsule is also best visualized with the arthroscope in the 6R portal and directed dorsally and radially (Table 2).
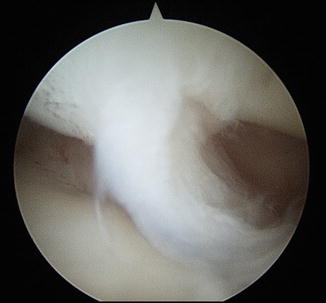
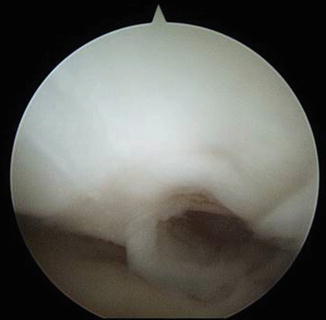
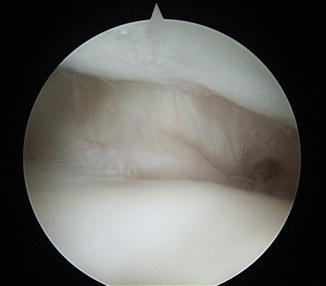
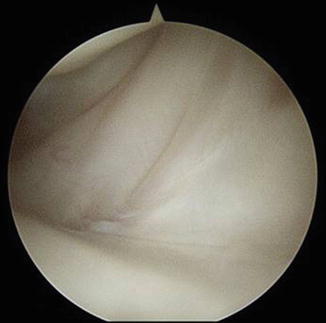

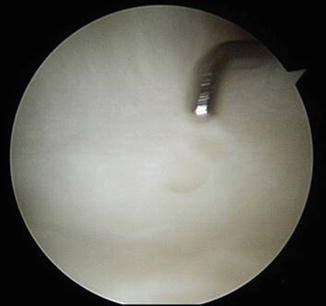
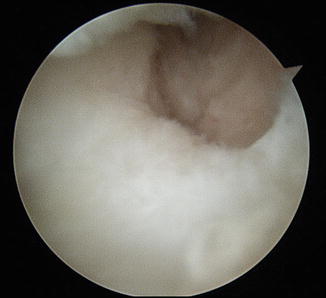
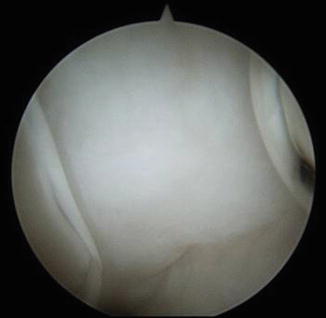
Fig. 1
Ligament of Testut (radioscapholunate)
Fig. 2
Scapholunate interosseous ligament (SLIL)
Fig. 3
Long radiolunate ligament
Fig. 4
Long radiolunate ligament (right), Space of Poirier (center), radioscaphocapitate ligament (left)
Fig. 5
Ulnolunate and ulnotriquetral ligaments
Fig. 6
Triangular fibrocartilage complex (TFCC)
Fig. 7
Pre-styloid recess
Fig. 8
Lunotriquetral interosseous ligament
Table 2
Radiocarpal arthroscopy surgical steps
Locate 3–4 portal (1 cm distal to Lister’s tubercle, between the EPL and EDC) |
Inject 3–4 ml saline with 18-gauge needle into 3–4 portal to insufflate the joint |
Check for fluid extravasation into DRUJ or midcarpal joint |
Skin incision only with #11 blade to establish the 3–4 portal |
Meticulous spreading down to capsule using a small curved hemostat |
Light pressure on the dorsal capsule with the hemostat to pop through the capsule. The injected saline should egress out of the joint |
Insert the cannula with the blunt trocar which is then substituted for the arthroscope |
Adjust the camera’s focus until the outer ring of the field on the monitor is in focus |
18-gauge needle is introduced into the 6R portal to allow for outflow of fluid |
Identify the ligament of Testut and the scapholunate interosseous ligament |
Inspect the articular surfaces of the scaphoid, radius, lunate |
Identify the long radiolunate ligament |
Identify the ulnolunate/ulnotriquetral ligaments |
Identify the triangular fibrocartilage complex |
Identify the triquetrum and the lunotriquetral interosseous ligament with the arthroscope in the 6R portal |
Diagnostic Wrist Arthroscopy of the Midcarpal Joint
After arthroscopy of the radiocarpal joint is complete, the midcarpal joint should be evaluated. The radial midcarpal portal (Fig. 9) is typically established 1 cm distal to the 3–4 portal, and the ulnar midcarpal portal is made 1 cm distal to the 4–5 portal. Due to smaller anatomy in the pediatric population, the midcarpal portals may not always be easily accessible. Without the presence of frank midcarpal instability (Fig. 10a and b), evaluation of the midcarpal joint in the pediatric population is generally low yield compared to the adult population as arthrosis seen in the pediatric population is rare. However, in the setting of an intercarpal ligament injury, the midcarpal portals may provide additional insight into the extent of the injury.
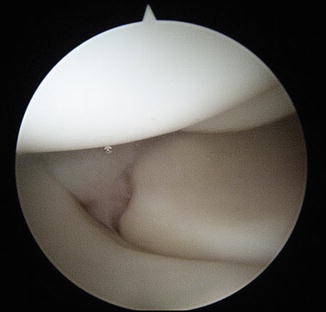
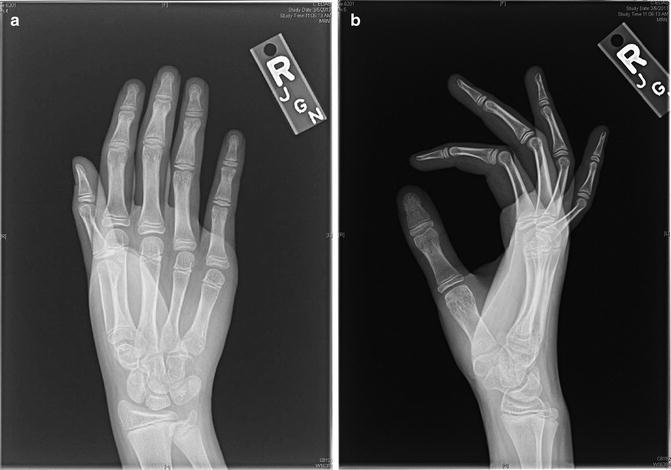
Fig. 9
Radial midcarpal portal view (capitate above, hamate in background, lunate at 7 o’clock, triquetrum at 4 o’clock)
Fig. 10
(a) PA of the wrist revealing midcarpal instability. The lunate is flexed. (b) Lateral X-ray showing the VISI deformity with the flexed lunate
Any pathology to the aforementioned structures should be documented during the diagnostic arthroscopy. Treatment for common pathologies found during arthroscopy is described below (Table 3).
Table 3
Midcarpal arthroscopy surgical steps
Establish the radial midcarpal portal 1 cm distal to 3–4 portal |
Inspect the articular surfaces of the scaphoid, lunate, triquetrum, hamate, capitate, trapezium, trapezoid, SL interval, LT interval |
Establish ulnar midcarpal portal 1 cm distal to the 4–5 portal to be used as an instrumentation portal |
Chondral Injuries
Although rare, articular cartilage injuries within the wrist can occur in the pediatric population and cause symptomatic wrist pain. Free fragments may impinge during range of motion of the wrist and may cause discomfort and/or a clicking sensation. After diagnostic arthroscopy of the radiocarpal joint, any identified loose cartilage flaps should be debrided and fragments should be removed. Patients should be expected to have lasting symptomatic relief with arthroscopic debridement after failed conservative treatment (Chen et al. 2011; Itadera et al. 2001).
The Triangular Fibrocartilage Complex (TFCC)
TFCC tears typically present as ulnar-sided wrist pain exacerbated with twisting activities. The diagnosis may be made by palpation around the ulnar side of the wrist, the ulnocarpal compression test, and the TFCC grind test. Occasionally, patients will report a clicking sensation with forearm rotation.
Following diagnostic evaluation of radiocarpal joint, a probe is introduced via the 6R portal and the “trampoline test” of the articular disk of the TFCC is performed. An intact TFCC without a tear should give stout resistance with depression created by a probe, recovering soon after pressure is removed like a trampoline (Atzei 2009). A noncompliant articular disk indicates a tear, and further investigation should be performed, especially in the periphery to identify the tear, if not visualized already. A probe placed underneath the articular disk (Hook Test, Fig. 11) confirms a peripheral tear of TFCC. The Palmer classification of TFCC injuries (Table 1) is based on whether the injury is traumatic (Type 1) or degenerative (Type 2). The acute traumatic tears are subclassified based on the location of the tear, and this is used to guide treatment (Geissler 2011; Kovachevich and Elhassan 2010; Osterman and Terrill 1991). Palmer type 1A, 1C, and 1D tears are typically treated with arthroscopic debridement. Palmer type 1B (peripheral) tears are typically repaired due to the abundant vascularity (Bednar et al. 1991) and potential to heal in the periphery. There are many techniques described for peripheral TFCC repair, including open, inside-out, outside-in, and all-arthroscopic techniques (Skie et al. 1997; Yao 2009; Yao et al. 2007; Table 4).