Fig. 1
The six phases of throwing
Assessment of Little League Shoulder
Signs and Symptoms of Little League Shoulder
The typical patient with little league shoulder is an overhead athlete between 11 and 16 years of age. The most common complaints include anterolateral shoulder pain and loss of velocity.
Physical examination of the patient should include inspection, palpation, range of motion, and strength testing. Inspection should be compared to the contralateral side. Any asymmetry of the muscle or bony architecture should be noted. Palpation of the acromioclavicular joint, sternoclavicular joint, glenohumeral joint, scapula, clavicle, coracoid, and proximal humerus should be performed. Tenderness to palpation over the proximal humerus is the most common exam finding in patients with little league shoulder (Carson and Gasser 1998). Range of motion is evaluated and compared to the contralateral side. Strength testing includes all muscles of the rotator cuff, deltoid, and periscapular musculature. There are no specific provocative maneuvers for little league shoulder, but impingement testing and instability testing should be included to rule out other potential diagnoses.
Little League Shoulder Imaging and Other Diagnostic Studies
Conventional radiographs including anteroposterior views in internal and external rotation may reveal physeal widening or irregularity (Fig. 2). Since these are often subtle findings, it may be necessary to image the contralateral shoulder for comparison.
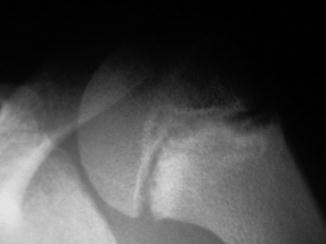
Fig. 2
AP radiograph reveals lateral physeal widening in a patient with little league shoulder
Magnetic resonance imaging (MRI) is not typically necessary for the diagnosis of little league shoulder. However, MRI has been documented in case reports as an adjunct for diagnosis in patients with normal radiographs. MRI has been reported to demonstrate focal widening of the proximal humeral physis with extension of physeal signal intensity into the metaphysis (Obembe et al. 2007). The most important role of MRI may be in assessing other potential causes of pain in the adolescent throwing athlete.
Little League Shoulder Classification
Currently there is no classification system specific for little league shoulder.
Little League Shoulder Outcome Tools
Currently there are no specific outcome tools available for little league shoulder.
Little League Shoulder Treatment Options
Nonoperative Management of Little League Shoulder
The initial treatment of little league shoulder is rest and activity modification, typically including 3 months of rest before starting with a gradual return to throwing (Table 1). The protocol regarding return to throwing has been provided by the US Baseball Medical & Safety Advisory Committee (Table 2). Initially, the protocol involves light tossing with a gradual increase in distance and velocity. If symptoms return during any point in the throwing program, the athlete should initiate an additional period of rest with further assessment of symptoms through clinical and radiographic evaluation (Osbahr et al. 2010). If the patient remains asymptomatic during the throwing program, he or she may return to play. A previous report (Carson and Gasser 1998) demonstrated that 21 of 23 patients (91 %) were able to return to baseball at an average of 3 months (range: 1 month to 1 year) with asymptomatic shoulders. There are rarely any growth disturbances or length discrepancies secondary to little league shoulder.
Table 1
Little league shoulder: Non-operative management
Little league shoulder | |
|---|---|
Nonoperative management | |
Indications | Contraindications |
Patients with clinical history, physical exam, and radiographic findings consistent with little league shoulder | Imaging findings consistent with other pathology including: rotator cuff tear and glenohumeral instability |
Table 2
Little league shoulder: Physical therapy recommendations
Little league shoulder |
|---|
Physical therapy recommendations |
Phase 1 |
Distance: 20 ft |
Number of throws per set: 15, 15, 20 |
Rest between throws/sets: 12 s/6–8 min |
Intensity: 50 % maximum, light tosses |
Phase 2 |
Distance: 30 ft |
Number of throws per set: 15, 15, 20 |
Rest between throws/sets: 12 s/6–8 min |
Intensity: 50 % maximum, light tosses |
Phase 3 |
Distance: 40 ft |
Number of throws per set: 15, 20, 20 |
Rest between throws/sets: 12 s/6–8 min |
Intensity: 75 % maximum, light tosses |
Phase 4 |
Distance: 46 ft |
Number of throws per set: 20, 20, 25 |
Rest between throws/sets: 12 s/6–8 min |
Intensity: 75 % maximum, light tosses |
Phase 5 long |
Distance: 90 f. (80 % of target distance) |
Number of throws per set: 15, 15, 15 |
Intensity: 50 % maximum |
Phase 6 |
Distance: 46 ft |
Number of throws per set: 20, 20, 25 |
Rest between throws/sets: 12 s/6–8 min |
Intensity 3/4 speed |
Phase 7 long |
Distance: 120 f. (100 % of target distance) |
Number of throws per set: 20, 20, 20 |
Phase 8 |
Distance: 60’6” |
Number of throws per set: 25, 30, 30 |
Rest between throws/sets: 12 s/6–8 min |
Intensity: full speed |
Prevention of little league shoulder is the most important factor for clinicians treating this condition. Pitch count limits and proper throwing mechanics are key components identified to prevent little league shoulder (USA Baseball Medical and Safety Advisory Committee (2008)).
Operative Treatment of Little League Shoulder
Currently there are no roles for operative management of little league shoulder.
Summary
Little league shoulder is an injury to the proximal humeral physis that most commonly occurs in overhead athletes ages 11–14 years old. The typical symptoms include pain and loss of velocity. Physical exam findings include tenderness over the proximal humeral growth plate, with normal strength and range of motion of the shoulder. Radiographs may reveal widening or irregularities of the proximal humeral physis, especially when compared to the contralateral side. Treatment consists of rest, activity modification, a strict throwing program, and when asymptomatic, a return to play. Patients typically are able to return to play within 3–6 months with no further symptoms. There is currently no role for surgical management of little league shoulder. Proper throwing techniques and limited pitch counts are valuable tools in prevention of little league shoulder.
Shoulder Instability
Introduction to Shoulder Instability
Shoulder instability in adolescent athletes may be secondary to a traumatic glenohumeral dislocation or due to chronic overuse. There are two groups of patients that are commonly evaluated: traumatic unilateral instability athletes and atraumatic multidirectional instability athletes.
Traumatic shoulder dislocations occur primarily during sporting events or collision activities in young athletes. For example, in young ice hockey players, the incidence of glenohumeral dislocation was approximately 7 % in one study (Cleeman and Flatow 2000). Up to 40 % of all primary shoulder dislocations occur in patients younger than 22 years of age (Axe et al. 1996). Redislocation rates are higher in patients younger than 20 years old. Nonsurgical versus surgical management for adolescents sustaining a first-time shoulder dislocation is controversial.
Multidirectional instability is typically caused by repetitive overhead activities and has characteristic symptoms of subluxation in more than one direction (anterior, posterior, inferior), without an acute traumatic event (Neer and Foster 1980; Paxinos et al. 2001). This occurs most commonly in throwing athletes, swimmers, water polo athletes, gymnasts, and tennis players. These activities have in common a motion that repetitively stretches the shoulder capsule to an extreme range of motion.
Between these two groups of patients (traumatic unidirectional instability and atraumatic multidirectional instability) lies a spectrum of disease that many patients may fall into. This is especially true of overhead athletes in which repetitive microtrauma may lead to subtle instability. These patients may benefit from individualized treatment utilizing specific recommendations based on the underlying pathology.
Pathoanatomy and Applied Anatomy of Shoulder Instability
The glenohumeral joint allows a greater range of motion than any other joint. Static and dynamic stabilizers provide the joint stability. Deficiency or injury to any portion of the stabilizers may lead to glenohumeral instability.
Static stabilizers include: the capsule, humeral head, glenoid, glenohumeral ligaments, and the labrum. Different portions of the capsule and ligaments provide stability depending on the position of the arm. The anterior band of the inferior glenohumeral ligament prevents anterior translation when the arm is in 45–90° of abduction and external rotation. The middle glenohumeral ligament prevents anterior translation when the arm is in less than 45° of abduction and 45° of external rotation. The superior glenohumeral ligament prevents inferior translation when the arm is in adduction.
The dynamic stabilizers of the glenohumeral joint include the scapulothoracic musculature and the rotator cuff muscles (the supraspinatus, infraspinatus, teres minor, and subscapularis). The rotator cuff compresses the humeral head against the glenoid to increase stability.
Traumatic anterior instability is commonly associated with detachment of the anterior inferior labrum and capsule, also known as a Bankart lesion (Fig. 3). If the detachment of the labrum also involves the glenoid, it is known as a bony Bankart lesion. Bony injuries may occur to the posterior humeral head (Hill-Sachs lesion) during an anterior dislocation or the anterior humeral head (reverse Hill-Sachs lesion) during a posterior dislocation.

Fig. 3
Bankart lesion
Multidirectional instability is associated with global shoulder laxity. The anatomic lesion found in multidirectional instability is a large, patulous inferior capsular pouch that extends both anteriorly and posteriorly in varying degrees, creating a global increase in capsular volume (Schenk and Brems 1998). Dynamic stabilizers also likely play a role in the development of multidirectional instability, as rotator cuff and periscapular muscle strengthening will often alleviate the symptoms in these patients.
Assessment of Shoulder Instability
Signs and Symptoms of Shoulder Instability
A detailed history and physical exam is critical in the diagnosis of shoulder instability. The athlete will typically complain of: pain, difficulty with overhead activities, feeling of the shoulder moving or popping, an inability to participate in sports, or episodes of “dead arm” in which the athlete loses control of the arm transiently. The history should include hand dominance, activity level, duration of symptoms, and previous treatments. It should be noted if a traumatic event occurred prior to the symptoms. Specific questions include: Did the initial event require reduction? How many episodes of instability have there been, and how many have required a reduction? What position was the arm in when the symptoms began? Complaints of pain or apprehension with the arm abducted and externally rotated suggest anterior instability, while symptoms that occur with the arm flexed, adducted, and internally rotated suggest posterior instability.
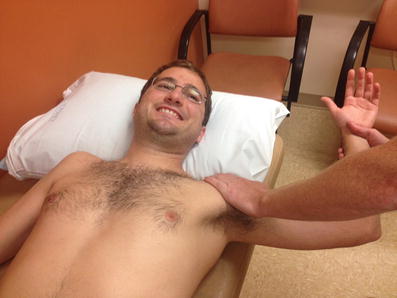
The physical exam should include a comparison to the contralateral limb as a control. Inspection is made of the shoulder girdle for atrophy of the trapezius, infraspinatus, supraspinatus, teres minor, and deltoid. Palpation over the anterior and posterior glenohumeral joint line, acromioclavicular joint, clavicle, and biceps tendon should be performed, with the presence of any tenderness documented. Active and passive range of motion in all six planes of the scapula should be performed, although most patients with instability will have full motion. Strength testing of the rotator cuff and periscapular musculature is also documented. Signs of generalized laxity include elbow hyperextension and the ability to reach the forearm with the abducted thumb (Fig. 4a, b).
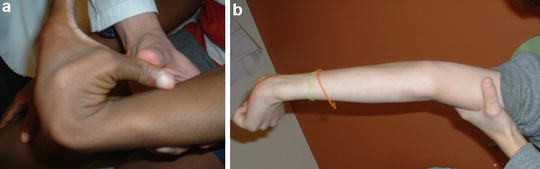
Fig. 4
(a) Signs of hyperlaxity include: thumb-to-forearm sign. (b) Elbow hyperextension
The shoulder is then examined for stability with specific examination maneuvers:

Anterior and posterior laxity may be assessed for with the patient in a sitting position. The examiner places the thumb and index finger on the anterior and posterior aspects of the proximal humerus and then directs an anterior and posterior force on the proximal humerus. Any laxity should be compared to the contralateral side.
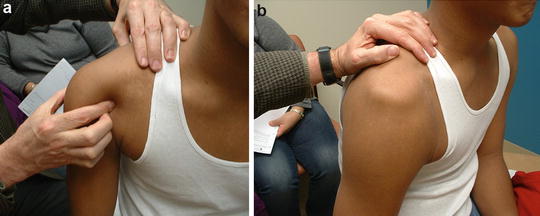
The sulcus sign (Fig. 5a, b) is an examination to determine the presence of inferior instability of the glenohumeral joint. This test can be administered with the patient either seated or standing with the arm relaxed. The examiner palpates the shoulder by placing the thumb and fingers on the anterior and posterior aspects of the humeral head. The examiner grasps the patient’s elbow with the other hand and applies a downward distraction force. A positive test will result in a sulcus being formed between the acromion and the humeral head as the humeral head moves inferiorly while the force is being applied.
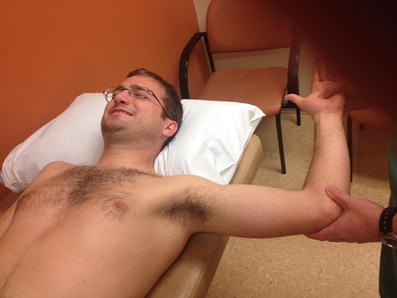
Anterior apprehension test (Fig. 6) is performed with the patient supine and the arm placed in 90° of abduction with the elbow flexed to 90°. The arm is then gradually externally rotated. A positive test will elicit pain or apprehension in the patient.
Jobe’s relocation test (Fig. 7) is similar to the apprehension test. The patient is supine with the arm in 90° of abduction and elbow flexed to 90°. The arm is then externally rotated. At the point the patient feels pain or apprehension, the amount of external rotation is documented. The test is then repeated but with the examiner placing a posteriorly directed force over the proximal humerus. The amount of external rotation that can be obtained prior to any pain or apprehension occurring is again documented. If there is increased external rotation with the posteriorly directed force, the test is considered positive.
The jerk test (Fig. 8) is used for posterior shoulder instability. In this test the patient is sitting with the arm forwardly elevated to 90° and internally rotated 90°, while the examiner applies a posteriorly directed force on the proximal humerus. The test is considered positive if there is a clunk or pain associated with the maneuver.
Fig. 5
(a) Sulcus sign technique: the examiner palpates the shoulder by placing the thumb and fingers on the anterior and posterior aspects of the humeral head. The examiner grasps the patient’s elbow with the other hand and applies a downward distraction force. (b) Sulcus sign: a positive test will result in a sulcus being formed between the acromion and the humeral head as the humeral head moves inferiorly while the force is being applied
Fig. 6
Anterior apprehension sign: shoulder is placed in 90° of abduction with the elbow flexed to 90° and then gradually externally rotating the arm. A positive test will elicit pain or apprehension in the patient
Fig. 7
Jobe’s relocation test: the patient is supine with the shoulder in 90° of abduction and elbow flexed to 90°. The arm is then externally rotated. At the point the patient feels pain or apprehension, the amount of external rotation is documented. The test is then repeated but with the examiner placing a posteriorly directed force over the proximal humerus. The amount of external rotation is again documented. If there is increased external rotation with the posteriorly directed force, the test is considered positive
Fig. 8
Jerk test: in this test the patient is sitting with the arm forwardly elevated to 90° and internally rotated 90° while the examiner applies a posteriorly directed force on the proximal humerus. The test is considered positive if there is a clunk or pain associated with the maneuver
Shoulder Instability Imaging and Other Diagnostic Studies
Standard shoulder radiographs should be performed for athletes with concern for instability. Anteroposterior and axillary radiographs are used to determine any translation of the humerus on the glenoid (Fig. 9a, b). A West Point axillary view may be used to assess for a bony Bankart lesion or anteroinferior glenoid deficiency. The Stryker notch view may be used to identify a Hill-Sachs lesion.
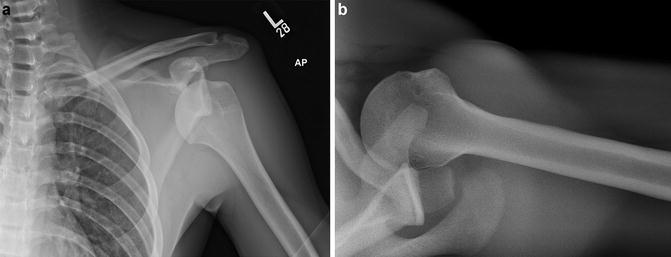
Fig. 9
(a) AP radiograph of an anteroinferior shoulder dislocation. (b) Axillary radiograph of anterior shoulder dislocation with Hill-Sachs deformity
Computed tomography (CT) scans are typically not used for cases of shoulder instability. However, they may be obtained to assess bony deficiency of the glenoid or humerus prior to a planned surgical procedure or if the patient has failed a prior surgical procedure.
Magnetic resonance imaging (MRI) with or without contrast is used to evaluate the articular cartilage, labrum, and rotator cuff of athletes with instability (Fig. 10). MRI is helpful in patients that have failed conservative management of glenohumeral instability or are possible surgical candidates as the MRI can be helpful for preoperative planning.
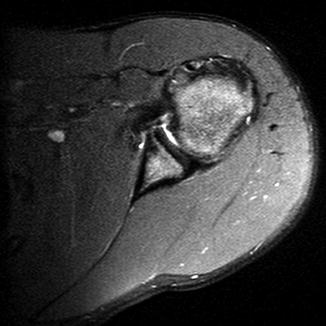
Fig. 10
Axial MRI revealing Bankart lesion
Shoulder Instability Classification
The major instability patterns are anterior and multidirectional. Historically, instability is characterized as either traumatic unilateral instability or atraumatic multidirectional instability.
Shoulder Instability Outcome Tools
Currently there are no specific outcome tools available for shoulder instability.
Shoulder Instability Treatment Options
Nonoperative Management of Shoulder Instability
The goal of nonoperative management of shoulder instability is to rehabilitate and strengthen the stabilizing structures of the shoulder to prevent symptoms (Table 3). Nonoperative management is the initial treatment of choice for multidirectional instability patients. Patients with traumatic unilateral instability should undergo a trial of nonsurgical management before any consideration of operative intervention. Formal therapy (Table 4) includes strengthening of the rotator cuff muscles and deltoid, along with treatment of any scapular dyskinesia that may be present. Patients should avoid any activities that may place the shoulder at risk for dislocation including overhead activities or collision sports. Nonoperative management should be trialed for approximately 6 months.
Table 3
Shoulder instability: Non-operative management
Shoulder instability | |
|---|---|
Nonoperative management | |
Indications | Contraindications |
Multidirectional instability | Recurrent unidirectional instability in a high-demand or athletic patient |
First-time traumatic dislocation | |
Table 4
Shoulder instability: Physical therapy recommendations
Shoulder instability | |
|---|---|
PT recommendations | |
Formal therapy includes strengthening of the rotator cuff muscles and deltoid along with the treatment of any scapular dyskinesia that may be present. Patients should avoid any activities that may place the shoulder at risk for dislocation including overhead activities or collision sports |
Outcomes of Nonoperative Management of Shoulder Instability
Nonoperative management of shoulder instability is dependent upon the type of instability being treated. Patients with multidirectional atraumatic instability treated with exercise and physical therapy (PT) have success rates of up to 83 % (Burkhead and Rockwood 1992). Patients with traumatic unidirectional instability are less likely to respond well to PT and exercise compared to patients with multidirectional instability.
Operative Treatment of Shoulder Instability
Indications/Contraindications
The indication for operative management of shoulder instability is symptomatic, recurrent traumatic instability despite strengthening exercises and physical therapy (Table 5). Patients with multidirectional instability are usually managed nonoperatively, as they have less predictable outcomes after surgical intervention. Relative contraindications include: voluntary dislocators, patients with underlying psychiatric disturbances that may preclude compliance with postoperative therapy protocols, and patients with uncontrolled seizure disorders. This group of patients is at high risk of failure of a repair, and an extensive discussion regarding the risks and benefits of both nonoperative and operative management should occur prior to undergoing a surgical repair.
Table 5
Recurrent traumatic shoulder instability: Operative management
Recurrent traumatic shoulder instability | |
|---|---|
Operative management | |
Indications | Contraindications |
Traumatic, unidirectional, recurrent, symptomatic instability in a compliant patient that has failed physical therapy and shoulder strengthening exercises | Multidirectional instability, voluntary dislocations, psychiatric disturbance, seizure disorder |
Surgical Procedure
Preoperative Planning
A complete discussion of the risks of the surgery should occur with the patient and his/her family including: infection, injury to nerves or blood vessels, stiffness, recurrence, and pain (Table 6). A complete neurovascular exam should be documented prior to the procedure. Radiographs and an MRI should be obtained and reviewed prior to surgery to determine any bony deficiencies that may need to be addressed, as well as the size and location of the Bankart lesion. An exam under anesthesia should be performed with special attention paid to the range of motion, laxity testing, and presence of a sulcus sign.
Table 6
Recurrent traumatic shoulder instability: Operative planning
Recurrent traumatic shoulder instability |
|---|
Preoperative planning |
OR table: OSI flattop |
Alternative: regular OR table utilizing beach chair position |
Position/positioning aids: supine, radiolucent arm board |
The surgeon will be positioned in the axilla of the patient |
A small rolled towel is used as a bump between the scapulae |
Fluoroscopy location: not applicable |
Equipment: basic orthopedic set, humeral head retractor, self-retaining retractor, freer elevator, Bankart set, small curettes, drill with 2.0 mm and 2.5 mm drill bits, cotton nonabsorbable suture, commercially available suture anchors |
Tourniquet: none |
Positioning
An OSI flattop table is used with the patient in a supine position. An alternative is to use a regular OR table and have the patient in a beach chair position. For adolescent patients, a radiolucent arm board may be used. The surgeon should be positioned in the axilla of the patient.
Surgical Approach
The patient’s entire upper extremity is prepped and draped in the usual sterile fashion. Perioperative antibiotics are administered (Table 7). The technique is based on Matsen’s original description (Thomas and Matsen 1989). A 6 cm incision is made through the axillary crease using a no. 15 blade scalpel (Fig. 11). Dissection is taken through the subcutaneous tissue until the deltopectoral interval can be identified. Proximal dissection is carried down to the level of the coracoid. The cephalic vein is identified and carefully retracted laterally along with the deltoid. Subsequently, the clavipectoral fascia is incised vertically along the lateral edge of the conjoint tendon (coracobrachialis and short head of the biceps). Proximally the clavipectoral fascia blends into the coracoacromial ligament, which should be preserved during dissection. The next step is to identify the rotator interval superiorly and the inferior aspect of the subscapularis tendon. The axillary nerve is palpated using the index finger to identify it as it crosses the anteroinferior border of the subscapularis muscle. The anterior humeral circumflex vessels can also be identified and protected at the inferior border of the subscapularis muscle.
Table 7
Recurrent traumatic shoulder instability: Operative steps
Recurrent traumatic shoulder instability |
|---|
Surgical steps |
6 cm incision along the axillary crease |
Identify the deltopectoral interval, and retract deltoid and cephalic vein laterally |
Incision through clavipectoral fascia |
Subscapularis tendon is exposed and incised with underlying capsule just medial to biceps tendon |
Fukuda retractor placed posterior to glenoid for better visualization of glenoid and Bankart lesion |
Preparation and drilling of articular margin of glenoid for reconstruction |
Placement and tying of suture anchors or suture to repair Bankart lesion |
Anatomic repair of subscapularis tendon and underlying capsule |
Subcutaneous and skin closure |
Fig. 11
Six centimeter skin incision for Bankart repair. It usually heals with an excellent cosmetic result
Next, the superior 80 % of subscapularis tendon and capsule are taken off the humerus using electrocautery approximately 8 mm medial to the biceps tendon (Fig. 12). A nonabsorbable suture is placed in the superior aspect of the subscapularis to mark it for later repair. The subscapularis release is extended inferiorly to the level of the anterior circumflex humeral vessels, which are protected. The inferior 20 % of the subscapularis is left intact. The subscapularis and capsule are reflected medially to reveal the glenohumeral joint.
Fig. 12
Subscapularis and anterior capsule taken off the humerus approximately 8 mm medial to the biceps tendon
Technique
A Fukuda humeral head retractor is placed posterior to the glenoid to move the humeral head posterolaterally. Irrigation of the glenohumeral joint with normal saline is then performed. A thorough evaluation of the joint is performed to identify any bony deficiencies, labral injuries, articular surface injury, and/or loose bodies. A freer elevator may be used to identify the Bankart lesion. Typically, the anteroinferior labrum is attached to the inferior glenohumeral ligament, which is avulsed off the anterior glenoid rim.
The reconstruction of the Bankart lesion is then performed. A small curette is used to roughen the inner edge of the glenoid neck. Next, a commercially available suture anchor drill is used to place three anchors on the edge of the articular cartilage. The suture anchors are placed on the inner edge of the glenoid as it joins the neck of the glenoid to be certain to create a bumper effect with the repair (Fig. 13). This can also be performed using transosseous tunnels with suture to repair the capsulolabral detachment. The suture is then tied with the knots lying over the capsule and not on the articular surface. This will prevent mechanical irritation of the joint.
Fig. 13
The suture anchors are placed on the inner edge of the glenoid as it joins to the neck of the glenoid to create a bumper effect with the repair
The joint is then copiously irrigated with saline. The subscapularis capsular reattachment is performed anatomically while the arm is held in 15° of external rotation, utilizing two 3 mm suture anchors in the bone as well as several nonabsorbable cotton sutures (Fig. 14). This helps to prevent late subscapularis insufficiency. The deltopectoral interval is allowed to come together without sutures and the subcutaneous tissues are closed with interrupted absorbable suture. The skin is closed with an absorbable subcuticular suture. A sterile compressive dressing is applied, and the patient’s arm is placed into a shoulder sling.

Fig. 14
The subscapularis capsular reattachment is performed anatomically while the arm is held in 15° of external rotation, utilizing two 3 mm suture anchors in the bone as well as several nonabsorbable cotton sutures
Postoperative Management
Initially the patient is kept in the sling at all times except for showering and performing Codman’s exercises (Table 8). Initial exercises are for wrist and elbow range of motion four times per day. At the 1-week postoperative visit, the wound is examined. At 4 weeks postoperatively, the sling is discontinued. Passive range of motion is begun at 4 weeks postoperatively with forward elevation allowed to 90° and external rotation to 15°. This is gradually increased over the next 4 weeks, with an increase in active range of motion begun. Week 12 is the time when noncontact activities are allowed and overhead throwers can begin light throwing exercises. Return to sports is typically between 3 and 6 months, with no contact sports allowed until at least 6 months postoperatively.
Table 8
Recurrent traumatic shoulder instability: Postoperative protocol
Recurrent traumatic shoulder instability |
|---|
Postoperative protocol |
Sling initially at all times except for showering and elbow exercises |
Week 1: check wound |
Week 4: discontinue sling, and allow passive range-of-motion exercises to begin |
Week 4–12: increase passive range of motion, begin active motion, and begin strengthening program |
Week 12: return to noncontact activities, light throwing, possible return to sports |
6 months: return to contact sports allowed, no restrictions |
Outcomes of Operative Management of Recurrent Traumatic Shoulder Instability
Good outcomes of surgically repaired recurrent traumatic shoulder instability have been reported with a redislocation rate of only 3.5 % of patients treated operatively (Rowe et al. 1978). Current literature reports an incidence of recurrent instability after Bankart repair between 1.5 % and 9 % (Galatz et al. 2008). The literature (Wirth et al. 1996) supports 93 % good or excellent results at an average follow-up of 5 years, with a high degree of patient satisfaction and marked improvement in ratings for pain, strength, stability, and function. Another report (Thomas and Matsen 1989) also described follow-up at an average of 5 years and found that 97 % of results were good or excellent. Open repair for recurrent shoulder instability in athletes has very good results. Researchers (Pagnani and Dome 2002) performed the operation on 58 football players and had no recurrent dislocations with excellent functional outcomes. Complications of surgical treatment of recurrent traumatic shoulder instability include: recurrence, loss of motion, subscapularis rupture, and problems related to the hardware. Recurrence is reported between 1.5 % and 9 % in the current literature. Loss of motion is typically seen in older patients and not in the adolescent age group.
Preferred Treatment
Patients with multidirectional instability are treated with formal physical therapy including: strengthening of the rotator cuff muscles and deltoid along with treatment of any scapular dyskinesia that may be present. These patients may need long-term therapy (greater than 1 or 2 years) before symptoms are improved. Rarely is surgical intervention necessary.
Any patient with recurrent traumatic shoulder instability is treated with physical therapy and strengthening for at least 6 months. If after 6 months of physical therapy and strengthening the patient is still having symptomatic dislocation episodes, then a consideration for surgical intervention is made. Risks of the surgery are discussed. If the patient agrees to surgical intervention, an open Bankart repair as described above is performed.
Surgical Pitfalls and Prevention
Management of Complications
Recurrent shoulder instability occurs in about 3.5 % of cases despite an open repair (Table 9). This is a difficult complication to treat. Every attempt should be made to determine the exact cause of the failure. New radiographs and a repeat MRI may be used to identify bony or soft tissue deficiencies. A CT scan may be used to characterize any glenoid or humeral head bone loss. Revision surgery may be needed.
Table 9
Recurrent traumatic shoulder instability: Potential pitfalls and prevention
Recurrent traumatic shoulder instability | |
|---|---|
Potential pitfalls and prevention | |
Potential pitfall | Pearls for prevention |
Iatrogenic musculocutaneous nerve injury | Stay lateral to conjoint tendon during dissection |
Do not excessively retract conjoint tendon during procedure | |
Mechanical irritation | Suture anchors or tunnels must not be through articular surface
Stay updated, free articles. Join our Telegram channel
Full access? Get Clinical Tree
 Get Clinical Tree app for offline access

|