Fig. 1
Anteroposterior (a) and lateral (b) radiographs of the elbow demonstrating a displaced radial neck fracture (Courtesy of Joshua M. Abzug, MD)
Minimally displaced radial neck fractures may be difficult to identify on plain radiographs because the fracture line may be superimposed over the ulna. Additionally, in those patients in whom ossification of the epiphysis has not yet occurred, it may be difficult to determine the amount of displacement of the radial head. The only clue to a significantly displaced fracture in a young child may be a small “fleck” of bone about the proximal radius or deformation of the proximal metaphysis because the unossified radial head is not visualized.
Identification of a posterior fat pad sign on the lateral radiograph is another important but subtle indicator that a fracture is present. While the presence of this sign is most commonly associated with a non-displaced supracondylar fracture, it may also indicate the presence of a radial neck fracture in a child, as the physis is intra-articular and therefore fractures in this region will result in the presence of an elbow effusion (Skaggs and Mirzayan 1999). Additionally, the presence of the supinator fat pad, a thin layer of fat that lies on top of the supinator muscle in the proximal forearm that can often be seen on plain radiography, should be assessed. It has been hypothesized that displacement of this fat pad can indicate that there is injury to the proximal radius (Chambers 2001). However, this is not always a reliable sign of fracture, and absence of fat pad displacement may be more reliable as an indication of the absence of a radial neck fracture (Irshad et al. 1997).
Magnetic resonance imaging is the best advanced imaging modality for evaluating proximal radius injuries in children with incomplete radial head ossification. However, because this test generally requires sedation or general anesthesia to complete, its utility is limited. If the examination and radiographs are suspicious for a displaced fracture, it may be preferable instead to examine the elbow while the child is under anesthesia. An elbow arthrogram coupled with live fluoroscopy allows a complete assessment of the fracture type and degree of displacement. Reduction can then be performed, taking advantage of the arthrogram to assess the success of realignment maneuvers.
Injuries Associated with Radial Head and Neck Fractures
Fractures of the radial neck may occur with a concomitant posterior elbow dislocation. Patients may also sustain an associated medial epicondyle or olecranon fracture (Monteggia variant). Neurovascular injury is uncommon; however, the posterior interosseous nerve is within close proximity to the fracture site and may become damaged.
Radial Head and Neck Fracture Classification
The most commonly utilized classification scheme for pediatric radial neck fractures is the Salter-Harris (SH) system. SH I (SH) fractures traverse the physis. SH II fractures traverse part of the physis and exit out the metaphysis and are the most common fracture pattern seen in displaced pediatric radial neck fractures. SH III fractures involve the physis and epiphysis, and SH IV fractures involve the epiphysis, physis, and metaphysis. Type III and IV fractures are relatively uncommon and are mostly seen in older children and adolescents (Salter and Harris 1963).
Wilkins classified pediatric radial neck fractures into two types, each with additional subtypes. Type I injuries are valgus fractures; subtype A injuries are SH I and SH II fractures, subtype B are SH IV fractures, and subtype C are isolated fractures of the radial metaphysis. Type II injuries are radial neck fractures associated with posterior elbow dislocations; subtype D describes proximal radius fractures that occur from reduction of the elbow dislocation and subtype E fractures are those proximal radius fractures that occur concomitantly with elbow dislocations (Wilkins 1991).
A classification scheme has also been proposed by Judet and colleagues. Type I fractures have minimal or no displacement, Type II fractures have lateral displacement of less than ½ the shaft diameter and angulation of less than 30°, Type III fractures have contact between the fracture fragments and angulation between 30° and 60°, and Type IV fractures have complete loss of contact between the bony fragments and angulation of more than 60° (Judet et al. 1962).
The O’Brien classification is based on the degree of angulation and recommends treatment based on these parameters. Type 1 fractures are angulated less than 30° and require immobilization. Type 2 fractures are angulated 30–60° and can be treated with closed reduction. Type 3 fractures are angulated greater than 60° and require open reduction (O’Brien 1965).
Radial neck fractures with associated proximal ulna or olecranon fractures are considered Monteggia equivalents and classified according to the Bado classification.
Radial Head and Neck Fracture Outcome Tools
No specific outcome measures exist to assess pediatric radial head and neck fractures. The most commonly utilized outcome tool for all pediatric upper extremity fractures is the DASH score.
Radial Head and Neck Fracture Treatment Options
Nonoperative Treatment of Radial Head and Neck Fractures
Indications/Contraindications
The majority of pediatric radial neck fractures can be managed without operative intervention (Table 1). Minimally to moderately displaced proximal radius fractures can often be treated conservatively due to the potential for remodeling. In children younger than 6–8 years of age, up to 30° of angulation and less than 50 % translation is acceptable because predictable remodeling occurs in this age group (Chambers 2001). Younger children with more severe angulation and older children and adolescents with greater than 10–15° of angulation, however, are best treated with fracture reduction.
Table 1
Radial head and neck fractures: Nonoperative management
Indications | Contraindications |
|---|---|
Non-displaced or minimally displaced fractures | Radial neck fracture angulation >30° |
Radial neck fracture angulation <30° with translation <50 % in any plane | Significantly displaced fractures (>50 % translation) |
Techniques
Minimally displaced Salter-Harris I and II fractures and metaphyseal fractures, regardless of the age of the child, can be treated in a long arm cast with the elbow flexed to 90° for 3-week duration. After cast removal, active elbow range of motion is initiated. Most children return to full activities within 3–6 weeks after cast removal.
Closed reduction can be achieved using one of several described techniques. One method involves flexing the elbow to 90° and fully supinating the forearm. Next, pressure is applied to the shaft of the proximal radius in order to reduce the head. Applying the pressure to the shaft as opposed to the head utilizes a long lever arm, achieving a greater mechanical advantage (Monson et al. 2009).
Other commonly used techniques are two-person maneuvers. One such technique involves rotating the forearm under fluoroscopy to identify the position in which the maximum degree of angulation is visible on the AP view of the elbow (Fig. 2). Next, longitudinal traction and varus stress is applied to the elbow by an assistant while the surgeon pushes downward and laterally on the radial shaft in the interosseous space (Neher and Torch 2003).
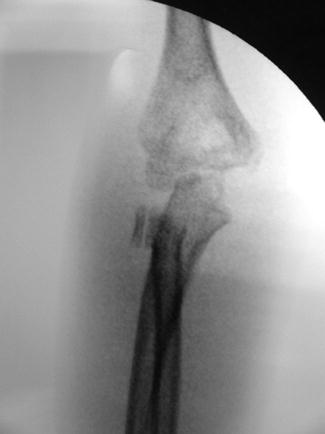
Fig. 2
Fluoroscopic view of the elbow demonstrating the maximal amount of angulation of the radial neck fracture (Courtesy of Joshua M. Abzug, MD)
Another technique fully supinates the forearm first. Longitudinal traction and a varus force is then applied across the elbow, while a medially directed force is applied via thumb pressure to the skin overlying the radial head (Patterson 1934).
One final closed reduction technique involves wrapping an Esmarch bandage from distal to proximal in an attempt to realign the proximal radial fragment over the radial shaft.
Following the chosen maneuver, repeat radiographs or fluoroscopic images are obtained to assess the reduction. Fractures that are not adequately reduced are then taken to the operating room for further manipulation. Once an acceptable reduction is obtained, the patient is placed in a long arm cast at 90° of elbow flexion for 3 weeks.
Outcomes
Both Vocke and Berntstein demonstrated good results with conservative management of radial neck fractures angulated up to 50–60° in children aged under 6 and under 10, respectively (Bernstein et al. 1993; Vocke and Von Laer 1998). However, there is a lack of research to support an exact age cutoff as it relates to an acceptable degree of angulation and predicted outcomes.
Operative Treatment of Radial Head and Neck Fractures
Indications/Contraindications
Operative intervention should be performed for all pediatric radial neck fractures that are significantly angulated (greater than 30°) despite failed closed reduction maneuvers and all fractures that have significant displacement (greater than 50 % translation). Additionally, fractures with small “flecks” of bone in young children should be brought to the operating room to have an arthrogram performed to ensure adequate alignment is present. Should closed reduction attempts fail to achieve an acceptable reduction, percutaneous or open techniques should be employed. Advancing directly to an open reduction is sometimes necessary when significant displacement of the fracture is present, as there can be soft-tissue interposition or the radial head fragment can be extracapsular. However, open techniques are associated with worse outcomes, and therefore, a closed or percutaneous technique should be attempted prior to proceeding to open reduction when possible.
Surgical Procedure
Preoperative Planning
A systematic approach in the operating room is utilized to reduce the fracture in the most minimally invasive manner.
The algorithm begins by performing an elbow arthrogram in children with minimal or no ossification of the proximal radial epiphysis, typically children 5 years of age and younger. Subsequently, closed reduction maneuvers are attempted with the patient under general anesthesia. If a closed reduction maneuver reduces the fragment, stability is checked with live fluoroscopy, and if the fragment is stable, a long arm cast is applied. Due to the thick periosteum and typical SH II fracture pattern, there is almost always continuity of the periosteum, which aids in maintaining the reduction once it is achieved.
If closed reduction maneuvers fail, the arm is prepped and draped in the usual fashion and reduction of the fracture utilizing a percutaneous pin reduction is attempted. Successful reduction of the fragment allows for treatment with casting alone.
If percutaneous pin reduction maneuvers are unsuccessful, the Metaizeau technique is performed, as long as the fracture is angulated 60° or less (Judet Type III). Fractures that have no bony contact between the fragments and/or are angulated more than 60° are difficult to treat with the Metaizeau technique and require open reduction (Endele et al. 2010). Furthermore, manipulative reduction attempts for fractures angulated more than 60° have the potential to damage the cartilaginous epiphysis (O’Brien 1965).
The final step in the algorithm is to perform an open reduction and utilize K-wire fixation. As outcomes are less optimal and there is a higher complication rate following open reduction, this technique is reserved until after all other means of obtaining a successful reduction have been attempted (D’souza et al. 1993; Schmittenbecher et al. 2005).
Positioning
Regardless of the procedure that is being executed, positioning is the same (Table 2). The patient is placed supine on the operating room table with a hand table that permits fluoroscopic evaluation of the elbow and forearm. Alternatively, the elbow can be placed directly onto the inverted fluoroscopy unit. A nonsterile pneumatic tourniquet is applied to the upper arm, and the remainder of the upper extremity is prepped and draped in the usual fashion. These steps permit the progression through the aforementioned algorithm if necessary without having to spend time re-prepping or draping.
Table 2
Reduction of proximal radius fractures: Preoperative planning
OR table: standard OR table |
Position/positioning aids: supine with hand table extension or the elbow can be placed directly on the inverted fluoroscopy machine |
Fluoroscopy location: ipsilateral side |
Equipment: K-wires, flexible nails |
Tourniquet (sterile/nonsterile): nonsterile pneumatic tourniquet to upper arm |
Draping: extremity or split drapes |
Surgical Approaches
It is important for the surgeon to have knowledge regarding the course of the posterior interosseous nerve (PIN) when operating on the proximal radius. The PIN is the deep motor branch of the radial nerve that innervates the vast majority of musculature of the dorsal side of the forearm. After branching from the radial nerve proper in the region of the lateral epicondyle, it enters the forearm by splitting the supinator muscle. The PIN then passes near the dorsal aspect of the radius opposite the bicipital tuberosity. It has been shown to make contact with the proximal radius in up to 25 % of patients (Calfee et al. 2011).
The surgical approach for open reduction is the classic Kocher approach, a Kaplan approach which permits more anterior exposure, or a Boyd approach which may decrease the risk of PIN injury but is not as direct. The Kocher approach utilizes the interval between the anconeus muscle, innervated by the radial nerve proper, and the extensor carpi ulnaris muscle, innervated by the posterior interosseous nerve. In the Kaplan approach, the extensor digitorum communis muscle is split, providing a more anterior exposure, which, for this fracture, may be helpful depending on where the displacement is. It is imperative to pronate the forearm throughout either approach as this has been shown to move the PIN away from the bone.
The Boyd approach utilizes an incision that begins approximately 2.5 cm proximal to the elbow joint, lateral to the triceps tendon, and continues distally over the lateral side of the tip of the olecranon, ending at the junction of the proximal and middle thirds of the ulna. A plane is then created between the ulna medially and the anconeus and extensor carpi ulnaris laterally. The surgeon then strips the anconeus from the bone subperiosteally in the proximal part of the incision and reflects it in a radial direction, thus exposing the radial head.
Technique
An elbow arthrogram is typically performed prior to reduction (Fig. 3). A small-gauge needle attached to extension tubing is inserted into the elbow joint, either through the “soft spot” on the posterolateral aspect of the elbow, defined by the lateral distal humerus and the radial head, or posteriorly through the triceps into the olecranon fossa. After fluoroscopic confirmation, a 10 cc syringe filled with a solution of equal parts saline and contrast dye (Dormans 1994) is attached to the tubing. Under live fluoroscopy, the dilute contrast material is then injected. For a small child, only 3–5 cc of contrast is needed. The elbow is then taken through a range of motion to distribute the contrast material throughout the joint, and images are taken. Visualization of the entire radial head is now possible, and one can determine exactly how angulated and displaced the fracture fragment is.
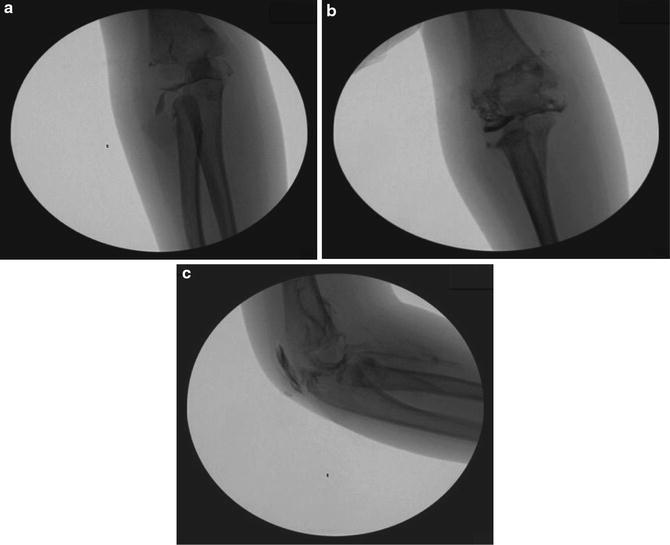
Fig. 3
Elbow arthrogram performed on a 3-year-old female following a fall down the stairs. (a) Anteroposterior view before reduction. (b) Anteroposterior view following reduction. (c) Lateral view following reduction (Courtesy of Joshua M. Abzug, MD)
When closed reduction attempts fail to achieve an acceptable reduction, percutaneous or open techniques should be employed. Percutaneous pin reduction can be performed following the elbow arthrogram, once the radial head is easily visualized (Table 3). A 0.062 in. or 5/64 in. K-wire is percutaneously inserted from the ulnar side of the radius to minimize potential injury to the PIN (Canale 2007). Once the sharp side of the wire punctures the skin, the wire is removed and turned around such that the blunt end of the wire is now inserted through the puncture hole. With the aid of fluoroscopy, the blunt end is now advanced to make contact with fracture fragment. Subsequently, the K-wire is used to “push” the radial head into anatomic alignment (Fig. 4). As some healing may have already occurred, it may be helpful to gently tap the K-wire with a mallet to facilitate movement of the fragment. This should be performed while utilizing fluoroscopy liberally, as the K-wire may not be advancing the fragment but may rather be advancing into the cartilaginous fragment. It is important to try and avoid entering the fracture site with the K-wire to avoid potential injury to the physis. Occasionally, two wires may be utilized to reduce the fragment: one to “push” the fragment up, thus improving the angulation, and one to “push” the fragment over, thus improving the translation.
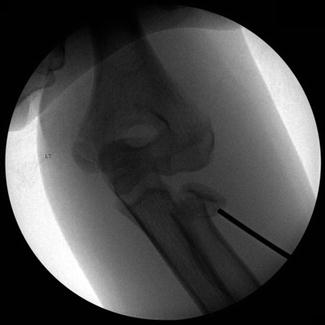
Table 3
Percutaneous pin reduction of proximal radius fractures: Surgical steps
Following elbow arthrogram, insert a 0.062 in. or 5/64 in. K-wire percutaneously from the ulnar side of the radius |
Remove wire following skin puncture and insert blunt end of wire into puncture site |
Under fluoroscopic guidance, advance blunt end of wire to make contact with fracture fragment, while avoiding entering the fracture site |
Push radial head into anatomic alignment. Light taps with a mallet may be necessary |
Fig. 4
Percutaneous reduction of a radial neck fracture utilizing the blunt end of a K-wire to engage and realign the displaced fragment (Courtesy of Joshua M. Abzug, MD)
The Wallace Joker technique is an alternate method of reduction. First, the level of the bicipital tuberosity is identified under fluoroscopy. A dorsal skin incision is then made at the same level lateral to the border of the ulna. Next, a joker is introduced between the radius and ulna, with care taken to avoid periosteal disruption. Using the joker, lateral pressure is then applied along the medial surface of the radius as counterpressure is applied to the proximal radial head fragment in order to achieve reduction.
If the fragment is angulated approximately 60° or less, but alignment remains unacceptable after percutaneous wire manipulation, the Metaizeau technique should be performed (Table 4). The Metaizeau technique utilizes an intramedullary K-wire or flexible titanium nail as a tool to facilitate reduction of the radial neck fracture fragment (Metaizeau et al. 1980) (Fig. 5). In either case, the last 1.5 cm should be bent approximately 20–30° prior to insertion. The intramedullary device is inserted in a retrograde fashion utilizing either a dorsal or radial starting point. The limb should be exsanguinated and the tourniquet inflated. A dorsal incision approximately 2–3 cm in length is made in the region of Lister’s tubercle, ensuring that this location is proximal to the physis by 1–2 cm. Soft-tissue dissection is carried out to identify the extensor pollicis longus (EPL) tendon in the third dorsal extensor compartment. Once it is identified, the compartment is released, and the tendon is transposed and protected to reduce the risk of injury during nail insertion and while the nail remains in place during fracture healing. Under direct visualization, with the EPL protected, an oblong hole is then made in the dorsal cortex of the radius. The intramedullary device is inserted and passed retrograde in the radius up to the fracture site. Under fluoroscopic guidance, the bent tip is now advanced across the fracture site to engage the fracture fragment. Repeating the arthrogram at this point may facilitate visualization of the fracture fragment and the reduction. Once the tip of the intramedullary device has engaged the fracture fragment, the intramedullary device is rotated 180°, thus reducing the fracture fragment. Multiple fluoroscopic images are obtained during this process to ensure that the fragment is moving appropriately. After the fragment is reduced into acceptable alignment, the intramedullary device is cut just above the dorsal radial cortex and the tourniquet is deflated. Hemostasis is obtained and the dorsal incision is closed. The child is then placed in a long arm cast, and final images are obtained to ensure maintenance of reduction.

Table 4
Metaizeau technique: Surgical steps
Exsanguinate limb and inflate tourniquet |
Make dorsal incision in region of Lister’s tubercle, approximately 2–3 cm in length, after ensuring that the physis is distal to this location |
Soft-tissue dissection to identify EPL tendon in third dorsal extensor compartment |
Release compartment. Transpose and protect EPL tendon |
Make oblong hole in dorsal cortex of radius |
Bend tip of intramedullary device 20–30° |
Place intramedullary device through the radius in a retrograde fashion |
Advance tip past fracture site into the proximal radial head fragment |
Rotate intramedullary device 180°, reducing the fracture fragment |
Obtain multiple fluoroscopic images to ensure appropriate fragment movement and subsequent reduction |
Cut intramedullary device just above dorsal radial cortex |
Deflate tourniquet, obtain hemostasis, and close incision |
Place long arm cast and obtain final images |
Fig. 5
Reduction of a radial neck fracture utilizing an intramedullary device (Metaizeau technique). (a) Anteroposterior radiograph demonstrating a displaced radial neck fracture. (b) Insertion of the intramedullary flexible nail utilizing a radial-sided entry point. (c) Advancement of the flexible nail to engage the fracture fragment. Note the utilization of an arthrogram to aid in the visualization of the radial head. (d) Rotation of the intramedullary nail 180° to reduce the fragment. (e) Anteroposterior view following reduction. (f) Lateral view following reduction (Courtesy of Joshua M. Abzug, MD)
As noted earlier, open reduction should only be used when all other attempts to reduce the fracture have failed (Table 5). A standard Kocher approach is utilized by making a posterolateral incision from the lateral condyle and extending obliquely in a distal medial direction to end approximately 5 cm distal to the tip of the olecranon. The plane between the extensor carpi ulnaris and the anconeus muscles is then identified and explored. With the forearm held in a pronated position, the anconeus is retracted ulnarly and the extensor carpi ulnaris is retracted radially. The fibers of the supinator muscle can be identified crossing at a right angle to the wound. Its proximal fibers should be gently retracted distally to avoid potential injury to the posterior interosseous nerve. The joint capsule is now visualized in the depth of the proximal aspect of the wound. The capsule is then incised to obtain adequate visualization of the fracture, and the fracture is now able to be reduced under direct visualization. Stabilization is typically performed with a minimum of two K-wires placed obliquely through the fracture site and left protruding through the skin for easy removal. Transcapitellar pins should be avoided as they make break during the healing period, even if the child is in a long arm cast.
Table 5
Open reduction of distal radius fractures: Surgical steps
With the forearm pronated, perform standard Kocher approach by making posterolateral incision from the lateral condyle extending obliquely to end approximately 5 cm distal to the tip of the olecranon
Stay updated, free articles. Join our Telegram channel
Full access? Get Clinical Tree
 Get Clinical Tree app for offline access

|