General: Is behavior age-appropriate? Is gait normal and age-appropriate? What percentiles are the child’s height and weight?
Skin: Does the child have axillary freckling, café au lait spots, or other birth marks or skin lesions?
Head and neck: Does the child have dysmorphic features? Preauricular skin tags? Antihelices present in the ears? Does the child see and hear normally?
Spine: Is there full motion at the cervical spine? Is the spine straight? Is there a dimple or hairy patch at the base of the spine?
Lower extremities: Are the hips reduced? Are the thigh creases and leg lengths equal? Are there any foot anomalies?
Neurologic: Are there upper motor neuron signs such as Hoffman’s or clonus? Are reflexes (including abdominal reflex) normal?
Understanding Child Development Stages
0–3 Months
The first 3 months of life are sometimes referred to as the “fourth trimester,” in reference to the dramatic transition, the newborn must make from life inside the uterus to the outside world. During this time period, the infant can already turn toward a parent’s voice and attend to a human face. But they still have open fontanelles, poor head control, and poor ability to regulate their body temperature. It can be intimidating for the surgeon who does not see infants regularly to handle and examine these fragile little humans under the watchful eye of their anxious (and sleep-deprived) parents. The exam should begin with the infant swaddled, either in their parent’s arms or on the exam table. The area of interest can then be exposed for the exam, while the remainder of the infant remains covered and warm. Provocative maneuvers and anything that might cause pain should be reserved for the end of the examination. Passive range of motion testing can be a provocative maneuver in an infant, as they generally do not like for an extremity to be held or confined, so this testing should be saved for the end as well.
Observing active use of the upper extremities can be difficult in newborns. They will tend to hold the upper extremities with the arms adducted, elbows flexed, forearms pronated, and fists clenched. Very young infants will not yet reach for toys and rattles. Instead, active motion can be elicited by tickling or stroking the area of interest (such as the back of the hand to elicit finger extension). Infant reflexes can also be used to the examiner’s advantage (Table 2).
Table 2
Infantile reflexes relevant to the upper extremity examination
Reflex name | Description | Duration |
|---|---|---|
Moro or Startle | Back arches and extremities extend to startling stimulus | 4–6 months |
Tonic Neck or Fencer’s | When the head is turned to one side, the arm on that side will extend, while the opposite arm flexes at the elbow | 6 months |
Grasp | Infant grasps fingers around an object placed in the palm | 3–4 months |
3–12 Months
Infants at this age should be able to engage much more readily with their environment than the newborn. Late infancy is a time of rapid development in both gross and fine motor skills. Although each child’s development may progress differently, there are general milestones that can be expected:
Three months: Independent head control, track objects with eyes, turn head to sound, smiles
Six months: Roll over, sit unsupported, put objects in mouth, transfer objects from one hand to the other
Nine months: Crawl
Twelve months: Pull to stand, cruise (walk holding on to furniture)
Specific to hand development, infants progress through a standard pattern of grasp development during this time (Case-Smith 1995). At 5–6 months, an instinctive palmar grasp develops, using the entire hand as a unit without independent use of the digits or any meaningful use of the thumb and without regard for visual input (Fig. 1). The infant typically secures the object and then adjusts their grasp accordingly. This is a transitional behavior between the grasp reflex (see Table 2) and more mature grasp patterns. By 7–8 months, the infant develops a more purposeful grasp, most commonly a raking (or palmar) grasp, in which they can stabilize the object using the fingers themselves, rather than by holding the fingers against the palm (Fig. 2). The 7-month-old typically approaches and manipulates an object with both hands, grasping and inspecting it before bringing it to their mouth. At 9–12 months, the child begins to use the thumb independently as the tip pinch (pincer grasp) develops. In the pincer grasp, the thumb and index finger are opposed pad to pad to hold an object (Fig. 3).

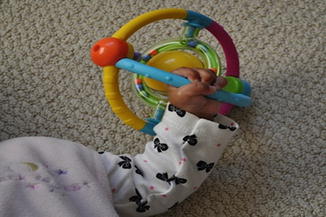
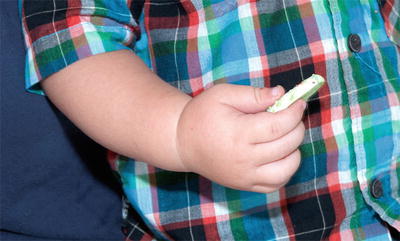
Fig. 1
Instinctive palmar grasp. Note lack of thumb involvement with grasp
Fig. 2
Raking or palmar grasp. More purposeful and independent use of the fingers and thumb is noted
Fig. 3
Pincer grasp. The thumb and index finger are opposed pad to pad to hold the cookie (Reproduced with permission from Shriners Hospitals for Children — Northern California)
Toys can be a useful distraction device at this age and can also assist in the examination. We often allow a baby to “warm up” to the office setting and the examiner by providing a few toys for them to play with independently. This independent play allows for careful inspection of hand function, and the examiner can gradually join in with the play to encourage specific hand functions. Similarly, once infants begin to eat finger foods, around 6 months of age, many parents will have snacks with them which can be a great adjunct to the examination. Stranger anxiety presents at different ages and to a different extent in each child but generally peaks between 6 and 12 months of age. For this reason, more focused or difficult portions of the exam of older infants are often better accomplished with the child in the parent’s lap.
1–5 Years
Growth and development continue rapidly during this time period. By 18 months, the child should be able to walk independently, say several intelligible words, and feed themselves with a spoon. A 2-year-old can run, speak in 2–3-word sentences, manipulate large buttons and zippers, and scribble with a crayon. A 3-year-old can speak in full sentences, throw and catch a ball, and hold a crayon with a tripod grip. By 5 years old, language is more complex, as are fine motor skills (such as stringing small beads) and the child’s hand dominance is generally established.
Toddlers become accustomed to visiting the pediatrician for immunizations, so during this time period they may begin to associate the doctor’s office and all the white coats with getting “a shot.” They may start to be intimidated by large groups of people, such as the myriad of doctors and trainees at a teaching institution. In addition, toddlers are increasingly difficult to distract and win over with a simple toy, so distraction devices that worked in the past for the infant examination will not always continue to work. Although some parents may request that the doctor remove the white coat, this rarely will actually make a difference in the toddler’s perception of the exam, and appropriate dress is really at the discretion of the examiner.
Toddlerhood is all about increasing self-awareness and increasing independence. This can be used to the examiner’s advantage by giving the toddler choices throughout the examination. A classic mistake is to ask a toddler “Can I see your hand?” After this question, any self-respecting 2-year-old will shout “No!” and hide that hand from view for the rest of the doctor’s visit. Instead, the 2-year-old should be asked “Do you want me to look at this hand first, or the other one?” This and other choices such as “Do you want to sit on your mom’s lap or on the table?” can help the toddler feel in control of the situation while you can proceed with the necessary parts of the examination.
Even with all of the above, some children of this age will be simply too difficult to examine properly on a given day. If this is the case, it is best to do as much of the examination as possible, then reassess the situation. At times, a short break from the exam is all that is needed. At other times, you will need to document thoroughly what you were or were not able to examine and bring the child back for a repeat examination on another day.
5–12 Years
In general, school-aged children are much easier to examine than children under 5 years of age. The examination can begin to model a more adult pattern. For example, children can follow instructions so that things like motor strength can now be directly examined. However, children at this age often require explanations of the various components of the examination. To use motor strength testing as an example, most adults will readily comply if you ask them to “bend your elbow and don’t let me straighten it.” While school-aged children can follow these instructions, the examiner needs to slow down and explain tests more completely. For more complex tests, demonstrating with a parent first can help. For example, you may say something like “Now I need to see how strong you are. Can you bend your elbow? Now hold it bent as strong as you can and don’t let me straighten it out.”
Modesty also develops during the late elementary school and middle school years. Things that adults take for granted, such as men removing their shirts for a shoulder exam, are often much more sensitive concepts for children of this age. It is common for a 10-year-old boy to not want to take off his shirt for doctors to examine him. If the child’s chest and shoulders need to be visible for the upper extremity exam, the child should be given the opportunity to change into a gown while the examiner waits outside the room. During the exam, only the necessary body part should be exposed from the gown.
13–18 Years
During this time period, children’s developmental skills are much like adults, but their social and cognitive skills are still maturing. Modesty remains an issue and should be addressed as above. In addition, there may be certain parts of the examination or interview that are better addressed without the parents in the room. For example, a teenage boy presenting with swelling and pain over the metacarpophalangeal joint may be reluctant to admit in front of his parents that his symptoms began after punching someone in the teeth, information which is vital to the correct diagnosis and management of his likely joint infection.
The examination can generally proceed as for adults. However, teenagers are still less accustomed to the doctor’s office than are adults, so each part of the examination should be explained, and any tests that may elicit pain should be discussed beforehand.
General Examination of the Upper Extremity in Children
As discussed above, the physical examination may be performed in different orders depending on the age and cooperation of the child. In general, the physical exam can be divided into either the action of the examiner or the system being examined. See Table 3 for an example of dividing the upper extremity examination by systems. For children, it is best to think of the exam in terms of the action of the examiner. Although this may make the exam seem “out of order” to the surgeon, it will generally yield the best cooperation from young patients:
Table 3
Upper extremity examination by systems
1. | Skin: Lesions, abrasions |
2. | Muscles: Strength testing, atrophy |
3. | Nerves: Sensory testing, provocative maneuvers |
4. | Blood vessels: Pulses, capillary refill, Allen’s test |
5. | Bones and joints: Range of motion, deformity, tenderness to palpation |
1.
Observation: The child is first observed at rest and at play in the examination room (Fig. 4). Age-appropriate toys should be available in the room even before the examiner enters, so that the child does not associate the toys with the exam. While the reason for the visit and history are discussed with the parents, the surgeon should keep one eye on the child at play. Through play, you can see whether both upper extremities are symmetric in appearance and whether the child uses both hands equally or tends to favor one over the other. Consistent hand preference (handedness) does not usually appear until age 2½ to 3 years (Murray 1995), so strong preferential use of one hand in a younger child should raise suspicion for a central nervous system condition, such as cerebral palsy, affecting the control of the contralateral hand.
2.
Inspection: Any skin abnormalities, such as lesions which can be associated with congenital conditions (i.e., café au lait spots, hemangiomas), or signs of trauma (ecchymosis, swelling, lacerations, abrasions) can be detected easily by inspection. In addition, careful inspection should include:
a.
Number and size of digits. In general, the tip of the thumb should be almost in line with the index PIP joint when adducted, and the fingertip pad of the thumb should be larger than that of the index finger. The index and ring fingers should be roughly the same size and length, with the middle finger being slightly longer. Digits should be the same length as the corresponding digits on the opposite hand.
b.
Nail plate and eponychium. Absence of nail elements may indicate nail-patella syndrome or be associated with hypodactyly. In the case of syndactylized digits, it is important to note whether the paronychium is present or will need to be reconstructed when the fingers are separated.
c.
Digital flexion creases. Absence of digital flexion creases indicates that the affected joint did not move during prenatal development. An extrinsic abnormality, such as in hypoplastic thumb or arthrogryposis, or joint abnormality such as in symphalangism, may cause creases to fail to form. Similarly, children with arthrogryposis may have diminished or absent creases at the wrist and elbow as well.
d.
Muscle bulk or wasting. Absence or wasting of thenar musculature may indicate median nerve injury or thumb hypoplasia, while wasting of interossei may indicate ulnar nerve injury.
e.
Angular and rotational deformities. The nail plates of the index through small fingers should all face in the same direction. When flexed, the index through ring fingers should point generally toward the scaphoid, without overlapping each other. The thumb should be rotated out of the plane of the hand.
3.


Palpation/percussion: If passive range of motion testing is not expected to be painful for the child, it can be performed at this point. However, in young children or those with contractures, passive range of motion can be painful and should be saved for later in the examination. The degree of opening of the first web space along with the range of motion of the digits, wrist, forearm, elbow, and shoulder is noted. When measuring wrist range of motion, it is important to include radial and ulnar deviation, as these can be affected in many children’s conditions such as radial or ulnar deficiency, arthrogryposis, and multiple hereditary exostoses. When measuring forearm range of motion, the examiner should stabilize the child’s elbow against their side with one hand and rotate the distal forearm with the other hand. This prevents compensatory motion of the shoulder and wrist from affecting the measured rotation. Actual goniometric measurement of forearm rotation often requires a second examiner to work the goniometer while the first examiner positions the child’s forearm.
Stay updated, free articles. Join our Telegram channel
Full access? Get Clinical Tree
