Fig. 18.1
The optimized traction device. 1 thread guide rail, 2 tension spring, 3 thread guide roller, 4 tensioning button, a single traction ratchet for even, stepwise tension via both threads to avoid dehiscence and tearing of the neovagina, 5 tension release lever, 6 locking mechanism to fix the traction ratchet and prevent inadvertent release, 7 pan-head screw for easy disassembly for autoclaving (Reproduced with permission from Brucker et al. [3])
Applicators, pluggable segmented dummy, and vaginal dummies
The set of instruments developed for the technique as shown in Fig. 18.2. The straight and curved thread applicators with ergonomic handgrips are required for vaginoabdominal perforation (straight) and abdominovaginal perforation and peritonealization (curved). The sharp-edged applicator tips enable easy perforation of the vaginal dimple and retroperitoneal feed-through of the tension threads. The pluggable segmented dummy is designed to stretch the vaginal dimple into the abdominal cavity. The vaginal dummies used for postoperative maintenance of the neovagina have diameters of 2, 2.5, and 3 cm, and lengths of 10 and 12 cm.
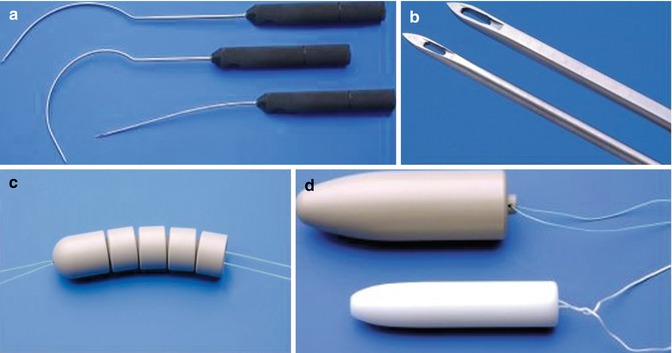
Fig. 18.2
Instruments and vaginal dummies for laparoscopically assisted neovagina creation by expansion. (a) Straight applicator for vaginal-abdominal perforation and curved tread guides for retroperitoneal feed-through of the tension threads, all equipped with ergonomic hand grips. (b) Sharp-edged applicator tips. (c) The pluggable segmented dummy for the traction phase with the “olive” as the top segment. (d) Vaginal dummies for postoperative maintenance of the neovagina. Lettering from top left, clockwise (Reproduced with permission from Brucker et al. [10])
Laparoscopic instruments and equipment
The procedure requires a standard set of laparoscopic instruments comprising a 0° endoscope, a Veress needle, and two trocars (10 and 5 mm in diameter). It further requires a xenon light source and a thermoflator. A 3-chip camera with integrated control buttons, zoom, and focusing is needed for imaging. The video camera system and monitor should have full high-definition (HD) quality (1,920 × 1,080 pixels) for visualization of fine structures. Lastly, the procedure requires a minimum of two grasping forceps, including a sharp forceps to enable secure gripping the uterosacral ligaments.
Preoperative Management and Preparations
Before surgery is considered, it is essential to confirm the diagnosis of MRKH syndrome or (C)AIS by chromosome and hormone analysis and ultrasonography, and establish the indication for the chosen procedure. In addition, magnetic resonance urography (MRU), and in some cases diagnostic laparoscopy, may be necessary to exclude other malformations of the urogenital tract. The patient and her parents or legal guardians need to be educated about all available treatment options, surgical and nonsurgical, and discuss the patient’s expectations of surgical treatment. With regard to laparoscopically assisted neovaginoplasty, the procedure, the immediate postoperative course, and the necessity to wear a vaginal dummy for a prolonged period to maintain neovaginal function and to see the specialist for regular check-ups should be discussed in detail.
Preoperative anesthesiologic evaluation should be performed and thrombosis prophylaxis achieved using low-molecular weight heparin and compression stockings. Bowel preparation is mandatory. A first or second-generation cephalosporin should be administered for antibiotic prophylaxis less than 30 min preoperatively and maintained postoperatively until the traction device is removed.
Surgical Technique
For surgery, the patient is placed in the Trendelenburg position with her legs resting on sufficiently padded leg holders to enable unhindered access to the perineum. The patient is prepped and draped in a standard sterile manner, allowing simultaneous access to both the abdominal and the vaginal region. The procedure is performed under general anesthesia. Immediately before surgery, epidural anesthesia is additionally administered for postoperative pain control.
Laparoscopically assisted neovaginoplasty is a technically demanding procedure that takes a team of two surgeons, one or (ideally) two assistants, and a scrub nurse 1–2 h to complete.
Prior to laparoscopy, the future position of the traction device just below the umbilical fossa is determined and marked with a pen, as are the future puncture points to the left and right of the traction device.
Laparoscopy is initiated, a pneumoperitoneum is created, and the optical trocar and telescope are introduced. Following inspection of the initially intraabdominal site, the suprasymphyseal auxiliary trocar is placed. The procedure requires only a single suprapubic trocar.
Next, the direction of the perforation necessary for the introduction of the traction threads through the vaginal dimple into the abdominal cavity is determined diaphanoscopically using simultaneous laparoscopy and cystoscopy in the picture-in-picture mode. The future neovaginal apex needs to lie dorsally on the connecting fibrous band of the rudimentary uterus, exactly dorsally to the uterosacral ligaments.
Controlled digital pressure from the left forefinger is then applied to the vaginal dimple, pushing it in the direction of the abdomen, until the vaginal dimple is almost perforated, as shown in Fig. 18.3. Simultaneously, the straight thread guide is inserted under this guiding finger together with the two threads attached to the dummy, following the guiding finger to the proximal end of the dimple while the left middle finger is used to distance the rectum dorsally. It is crucial during this step to grasp the uterosacral ligaments at their union using a laparoscopic forceps and to draw them as far as possible in the cranioventral direction. This ensures that the bladder cannot be punctured because it is stretched and flattened and removed from the point of perforation. Fig. 18.3 illustrates the correct and incorrect finger and forceps positions.
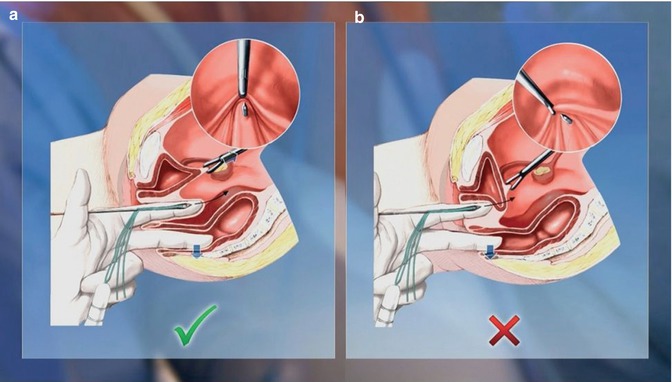
Fig. 18.3
Correct (a) and incorrect (b) finger and forceps positions during transvaginal perforation of the vaginal dimple (Reproduced with permission from Brucker et al. [10])
Perforation of the vaginal dimple then introduces the threads into the abdominal cavity. Unlike other Vecchietti-based techniques, our procedure thus obviates the need for tunneling of the vesicorectal space.
Intraabdominally, the threads are detached from the straight thread guide, which is then retracted. Injury to the bladder and rectum is excluded by cystoscopy and rectal palpation.
After the bladder is filled to 200–300 mL, the curved thread guides are successively inserted at the marks previously made on the right and left side of the abdomen and then retroperitoneally advanced to the upper end of the vagina, as shown in Fig. 18.4. After intraabdominally threading each thread into the guide, it is drawn back behind the peritoneum and out through the abdominal wall, as illustrated in Fig. 18.5.
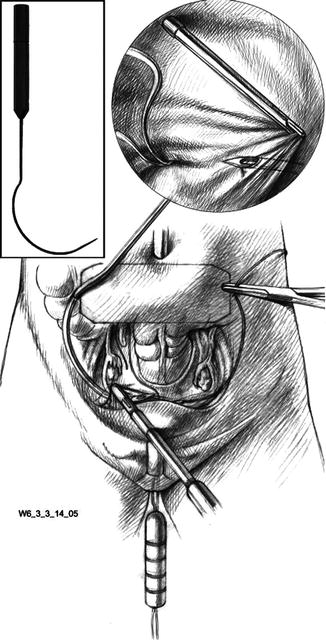
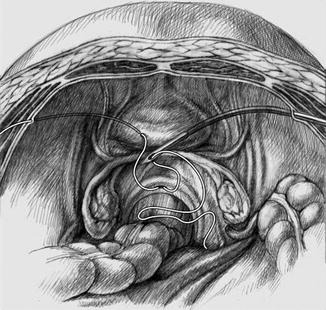
Fig. 18.4
Insertion of the curved thread guide, down to the cranial end of the vagina (Reproduced with permission from Brucker et al. [3])
Fig. 18.5
Retroperitoneal drawing of the threads through the abdominal wall (final result on the left). The right side shows the thread about to be retroperitoneally drawn to the exterior (Reproduced with permission from Brucker et al. [3])
Under cystoscopic control, a suprapubic catheter is then inserted and the transurethral catheter removed to prevent pressure from the dummy causing urethral necrosis. The suprapubic catheter remains in place until removal of the traction device. This change of catheters can be dispensed with if only the top segment of the pluggable dummy, the olive (Fig. 18.2c), is used. In this case, urethral necrosis will not occur because as a rule the olive will reach its final position behind the urethra within hours.
Finally, the traction device is positioned as far cranioventrally as possible, with its cranial edge bordering on the lower edge of the navel, as shown in Fig. 18.6. This achieves the greatest potential for maximization of neovaginal length and the best possible anatomical axis. Each thread is fed via a thread guide on the tension device to the spring opposite the thread exit point and inserted into the slot in the tensioning wheel shaft. The threads are secured by attaching the tensioning wheel with an audible click. The wheel is gradually turned until the necessary tension has been built up and then secured with the locking mechanism. This tensions the two threads simultaneously and uniformly.
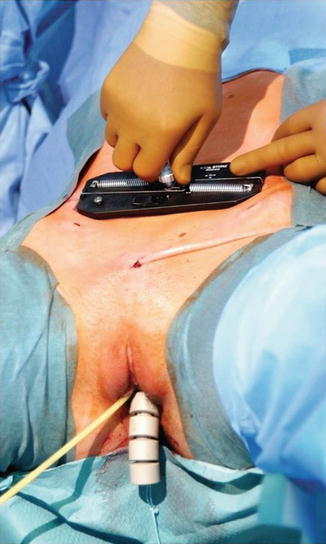
Fig. 18.6
Using the traction device to tension the threads postoperatively (Reproduced with permission from Brucker et al. [10])
Postsurgical Management
After surgery, daily tightening of the threads using the traction device requires pain control via an indwelling epidural catheter. Once expansion has created a neovagina of approx. 10 cm in length, usually 4 or 5 days after surgery, the tension threads are loosened slightly and cut close to the abdominal wall to enable removal of the traction device and segmented dummy. The latter is extracted vaginally together with the intracorporeal portion of the threads.
To maintain the neovagina and speed up epithelialization, a vaginal dummy must be worn for several weeks after surgery. Insertion is facilitated by generously coating the dummy with estrogen-containing cream, which also promotes epithelialization. In the absence of regular intercourse after this phase, it is advisable to continue wearing the dummy several times a week to prevent neovaginal shrinkage.
Modifications
The surgical technique described above encompasses a number of fundamental modifications to the original procedure using a traction device to create a neovagina by vaginal dimple expansion as first described in patients with congenital vaginal aplasia by Vecchietti in 1965 [12]. The then novel original procedure involved laparotomy to access and dissect the vesicorectal space. With the advent of laparoscopy, it became possible to replace laparotomy, obviating the morbidity open surgery entails. Thus the first laparoscopic Vecchietti neovaginoplasty procedures were reported by Gauwerky et al. in 1992 [1] and Fedele et al. in 1994 [13], the former technique being based on vesicorectal tunneling, the latter already replacing this dissection step by vaginoabdominal perforation of the rectovesical septum, thus further reducing morbidity.
Our current technique is the result of the substantial further development and optimization of both the instruments and devices required for the procedure and the surgical technique of laparoscopically assisted neovaginoplasty.
Essentially, our technique involves three major modifications to the original Vecchietti technique. First, it replaces abdominal open surgery by laparoscopically assisted minimally invasive surgery. Second, it dispenses with the need for dissection of vesicorectal space by using the vaginal approach to introduce the tension threads into the abdominal cavity by vaginoabdominal perforation of the rectovesical septum. Third, in our technique, the traction device is positioned just below the umbilical fossa rather than in the suprapubic region as in the original technique. This is an important modification as it greatly reduces the danger of the olive being drawn too ventrally in the direction of the bladder, potentially resulting in injury to, and even perforation of, the bladder, as has been reported by others [14, 15]. At the same time, the more cranial positioning of our traction device also enables better anatomical results in terms of both neovaginal length and an anatomically correct axis.
Review of the Literature
The following review of the literature will focus on the post-operative functional results of neovagina formation by laparoscopically assisted expansion of the existing vaginal vault. The essential data from relevant publications are summarized chronologically in Table 18.1, updating a recent review by Brucker et al. [6] that discusses the wide range of treatment options available to patients with congenital vaginal aplasia and other malformations of the female genitalia. This section will focus on Vecchietti-derived techniques since the nonsurgical dilation method originally developed by Frank and the other surgical procedures, e.g. those using skin grafts (McIndoe), peritoneum (Davydov), or bowel, particularly sigmoid colon, are discussed in detail elsewhere in this monograph.
Table 18.1
Selected publications, in chronological order, reporting expansion-based laparoscopic or laparoscopically assisted neovaginoplasty techniques and their outcomes
Author (year) [Reference] | Type of study | Patients, N (technique) | Indication (n) | Age, median [range] or mean ± SD, years | Operative time, median [range] or mean ± SD, min | Intraoperative complications, no. of patients (%) | Traction time [range], days | Neovaginal length, median [range] or mean ± SD, cm | Satisfactory results, n/N (%) | Follow-up, median [range] or mean ± SD, months |
|---|---|---|---|---|---|---|---|---|---|---|
Gauwerky (1992) [1] | Technique | n.d. | MRKH | n.d. | n.d. | n.d. | n.d. | n.d. | n.d. | n.d. |
Gauwerky (1993) [16] | Technique and case reports | 5 (Vecchietti with VRT) | MRKH (2) | 27.3 [23–33] | n.d. | 0 | 15 [12–19] | 9.6 [8–12] | 5/5 (100) | 91 [72–108] |
AIS (2) | ||||||||||
Other (1) | ||||||||||
Fedele (1994) [13] | Technique, case report | 2 | MRKH | 2/2 (100) | ||||||
Fedele (1996) [15] | Open noncomparative clinical study | 14 | MRKH | [15–34] | n.d. | 0 | n.d. | 8.1 ± 1.1 | 13/14 (93) | [6–24] |
Borruto (1999) [17] | Retrospective analysis of laparoscopy vs. laparotomy | 7 (laparoscopic vs. 69 laparotomic Vecchietti procedures) | MRKH | n.d.
Stay updated, free articles. Join our Telegram channel
Full access? Get Clinical Tree
 Get Clinical Tree app for offline access

|