Fig. 1
Schematic illustrations of the neuroanatomy of the elbow relative to the proximal anteromedial (a) and mid anterolateral (b) portals demonstrate the proximity of vital structures. The arthroscopic instruments are shown as a gray cylinder (Courtesy of Dan A. Zlotolow, MD)
The elbow is not a forgiving joint, with minimal dissection the key to maintaining motion after surgery. The arthroscope allows the surgeon to look and work inside the elbow joint itself through small capsular windows rather than large arthrotomies. It is not, however, a magical wand that cures disease simply by inserting it into the joint. The same work that would have been done via an open incision still needs to get done on camera. If poor visualization, equipment limitations, or the pathology does not allow what would have been done open to be done with a scope, then the only option is to convert to an open procedure. As the surgeon gains more and more experience with this technique, the need for open procedures will diminish but never disappear.
Begin your excursion into elbow arthroscopy only after you have mastered basic arthroscopic techniques in less demanding joints such as the knee, the shoulder, and/or the wrist. Experience with open surgical approaches to the elbow is also a prerequisite. Before attempting a procedure arthroscopically, you should be comfortable with the open procedure. Not only does experience with the open procedure inform your arthroscopic technique, but it is a necessary bailout if arthroscopy is not possible. This chapter will serve as a primer for those considering adding elbow arthroscopy to their armamentarium and as a reference for those already familiar with these techniques. It is not intended to serve as a how-to-guide for the novice surgeon (Savoie 2007).
Indications for elbow arthroscopy in children are symptomatic plicas, loose bodies, infection, osteochondritis dissecans (OCD), and elbow contractures. Contraindications include any process that has distorted the normal anatomy such as dysplasia about the elbow, burns, heterotopic ossification, and skeletal deformity. Ulnar nerve subluxation and transposition are not contraindications to arthroscopy, but do require an open approach to the medial portals. There may be no advantage to arthroscopy over an open approach if the medial side requires an open approach.
Basic Elbow Arthroscopy
There are several techniques that can be used to minimize the risk of neurovascular injury during arthroscopy, beginning with how to position the patient. Elbow arthroscopy can be performed with the patient supine, prone, or lateral decubitus. There are advantages and disadvantages to each position (Table 1), but once you decide upon a position, stick with it. No matter what the patient’s position is, the arthroscope most often is pointing toward the surgeon, making navigation confusing since everything is a reversed mirror image of what you expect. Familiarity breeds comfort in this case, so maintain the same positioning and learn how to scope well in that position.
Table 1
Advantages and disadvantages of patient position for elbow arthroscopy
Position | Advantages | Disadvantages |
|---|---|---|
Supine | Easiest to achieve | Requires suspending the arm on a tower and traction |
Easiest to manage airway | Arm unstable | |
Joint is seen in upright position | Difficult access to the posterior compartment | |
Freedom to maneuver instruments in the anterior compartment | ||
Lateral decubitus | Does not require traction | More difficult to maneuver instruments in the anterior compartment |
Arm stable in arm holder | Slightly more difficult to manage airway | |
Good access to the posterior compartment | Joint is seen upside down | |
Prone | Arm stable in arm holder | Difficult to manage airway |
Good access to the posterior compartment | Increased positioning and anesthesia risks | |
Freedom to maneuver instruments in the anterior compartment | Joint is seen upside down |
The lateral decubitus position straddles the risks and advantages of the prone and supine positions and will be discussed here. After general anesthesia with endotracheal intubation is achieved, place the patient in the lateral decubitus position on a beanbag, surgical side up. A slightly more prone than a true lateral position allows for more distance between the table and the elbow, mitigating some of the instrumentation disadvantages of the true lateral position. An axillary roll is used to prevent compression of the brachial plexus during the procedure and should be placed just caudal to the axilla. Make sure that the peroneal nerve is free around the fibular head and that the lateral malleolus is well padded. The down arm should not be abducted more than 90° to prevent prolonged traction on the brachial plexus. The elbow is well padded and flexed to 90°. Avoid flexion beyond 90° to prevent ulnar nerve compression and maintain unrestricted vascular flow. Place the surgical limb over a padded arm holder with the patient at the very edge of the surgical table. The goal is to have as much clearance between the table/patient and the elbow to allow for unrestricted instrument maneuvering in the anterior compartment (Fig. 2a).
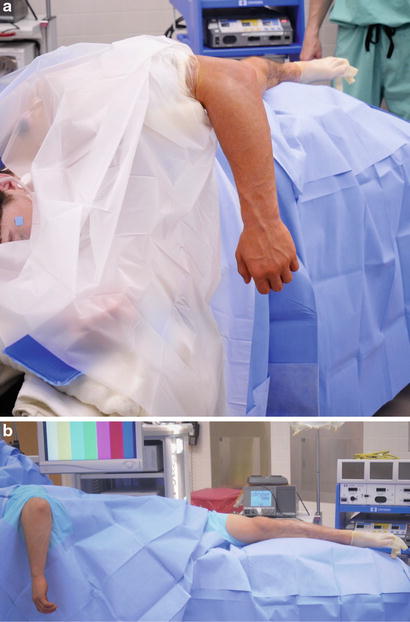
Fig. 2
The patient is positioned lateral decubitus with the arm over a padded arm holder (a). A check is made in this position to assure that instruments can be maneuvered in the anterior compartment. Final setup of the room (b) includes a monitor opposite the elbow and fluid bags suspended on a pole for gravity inflow (Courtesy of Shriners Hospitals for Children, Philadelphia)
Place the monitor directly in front of where you will be doing the arthroscopy so that your view is clear and unrestricted. Set the arthroscope to maximal zoom and make sure the monitor is close to the field. A 4.0 mm 30° arthroscope is usually used, but a 2.7 mm scope may be appropriate for younger children. Fluid flow can be controlled by a pump or by gravity. Gravity is most reliable and easiest to control and requires no specialized equipment (Fig. 2b).
A sterile or nonsterile tourniquet can be used. Either way, the tourniquet should be as proximal on the arm as possible. For young children, a HemaClear (HemaClear, OHK Medical Devices, Grandville, Michigan, USA) tourniquet may be necessary to optimize the surgical field. Set the arm on a well-padded arm holder, and check once more to make sure that there is adequate room around the elbow to maneuver instruments in the anterior compartment. Make adjustments as necessary.
Prepare and drape the arm in the standard fashion. Place the hand and forearm into an impermeable stockinet secured with a self-adherent elastic bandage. If simultaneous access to the knee is required, drape out the leg concurrently over a nonsterile tourniquet (Fig. 2b). Mark out the relevant bony and soft tissue landmarks and the portal sites (Fig. 3). Make sure once again that the ulnar nerve does not subluxate. The most commonly used portals are the proximal anteromedial, proximal anterolateral, soft-spot, posterolateral, and direct posterior portals. Other accessory portals, particularly the posteromedial, may pose greater risks and should be used only when needed.
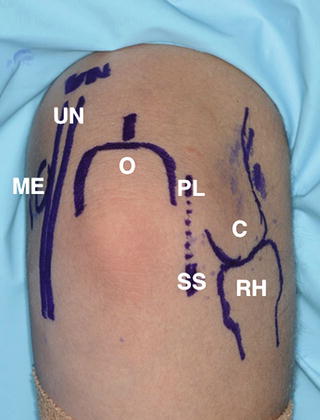
Fig. 3
Once the patient is positioned in the lateral decubitus position with their arm on an arm holder, mark the skin to identify the ulnar nerve (UN), medial epicondyle (ME), olecranon (O), soft-spot portal (SS), the capitellum (C), and the radial head (RH). The anconeus split approach is made by connecting the posterolateral portal (PL) with the soft-spot portal (dotted line) (Courtesy of Shriners Hospitals for Children, Philadelphia)
Exsanguinate the arm and inflate the tourniquet. Insufflate the joint with 20–30 ml of saline or 0.25 % bupivacaine with epinephrine via the direct posterior portal or the soft-spot portal. The posterior portal is easier and more reliable unless the patient has a fenestrated olecranon fossa, in which case the fluid can inadvertently be injected into the antecubital fossa. If the fluid is in the joint, the elbow will extend slightly as the capsule expands.
Begin with the proximal anteromedial portal. Incise the skin with a #15 blade (not a #11 blade), and dissect bluntly with a straight hemostat to the capsule. Direct the dissection angled proximally and laterally so as to skive off the anterior cortex of the humerus. Do not puncture the capsule with the hemostat, as this will deflate the capsule and increase the risk of median nerve injury. Use the camera cannula with a blunt trochar to pierce the capsule, following the line of dissection. The bony anatomy will be easily felt through the instrument if the cannula is in the joint. Whenever possible, minimize the number of passes of instruments in and out of the joint, as each pass carries a risk to nearby structures. Replace the trochar with the camera, connect the inflow tubing, and set up a drainage tube to gravity outflow into a bucket on the floor. Make sure that the inflow tubing is primed to minimize the amount of air in the joint and open the flow. Keep the outflow off to reinflate the joint.
Take a quick look around the joint, and make sure that the portal placement allows for adequate maneuvering and visualization (Fig. 4a). Place the camera against the far capsule at the entry point of the mid anterolateral portal. Maintaining the cannula in place, remove the camera and place a switching stick though the cannula and out of the joint. Incise the skin to allow passage of the switching stick. Place a working cannula over the switching stick into the joint, pushing the camera cannula to the center of the joint. Remove the switching stick and reinsert the camera into the camera cannula. Confirm placement of the working cannula. The switching stick can be used as a retractor, or the working cannula can convey a 3.5 mm shaver (Fig. 4b).
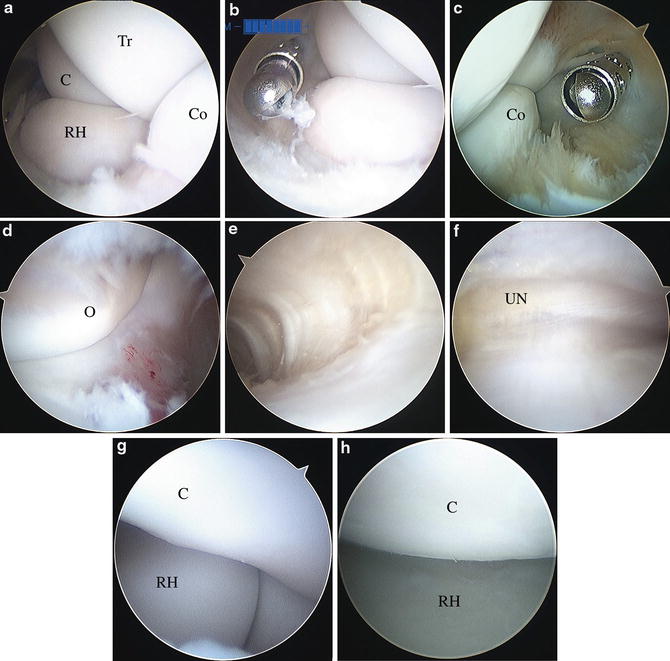
Fig. 4
Arthroscopic view from the proximal anteromedial portal (a) shows the radial head, capitellum, coronoid, and trochlea. A working cannula is conveyed through the mid anterolateral portal (b), which can be used to pass a shaver or other instrumentation into the joint without requiring multiple passes through the portal. Switching the camera and working portals provides access to the medial side of the joint (c). The olecranon and its fossa (d) and the medial gutter (e) can be seen in the posterior compartment. At the entrance of the medial gutter, the ulnar nerve can often be seen just outside of the capsule (f). At the far end of the lateral gutter, the radial head, capitellum, and proximal radioulnar joint can be seen (g). Switching to the soft-spot portal allows close-up visualization of the radiocapitellar joint (h). Abbreviations: radial head (RH), capitellum (C), coronoid (Co), and trochlea (Tr), olecranon (O), and ulnar nerve (UN) (Courtesy of Shriners Hospitals for Children, Philadelphia)
With the camera through the proximal anteromedial portal, inspect the radial head, the capitellum, the proximal radioulnar joint, the coronoid, and the lateral half of the capsule for pathology. The anterior compartment of the elbow is a wide open room that allows unrestricted visualization from the medial side unless the capsule is contracted (smaller capsular volume) or there is an exuberant inflammatory process (synovitis narrowing the visible space). If the capsule is contracted, proceed with caution. If there is inadequate visualization to achieve the surgical goals, conversion to an open procedure is appropriate unless the surgeon has experience with an arthroscopic capsular release. If synovitis is obscuring the view, a controlled synovectomy can be performed with a nonaggressive shaver using low intermittent suction or gravity outflow. The blades of the shaver should always point away from the anterolateral capsule so as not to inadvertently debride the posterior interosseous nerve (PIN). Maintain the capsule intact if possible and only debride the synovitis. This will minimize fluid extravasation.
Keeping both cannulas in the joint, replace the camera and the shaver each with a switching stick. Switch the cannulas and reinsert the camera and the shaver, now from opposite portals. Inspect the medial side, debriding as required for visualization (Fig. 4c). Remember that there is only so much fluid that the soft tissues can absorb before they become too saturated to allow good visualization. Work efficiently and have a plan. Extraneous steps are extraneous.
Make a direct posterior portal and place the shaver into the olecranon fossa. With the blades of the shaver pointing away from the ulnar nerve, debride blindly to remove the fat pad in the olecranon fossa. Insert the camera through the direct posterior portal, and reinsert the shaver through the posterolateral portal. Inspect the olecranon fossa, the medial gutter, and the olecranon (Fig. 4d, e). If the olecranon fossa is fenestrated, fat pad debridement will need to be done under direct visualization with the camera in the posterolateral portal. Switch the camera to the posterolateral portal and reinspect the olecranon fossa, the opening of the medial gutter, the ulnohumeral joint, and the olecranon. The ghostlike ulnar nerve can often be visualized on the other side of the joint capsule along the medial side (Fig. 4f).
Follow the ulnohumeral joint down to the lateral gutter with the camera in the posterolateral portal. Slight elbow extension can take tension off of the posterolateral soft tissues and open the lateral gutter. Place a needle though the soft-spot portal to confirm portal placement. The needle should emerge into view just proximal to the radial head. Pass a shaver through the soft-spot portal, and debride enough of the fat pad to allow for visualization of the proximal radioulnar joint, the radial head, and the capitellum (Fig. 4g). This is a relatively safe area to debride as long as the blades are pointed away from the articular surfaces. There are no neighboring neurovascular structures, and the collateral ligament inserts distally.
Moving the camera to the soft-spot portal allows close-up visualization of the radiocapitellar joint (Fig. 4h). A more bird’s eye view of the radiocapitellar joint is rarely possible due to the minimal capacitance of the lateral gutter. Accessory posterolateral or posterior portals may be used as needed and pose little additional risk.
Remove all instrumentation from the joint. Close the portal sites and deflate the tourniquet. Apply a sterile dressing and flip the patient back to a supine position. Place a splint or cast as required based on the procedure.
Elbow arthroscopy preoperative planning |
|---|
OR table: standard |
Position/positioning aids: lateral decubitus |
Fluoroscopy: mini C-arm |
Equipment: arthroscopy tower, arthroscopy instruments, 3.5 mm shaver, 4.0 (or 2.7) mm 30° arthroscope, inflow pump or tall IV stand, suction, gravity outflow |
Tourniquet (sterile/nonsterile): upper arm, nonsterile |
Fig. 5
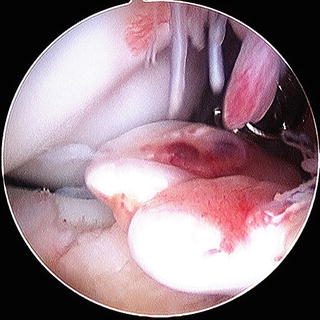
Loose bodies can be large or small and obvious or hidden. Because of their tendency to move, remove the loose bodies as soon as they come into view (Courtesy of Shriners Hospitals for Children, Philadelphia)
Elbow arthroscopy surgical steps |
|---|
Set up room; check equipment |
Position patient lateral on a beanbag |
Apply nonsterile tourniquet to upper arm |
Prepare and drape the limb over an arm holder |
Mark out anatomic landmarks |
Make sure camera is on, pump is primed, and outflow is set up |
Exsanguinate the limb and inflate the tourniquet |
Insufflate the joint |
Confirm that the ulnar nerve does not sublux |
Incise and dissect down to the capsule at the mid anterolateral portal |
Pierce the capsule with the camera cannula and blunt trochar |
Insert the camera and abut the capsule at the mid anterolateral portal |
Replace the camera with a switching stick |
Pass the switching stick from inside out to make the mid anterolateral portal |
Insert a cannula through the proximal anterolateral portal |
Reinsert the camera through the camera cannula |
Insert a shaver into the joint through the accessory cannula |
Debride as necessary to inspect the lateral side of the joint |
Use two switching sticks to switch the portals for the camera and accessory cannulas |
Debride as necessary to inspect the medial side of the joint |
Remove the instruments when the work anteriorly is complete |
Insert a shaver into the posterior portal and debride the olecranon fat pad |
Insert the camera into the posterior portal |
Insert the shaver through the posterolateral portal |
Visualize the medial and lateral gutters and the olecranon fossa, switching portals as needed |
Create a soft-spot portal to better view the lateral gutter |
Close the portal sites and apply a sterile dressing |
Release the tourniquet |
Elbow arthroscopy postoperative protocol |
|---|
Type of immobilization: depends on surgical findings (long arm splint or cast, soft dressing) |
Length of immobilization: depends on surgical findings (usually less than 2 weeks) |
Rehab protocol: active and active assisted range of motion followed by strengthening |
Elbow arthroscopy potential pitfalls and preventions | |
|---|---|
Potential pitfall | Pearls for prevention |
Equipment trouble | Make sure that all equipment is available and functioning properly before patient is asleep |
Ulnar nerve injury | Make sure nerve is securely in the cubital tunnel |
Avoid posteromedial portals | |
Avoid debridement in medial gutter or posteromedial joint | |
Radial nerve injury | Place anterolateral portals under direct visualization |
Avoid anterolateral capsular debridement | |
Median nerve injury | Avoid placing the proximal anteromedial portal too anterior on the humerus |
Make sure that the arm holder is well padded and that no assistant rests on the arm during the procedure | |
Olecranon Impingement
Some young athletes, particularly throwers, will develop olecranon impingement against the fossa. This may be the result of apophysitis or fracture leading to a longer olecranon. The lengthened olecranon then impinges on the fossa and blocks terminal extension. Secondary changes may be seen at the fossa. Arthroscopic treatment is fairly straightforward and may be an excellent technique for the novice arthroscopist to attempt. If the olecranon fossa is not fenestrated, begin by placing a shaver in the posterior portal, blades facing away from the ulnar nerve, and clearing away some of the fat pad. Insert a camera in the posterolateral portal. Using a burr always pointed away from the ulnar nerve, resect enough olecranon to make sure that there is no impingement. Make sure to remove any loose bony fragments from the joint. The defect created in the olecranon from a small amount of resection will appear enormous through the arthroscope. It is best to resect down to the level of resection required from proximal to distal, so that the burr itself can serve to measure the amount resected. Once the desired depth is reached, widen the path medially and laterally. Terminally extend to elbow to confirm adequate resection under direct visualization. Visualize the lateral and medial gutters and the sides of the olecranon. Fluoroscopy can be used as well but may be misleading since it cannot detail the three-dimensional architecture.
Stay updated, free articles. Join our Telegram channel

Full access? Get Clinical Tree


