Fig. 1
Green wavy line represents growth plate. Red line outlines the joint capsule
Haraldsson described in children two crucial blood vessels that enter the lateral condyle through the posterior portion close to the lateral capsular origin and the origin of the anconeus (Haraldsson 1959). These vessels are end arteries with an anastomosis in the ossific nucleus and do not communicate with the metaphyseal or the epiphyseal vessels. Hence, during surgery, preserving the posterolateral soft tissue attachment, which provides the blood supply to the fragment through the attachment of the lateral collateral ligament and the extensor carpi radialis longus and brevis muscles, is critical.
Assessment of Fractures Around the Elbow
Thorough history and physical examination is key in order to identify lateral condyle fractures. Children will typically present with a history of a fall on an outstretched hand. This is the most common mechanism of injury for lateral condyle as well as supracondylar fractures of the humerus. Axial and valgus loading forces from the fall force the fracture to propagate into the lateral condyle. Avulsion of the lateral condyle may also occur if an adducted arm is forcefully supinated. Pain and swelling of the elbow is the most common presentation. The common differential diagnosis of injures around the elbow is listed in the Table 1.
Table 1
Differential diagnosis of lateral condyle fracture
Bony injury | Soft tissue injury |
|---|---|
Supracondylar fracture | Sprain/lateral collateral ligament |
Radial neck fracture | Contusion or bruising |
Medial epicondyle fracture | Nonaccidental trauma |
Olecranon fracture/Monteggia fracture dislocation | |
Trochlea and capitellum fracture | |
Physeal separation | |
Elbow dislocation |
While examining children with an elbow injury, it can be challenging to obtain a complete examination in one encounter, and therefore, careful attention should be given to any pertinent positive findings. The examiner should look for deformity, ecchymosis, and swelling around the elbow. Any associated bleeding seen around the elbow should be carefully assessed for the presence of an open fracture. Increased swelling might suggest increased soft tissue damage and later displacement of the fracture. The distal humerus and its bony prominences should be carefully palpated while asking and looking for a pain response. It is often better to start examining the noninjured side or the shoulder of the injured side as this may help ease the fears of an injured child and help build trust with the patient and their parents. Subtle nondisplaced fractures can be easily missed on radiographs, and clinical examination is critical in recognizing them. Often, crepitus can be felt while palpating the humerus, which can be indicative of an underlying fracture. Sometimes, a valgus or varus force has to be applied to appreciate the crepitus. It is recommended to perform this maneuver under general anesthesia, as this may be very painful.
A complete neurovascular examination of the limb should be performed with particular focus on examining the sensory and motor components of the median nerve, anterior interosseous nerve, radial nerve, and ulnar nerve. All equivocal or positive findings should be documented. It is important to realize that the sensory examination is generally not reliable in children less than 8 years of age. It is often difficult to obtain all of the necessary examination components in the first encounter, and therefore, multiple examinations performed at various time points by the same person are necessary to complete a complete initial examination and detect any deterioration of nerve function over time. The next step of the physical examination is to move the elbow joint actively and passively to check the range of movement, as pain permits. Often, this is not possible in the emergency department and might have to be done in a setting when the child is sedated or anesthetized. Finally, it is imperative to examine the joint above and below to avoid missing any concomitant injuries.
Imaging and Other Diagnostic Tests
Radiographic interpretation of elbow fractures in children can be challenging because of the changing ossification pattern as they grow. It is important to obtain standard anteroposterior (AP) and lateral radiographs centered about the elbow, as well as additional AP and lateral radiographs that include the joint above and below. Often it is not possible to fully extend the elbow for the standard AP view as the fracture may prevent full extension of motion and may be limited by pain. In these scenarios, a Jones view, a shoot-through AP with the elbow flexed, may be helpful as it gives a good view of the distal humerus despite the overlapping radius and ulna. An internal oblique view should also be obtained as this best demonstrates the amount of displacement present in lateral condyle fractures (Song et al. 2007). A 20° tilt view, with the elbow elevated so that the arm is flexed 20°, has also been reported as beneficial in assessing fracture displacement in lateral humeral condyle fractures (Imada et al. 2010). Comparison radiographs should only be obtained in extreme settings, as Kissoon et al. demonstrated that routine comparison radiographs did not increase the accuracy of diagnosis (Kissoon et al. 1995).
Advanced imaging such as magnetic resonance imaging (MRI) and computed tomography (CT) is not routinely required for lateral condyle fractures, and its use can add to unnecessary expenditure and delay in operative intervention. Computed tomography scans may be used for extensive fractures such as intercondylar fractures or in high-energy trauma where interpretation may be difficult with routine radiographs. Magnetic resonance imaging (MRI) can also be obtained to look for nondisplaced or minimally displaced fractures and to determine articular involvement. The stability of lateral humeral condyle fractures is closely related to the cartilage hinge integrity, and MRI can be used to assess this better than plain radiographs (Horn et al. 2002). However, intraoperative arthrography is cheap and can easily be performed to study the articular surface congruence. This modality should be used whenever there is doubt about the morphology of the distal humerus or the adequacy of the reduction of the fracture (Marzo et al. 1990). Other imaging modalities, such as ultrasound, may be of value in younger children with large amounts of unossified cartilage (Davidson et al. 1994).
Classification
Milch classified these fractures based on the exit of the fracture line at the articular surface of the distal humerus (Milch 1964) (Fig. 2):
Fig. 2
Milch classification
Type I: This is the less common pattern and is akin to a Salter-Harris (SH) type IV injury. The fracture involves the metaphysis, the physis, and the epiphysis of the lateral condyle ossification nucleus.
Type II: This fracture extends from the epiphysis and traverses through the physis and extends to the trochlea. It is usually believed to be analogous to an SH type II injury. However, if the articular surface is involved, it may also be considered an SH type III or IV.
A classification based on the amount of displacement present was described by Jakob et al. (1954) (Fig. 3).
Fig. 3
Jakob classification
Unlike the Milch classification, which only describes the appearance of the fracture and does not help guide treatment, the Jakob classification is valuable in determining the treatment for these injuries:
Stage I: The metaphysis and the physis are involved, but the articular cartilage is spared. The fracture is incomplete and therefore the fracture is stable. These fractures should be managed nonoperatively.
Stage II: The fracture violates the articular cartilage, but there are minimal displacement and no noticeable step-off of the articular surface. This type of fracture can displace over time and may require operative intervention.
Stage III: This fracture pattern involves the metaphysis, the physis, and the articular surface with displacement and rotation of the fracture fragment. Jakob stage III injuries are best managed with operative intervention.
Weiss et al. described another classification based on the amount of displacement. This system is particularly useful in predicting complications such as late displacement or delayed healing (Weiss et al. 2009):
Type I: Fractures have less than 2 mm of displacement.
Type II: Fractures have 2 mm or more of displacement with an intact articular hinge, which is determined with the aid of an arthrogram.
Type III: Fractures have 2 mm or more of displacement and articular cartilage disruption. The authors found significantly greater complication rate as the fracture pattern progressed from type I to type III.
Treatment Options
Nonoperative Management of Lateral Condyle Fracture
The nonoperative management of lateral condyle fractures is controversial with practices varying from surgeon to surgeon. While some recommend surgical pinning of all lateral condyle fractures, others recommend cast treatment and close observation of nondisplaced fractures. The uncertainty in management is due to the difficulty of assessing fracture stability. Our preference is to use nonoperative management only for nondisplaced fractures. This is performed by placement of a long arm cast in 90° of elbow flexion and the forearm in neutral rotation. The cast should be appropriately molded and snug enough such that the fracture will not displace as the swelling goes down.
Lateral condyle fractures treated nonoperatively should be closely watched for displacement. Radiographs of the elbow, including an AP, lateral, and internal oblique view, should be performed weekly for the first 3 weeks to assess for any displacement and avoid potential complications (Marcheix et al. 2011) (Fig. 4a, b, c, d).
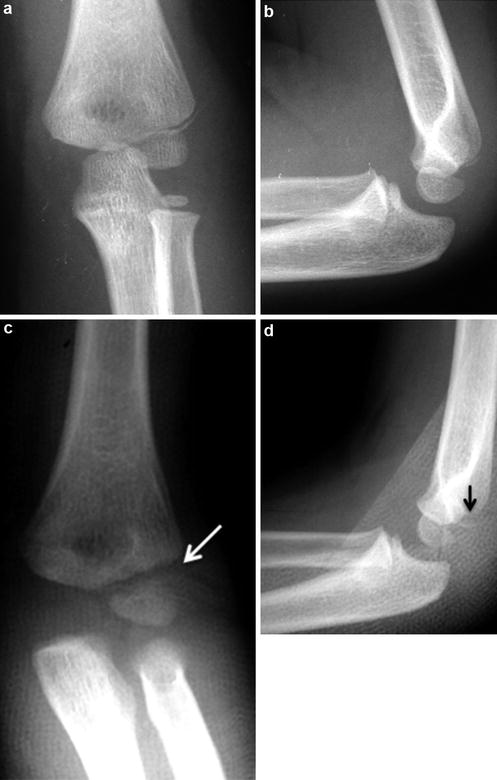
Fig. 4
Lateral condyle fracture. (a, b) AP and lateral elbow radiograph of a 5-year-old male with a nondisplaced lateral condyle fracture. (c, d) 1 week post casting showing interval displacement of fracture (solid arrows)
The cast is maintained for 6 weeks or until radiographic evidence of healing is seen. Once the cast is removed, active range of motion exercises are initiated. Most children can resume normal non-weight-bearing activity in 6 weeks and gradually increase to full function over the subsequent 6 weeks. The child and parents are counseled to refrain from contact sports for at least 6 months following the injury. Though there is no evidence regarding return to sport timing in this fracture, we have noticed that 6 months will give a reasonable chance for this fracture to remodel and decrease the chances for a secondary facture.
Lateral condylar fracture | |
|---|---|
Nonoperative management | |
Indications | Contraindications |
Jakob types I and II | Displacement and loss of reduction in cast |
Weiss types I and II <2 mm displacement | ≥2 mm displacement of fracture |
Intact periosteal hinge in arthrogram | |
Lateral condylar fracture | |
|---|---|
Physical/occupational therapy recommendations | |
Restriction in cast for 4–6 weeks depending on radiographic union. Encourage shoulder, wrist, and finger motion. Then start active range of motion about the elbow as tolerated. Return to school when comfortable |
Operative Management
In general, surgical intervention is recommended if nonoperative treatment fails, if there initially is more than 2 mm of displacement, or if there is obvious rotation or malalignment of the fracture.
Operative techniques include closed reduction with percutaneous pins or open reduction and internal fixation with pins or screws. Both pins and screw fixation have it own merits, but no one treatment has been shown to be superior to the other (Li and Xu 2012, Andrey et al. 2013) (Fig. 5a, b, c, d).
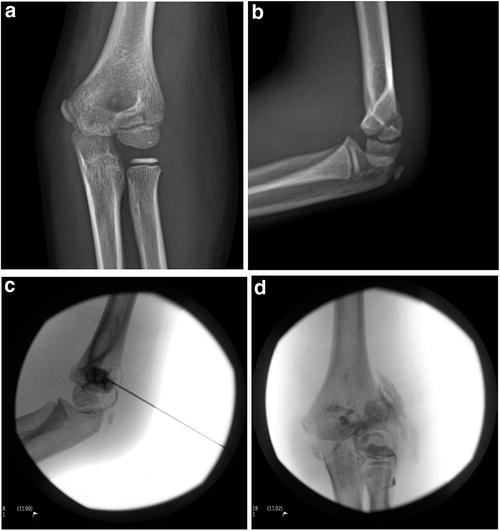
Fig. 5
(a, b) AP and lateral radiographs of a 9-year-old girl who fell from the monkey bars. (c, d) Intraoperative arthrogram showing intact articular surface. She was treated with closed reduction and percutaneous pinning
Displacement greater than 5 mm in any one radiographic view usually requires an open reduction with internal fixation. An attempt can be made to treat fractures with 2–5 mm of displacement with closed reduction and percutaneous pinning, but this technique is technically demanding and should be used judiciously (Song et al. 2008). Any intraoperative struggle to obtain or maintain an anatomic, congruent reduction should warrant open reduction. It is critical to assess the articular surface through either direct visualization or an intraoperative arthrogram in order to confirm the reduction of the elbow joint.
Preoperative Planning
Planning should include careful documentation of the distal neurovascular status. Make efforts to discuss all potential complications with parents including elbow stiffness, growth disturbance, delayed union, and lateral condylar overgrowth (pseudovarus). Additionally, a discussion regarding return to school and activities, especially in an athlete involved in pitching and throwing, should occur.
Plain radiographs should include standard AP, lateral views, and internal oblique views.
Positioning
Position the child in a supine position with the injured arm extended. In smaller children, a fluoroscopy tube can be inverted and used as the hand table. Place the child’s torso close to the hand table (or fluoroscopy tube) and place an arm board at the side of the head to prevent the head from slipping off of the operating table. This also allows easy fluoroscopy access and helps in rotating the shoulder joint. Pad the shoulder well and make sure that it does not extend beyond 90° of abduction as this can cause stretching of the brachial plexus. Secure the torso to the table with a safety belt and position the head on a foam doughnut with the anesthetic tubes coming off the opposite side. Turn the operating table 90° and position the ventilator on the opposite side of the hand table.
Apply a proper-sized tourniquet and set it to 100 mmHg above the mean systolic blood pressure. A sterile tourniquet may be necessary if access to the operating site is compromised due to the small nature of the extremity.
The fluoroscopy unit should be brought in from the foot end of the table to allow the surgeon and assistant adequate space. Furthermore, the fluoroscopy screen should be placed at the opposite end of the hand table to permit direct visualization. The instrument table should be placed on the right side of the surgeon, thus allowing the scrub nurse to pass instruments easily.
Closed Reduction and Percutaneous Pinning
The closed reduction and percutaneous pinning technique is only attempted on minimally displaced fractures, those with <5 mm of displacement (Mintzer et al. 1994). An intraoperative arthrogram is frequently helpful in assessing the reduction (Fig. 5c). The authors’ preference is to perform the arthrogram from a posterior approach, with the needle entering the elbow posteriorly just proximal to the tip of the olecranon.
Implants needed are usually 2 × 1.6 mm smooth Kirschner wires. In larger children (generally > 5 years of age), 2 mm smooth pins are used.
A divergent pin configuration is desirable as it provides better stability than parallel pins (Bloom et al. 2011). Application of slight valgus stress at the elbow, along with a posteriorly directed force, will aid in obtaining the reduction. Once the desired reduction has been obtained, the surgeon positions the first pin, and the orientation and the direction of the pin are assessed with fluoroscopy.
The first wire is placed perpendicular to the fracture and is aimed proximally and medially to obtain bicortical fixation within the medial humeral metaphysis. This method gives better fixation and prevents spinning of the fragment while placing the second wire. The second wire is then oriented transversely in a divergent manner to the fracture, which provides an increase in stability. The wires may be placed through the ossification center of the capitellum, without the need for significant concern for growth arrest.
At times, a third wire is needed if the initial two wires are inadequate to provide the necessary stability. The wires are bent and cut, and final images, including AP, lateral, and internal oblique views, are obtained. The wires may be either buried or left out of the skin. Sterile dressings and a long arm cast are then placed.
Lateral condylar fracture |
|---|
Preoperative planning for closed reduction percutaneous pinning |
OR table: standard operating table rotated 90° |
Position/position aids: patient supine with injured limb on hand table |
Fluoroscopy location: on the foot end of the patient with the screen on the opposite side for direct visualization for the surgeon. |
Equipment: Kirschner wires set, wire driver, contrast for arthrogram |
Tourniquet: tourniquet may be used |
Lateral condylar fracture |
|---|
Surgical steps for closed reduction percutaneous pinning |
Reduce the fracture under fluoroscopy |
Perform an arthrogram to assess stability and integrity of the joint |
Place 2–3 wires in divergent fashion |
Assess stability |
Apply a long arm cast or splint depending on swelling |
Arthroscopic-Assisted Reduction and Percutaneous Pinning
Arthroscopic-assisted reduction and pinning were developed in order to avoid the excessive stripping of the soft tissues that is necessary with open reduction. However, elbow arthroscopy can be challenging in the setting of a fracture. Hausman et al. reported their results in arthroscopic-assisted percutaneous pinning. In this six-patient series, all patients healed completely within 4 weeks and had full range of motion. The patients were pain-free at final follow-up of 8 months (Hausman et al. 2007).
Open Reduction and Internal Fixation
Indications for open reduction and internal fixation consist of initial fracture displacement of ≥5 mm, an incongruent joint surface, and failure of closed reduction. Stress views showing 5 mm or more of displacement with an incongruent articular surface are also an indication for open reduction internal fixation, even if the non-stress views show less than 5 mm of displacement.
The positioning and setup for this procedure are similar to that for a closed reduction with a hand table and sitting stool for the surgeon. A head lamp and surgical loupes are often very helpful for this procedure.
Lateral condylar fracture |
|---|
Preoperative planning for open reduction internal fixation |
OR table: standard operating table rotated 90° |
Position/position aids: patient supine with injured limb on hand table |
Fluoroscopy location: on the foot end of the patient with the screen on the opposite side for direct visualization for the surgeon |
Equipment: Kirschner wires set, wire drivers, Hohmann retractors |
Tourniquet: sterile tourniquet |
Additional items: head lamp, loupe magnification |
Surface Marking and Exposure
Mark the lateral epicondyle, the olecranon, and the radial head. A curvilinear incision is made along the lateral edge of the distal humerus placed such that the proximal two third of the incision is on the humerus and the remaining third crosses the joint line. A lateral Kocher approach to the elbow is then performed (Fig. 6a, b). Alternatively, a more anterior Kaplan approach can be utilized. The fracture usually guides the dissection through the rent it created in the soft tissues. A large fracture hematoma is typically present within the elbow joint.
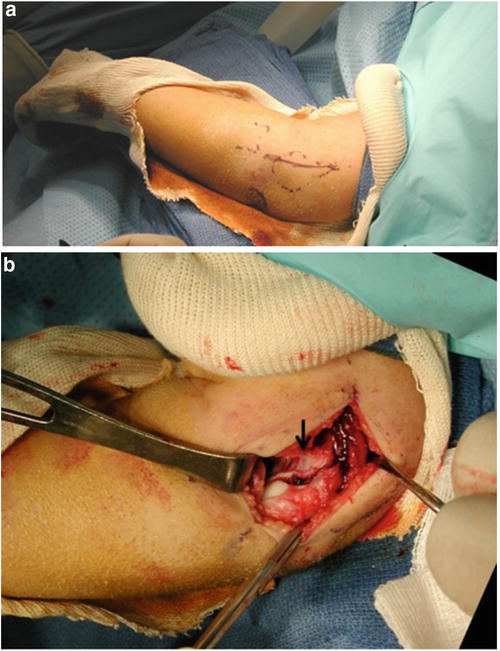
Fig. 6
Preoperative (a) and intraoperative (b) photographs of an open reduction of a lateral humeral condyle. The fracture is well visualized in picture b (arrow)
The next step is to carefully strip the anterior humeral periosteal layer and follow it distally to the articular surface of the elbow. This permits visualization of the fracture line and its extent into the articular surface. The dissection should not be extended posteriorly as the blood supply to the lateral condylar epiphysis enters the bone through the posterior soft tissue attachments. Adequate visualization is achieved when the trochlea and the fracture line can be seen anteriorly.
Lateral condylar fracture |
|---|
Surgical steps for open reduction internal fixation |
Approach is the standard Kocher approach through a lateral incision (alternatively, a more anterior Kaplan approach can be utilized) |
An interval between triceps and brachioradialis is developed guided through the fracture rent |
The posterior attachment of the fragment is preserved with minimal dissection |
Reduce the fragment with reduction clamps or provisional Kirschner wires |
Fix the fragment with Kirschner wires in a divergent fashion |
Apply a long arm cast or posterior splint |
Reduction and Fixation of Fracture
The key to obtaining a successful reduction of lateral condyle fractures is good visualization. Retractors should be placed anteriorly within the elbow capsule to see the trochlea and the fracture line. The fracture edges should be irrigated with copious saline, and the fracture hematoma should be removed. A congruent reduction should be obtained and maintained with a reduction forceps or with provisional Kirschner wires. The initial wire placed can also be used as a joystick to help rotate and reduce the fragment. The fracture site should then be assessed with direct visualization and fluoroscopically. If the reduction is satisfactory, the fixation wires can be placed as described above. A third wire can be used if needed.
In children above 12 years of age, a large fracture fragment can be fixed with a cannulated screw. This fixation might give better compression at the fracture site although the screw heads are often prominent and necessitate later removal.
Once the reduction and fixation are adequate, the periosteum overlying the fracture laterally should be closed with absorbable suture in order to help decrease the chances of lateral spur formation. The extremity is then placed in a long arm cast at 90° of elbow flexion with the forearm in neutral to mild pronation.
Postoperative Management
The child is admitted overnight to administer intravenous antibiotics, neurovascular monitoring, and pain control medications. Radiographs in the cast are obtained 1–2 weeks following surgery. The pins are maintained for 4–6 weeks, although 3 weeks of pin stabilization may be sufficient (Thomas et al. 2001). Gentle active motion is begun as soon as the cast is removed. A splint or sling may be used for additional protection if desired.
Isometric exercises are initiated after 6 weeks. Return to sports should occur after 3–6 months, as long as motion and strength are satisfactory. Physical or occupation therapy referral is seldom needed, and most children return to full function without it. However, therapy may be beneficial in children who fail to show steady progress.
Lateral condylar fracture |
|---|
Postoperative protocol |
Type of immobilization: long arm cast |
Length of immobilization: 4–6 weeks |
Rehab protocol: active range of motion exercises after 6 weeks |
Return to sport: after 3–6 months |
Outcomes
No long-term clinical outcomes exist regarding pediatric lateral condyle fractures. Most children who get immediate treatment tend to do well. However, 10 % of children will have a 10–15° extension loss at 1–2 years post injury. Delayed open reduction after 3 weeks predisposes the patient to loss of range of motion and other complications listed below (Wattenbarger et al. 2002).
Pitfalls and Prevention
Many pitfalls can be identified when managing these fractures. If nonoperative treatment is opted for, then weekly follow-up radiographs are necessary for 3 weeks to detect late displacement of the fracture. Internal oblique views may help demonstrate displacement better. Additional techniques, such as examination under anesthesia, stress views, and/or an arthrogram, may be needed to assess the congruency of the fracture.
In an operative setting, it is imperative not to extend the dissection into the posterior soft tissue attachments of the fragment, as this can lead to avascular necrosis (AVN) of the capitellum and nonunion of the fracture. The fracture and the trochlea should be well visualized before any attempt at reduction is performed. A head light and loupe magnification will aid in obtaining an anatomic reduction.
The pins should be divergent and bicortical in order to obtain optimal stability.
Lateral condylar fracture | |
|---|---|
Potential pitfalls and prevention | |
Potential pitfall | Pearls for prevention |
Pitfall 1 | Prevention 1 |
Late displacement in nonoperative management | 1a: Follow up weekly for 3 weeks |
1b: Obtain advanced imaging to assess displacement | |
Pitfall 2 | Prevention 2 |
Unable to determine the congruency of the articular surface | 2a: Obtain arthrogram |
2b: Visualize the trochlea and fracture before reduction | |
Pitfall 3 | Prevention 3 |
AVN of capitellum and nonunion | 3a: Careful soft tissue handling |
3b: Avoid dissection into posterior soft tissue attachments of the fragment | |
Pitfall 4 | Prevention 4 |
Loss of fixation of pins | 4a: Divergent pin configuration |
4b: Bicortical pin placement. Confirm on fluoroscopy after cutting the pins | |
Pitfall 5 | Prevention 5 |
Skin necrosis | 5a: Place a well-padded cast |
5b: Point the sharp edges of the pins away from the skin | |
Complications
Complications from lateral condyle fractures are usually due to late/delayed presentation or from an inadequately treated fracture. Delayed presentation and/or a missed diagnosis may lead to nonunion of the fracture. Nonunions can result in a cubitus valgus deformity due to growth arrest of the lateral condyle with normal growth of the medial condyle. Left untreated, a nonunion can ultimately result in elbow instability, cubitus valgus, and tardy ulnar nerve palsy. Treatment of nonunion of the lateral humeral condyle generally consists of in situ surgical repair of the nonunion with internal fixation, along with a humeral osteotomy and ulnar nerve transposition, if needed (Tien et al. 2005).
Posterolateral spur formation (lateral overgrowth) is a common problem after surgical treatment of lateral condyle fractures and may give the elbow the appearance of being in varus (Pribaz et al. 2012). This typically improves over time, and no specific treatment is needed.
Avascular necrosis of the capitellum may occur after open reduction of lateral condyle fractures. Excessive exposure of the posterior structures of the fragment is thought to predispose to this complication as it disrupts the blood supply to the epiphysis. The vascular supply to the trochlea is also at jeopardy during surgical exposure. This risk seems to be minimized by avoiding posterior dissection (Wattenbarger et al. 2002).
Growth arrest in children after lateral condyle fractures has been described and usually is manifest on radiographs as a fishtail deformity. This typically does not cause any symptoms and children with this finding should be monitored until skeletal maturity (Cates and Mehlman 2012).
Lateral condylar fracture | |
|---|---|
Common complications | Management |
Pin site infection | Antibiotics and removal of the pins when healing is achieved |
Posterolateral spur | Reassurance. Will usually resolve |
Delayed union | Prolonged immobilization for up to 12 weeks |
Nonunion | Compression fixation and bone grafting with screws. Simultaneous corrective osteotomy if deformity is present |
Cubitus varus | Valgus supracondylar osteotomy of distal humerus |
Cubitus valgus | Varus supracondylar osteotomy or gradual distraction with Ilizarov external fixator |
Fishtail deformity | Monitor until skeletal maturity, as it can cause functional deficits |
Tardy ulnar nerve palsy | Decompression of cubital tunnel and ulnar nerve transposition |
Summary
Lateral humeral condyle fractures are very common in children. Nonoperative treatment is sufficient for many of these injuries, but the practitioner must be aware of the propensity for these fractures to displace while in a cast. Operative treatment is frequently successful and closed or open reduction may be required. Closed reduction is technically demanding and has limited indications, so the practitioner should not hesitate to open the fracture if required.
Fractures of the Medial Condyle of the Humerus
Introduction
Fractures of the medial condyle of the elbow are uncommon, and therefore, a high index of suspicion is needed to make the correct diagnosis of this injury. These fractures may be considered the medial version of fractures of the lateral humeral condyle as fractures of the medial humeral condyle typically begin in the metaphyseal region and propagate distally and laterally. Medial condyle fractures also extend into the joint itself and share similar classification systems to lateral condyle fractures, and the principles of treatment are the same for both fractures.
Pathoanatomy and Applied Anatomy
The medial and lateral secondary ossification centers of the distal humerus form the distal humeral articulation of the elbow. The medial condylar physis contributes to the medial portion of the distal humerus and is separated from the lateral (capitellar) ossification center by the trochlear notch. The lateral crista of the trochlea derives from the lateral condylar physis, while the medial portion originates from the medial capitellar secondary ossification center. Fractures of the medial condyle of the humerus typically have a fracture line that originates in the medial metaphysis and propagates distally and laterally. The fracture line usually extends to the cartilage of the distal humerus and may extend into the elbow joint. The intra-articular extension of the fracture line is variable in location but frequently occurs through the trochlear notch lateral to the medial ossification center of the trochlea.
Stay updated, free articles. Join our Telegram channel

Full access? Get Clinical Tree


