Fig. 1
A child with amyoplasia demonstrating the characteristic facies with a hemangioma over the nasal bridge (a). The shoulders are often internally rotated with the elbows in extension and the wrists in flexion (b) (Courtesy of Shriners Hospital for Children Philadelphia)
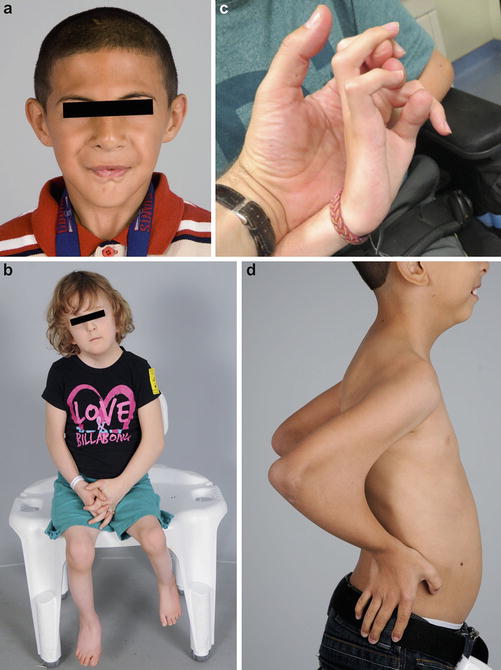
Fig. 2
The more common types of distal arthrogryposis include Freeman-Sheldon (a), Sheldon-Hall (b), Beals contractural arachnodactyly (c), and Escobar syndrome (d) (Courtesy of Shriners Hospital for Children Philadelphia)
Table 1
Distal arthrogryposis types
Distal arthrogryposis types | Other name(s) | Label | Characteristic findings |
|---|---|---|---|
Distal arthrogryposis type 1 | Common or typical | DA1 | Camptodactyly, clasped thumb, clubfoot |
Distal arthrogryposis type 2A | Freeman-Sheldon syndrome | DA2A | Whistling face, camptodactyly, clasped thumb, clubfoot, scoliosis |
Distal arthrogryposis type 2B | Sheldon-Hall syndrome | DA2B | Prominent nasolabial folds, downslanting palpebral fissures, small mouth, camptodactyly, clasped thumb, clubfoot |
Distal arthrogryposis type 3 | Gordon syndrome | DA3 | Short stature, cleft palate |
Distal arthrogryposis type 4 | Scoliosis | DA4 | Scoliosis, camptodactyly |
Distal arthrogryposis type 5 | Ophthalmoplegia, ptosis | DA5 | Ptosis, strabismus, restrictive lung disease |
Distal arthrogryposis type 6 | Sensorineural hearing loss | DA6 | Hearing loss, camptodactyly |
Distal arthrogryposis type 7 | Trismus-pseudocamptodactyly | DA7 | Trismus, pseudocamptodactyly, short stature |
Distal arthrogryposis type 8 | Autosomal dominant multiple pterygium syndrome, Escobar | DA8 | Multiple pterygia, camptodactyly, scoliosis, ptosis, downslanting palpebral fissures |
Distal arthrogryposis type 9 | Beals syndrome (congenital contractural arachnodactyly) | DA9 | Camptodactyly, arachnodactyly, kinked upper earlobe, tall stature |
Distal arthrogryposis type 10 | Congenital plantar contractures | DA10 | Plantar contractures |
Amyoplasia is the single most common type of arthrogryposis. There is no known cause, but theories include intrauterine crowding and failure of anterior horn cell development. Maternal bicornuate uterus and oligohydramnios have been historically thought to increase the risk of amyoplasia, supporting intrauterine crowding as a potential cause (Miller et al. 1979). More recent investigations have challenged the commonly held belief that maternal uterine factors are a common cause of arthrogryposis (Hall 2013; Fahy and Hall 1990). Children with amyoplasia often have characteristic facies, with hemangiomas over the bridge of the nose and over the occiput, high cheeks, and button noses (Hall et al. 1983). The hemangiomas, often referred to as stork bites, can range from small, flat erythematous skin lesions to large, raised ruddy to bluish tumors that can extend through the skull into the cranium (Fig. 1a). While most hemangiomas resolve or diminish with time, raised lesions should be imaged to evaluate for intracranial extension. Neurosurgical consultation may be appropriate to evaluate large lesions. Most children have average to above-average intelligence. Diminution of the motor cortex may allow expansion of other cortical centers during development, possibly resulting in higher than average intelligence.
Assessment
A global assessment of the child’s cognitive, social, and physical abilities is required. In addition, having an idea of the family support structure and available resources can help develop the treatment plan. Early interventions are most likely to make a positive impact, so early assessment by a surgeon familiar with these disorders is the key to long-term success. A thorough intake worksheet such as the one included in this chapter (Fig. 3) can help to obtain a more complete picture of the child’s needs. All of the joints of the upper limb should be examined for both active and passive motion. Watching the child play with a variety of differently shaped and sized toys is a very efficient way of judging the child’s function. If possible, observe how the child eats finger foods or drinks from a bottle. There is no substitute for spending a few minutes to play with the child to gain a good understanding of who they are as people and what they require as patients.
Fig. 3
An intake worksheet can be very helpful to get a thorough assessment of the child (Courtesy of Dan A. Zlotolow, MD)
An examination while the child is under anesthesia, whenever possible, is extremely helpful for determining the true extent of the contractures without muscular resistance. Also, it is a great opportunity to localize potential donor muscles for muscle transfers such as the latissimus dorsi. Percutaneous electrical stimulation with or without ultrasound guidance can be used to determine the suitability of the pectoralis major, the latissimus dorsi, and the gracilis for muscle transfer. Children with arthrogryposis will typically visit the operating room several times for either spine or upper or lower extremity correction before the age at which they become good candidates for muscle transfers (usually 6 years old or older), and an intraoperative assessment prior to that age is most often possible.
Treatment Options
The goal of any treatment plan for a child with arthrogryposis is to achieve functional independence for that child. For the lower extremities, the goals are ambulation and sitting. Traditionally, ambulation has trumped all other treatment goals. In many centers, the lack of expertise and familiarity with upper limb surgery relegates upper limb function to an afterthought. This is a disservice to these children and to the adults who care for them. Basic upper limb function is as important to the well-being of these children as ambulation.
For the upper extremity , the primary goals are to have “one hand to eat and one to wipe.” They can be the same hand. The rate-limiting step in optimizing the child’s independence is always finger and thumb motion. Independent self-feeding requires at least some hand function. The child must be able to acquire the food, grip it firmly enough to bring it to their mouth, and release it. Beyond that, the wrist and the elbow combined must have enough extension to reach the plate or the table and sufficient flexion to allow the hand to reach the mouth. Forearm and shoulder rotation need to allow the hand to face the plate and then the mouth.
Perineal care can be performed through the legs or around the back. Both require sufficient hand function to hold the toilet paper firmly. Children who wipe their buttocks through the legs require wrist flexion, elbow extension, and shoulder internal rotation. Children who wipe their buttocks around the back require forearm supination, elbow extension, and shoulder extension.
The next priorities on the functional ladder are bathing and dressing, followed by food preparation, driving, and other activities of daily living. Recreational activities and sports participation may be achievable in children who are mildly affected.
Arthrogryposis nonoperative management: stretching and splinting | |
|---|---|
Indications | Contraindications |
Shoulder adduction contracture | None |
Shoulder internal rotation contracture | None |
Elbow flexion contracture | None |
Elbow extension contracture | Less than 30° of passive elbow flexion |
Forearm pronation contracture | None |
Wrist flexion contracture | None |
Wrist extension contracture | None |
Digital contractures | None |
Arthrogryposis physical/occupational therapy recommendations |
|---|
Begin passive range of motion as soon as possible |
Fit for splints as soon as able to fit onto patient’s limb |
Avoid splinting during the day to encourage limb-cortical development |
Nighttime hourglass splinting for elbow extension contractures |
Nighttime composite finger, thumb, and wrist extension splints |
Avoid supination straps and shoulder taping since this is ineffective |
Arthrogryposis | |
|---|---|
Common complication | Management |
Peri-implant fracture | Revision or immobilization |
Elbow ligament varus/valgus laxity | Stop PROM |
Recurrence of contracture | Revision or acceptance |
Shoulder
Weakness in shoulder girdle musculature is difficult to treat and is unfortunately very common in children with amyoplasia. Patients often present with severe internal rotation and adduction contractures. These rarely respond to passive stretching, though a course of therapy is recommended nonetheless. The deltoid, rotator cuff, pectoralis, latissimus dorsi, and peri-scapular muscles may be absent. The trapezius is often preserved. Pectoralis function is key to bimanual activities, allowing the child to press both hands together. Latissimus function adds shoulder extension and active adduction for holding objects against the side between the arm and thorax. Deltoid and rotator cuff function allows abduction and forward flexion.
Surgical options are very limited. Patients who have sufficient musculature around the shoulder to enable tendon or muscle transfers usually have adequate function to not require them. Those children with poor function rarely have available donors. Capsular releases have also not been effective in this population. Internal rotation contractures are best treated with a humeral external rotation osteotomy. The medial approach requires visualization and retraction of the median and ulnar nerves, but is more cosmetic and provides a better bony surface for plate application than the deltopectoral approach (Kozin 2007).
For the child with a severe elbow extension contracture, distinguishing between an internal rotation contracture at the elbow and a pronation contracture at the forearm can be difficult. For these children, we will perform an elbow release first, followed by a concomitant distal humeral rotational osteotomy if needed.
Relative contraindications to a humeral external rotation osteotomy include (1) insufficient or marginal internal rotation for perineal care and (2) absence of pectoralis function. Children who lack pectoralis function but retain triceps function will use a crossover grasp pattern that requires internal rotation.
Humeral External Rotation Osteotomy
Place the patient supine on a standard operating room table with a hand table. Regional anesthesia is helpful to control postoperative pain and as a supplement to general anesthesia. The incision line is drawn along the medial intermuscular septum at about the middle of the brachium. Bupivacaine with epinephrine is injected subcutaneously to the length of the incision. The arm is prepared and draped to the axilla. A tourniquet is not routinely used due to the proximal extent of the dissection. If one is needed, a thin circular, non-pneumatic tourniquet can allow sufficient exposure (HemaClear, OHK Medical Devices, Grandville, Michigan, USA).
Incise the skin and raise full-thickness subcutaneous flaps anteriorly and posteriorly to the level of the fascia. The medial brachial and antebrachial cutaneous nerves are routinely encountered and should be protected. The basilic vein runs with the medial antebrachial cutaneous nerve and should be preserved as well. Continue the dissection between the median and ulnar nerves along the intermuscular septum. The humerus will be palpable before it is visible. Strip enough of the triceps muscle off of the bone to clear a footprint large enough for placing a plate. Plate sizes run from 2.4 to 3.5 mm for this operation and should be appropriate for the size of the bone. Children with arthrogryposis often have humeri that are smaller in caliber than expected for an unaffected age-matched child. Remember to gently precontour the plate so as to provide compression on the far side of the bone. Forgetting to do so can lead to a delayed union.
Apply the plate provisionally to the proximal osteotomy fragment as anterior as the soft tissues will allow. Remove the plate. Split the periosteum longitudinally and apply Holman retractors to protect the surrounding neurovascular structures. Perform a transverse osteotomy using a reciprocating saw while preserving the periosteal sleeve. Reapply the plate to the proximal fragment. Place a fracture reduction clamp around the distal fragment and the plate. Externally rotate the arm to the desired position of between neutral to 15° of internal rotation. Provisionally clamp the distal humeral fragment to the plate and reassess the rotation of the arm. Sufficient internal rotation should be preserved to allow for midline function such as perineal care. Fix the plate to the distal fragment and reassess one more time (Fig. 4a). If the position of the arm is optimized, confirm screw lengths and plate position using fluoroscopy (Fig. 4b).
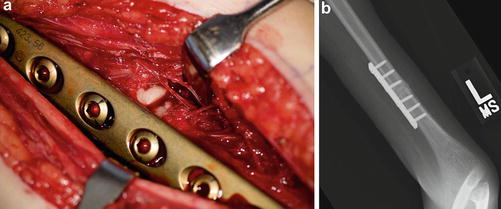
Fig. 4
Intraoperative photograph (a) and fluoroscopic image (b) of a humeral rotational osteotomy performed via a medial approach (Courtesy of Shriners Hospital for Children Philadelphia)
Close the subcutaneous layer and the skin in standard fashion. Apply a sterile dressing with the elbow in 90° of flexion. Apply a long arm splint with a side bar to prevent elbow extension. If the fixation was felt to be tenuous or the child is very active, a triangular wedge can be used to place the arm in a gunslinger position (Fig. 5).
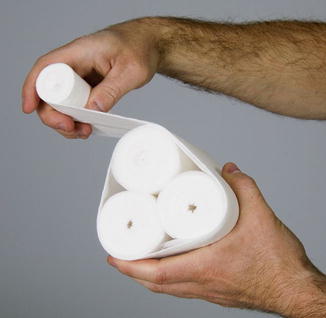
Fig. 5
A triangular wedge can be made out of rolls of cast padding to maintain the arm in a gunslinger position (Adapted from Zlotolow and Thompson 2011)
Remove the splint 4–6 weeks after surgery and outfit with a fracture orthosis (Fig. 6) if union has not been achieved. Begin a passive range-of-motion protocol while maintaining the orthosis at all other times until union.
Fig. 6
A fracture orthosis can be used to protect the osteotomy site until union is achieved (Courtesy of Shriners Hospital for Children Philadelphia)
Humeral osteotomy preoperative planning |
|---|
OR table: standard |
Position/positioning aids: supine |
Fluoroscopy: mini C-arm |
Equipment: size-appropriate compression plate |
Tourniquet (sterile/nonsterile): none or HemaClear |
Humeral osteotomy surgical steps |
|---|
Longitudinal medial incision on mid-brachium |
Identify and protect medial brachial and antebrachial cutaneous nerves |
Follow medial intermuscular septum to bone between ulnar and median nerves |
Apply plate proximally as anterior as the anatomy will allow |
Remove plate and split the periosteum longitudinally |
Perform a transverse osteotomy |
Reapply plate proximally |
Rotate humerus to desired position |
Apply plate distally |
Close wound |
Apply long arm splint or cast |
Humeral osteotomy postoperative protocol |
|---|
Type of immobilization: long arm splint ± body wrap |
Length of immobilization: 4–6 weeks |
Rehab protocol: finger mobility and contralateral arm motion |
Return to sport protocol: 3 months |
Humeral osteotomy potential pitfalls and preventions | |
|---|---|
Potential pitfall | Pearls for prevention |
Nonunion | Minimal periosteal stripping |
Maintain periosteal cuff in continuity | |
Precontour plate to compress the far side of the osteotomy | |
Overcorrection | Make sure hand can comfortably reach midline before finalizing rotation |
Nerve injury | Visualize the median and ulnar nerves and dissect between them |
Subperiosteal dissection at the osteotomy site to protect radial nerve | |
Elbow
Active elbow extension is preserved in most children with arthrogryposis. However, since most children lack adequate elbow flexion strength to oppose the triceps, extension contractures are common. If the child cannot flex the elbow more than 30°, the true axis of rotation of the elbow joint can be difficult to determine. In these children, well-intentioned parents, therapists, and surgeons bend the elbow out of its plane of motion, most commonly leading to valgus instability. Passive elbow motion exercises, static or dynamic elbow splints, and serial casting in a child with no passive flexion are contraindicated.
If the child can flex the elbow beyond 30°, actively or passively, supervised range-of-motion exercises can yield sufficient flexion for the child to reach their mouth. An hourglass splint (Fig. 7) can be very helpful to augment and preserve the gains made with therapy. The achievement of passive hand to mouth motion can be a life-changing milestone for these children. Feeding and grooming become possible via pushing their arm against their knee or other arm, a desk or table, or by abducting the shoulder and allowing gravity to flex the elbow (Fig. 8).
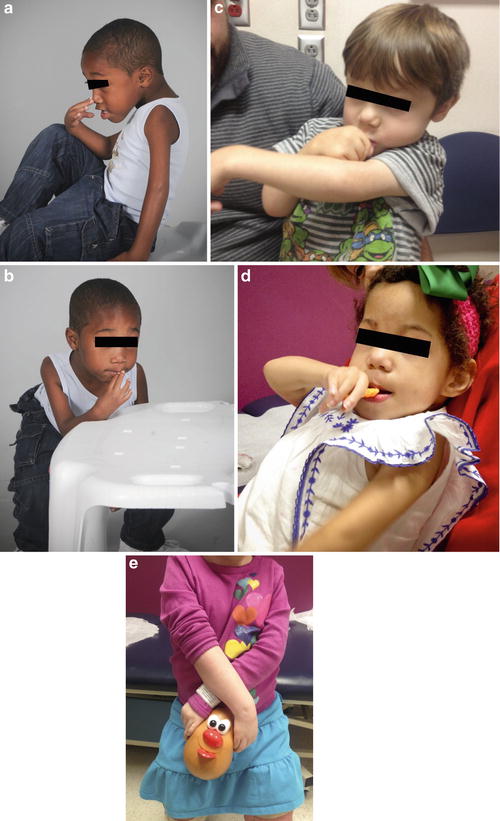
Fig. 7
An hourglass splint can be used to help gain more elbow flexion both before and after surgery provided the patient has at least 60° of flexion to begin with (Courtesy of Shriners Hospital for Children Philadelphia)
Fig. 8
Children can use passive flexion of the elbow to feed themselves by pushing their forearm against their knee (a), a table (b), or their other arm (c) or by abducting the shoulder and allowing gravity to flex the elbow (d) (Courtesy of Shriners Hospital for Children Philadelphia)
If passive motion cannot be achieved with therapy or if therapy is not possible due to inadequate initial motion, surgical release is a good option. The results of triceps lengthening, posterior capsular release, and ulnar nerve transposition have been promising (Van Heest et al. 2008). Loss of terminal extension and triceps weakness are possible, but most children achieve sufficient flexion to feed themselves. The results are most predictable in children under the age of three, but releases in older children are still possible with variable outcomes (Zlotolow and Kozin 2012).
Because of the potential loss of elbow extension after a release, bilateral releases are discouraged. Begin with the arm most likely to have an adequate hand for feeding (the dominant hand). Do not release the nondominant side until the child demonstrates at least the potential to carry out perineal care with the flexed arm. Remember the doctrine “one hand to wipe and one hand to eat, but it can be the same hand.”
Active elbow flexion can be more difficult to obtain than passive flexion, and the functional benefits over passive flexion are less clear. On occasion, an elbow release alone will allow a previously restrained biceps or brachialis to flex the elbow. The “new” active flexor function is typically a grade 1 or a weak 2 and rarely provides enough active flexion to truly enhance function. In a child with passive motion who would benefit from active elbow flexion, there are several options for achieving active flexion. Poor triceps function is a contraindication to any transfer for active elbow flexion. Patients who have had a previous triceps lengthening typically have compromised triceps strength and are usually not candidates for active elbow flexion transfers. Transfer of the entire triceps to the biceps has proven to be a poor option for analogous reasons, with many children developing elbow flexion contractures (Van Heest et al. 1998).
Transferring only the long head of the triceps may avoid the flexion contracture that results from transferring the entire triceps. Proponents of this technique have yet to demonstrate a substantial improvement in function from this transfer (Gogola 2010). More experience with this transfer is needed before it can be recommended for widespread use.
Other options for restoring active elbow flexion are a Steindler flexorplasty (Goldfarb et al. 2004), a bipolar latissimus dorsi transfer (Zancolli and Mitre 1973), a uni- or bipolar pectoralis major transfer (Clark 1946; Carroll and Kleinman 1979), and a free muscle transfer (Kay et al. 2010). Few children with arthrogryposis have a sufficiently strong latissimus dorsi for transfer, but when the muscle is present, it is the best choice for restoring active elbow flexion. The pectoralis major transfer has also been described, and the muscle is often present. However, the possible functional loss and cosmetic concerns make it a clear second choice (Carroll and Kleinman 1979; Lahoti and Bell 2005). Transfer of only the sternocostal portion of the pectoralis major may be a better option from an appearance standpoint but may not be of sufficient strength.
On the other side of the spectrum, elbow flexion contractures are even more difficult to treat. Children born with a flexed elbow may benefit initially from a passive range-of-motion protocol. Most children with elbow flexion contractures lack triceps function, and many are deficient in active flexion as well. A pterygium across the antecubital fossa often accompanies the flexion contracture (Fig. 9) and heralds a more recalcitrant problem. Elbow flexion contractures have not responded reliably to surgical release, and therefore, the procedure is not recommended.
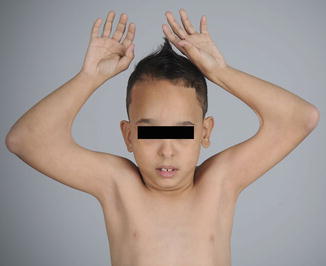
Fig. 9
Children with elbow flexion contractures often have a pterygium over the antecubital fossa (Courtesy of Shriners Hospital for Children Philadelphia)
Elbow Extension Contracture Release
Place the patient supine on a standard operating room table. Regional anesthesia is helpful to control postoperative pain and as a supplement to general anesthesia. Considerable time is spent defining the anatomic landmarks of the elbow, particularly if there is little to no elbow flexion. The olecranon is identified by following the subcutaneous border of the ulna proximally along the forearm to the elbow. Next, the medial and lateral epicondyles are palpated to confirm the location of the olecranon. If there is any doubt, fluoroscopic images are obtained.
The incision line is drawn along the subcutaneous border of the ulna, curving ulnar to the olecranon, then running along the posterior aspect of the arm. The incision should run the entire length of the triceps tendon, at least midway up the brachium. Bupivacaine with epinephrine is injected subcutaneously the length of the incision. The arm is prepared and draped to the axilla. A tourniquet is not routinely used due to the proximal extent of the dissection. If one is needed, a thin circular, non-pneumatic tourniquet does allow sufficient exposure (HemaClear, OHK Medical Devices, Grandville, Michigan, USA).
Incise the skin and raise full-thickness subcutaneous flaps medially and laterally past the level of the epicondyles. The ulnar nerve can be identified just proximal to the cubital tunnel beneath a thick fascio-tendinous band of the triceps that inserts onto the medial epicondyle. Transpose the ulnar nerve anteriorly into a subcutaneous pocket and secure the pocket closed by suturing subcutaneous fat to the anterior aspect of the medial epicondyle (Fig. 10a). Make sure that the medial antebrachial cutaneous nerve and its branches are not included in the sutured fat. After transposition, confirm that the ulnar nerve is not kinked or compressed anywhere along its new course.
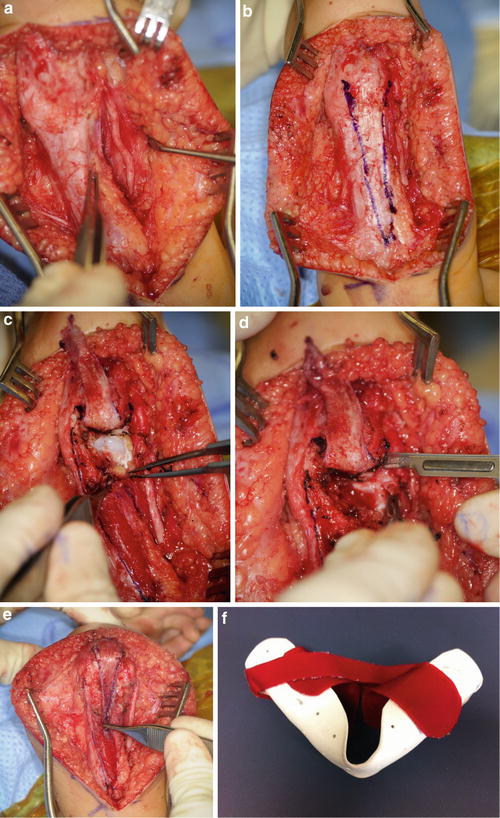
Fig. 10
Releasing an elbow extension contracture requires transposition of the ulnar nerve (a), creation of a V-shaped distally based triceps tendon flap (b), release of the posterior capsule (c), elevation of the medial head of the triceps (d), and repair of the triceps in a V to Y fashion (e) (Courtesy of Shriners Hospital for Children Philadelphia)
Incise the triceps tendon along its entire length in a distally based V shape (Fig. 10b), leaving enough tendon on the outside of the V to later perform a V to Y repair. Elevate the tendon flap off of the muscle using bipolar electrocautery to its insertion onto the olecranon. Release any remaining triceps attachments to the olecranon and medial and lateral epicondyles. Following the olecranon down to the olecranon fossa, release the fat pad and the capsule, keeping these in continuity with the triceps muscle. Release the capsule along the medial and lateral gutters as distally as possible without destabilizing the medial and lateral ligaments (Fig. 10c). Continue incremental releases until the elbow can flex past 90°. The maximum that is typically achievable is less than 120°. Do not force the elbow into flexion, as a transphyseal fracture is easily created. If there is nothing left to release posteriorly or medially and laterally along the elbow, but elbow flexion is still inadequate to reach the mouth, consider an anterior closing wedge humeral osteotomy just proximal to the olecranon fossa.
To optimize triceps excursion, elevate the medial head of the triceps off of the posterior humerus extraperiosteally to the level of the spiral groove (Fig. 10d). The radial nerve can be localized and protected by following the lower lateral brachial cutaneous nerve to the spiral groove (Zlotolow et al. 2006).
Assess the level of external rotation of the shoulder with the elbow at maximal flexion. If passive external rotation is not within 30° of neutral, consider performing a concomitant humeral rotational osteotomy (Zlotolow and Kozin 2012). The exposure has already been accomplished by elevation of the medial head of the triceps. Contour medial and lateral column plates to fit just proximal to the distal humeral physis, staying out of the olecranon fossa. Staggered plates of different lengths are recommended to minimize the potential for a stress riser at the end of the plates. Apply the plates provisionally to the distal osteotomy fragment. Remove the plates. Split the periosteum longitudinally and apply Holman retractors to protect the anterior neurovascular structures. Perform a transverse osteotomy using a reciprocating saw. Reapply the plates to the distal fragment. Place a fracture reduction clamp around the proximal fragment and the plates. Externally rotate the arm to the desired position of between neutral to 15° of internal rotation. Provisionally clamp the proximal humeral fragment to the plates and reassess the rotation of the arm (Fig. 11a). Sufficient internal rotation should be preserved to allow for midline function such as perineal care. Fix the plates to the proximal fragment and reassess one more time. If the position of the arm is optimized, confirm screw lengths and plate position using fluoroscopy (Fig. 11b).
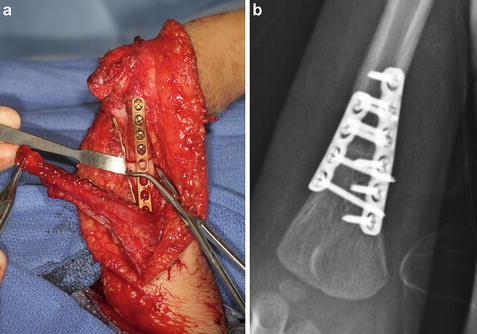
Fig. 11
A humeral rotational osteotomy can be performed at the same setting as a posterior elbow release since the exposure has already been achieved in performing the release. After the osteotomy is performed, the plates are reapplied to the distal fragment and a clamp is used to secure the osteotomy for assessment of rotation (a). Final fluoroscopic images are used to check screw lengths and plate placement (b) (Courtesy of Shriners Hospital for Children Philadelphia)
Alternative fixation schemes include medial and lateral crossing pins and a single posterior plate. The results of medial and lateral plating are superior to either of the alternatives in our hands, but no consensus exists. Pin fixation requires prolonged immobilization of up to 6 weeks, increasing the risk of losing elbow motion. Single plate fixation is both less rigid than dual plates but also results in a more pronounced stress riser. A postoperative fracture just proximal to the single plate is a common complication.
With the arm in maximal flexion, repair the triceps in a V to Y fashion using a braided nonabsorbable suture (Fig. 10e). Elevation of the medial head of the triceps to the spiral groove will allow the triceps muscle to reach all the way to the olecranon in most cases, facilitating the repair. If the length of the V is insufficient to allow for a primary repair, autograft or allograft may be used to bridge the gap. A properly planned triceps tendon flap and the medial head elevation will avoid this complication.
Reassess the course of the ulnar nerve prior to closing the wound. Close the subcutaneous layer and the skin in layers. Elbow extension can facilitate closure by taking tension off of the wound. Apply a sterile dressing with the elbow in maximal flexion. Apply a long arm splint with a side bar to prevent elbow extension. If the soft tissue envelope is too edematous to allow for positioning the elbow in maximal elbow flexion, flex the arm to within what the soft tissues will tolerate and immobilize in that position. If the fixation was felt to be tenuous or the child is very active, a triangular wedge can be positioned to place the arm in a gunslinger position.
If soft tissue edema prevented splinting of the elbow past 90° of flexion, perform a splint change under sedation 1 week after surgery to recover the missing flexion. Otherwise, remove the splint 2 weeks after surgery and outfit with an hourglass splint (Fig. 10). Begin a passive range-of-motion protocol while maintaining the hourglass splint at all other times for 6 weeks. Continue range-of-motion exercises through the fourth postoperative month while weaning the hourglass splint to nighttime and naps only. If elbow extension is proving difficult to recover, alternate an elbow extension splint with the hourglass splint.
Radiographs should be used to confirm bony union between 4 and 6 weeks after surgery if an osteotomy was performed.
Elbow extension contracture release preoperative planning |
|---|
OR table: standard |
Position/positioning aids: supine with arm across chest on bolster |
Fluoroscopy: mini C-arm |
Equipment: size-appropriate compression plates for medial and lateral columns if osteotomy required |
Tourniquet (sterile/nonsterile): none or HemaClear |
Elbow extension contracture release surgical steps |
|---|
Longitudinal dorsal incision from proximal ulna to proximal brachium |
Identify and transpose the ulnar nerve subcutaneously |
Incise and elevate the triceps tendon in a distally based V flap |
Elevate the medial head of the triceps from its origin |
Release the posterior capsule of the elbow until at least 90° of flexion is achieved |
Assess the need for a rotational osteotomy |
Affix medial and lateral column plates distal to the planned osteotomy |
Perform a transverse osteotomy proximal to the olecranon fossa |
Reapply plates distally |
Rotate humerus to desired position |
Apply plates proximally |
Repair the triceps in a V to Y fashion |
Close the wound |
Apply a long arm splint or cast |
Elbow extension contracture release postoperative protocol |
|---|
Type of immobilization: long arm splint ± body wrap |
Length of immobilization: 2 weeks |
Rehab protocol: hourglass splint for 6 weeks and A/PROM |
Elbow extension contracture release potential pitfalls and preventions | |
|---|---|
Potential pitfall | Pearls for prevention |
Loss of passive extension | Alternate flexion and extension splints |
Loss of active extension | Elevate the medial head of the triceps to maximize excursion |
Inability to repair triceps tendon | Make as long V in the triceps as possible |
Elevate the medial head of the triceps | |
Peri-implant fracture | Stagger the plates to minimize the proximal stress riser |
Bipolar Latissimus Dorsi Transfer
After the patient is under general anesthesia, place the patient in a lateral decubitus position on a beanbag. The field should be clear from midline on the back to the nipple line on the front and from the base of the neck to the iliac crest. Make sure that all of the bony prominences are well padded and that there is an axillary roll in place. The peroneal nerve should be free of compression at the level of the fibular head.
Begin with an incision in line with the lateral border of the muscle, from the posterior axillary fold to about the midpoint of the posterior iliac crest. A skin paddle may be kept on the muscle for postoperative monitoring and to facilitate closure if there is good muscle bulk. Since children with arthrogryposis generally have a smaller latissimus dorsi and abundant skin and subcutaneous fat in the arm, a skin paddle is not generally necessary. If a skin paddle is used, it should be small enough to allow primary closure of the harvest site.
Create full-thickness subcutaneous flaps to the level of the latissimus dorsi. Working from distal to proximal and lateral to medial, free the muscle from its attachments, maintaining meticulous hemostasis (Fig. 12a). Hematomas can occur at the harvest site if there is inadequate hemostasis. Identify the thoracodorsal artery, vein, and nerve as they emerge deep to the latissimus and trace it back to the axillary artery and the brachial plexus. Ligate the vascular branches to the serratus to gain maximal length on the pedicle. Identify and preserve the long thoracic nerve to the serratus running near the vascular branches. More proximally, the circumflex scapular artery and veins rarely need to be ligated, but doing so can add a small amount of length to the pedicle.
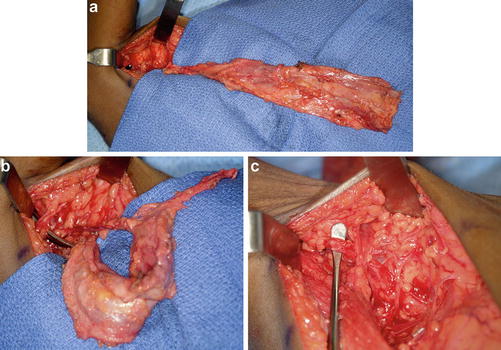
Fig. 12
The bipolar latissimus dorsi muscle transfer is an excellent choice for providing active elbow flexion, provided the muscle is expendable and of adequate strength. The muscle is isolated on its pedicle (a) and transferred via a tunnel towards the coracoid (b). The pedicle is checked throughout the procedure to make sure it is not kinked, rotated, or under tension (c) (Courtesy of Shriners Hospital for Children Philadelphia)
Once the pedicle is isolated, separate the latissimus from the teres major and expose the insertion. The axillary nerve and posterior circumflex humeral vessels are immediately deep to the latissimus and serratus near their insertion onto the humerus. Place a Penrose drain around the latissimus insertion and provisionally close the donor incision with a few staples or towel clamps to prevent desiccation of the wound.
Make an incision in line with the conjoint tendon at the anterior shoulder large enough to pass the latissimus. Expose the coracoid. Make an S-shaped incision at the antecubital fossa and dissect down to the biceps tendon. Surprisingly, most children will have a biceps tendon that flexes the elbow when pulled proximally. The biceps muscle is often completely absent, replaced by fascial-type tissue. Create a generous subcutaneous tunnel from the distal to the proximal arm incision and pass a Penrose drain to mark the tunnel.
Stay updated, free articles. Join our Telegram channel

Full access? Get Clinical Tree


