If speed is essential, it may be more appropriate to use the intraosseous route for immediate access, and to cut down later for continued fluid and drug therapy.
Equipment
Skin-cleansing swabs.
Lidocaine (lignocaine) 1% for local anaesthetic with a 2 mL syringe and a 25 gauge needle.
Scalpel.
Curved haemostats.
Suture and ligature material.
Cannula.
Procedure
1 Immobilise the appropriate limb.
2 Clean the skin.
3 Identify the surface landmarks for the relevant vein (Table 21.1).
4 If the child is responsive to pain, infiltrate the skin with 1% lidocaine (lignocaine).
5 Make an incision perpendicular to the course of the vein through the skin.
6 Using the curved haemostat tips, bluntly dissect the subcutaneous tissue.
7 Identify the vein and free a 1–2 cm length piece.
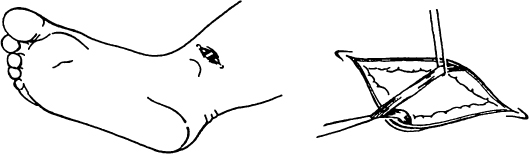
8 Pass a proximal and a distal ligature (Figure 21.2).
9 Tie off the distal end of the vein, keeping the ends of the tie long.
10 Make a small hole in upper part of exposed vein with a scalpel blade or fine-pointed scissors.
11 While holding the distal tie to stabilise the vein, insert the cannula.
12 Secure this in place with the upper ligature. Do not tie this too tightly; doing so would cause occlusion.
13 Attach a syringe filled with 0.9% saline to the cannula and ensure that fluid flows freely up the vein. If free flow does not occur, then either the tip of the cannula is against a venous valve or the cannula may be wrongly placed in the adventitia surrounding the vein. Withdrawing the catheter will improve flow in the former case.
14 Once fluid flows freely, tie the proximal ligature around the catheter to help immobilise it.
15 Close the incision site with interrupted sutures.
16 Fix the catheter or cannula to the skin and cover with a sterile dressing.
Table 21.1 Surface anatomy of the brachial and long saphenous veins.
One finger-breadth lateral to the medial epicondyle of the humerus
Half a finger-breadth superior and anterior to the medial malleolus
Small child
Two finger-breadths lateral to the medial epicondyle of the humerus
One finger-breadth superior and anterior to the medial malleolus
Older child
Three finger-breadths lateral to the medial epicondyle of the humerus
Two finger-breadths superior and anterior to the medial malleolus
Figure 21.2 Site of a long saphenous cut-down and its technique.
Umbilical Vein
Venous access via the umbilical vein is a rapid and simple technique. It is used during resuscitation at birth.
Equipment
Skin-cleansing swabs.
Umbilical tape.
Scalpel.
Syringe and 0.9% saline.
Catheter.
Procedure
1 Loosely tie the umbilical tape around the cord.
2 Cut the cord with a scalpel, leaving a 1 cm strip distal to the tape.
3 If there is bleeding from the vein, gently tighten the tape to stop it.
4 Identify the umbilical vein. Three vessels will be seen in the stump: two will be small and contracted (the arteries, sited inferiorly), and one at the head end will be dilated (the vein) (Figure 21.3).
5 Fill a French 5 gauge catheter with 0.9% saline.
6 Insert the catheter into the vein, and advance it approximately 5 cm.
7 Tighten the umbilical tape to secure the catheter. A purse-string suture may be used later to stitch the catheter in place.
The technique of intraosseous infusion is not new. It was used in the 1930s as a quick method of gaining vascular access (the only alternative was to use a reusable, resharpened metal needle or to perform a venous cut-down). Because it is important to achieve vascular access quickly in many life-threatening situations, intraosseous infusion is again being recommended. Specially designed needles make this quick and easy. It is indicated if other attempts at venous access fail, or if they will take longer than 1.5 minutes to carry out. It is the recommended technique for circulatory access in cardiac arrest.
Equipment
Alcohol swabs.
An 18 gauge needle with trochar (at least 1.5 cm in length).
A 5 mL syringe.
A 20 mL syringe.
Infusion fluid.
Procedure
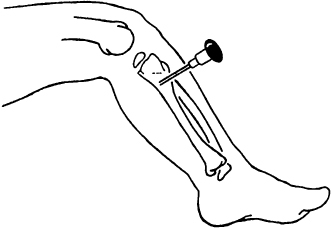
1 Identify the infusion site. Fractured bones should be avoided, as should limbs with fractures proximal to possible infusion sites. The landmarks for the upper tibial and lower femoral sites are shown below in the box, and the former approach is illustrated in Figure 21.4.
2 Clean the skin at the chosen site.
3 Insert the needle at 90° to the skin.
4 Continue to advance the needle until a ‘give’ is felt as the cortex is penetrated.
5 Attach the 5 mL syringe and aspirate; blood marrow may be used to check blood glucose and to provide blood culture. Flush to confirm correct positioning.
6 Attach the filled 20 mL syringe and push in the infusion fluid in boluses.
Figure 21.4 Tibial technique for intraosseous infusion.
Surface anatomy for intraosseous infusions
Tibial
Anterior surface, 2–3 cm below the tibial tuberosity
Femoral
Anterolateral surface, 3 cm above the lateral condyle
Other Powered Devices
The EZ-IO drill is a powered device that enables rapid insertion of an intraosseous needle. The same landmarks are used as for manual insertion and the procedure is less painful for the conscious victim due to its rapidity. The EZ-IO needles are available in two sizes: for children under 40 kg and over 40 kg in weight.
Procedure
1 Use universal precautions.
2 Clean the site.
3 Choose an appropriate size needle and attach it to the drill – it will fix magnetically.
4 Hold the drill and needle at 90° to the skin surface and push through the skin without drilling, until bone is felt.
5 Push the drill button and drill continuously and push until there is loss of resistance – there is a palpable ‘give’ as the needle breaches the cortex.
6 Remove the drill and unscrew the trochar.
7 Aspirate the marrow if possible.
8 Attach the pre-prepared connection tube.
9 There is an optional device to secure the needle but this is not essential.