Subjective persistent irritation or other local symptoms with no gross lesions
Persistent lesion despite standard therapy (i.e., unresolved candidiasis)
Lesions with any of the following features: asymmetrical, irregular border, color variation, rapidly changing lesion, bleeding or non-healing lesion
Vulvar ulceration (non-herpetic)
Pigmented vulvar lesions (i.e., melanoma)
Exophytic growths (i.e., condyloma, acrochordon)
Vulvar dysplasia/VIN
Biopsy may be performed via punch or excision. If the lesion is <4 mm in size or if ulcerated, it should be completely excised. If the lesion is larger, the biopsy should be taken from the area that has the most abnormal features. If there are multiple abnormal lesions noted on the vulva, then multiple biopsies should be taken.
Necessary Equipment
Sterile gloves
Skin antiseptic
Skin marker
Local anesthetic (1 or 2 % lidocaine with or without epinephrine)
30-gauge needle
Syringe
Keyes punch (2–5 mm) or scalpel (15-blade)
Forceps
Iris scissors
Gauze pads
Needle holder
Small diameter absorbable suture, preferably monofilament
Silver nitrate
Items needed for pathology (specimen cup, requisition)
Step by Step of the Procedure
As with any procedure, the first step should involve discussing the steps and rationale for the procedure with the patient and obtaining informed consent. The patient should then be placed in a comfortable position that allows exposure of the area in question, typically in stirrups on the examination table.
The lesion should be examined and the type of biopsy (punch or excisional) planned. The vulvar skin should be cleansed with antiseptic solution and the site of biopsy marked with a marking pen (Fig. 17.1). Local anesthetic should then be infiltrated into the dermis underlying the lesion, being certain to infiltrate the subcutaneous tissues surrounding the entire area to be excised (Fig. 17.2) Next the biopsy will be performed—either punch or excisional.
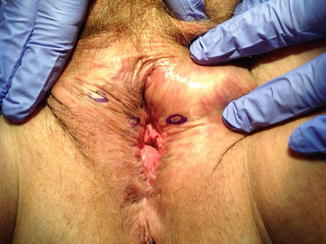
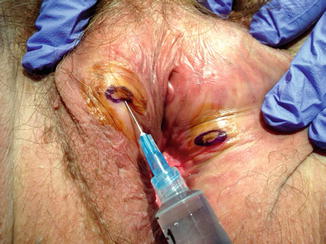
Fig. 17.1
Example of antiseptic cleansing and marking identifiable vulvar lesions to be biopsied
Fig. 17.2
Infiltrating local anesthesia into the dermis below the vulvar lesion for local anesthetic
If performing a punch biopsy, the most abnormal appearing area should be biopsied. The 2 mm punch biopsy is usually of sufficient size to produce an accurate histologic diagnosis [3]. The skin surrounding the lesion should be placed on stretch and the punch placed perpendicular to the skin over the area to be biopsied (Fig. 17.3) Pressure is applied and the device is twisted until the subcutaneous tissues have been entered. Forceps are then used to elevate the core of tissue and iris scissors are used to transect the base of the specimen (Fig. 17.4) The specimen is then placed in the container to be sent to pathology. Pressure is applied to the wound with gauze pads. Hemostasis can be obtained with pressure or with the use of silver nitrate sticks. If a 3 mm or smaller punch was used, then skin closure is typically not required. If a larger biopsy punch was used, then simple sutures should be placed to reapproximate the skin edges to result in improved patient satisfaction of cosmesis [4].

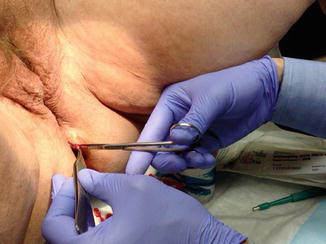
Fig. 17.3
Use of a Keyes punch biopsy to remove a vulvar lesion
Fig. 17.4
Complete excision of tissue from subdermal layer after use of Keyes punch biopsy
Excisions are performed if the entire lesion needs to be removed. Langer’s lines of skin tension should be identified and the long axis of excision should parallel these lines. Using a 15-blade, an elliptical excision is made around the lesion to be removed. The elliptical excision allows for easier and more cosmetic skin closure. Next, the superior edge of the specimen is grasped with forceps and the specimen is removed from the subcutaneous fat using either the blade or iris scissors. Hold pressure to the skin with gauze pads and place the specimen in the specimen cup. Prior to placing the specimen in the cup, while the specimen is still in anatomic orientation, the superior edge of the specimen can be tagged with a suture to aid the pathologist in reporting margin status. Simple interrupted sutures of a small suture diameter are then used to reapproximate the skin edges.
“Tips and Tricks” Section for Troubleshooting
Marking the lesion prior to infiltration of anesthetic can help with identification, as injection can change skin contours and make it difficult to identify the area to be excised/biopsied if the lesion is nonpigmented.
Langer’s lines can be identified by gently pinching the skin between the thumb and index finger. Incisions should be placed parallel to these lines for improved cosmesis.
Using a smaller gauge needle will cause less discomfort to the patient.
Smaller syringes allow for easier infiltration of local anesthetic.
After infiltrating the skin with local anesthetic but before proceeding with biopsy, use the needle or forceps to test the adequacy of the patient’s anesthesia.
Punch biopsy instruments are available in sizes from 2 to 10 mm, but typically if using a punch greater than 3 mm a suture will be required to close the excisional site.
Starting suturing in the middle of the wound and working in either direction can avoid the production of “dog ears” of the wound.
Post-procedure Care
The surgical wound should be kept moist and covered to aid in healing [5]. Applying an ointment to the wound can serve this role, and either petrolatum ointment or an antibiotic ointment, such as bacitracin, may be used for this purpose. One study showed that these two agents had similar results in terms of infection rates, but there was less contact dermatitis with the petrolatum ointment [6]. Sutures can then be removed in 7–10 days, which also gives the physician the opportunity to follow the patient’s progress and review pathology reports.
Stay updated, free articles. Join our Telegram channel

Full access? Get Clinical Tree


