CHAPTER 3 Procedures
Skin disinfection — general principles
Skin preparation solutions
• Alcoholic chlorhexidine may be used routinely as a skin preparation solution for procedures. Aqueous chlorhexidine is recommended for extremely low birth weight (ELBW) infants in the first few days of life.
• Never allow too much alcoholic chlorhexidine to sit on a baby’s skin, especially that of ELBW infants.
Vascular access
Peripheral intravenous (IV) cannula
Technique
3. Cleanse the insertion site thoroughly with a suitable skin preparation solution, allowing this to dry before inserting the cannula.
6. Use a new cannula for each new attempt. The person inserting the IV should not open new cannulae themselves, nor get new ones out of a drawer.
Remember, every new hole in the skin increases the infection risk and the pain for the baby.
Umbilical arterial catheter (UAC) insertion
General preparation
• Inserting a UAC is a two-person procedure — the assistant holds and monitors the baby during the procedure.
Insert the 3-way tap into the catheter and fill with heparinised Nsaline.
If inserting both an umbilical artery (UA) and an umbilical vein (UV) line, insert the UA line first, then the UV line. Tie in the UV line first, then the UA line. (See page 21.)
Technique for UAC insertion
1. If working in an incubator, ‘line’ the insides of the entry doors first with a sterile dressing towel each to minimise the risk of unsterilising your hands on entry to the cot.
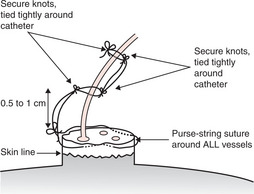
2. Cleanse abdomen, cord and cord clamp: use alcoholic chlorhexidine unless baby is <1000 g BW; if so use aqueous chlorhexidine. Then place a cord tie around the base of the cord to prevent ooze from the umbilical vein. The top of the cord tie should be level with the skin line (Fig 3.1).
3. Be careful not to let any skin preparation solution (especially alcoholic chlorhexidine) spill down the sides of the abdomen — a small infant lying in this for even a short time may receive 2nd or 3rd degree burns over the flanks and buttocks.
4. Cut cord cleanly (with a single slicing motion) about 1 cm above the skin line. Discard cord clamp and forceps used to hold clamp.
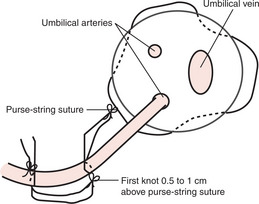
6. Identify the vessels (usually 2 arteries and 1 vein) — the arteries are smaller with thicker walls and sit proud of the cut surface; the vein is larger with a loose, thin wall.
8. Insert catheter to the correct distance:
— use the shoulder tip to umbilicus distance as a guide: measure from the tip of the left shoulder to the bottom of the umbilicus and put the catheter in this distance
10. Place a purse-string suture around the stump (not the skin) and secure the catheter (Figs 3.1 and 3.2).
12. The knots on the catheter should be tight enough that the catheter cannot be pulled through the knots, but not so tight that they occlude the catheter lumen — check that you can still aspirate blood back.
14. An acceptable position for the tip is T6–T12. If it is lower than T12, pull back to L3–L4. Do not leave at L1–L2.
15. Now arrange more permanent strapping of the catheter. There are numerous ways of strapping the catheter and each neonatal unit will have their own method. We suggest sandwiching the catheters between two strips of tape along the abdominal wall and up the catheter. (This is similar to taping intercostal catheters — see Fig 4.8 on page 52.) Apply a transparent, bio-occlusive, polyurethane dressing (such as Bioclusive, Tegaderm, Opsite) to the abdominal skin so that the tape is stuck to this and not directly to the skin.
Notes on UA infusions
• Parenteral fluids, including Na+ and Ca2+, can be administered through these lines, and antibiotics can also be given.
• Boluses of NaHCO3 (sodium bicarbonate) may be given slowly (<1 mmol/min — total dose should not be given over less than 5 minutes).
• Boluses of Ca2+ should only be given with great care — you must take all responsibility for the potential complications.
Umbilical venous catheter (UVC) insertion
Technique and equipment as for UAC insertion, page 15.
If inserting both an umbilical artery (UA) and an umbilical vein (UV) line, insert the UA line first, then the UV line. Tie in the UV line first, then the UA line. (See page 21.)
Stay updated, free articles. Join our Telegram channel

Full access? Get Clinical Tree


