Prepare your equipment. It is important to set up all your equipment beforehand so that it is ready to grab when you are in the middle of a procedure – with young children you will have to act quickly as even with help, it is difficult to keep them still for long and you don’t want to prolong their distress.
 Prepare pain relief. The specifics of what to use will vary between the different procedures but it is always important to consider how you plan to minimise pain and allow plenty of time for topical agents to have an effect.
 Prepare the child and the parents. It is important to talk the child and their parents through what will happen and why it is necessary to perform the procedure. Explain to the child in simple terms that they are able to understand. Don’t tell them that it will not hurt if this is not true as you will lose their trust. Talking them through what to expect will make the whole experience less frightening. Take the opportunity to ask the parents what they think will work best for their child in terms of distracting them or helping them to cope.
 Involve a play specialist. Play specialist are experts in child development and age-appropriate play. They are fantastic at engaging children in play in order to distract them from what is happening with the procedure and can make the whole thing go much more smoothly. If they are not available then medical students can often be very good at providing distraction by playing games or blowing bubbles.
 Position the child appropriately. Setting up the room, your equipment and the child in the best position can really increase your chances of success. Make sure that you have positioned the child in a way which means you can comfortably perform the procedure. This will vary between procedures and specifics are advised for each below.
 Prepare yourself. Make sure that you wash your hands thoroughly before starting the procedure. Wear gloves and an apron (blood can splash everywhere with a toddler thrashing around) to protect yourself and your clothes and bear in mind that some procedures should be done in sterile conditions (with sterile gown, gloves and drapes). Use the smallest pair of gloves you can fit into so that they are tight around your fingertips as this really helps with dexterity. If the procedure is going to take a while to perform, sit down at the same height as child so that you are comfortable and can keep a steady hand.
 Praise the child afterwards. Make sure that you praise the child afterwards for tolerating the procedure. Rewards such as certificates or stickers can also be much appreciated. Remember that the parents may also be feeling quite stressed by the procedure and a kind word to them wouldn’t go amiss either.
Cannulation
For a checklist of equipment which you need for putting in a cannula see Box 6.1.
Cannulation in children and NEONATES takes time and practice to get the hang of but most of the principles of insertion are the same as for adults. However, there are some differences (even in the equipment you will need) so consider the following before attempting to cannulate a child.
 Prepare your equipment. This includes taking the lids of bottles if you plan to drip blood into MICROTAINERS, flushing the extension set with saline and opening all the packets containing your equipment (you should either put your equipment in a sterile tray or place it back inside the open packets to protect them).
 Choose the correct cannula size. Look at the child’s veins before putting on the anaesthetic cream to get an idea of how big they are. The veins can be much more difficult to see properly after the anaesthetic cream as the skins swells and can become erythematous. You also need to consider what will be given through the cannula and how quickly (obviously, the bigger the cannula, the more quickly you can deliver fluids and don’t forget that there is a big change in maximum flow rates with a small change in cannula diameter). The larger the gauge number, the smaller the cannula is. See Table 6.1 for details of which cannula size to use.
 Choose the correct site. The back of the hand tends to be the best position for a cannula in young children and you can also use veins on the top of the feet in babies. In older children, you may be able to site a cannula in the antecubital fossa but these larger veins may be best left for emergency situations when access is really needed (for younger children, they should be avoided for routine use as the cannula is likely to become dislodged by the child bending and straightening their arm). If you really need venous access in a child who is peripherally shut down then the long saphenous vein can be a useful site. It runs just anterior to the medial malleolus. The scalp can also sometimes be a good site in babies, but this can look rather alarming for parents and needs to be explained.
 Prepare pain relief. Make sure that the child has had anaesthetic cream on the area you plan to cannulate for at least 40 min for Ametop gel or 60 min for EMLA cream before attempting the procedure. This can help to numb the skin and make the whole process much less painful for the child. If not left on for sufficient time then these topical preparations will not work properly. Obviously, if the child is unwell and in urgent need of intravenous access for medications or fluid resuscitation, you would not be able to wait this long and would have to cannulate in the absence of analgesia. Some older children may prefer to have a cold spray (ethyl chloride) sprayed on immediately before insertion of a cannula to numb the skin instead of anaesthetic cream. For babies, sucrose is sometimes used as an analgesic although there is some evidence that suckling with or without sucrose (such as on a dummy or a gloved finger) may be equally effective.
 Get someone else to help you. It is essential to have an extra pair of hands in addition to the play specialist and the child’s parent to help you hold the child still and pass you equipment. Having someone who is experienced at doing this can make an enormous difference to your chances of success as they will be better at holding the child’s arm still and can anticipate the steps in the process. Don’t use a parent to hold the child’s arm still as they will probably not feel comfortable holding on firmly enough to restrain them and you will end up with a moving target.
 Position the child appropriately. For younger children it can be useful to put the child on their parent’s lap so that they are sitting face to face. You can then bring the child’s arm underneath the parent’s arm and distract them by positioning the play specialist on the opposite side. Make sure that they are positioned so that you can comfortably reach them (probably with you kneeling down) as if you are uncomfortable or in an awkward position it will be much more difficult to keep a steady hand. See Video 3 for more details.
 Hold the skin taut. Tethering the vein by holding the overlying skin taut will straighten out any tortuous veins and help to stop them skipping out of the way of your needle.
 Collecting blood from a cannula. If you are likely to need blood samples, it is ideal to take blood at the same time as the cannula is inserted to avoid the child having to endure a separate needle for taking bloods. In older children, you may be able to use a syringe or vacutainer blood bottles to draw back blood from the cannula just after you have inserted it (and before flushing!). However, in younger children and babies, their small veins may collapse under the pressure applied by the suction of the syringe. In this case it is best to let blood drip from the end of the cannula into the paediatric blood bottles before you apply the extension set.
 Gloves
 Sterile alcohol skin wipes
 Cannulas (take a few of different sizes with you)
 A sticky cannula dressing
 An extension set (sometimes referred to as a T-piece or octopus)
 A syringe
 A vial of sterile 0.9% saline for injection
 Gauze
Gauze Sharps bin
 A bung (needed for the end of some types of extension sets)
 A tourniquet (for older children)
 A splint (for younger children in order to immobilise the hand you have cannulated)
 A bandage (for younger children to ensure the cannula is well secured and to hold the splint on)
 An extra syringe for drawing blood
 Blood bottles or mircotainers
 Capillary tube (for blood gas or SBR)
 Culture bottle, extra alcohol wipes for the bottle top, sterile needle for transfer of blood into the culture bottle
Table 6.1 Different sizes of cannula and their uses.
| Gauge | Colour (this may vary, check the gauge size) | Child’s age |
| 24 G or ‘Neoflon’ | Yellow | Any child under 2 |
| 22 G | Blue | Toddlers or any age of child with small veins |
| 20 G | Pink | Older children with larger veins or those needing resuscitation |
| 18 G | Green | Teenagers requiring rapid resuscitation |
 Top Tip
And don’t forget the general rules mentioned above.
 Prepare the child and parents.
 Involve a play specialist.
 Prepare yourself.
 Praise the child afterwards.
 Top Tip
Taking blood (including heel prick sampling)
For older children, taking blood can be done in the same way as in adults (apart from remembering to use analgesia and distraction techniques) and you can use normal adult bottles. However, for smaller children you may need to use a different technique for taking blood and collect the samples in paediatric sized tubes (sometimes called MICROTAINERS) which only need less than a millilitre of blood to fill them.
Heel prick sampling
For a checklist of equipment needed for a heel prick sample, see Box 6.2.
HEEL PRICK sampling can be a useful way of collecting blood from babies and toddlers. Basically, this technique relies on you catching drips of blood into the blood tubes. This can be quite challenging at first but as the tubes are so tiny, you don’t need many drops before they are adequately filled. The process of squeezing blood from the capillary bed can cause haemolysis of the sample so it may sometimes be better to attempt venepuncture even in babies (details below). Here are some suggestions to increase your chances of successfully taking a heel prick sample.
 Top Tip
 Sterile alcohol skin wipes
 A plaster or dressing (for afterwards)
 Petroleum jelly
 Spring-loaded lancets (take 2–3 with you)
 Gloves
 Gauze
Gauze Capillary tubes and bungs for the ends (if taking capillary blood gas sample or for an SBR in some units)
 Paediatric blood bottles for other blood needed from a heel prick sample
 Prepare your equipment. Take the lids off any paediatric blood bottles you are using and any safety caps off the lancets. Put some gauze or an absorbent pad on the floor or the parent’s lap or in the cot (depending on how the baby is positioned) to catch any stray drips.
 Prepare pain relief. Traditionally a tiny dose of oral sucrose (from a syringe or on a dummy) is given to babies just before painful procedures as it is thought to reduce their response to pain. Breastfeeding or breast milk from a syringe appears to be just as effective for analgesia and some units have moved towards this as an alternative to products like Sweet-Ease (Shah et al. 2012).
 Prepare the child and parents. You will mostly be performing heel pricks on babies who will not be able to understand what is happening but you can try explaining very simply to toddlers. It helps to explain to the parents what you are doing and why. It may also be useful to warn them that often the bit which babies are most distressed by is restraining the movement of their leg, not the pain caused by lancing the skin.
 Position the child appropriately. For babies and toddlers this can be best with the child lying on the parent’s lap. Having their feet hanging slightly downwards will allow gravity to help with collecting the sample. Most people use their non-dominant hand for squeezing and dominant hand for scraping the blood drops into the tube but find which way round is best for you and position the child accordingly.
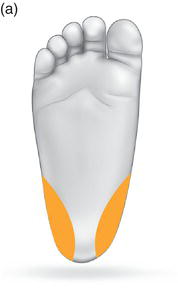
 Choose the correct site. Chosing the correct place to use your lancet is important to maximise your chances of success and minimise the pain it causes. Make sure that you go for the fleshy part on the side of the heel as this is rich in capillary supply and will bleed well. Try to avoid using the sole of the foot if possible as this is much more painful. See Fig. 6.1 for the correct sites for heel prick samples.
 Make sure that the baby’s feet are warm. If the baby has cold feet this will make collecting the sample difficult as cold feet are the result of capillary constriction, meaning that you won’t get much blood out. Try putting socks on and asking the parent to sit holding their child’s feet to warm them up for a few minutes first.
 Catching the drips. The hard part can be managing to catch each drop of blood in the bottle. The blood doesn’t usually drip from the foot but clings to it in a blob on the surface of the skin. This means that you need to scrape it off the skin and into the tube using the rim of the tube. This can be very tricky and end up with you smearing blood everywhere and very little actually getting into the bottle. Being deliberate and rapid in the way you collect the drops can help, as can spreading a very thin layer of petroleum jelly on the skin to help encourage the blood to remain in distinct droplets. If things are getting messy, wipe the skin with some sterile gauze as this will help further drops of blood to form in distinct droplets again.
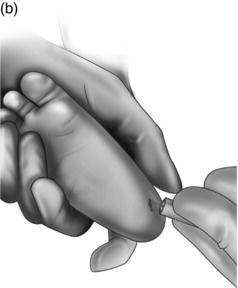
 Holding the foot. Hold the foot dorsiflexed and squeeze around the ankle and the sole of the foot (with your fingers and thumb respectively). The technique of squeezing in order to get the best blood flow takes practice. Watch Video 3 for details and See Fig. 6.1 for how to hold the foot.
 Let go between squeezes. Don’t just continually squeeze the baby’s foot in the desperate hope that it will keep bleeding as this doesn’t work. You need to release all pressure on the foot every couple of seconds in order to allow the capillaries to refill with blood.
 If you are taking more than one bottle, use more than one lancet. If you need to fill more than one paediatric bottle, it is unlikely that you will be able to collect all the blood from one lance. It can be kinder to start out by doing two lances just next to one another which will enable you to collect sufficient blood much more quickly rather than spending a long time squeezing the foot, upsetting the baby more and possibly also haemolysing the blood sample.
 Top Tip
Don’t forget to involve a play specialist to distract the child if they are old enough to benefit from distraction techniques, while playing music can help to soothe babies.
Venepuncture in babies
The difference with venepuncture in babies compared to older children is the size of the needle you use and the way you collect the blood. In babies, if you tried to use a butterfly needle with a syringe or a vacutainer system to collect blood, the veins would collapse under the pressure. This means that you need to collect blood by allowing it to drip from the end of the needle into the paediatric blood bottles.
 Choose the correct kind of needle. Some units will have special needles designed specifically for taking blood from newborns (they are usually either 23 G or 25 G and have a small flange to hold onto on one side), whilst others will use a butterfly needle or a cannula instead. You may see people using butterfly needles with the tubing cut off or a needle with the hub broken off the end, but this is not considered best practice and could leave you vulnerable medico-legally should anything go wrong as you would have modified the equipment against the manufacturer’s advice. Whichever one of these you use, the technique involves allowing blood to drip from the blunt end of the needle into the bottles (or attaching a syringe and very gently withdrawing the plunger if using a butterfly needle). You can occlude the vein between bottles to stop the flow of blood.
 Get someone to help you. Ask someone else to hold the baby’s arm still and to act as a tourniquet by squeezing. Squeezing and releasing can help with blood flow but be careful not to dislodge the needle as this can slowly work it out of position. If blood flow stops then try advancing the needle a tiny bit as this may be enough to place the needle back into the vein and blood to flow again.
 Anchor the vein. You should hold the skin taut over the vein in order to anchor it and stop it from moving away from your needle.
 Collecting blood cultures. You cannot use the method of catching drops of blood for collecting blood cultures. Instead, you need to use a closed system (such as a butterfly needle with a syringe) in order to avoid contamination of the sample. You may also sometimes see people using a needle and syringe to draw up blood that has drained into the hub of a cannula or needle (before it drips) but this can lead to contamination of the sample and is not recommended. For paediatric blood cultures, you only need to use one bottle rather than two. The volume of blood needed will depend on the age and weight of the child. For newborns you only need to collect between 1 mL and 1.5 mL of blood for cultures; for older children you will need 3–5 mL of blood. For teenagers whose circulating blood volume is almost equivalent to adults, you may wish to use two culture bottles (one aerobic and one anaerobic) and collect 10–20 mL of blood.
Capillary blood gas
see Box 6.2 for a checklist of equipment needed for a capillary blood gas sample.
This can be quite a tricky technique at first but is pretty straightforward once you get the hang of it. Capillary blood gas sampling involves taking blood from the capillary bed (usually in a child’s heel) using a capillary tube which sucks the blood up by capillary action! A capillary tube is a small, see-through straw-shaped tube made of either glass or plastic. Capillary action is the mechanism which causes liquid to be drawn up into a narrow tube so that when you touch the tube to a drop of blood, it automatically enters the tube.
 Top Tip
The difficult bit in this process is avoiding getting any air bubbles in the sample as this means that the machine will reject the sample. The secret of successfully collecting a capillary blood gas sample relies on you holding the tube at the correct angle. If you hold the tube tilted upright too much then the blood doesn’t fill the tube (or does so painfully slowly) but if you tilt the tube too far down then you will get air bubbles in your sample.
Make sure that you have had training in how to use the blood gas analysers at your trust as they vary between hospitals. In some units they will have a clot filter on the machine and you can attach your sample directly to this, whilst in others you need to insert a small iron rod into the tube and use a magnet to move it backwards and forwards along the tube to break up any forming clots.
 Top Tip
How to measure a spun bilirubin (SBR)
The equipment used for this will vary between different units (so make sure that you find out the specifics at your hospital) but the general principles in each case are the same.
 Collect a sample. Use the HEEL PRICK technique above to collect a blood sample, making sure that you are using the correct tube to collect the sample. In some trusts, blood for an SBR is collected in special blood bottles, whilst in others it should be collected in a capillary tube.
 Spin the sample. The clue is in the name; a spun bilirubin means that you have to put the blood sample in a centrifuge to spin it. If you are using a capillary tube, you will need to put a small amount of clay into each end of the tube to act as bungs to keep your sample in the tube. The process of spinning the sample separates different components of the blood so that the cells are at the bottom with a layer of plasma on top. The cells appear a dark red colour and the plasma is a translucent yellow colour.
 Measure the plasma bilirubin. A machine called a spectrophotometer is used to shine a light through the plasma component of the sample in order to calculate the amount of bilirubin present. Some machines are designed for slotting in the capillary tube directly (making sure to put the serum layer, not the cell layer, over the light source) but for others you have to transfer some of the serum to a cuvette first. A cuvette is a small container made of either clear plastic or glass which holds the serum as a thin film, allowing a light to be shone through it to measure the bilirubin levels. Use a pipette to draw up a small amount of serum and then inject it into the cuvette before putting the cuvette in the spectrophotometer to measure the bilirubin.
How to measure packed cell volume
This can be done on the same sample used for measuring a spun bilirubin level if you have used a capillary tube to collect the sample. Packed cell volume is exactly as it sounds: you are measuring the size of the layer of cells which have been separated out by spinning the sample in a centrifuge.
You can use a measuring tool (a bit like a ruler) to measure the height of the cell layer which has equivalent values of packed cell volume written on it for you to read off.
Intraosseous access
For a list of equipment needed for gaining intraosseous access, see Box 6.3.
This can be a life-saving procedure in an emergency situation. Bones are very vascular structures so, in resuscitation situations, if it is not possible to get intravenous access you can use intraosseous (IO) access as an alternative method to deliver fluids. If a child is acutely unwell and intravenous access is difficult, don’t waste time with multiple attempts at intravenous access; consider gaining IO access instead.
Gaining intraosseous access can be done either manually with an intraosseous needle (sometimes called a Cook needle) or using a mechanical device such as the following.
 Manual needle or mechanical device with correct size needle
 Sterile gloves
 Apron
Apron 10 mL syringe × 2 (one for saline flush one for collecting bone marrow sample)
 20 mL syringe for giving further fluid boluses if needed
 Alcohol skin wipes or a ChloraPrep sponge
 Sodium chloride 0.9% for flush
 Extension set
 Specimen bottles for sending marrow samples (e.g. for group and save)
 Tape
Tape1 EZ-IO (which is American and therefore pronounced as if saying ‘Easy IO’) is a device which looks and sounds like a drill. The needles are disposable but the drill device is reusable and battery powered.
2 Bone Injection Gun (BIG) is a spring-loaded device which fires the needle into the intraosseous space. The entire device is disposable.
 Preparing the parents. If you are using an EZ-IO it is worth bearing in mind that this will look incredibly distressing to parents as it looks and sounds like you are drilling into their child’s leg (which you sort of are) so try to get someone to distract them or remove them from the room temporarily whilst this happens.
 Preparing pain relief. If you need to gain intraosseous access then the child is probably comatose and you will not have time to delay for analgesia. Insertion of IO needles using the EZ-IO has been done on conscious adults without local anaesthetic and only causes moderate pain but flushing with saline can be very painful in conscious patients (in which case, very slow infusion of 2% lidocaine is recommended before flushing in order to numb the medullary cavity).
 Identify the correct site. There are two main sites commonly used for gaining IO access in children: proximal tibia and distal femur. These sites avoid damaging any growth plates and the proximal tibia is the site most commonly used. The distal tibia is also sometimes used if necessary. See Fig. 6.2 for sites which can be used for IO access.
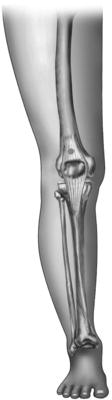
– Proximal tibia. Feel for the tibial tuberosity and then move your finger 1–2 cm medially and 2–3 cm peripherally. This should put you on the flat surface on the inner aspect of the tibia (see Fig. 6.2).
– Distal femur. Feel for the lateral condyle of the femur and then move 3 cm proximally and across to anterior surface in the midline (see Fig. 6.2).
– Distal tibia. Feel for the medial mallelous and move 2 cm proximally (this should only be used if you cannot gain access at either of the above suggested sites).
 Use the correct size needle.
– Manual: 16 G.
– EZ-IO: for children between 3 kg and 40 kg use the pink needle. For children over 40 kg use the blue needle.
– BIG: for newborns to children aged 12 years you need to use the red paediatric BIG and turn the red section until the correct age group (and therefore needle depth) for your patient is showing. For children older than 12 years use the blue adult BIG. This has a standard needle depth setting so you do not need to adjust it.
 Clean the skin. Clean the skin over the site with an alcohol wipe or ChloraPrep sponge and allow to dry completely.
 Insert the needle.
– Manually: insert the needle through the skin until you feel it touch against bone. With firm downwards pressure (by holding the circular head of the needle in the palm of your hand), use a twisting motion to advance the needle into the bone. You will feel a ‘give’ as the needle enters the bone marrow cavity, at which point you should immediately stop pushing (to avoid going all the way through the bone and out the other side). Remove the stylet and the needle should remain upright without you holding it if it is in the correct place.
– EZ-IO: attach the correct size of needle to the drill handle. Insert the needle through the skin until you feel it touch bone. Once the end of the needle is touching bone, pull the trigger on the drill to start it. Very little pressure is needed to insert the needle as the drilling action does most of the work (and in fact, if you use too much pressure it won’t work as well). Once you feel a ‘give’, release the trigger on the drill so that it stops. Remove the drill part.
– BIG: turn the dial to the correct age to set the depth of needle insertion. Hold the device against the skin, remove the safety catch and press down firmly to activate the spring-loaded needle. Be careful only to remove the safety catch once the device is in the correct position on the patient’s skin and your fingers are out of the way in order to avoid firing it through your own hand.
 Remove the stylet or trochar and leave the catheter in place. In all the above designs, there will be a central stylet or trochar which needs to be removed, leaving the catheter in place (just like when inserting a cannula and then removing the needle used to insert it). It needs to be unscrewed from inside the catheter regardless of which method you use to insert it. Dispose of the stylet in a sharps bin immediately.
 Aspirate a sample for testing. This will confirm that you have sited the needle correctly as you should be able to aspirate bone marrow (which to the naked eye looks like venous blood). You can send off the bone marrow for some basic investigations (don’t forget to label it as marrow not venous blood) including:
 blood cultures
 acid–base status
 haemoglobin
 glucose
 electrolytes
 renal function.
Do not try to run a bone marrow sample through a blood gas machine as you will break the machine.
 Attach extension set. These are similar to the extension sets used for cannulas. Don’t forget to prime it with 0.9% saline before attaching it.
 Flush using normal saline. Flush the line with 5–10 mL of 0.9% saline for injection. If there is swelling around the needle site, this indicates that the saline is going into the soft tissues and the needle needs to be resited.
 Secure the needle. If you have used a BIG to insert the needle then the red safety catch can be used to secure the needle by clipping it around the hub or the needle and then taping it to the skin. If you have used an EZ-IO they have specially designed dressings you can use to secure the needle. Other methods of making sure that the IO needle is not dislodged include the following.
– Lots of adhesive tape. Tear a strip of tape 4–5 cm long and tear it lengthways up to half way along the strip. Stick the whole part onto the skin and then wrap the two half strips around the hub of the needle and then stick to the skin. Repeat this a few times, sticking different lengths of tape around the hub in different places.
– Sticking a gallipot over it. Place a gallipot upside down over the top of the needle and tape or bandage the gallipot securely to the skin.
– Use syringe barrels as bolsters. Place syringes flat against the skin along either side of the needle to act as bolsters and tape them to the skin.
– Assign someone to hold it in place. If you have enough people available, you can assign someone to be responsible for making sure that the IO needle is not dislodged.
 Administer drugs and/or fluids. Any fluid or drug which can be given IV can also be given IO, including resuscitation drugs such as adrenaline.
 Remove it as soon as possible. Given the risk of infection, IO access should be removed as soon as you manage to get adequate IV access. The maximum time an IO needle can remain in situ before it needs to be removed is 24 h.


