7. Physiologic Monitoring*
Wanda Todd Bradshaw and David T. Tanaka
Significant advances in the management of the ill newborn have been made in the past 50 years. The clinical usefulness of the umbilical vein was first demonstrated by Diamond in 1947 to perform an exchange transfusion to prevent kernicterus. Later, James used the umbilical artery for acid-base determination. In most neonatal intensive care units (NICUs), use of these catheters has become the standard of care to assess blood gases, measure arterial and central venous pressures, administer medications and fluids, and obtain laboratory samples. The development of small indwelling peripherally inserted central catheters provides a route for administering the above mentioned items and may be used for laboratory sample withdrawal if no other method of obtaining blood is available. Because of the frequency and clinical significance of complications, alternatives to these intravascular routes have been vigorously sought. The development of noninvasive physiologic monitoring devices has been a major step toward this goal. In addition, the use of point-of-care testing for various laboratory values is evolving in neonatal care. This chapter reviews the procedures and advances in physiologic monitoring.
PHYSIOLOGY
Pulmonary Physiology
Gas exchange takes place in the alveoli of the lung. Ventilation is the movement of air into and out of these air spaces. Diffusion is the movement of oxygen (O 2) from the alveolar space into the pulmonary capillary and the movement of carbon dioxide (CO 2) from the pulmonary capillary into the alveolar space for eventual exhalation. Pulmonary perfusion is the flow of blood through the pulmonary capillaries that surround the alveolar spaces. Once oxygen diffuses through the alveolar lining cells and into the capillaries, it is bound to hemoglobin within the red blood cell. Oxygen content in the arterial blood is the sum of the amount of oxygen dissolved in the plasma and the amount bound to hemoglobin. Approximately 3% of the oxygen content is dissolved in the plasma, with the remaining 97% bound to hemoglobin. Pa o2 is the partial pressure of the oxygen dissolved in the plasma. Fetal hemoglobin has a higher affinity for oxygen than does adult hemoglobin; therefore, at any given Pa o2, more oxygen is bound to adult hemoglobin (Figure 7-1).
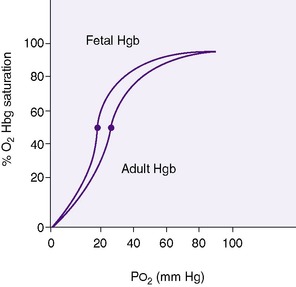 |
| FIGURE 7-1 |
Oxygen saturation (Sa o2) is the percentage of oxygen bound to hemoglobin. Pa co2 is the partial pressure of carbon dioxide in the blood.
Noninvasive Blood Gas Monitoring
OXYGEN
Noninvasive monitoring of oxygenation can be accomplished by using two monitoring technologies. Oxygen saturation monitoring is the most common and widely used method for assessing oxygenation status. Transmission technology relies on a pulsating arterial vascular bed between a dual light source and a photoreceptor. 30 As blood passes between the light source and the photoreceptor, different amounts of red and infrared light are absorbed, depending on the amount of oxyhemoglobin and reduced hemoglobin. With reflectance oximetry, the emitter and receptor are located beside each other. Emitted light is reflected back to the photoreceptor. This method uses the core body to obtain oxygen saturation and is useful when the patient’s peripheral blood flow is diminished. With both methods, the difference in light absorption is electronically processed and displayed by the monitor as the percentage of arterial hemoglobin oxygen saturation expressed as Sp o2.30Pulse oximetry probes are easy to apply and require no calibration or application of heat.
The second method of noninvasive monitoring of oxygenation is transcutaneous oxygen tension, which relies on the principle of oxygen diffusing from the skin capillaries through the dermis to the surface of the skin. To measure the oxygen, it is necessary to have adequate perfusion of the site, to intermittently calibrate the sensor, and to heat the skin, which then dilates the local capillaries and arterializes the capillary bed, as well as promotes faster diffusion of the oxygen from the skin. 31
CARBON DIOXIDE
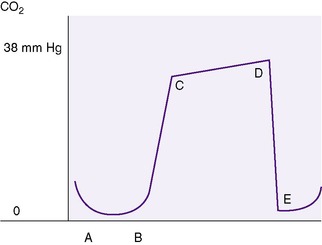
As with noninvasive monitoring of oxygen, carbon dioxide also can be assessed using two types of monitors. Transcutaneous carbon dioxide (Ptc co2) monitoring works under similar principles as for transcutaneous oxygen monitoring. The probe is a glass pH electrode that detects changes in pH caused by CO 2. Heating of the probe enhances CO 2 diffusion, providing a better correlation between the probe value and the Pa co2 value. 20 The second method used to measure the content of the carbon dioxide in the respiratory gases during the respiratory cycle is end-tidal carbon dioxide (Pet co2) monitoring, also called capnometry. With capnometry, an infrared light absorption determines the amount of CO 2 present in the sample. 22Capnography provides a visual graphic curve of Pet co2.42 The carbon dioxide content varies widely with the phase of the respiratory cycle. During inspiration, there are minimal amounts of carbon dioxide, whereas at the end of expiration, the carbon dioxide values are at their maximum level (Figure 7-2). Until recently, the relatively fast respiratory rate of newborns, combined with the small tidal volumes, resulted in inaccurate values when measured by end-tidal carbon dioxide monitors. Advances in technology have improved the reliability of this monitoring technique for newborn infants.
COMBINED OXYGEN–CARBON DIOXIDE MONITORING
Sp o2/Ptc co2 sensors combining pulse oximetry and transcutaneous carbon dioxide monitoring have been developed. The heated sensor is attached to the patient’s ear. It provides rapid Sp o2 values followed by carbon dioxide information within minutes as the site is warmed and arterialized. A single probe, designed to withstand motion artifact and low perfusion states, leads from the patient to the monitor. Because the probe is attached to the ear, its removal for chest radiographs or prone positioning is not necessary. Studies on normal volunteers, neonates, and very-low-birth-weight (VLBW) infants have shown acceptable correlation with both invasive and noninvasive monitoring techniques for oxygen. Carbon dioxide values were less reliable but allowed trending of ventilation status. 4,25,40
Cardiorespiratory Monitoring
The electrical activity of an infant’s heart is picked up by chest leads (usually three) placed on the infant and recorded by a cardiorespiratory monitor. The recording is displayed on a visual screen as the infant’s electrocardiographic pattern. The infant’s respiratory pattern also is recorded, because the chest leads electronically detect movement of his or her chest with each respiration.
Blood Pressure Monitoring
Systolic blood pressure (measured in millimeters of mercury [mm Hg]) is the pressure at the height of the arterial pulse and coincides with left ventricular systole. Diastolic blood pressure (measured in mm Hg) is the lowest point of the arterial pulse and coincides with left ventricular diastole. Mean arterial pressure is the diastolic pressure plus one-third the pulse pressure. Central venous pressure is the pressure in the right atrium and may be approximated by the blood pressure (volume) in any of the large central veins.
Point-of-Care Testing
Point-of-care testing (POCT) involves testing performed at or near the patient rather than in a laboratory. This process has steadily evolved from crude blood glucose determinations to numerous types of monitoring. Currently, whole blood glucose values, transcutaneous bilirubin, fecal occult blood, Nitrazine and gastric pH, urine dipstick, activated clotting time, hematocrit, some electrolyte values, and arterial blood gases are part of POCT for the neonatal population.
DATA COLLECTION
The indications for using the various techniques for physiologic data collection depend on the infant’s clinical situation. When umbilical artery and venous catheters cannot or should not be inserted or when such devices need to be removed, other devices may be considered.
Umbilical Artery Catheters
An umbilical artery catheter (UAC) is placed in those infants requiring frequent arterial blood gas determinations, continuous monitoring of arterial blood pressure, and infusion of parenteral fluids. The practice of medication administration through a UAC varies. 37 Infants who are candidates for indwelling catheters include critically ill neonates and those with congenital heart disease or disorders that cause respiratory insufficiency (e.g., surfactant deficiency, meconium aspiration syndrome, persistent pulmonary hypertension, diaphragmatic hernia). Although use of an indwelling UAC allows arterial pressure monitoring and accessibility for parenteral infusions, it is generally not used for these indications alone.
Umbilical Vein Catheters
Umbilical vein catheters (UVC) are useful for exchange transfusions, central venous pressure monitoring, emergency administration of fluids or chemicals in delivery room resuscitation, and administration of parenteral fluids and medications in the NICU, as well as obtaining blood for laboratory analysis. More complications are associated with umbilical venous lines than with umbilical arterial lines, but the complications are less severe. 3 UVCs are being used with increasing frequency for initial management of extremely-low-birth-weight (ELBW) infants. Catheters used as umbilical lines are available as both single-lumen and double-lumen items. Double-lumen catheters permit the simultaneous administration of infusates and medications. A Cochrane review supported the reduced need for peripheral lines when multi-lumen UVCs were used. 23
Noninvasive Oxygen–Carbon Dioxide Monitoring
Oxygen monitoring is indicated in infants receiving oxygen for any reason (seeChapter 23). Acute monitoring is used as a part of the management of acute respiratory disorders. Long-term monitoring is used to wean infants with chronic lung disease from oxygen therapy. Noninvasive oxygen monitoring is useful during transport, in emergency situations, and during procedures. However, this method provides no information on hemoglobin level, adequacy of ventilation, and oxygen delivery to the tissues and should be used as one part of total oxygenation and ventilation assessment. Even though oxygen saturation monitoring is used more, less variability in oxygen tension has been demonstrated when transcutaneous oxygen monitoring has been employed. 31 Carbon dioxide monitoring is useful for verifying that the endotracheal tube is in the trachea (end-tidal CO 2 monitoring) and for the infant with a respiratory disease in which retention of carbon dioxide may become clinically significant (end-tidal CO 2 and transcutaneous CO 2 monitoring). 12
Cardiorespiratory Monitoring
Cardiorespiratory monitoring should be used in any infant who requires intensive or intermediate care or is at risk for apnea or rhythm disturbances.
Blood Pressure Monitoring
Blood pressure monitoring should be used in the infant requiring surgery and in the acutely ill infant with cardiorespiratory distress or any other illness in which hypotension may be a significant contributor to the pathologic state. Central venous pressure should be monitored in infants who may experience an excess or loss of blood volume.
INTERVENTIONS
Umbilical Artery Catheter Placement
PROCEDURE
Determine the size and length of the catheter to be inserted. For infants weighing more than 1250 g, use a 5 Fr catheter, and for infants weighing less than 1250 g, use a 3.5 Fr catheter. Figures 7-3 and 7-4 correlate total body length with the length of the catheter to be inserted. Whereas these charts have worked reasonably well in larger preterm and term infants, a new formula (4 × birth weight in kilograms + 7) resulted in significantly better placement in VLBW infants. 41
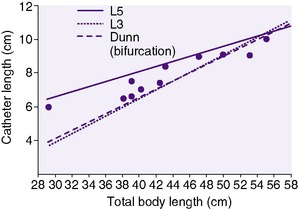 |
| FIGURE 7-3 (From Rosenfeld W, Biagtan J, Schaeffer H, et al: A new graph for insertion of umbilical artery catheters, J Pediatr 96:735, 1980.) |
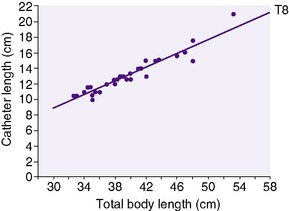 |
| FIGURE 7-4 (From Rosenfeld W, Estrada R, Jhaveri R, et al: Evaluation of graphs for insertion of umbilical artery catheters below the diaphragm, J Pediatr 98:627, 1981.) |
Place the infant in a supine position on a radiant heater or in an incubator. Ensure continuous temperature monitoring. Skin temperature should remain between 36° and 37° C (96.8° and 98.6° F). Provide appropriate oxygenation and ventilation. Ensure cardiorespiratory and oxygen saturation monitoring. Restrain the infant’s hands and feet to prevent him or her from contaminating the sterile field and interfering with the placement procedure. Wear a hat and mask. Wash hands before and after the procedure. Open the catheterization tray; most units now use commercially available disposable trays. Catheterization tray contents are shown in Figure 7-5. Put on sterile gown and gloves.
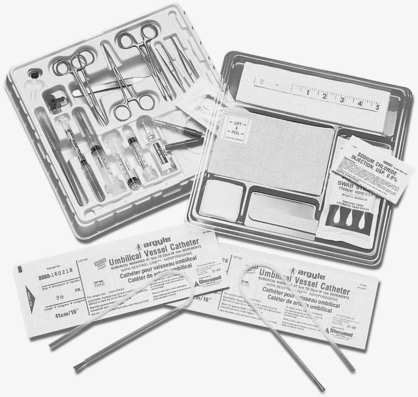 |
| FIGURE 7-5 (Courtesy Tyco/Healthcare Kendall-LTP.) |
Connect the catheter to the stopcock, and flush and fill the entire system, including the catheter, with flush solution. Turn off the stopcock to the catheter to prevent fluid from draining out of the catheter during insertion and securing of the catheter. Cleanse the cord and base of the umbilicus with a povidone-iodine swab three times, and allow the site to air-dry. Remove the povidone-iodine with alcohol. For infants weighing less than 1000 g, who may experience iodophor skin burns, or those with fragile skin, cleanse the area with povidone-iodine solution, permit the site to dry, and then remove the povidone-iodine with sterile water. Avoid using an excess of povidone-iodine solution so the infant is not lying in the solution during the procedure. Any residual iodophor should be washed off the infant carefully after the procedure is completed.
Drape the infant by placing an eye sheet over the umbilicus. An alternative method is to use sterile drapes, as follows:
1. Hold the diagonal corners of one drape, and allow the top half to fold over the bottom half. The result is a V shape.
2. Place the tips of the V on either side of the umbilicus.
3. Repeat with another drape and place on the other side of the umbilicus. The umbilical stump is now visible, yet surrounded by drapes.
After the UAC is inserted, the drapes can be removed easily without the need to pass the stopcock and catheter through an eyehole of a drape or cut or tear the eyehole drape. Ensure that the infant’s head and feet remain visible during the procedure to assess his or her color. A small eye drape with adhesive backing (Steri-Drape) has the advantage of being transparent, so that the infant’s color can be seen and temperature can be maintained. Towel drapes may interfere with a radiant heat source used for temperature regulation.
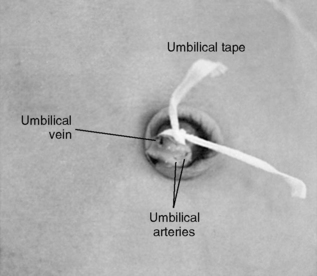
Place an umbilical cord tie (e.g., umbilical cord tape) around the base of the cord to control bleeding. A single overhand knot is preferred because it allows tightening as needed. Using tissue forceps, pick up the cord and cut it with a scalpel about 1 to 1.5 cm above the base. Arterial spasm allows only minimal bleeding. Identify the vessels. There are usually two arteries and one vein. The arteries are small, thick walled, and constricted. The vein is larger, thin walled, and usually gaping open. If the vein is at the 12 o’clock position, the arteries are usually at the 4 and 8 o’clock positions (Figure 7-6).
Stabilize the umbilical stump by grasping the cord between the thumb and index finger or grasping the edge of the stump with a mosquito hemostat. Ensure that the hemostat does not crush the umbilical vessels. With iris forceps, dilate one of the arteries by placing the tips of the forceps in the artery and gently allowing them to spring open. This procedure may need to be repeated several times. In ELBW infants, the artery may be so small that it may be necessary to initially insert one forceps tip and then both to dilate the artery. While grasping one side of the wall of the dilated artery with small forceps, gently insert the catheter. An alternative method is to insert the catheter between the open prongs of the forceps used to dilate the artery. Instructional aids such as Baby Umb (Medical Plastics Laboratory, Inc., Gatesville, Tex.) and the Umbilical Artery Catheterization Slide-Tape Neonatal Educational Program (Charles R. Drew Postgraduate Medical School, Los Angeles, Calif.) are helpful. As the catheter passes into the artery, resistance may be encountered at several points, as follows:
• At the umbilical cord tie (tape): The tie (tape) may be tied too tightly. Loosen slightly.
• At the point at which the umbilical artery turns downward (caudal) into the abdomen: Steady, gentle pressure is important because forceful pressure may cause the catheter to perforate the artery wall and create a false channel.
• At the point at which the umbilical artery joins the external iliac artery: Once again, steady gentle pressure is important.
Insert the catheter to the predetermined length. Aspiration on the syringe should provide immediate blood return. Lack of blood return may indicate the following:
• The catheter is not inserted far enough. Insert farther.
• The vessel wall has been perforated, or a false channel has been created. If the catheter has pierced the vessel wall, repeat the procedure using the other artery.
• The catheter is kinked. Pull back slightly and then advance.
• The stopcock is turned off. Correct the stopcock position. Return aspirated blood to the infant; then clear the catheter with flush solution.
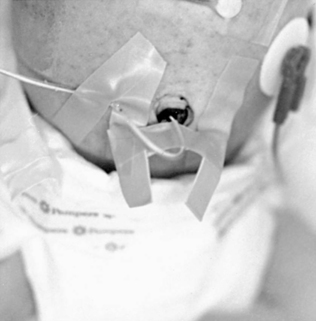
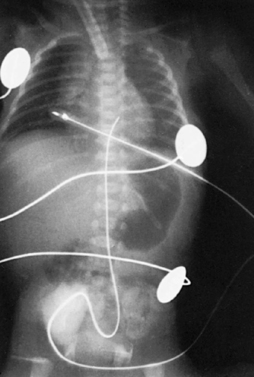
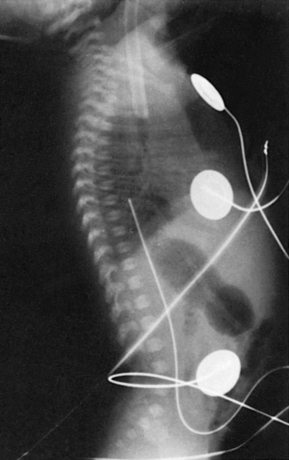
Observe the infant’s lower extremities and buttocks for signs of vascular compromise. If any blanching or blueness is seen, follow the steps outlined in the Complications section (see pp. 148-149). Secure the catheter by suturing it to the umbilical stump and by the use of an adhesive-type tape after using skin prep to protect the skin. The most common taping method is the “goalpost” (Figure 7-7). Connect the stopcock to the intravenous (IV) solution, and set the prescribed infusion rate on the infusion pump. Ensure that no air is in the tubing, stopcock, or catheter. All connections must be secure. Automatic infusion pumps must be used for UACs because arterial pressure must be overcome to permit IV fluid infusion. Determine catheter placement by an x-ray examination (abdominal, chest, or “babygram” depending on placement of the catheter). Figure 7-8 shows how the UAC appears on a lateral x-ray film.
 |
| FIGURE 7-8 |
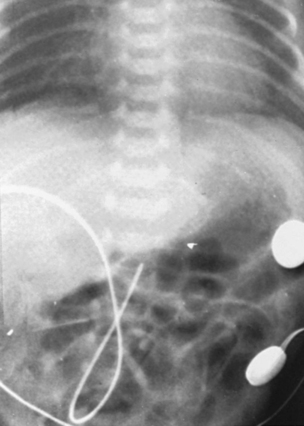
Note that the catheter enters the umbilicus and travels inferiorly before turning superiorly. This “leg loop” is characteristic of an arterial catheter. A UAC follows the aorta and is positioned slightly to the left of the patient’s vertebral column. Optimal placement is below the renal arteries and above the aortic bifurcation (L3 to L4) for a low catheter and below the left subclavian artery and above the diaphragm (T7 to T9) for a high catheter.3 Exclusive use of high UACs is supported by Cochrane review because ischemia is significantly less frequent and duration of catheter use is prolonged with high catheter position. 3Figure 7-9 shows high catheter placement, and Figure 7-10 shows low catheter placement.
 |
| FIGURE 7-10 |
If the catheter is too high, measure on the x-ray film the distance from the tip of the catheter to the desired level and pull the catheter back the appropriate distance. Some clinicians multiply this length by 0.8 to account for the magnifying effect of the x-ray film. If the catheter is placed too low, the catheter cannot be advanced but must be removed and replaced because the external portion of the original catheter is no longer sterile. Remove the umbilical cord tie (tape) or maintain the tie very loosely so as not to obstruct blood flow to the umbilical area.
TEACHING MODEL
The umbilical cord can be used for teaching the procedure of both arterial and venous catheterization. Many of the steps can be effectively carried out using a fresh placenta.
Special UACs and monitors are available for continuous Pa o2 or oxygen saturation monitoring.
NURSING CARE AND USE OF UMBILICAL ARTERY CATHETERS
Infants can be positioned on their sides or their backs. The abdominal position may be avoided because accidental slipping, kinking, and removal of the catheter may occur without being immediately apparent. If the abdominal position is used, the catheter should be monitored continuously; ensure pressure alarms are on with parameter settings that would rapidly detect pressure changes. Care needs to be taken so that the infant is positioned to prevent dislodgement of the catheter. Diapers are effective for preventing the feet and toes from becoming entangled in the catheter. The diaper is folded below the umbilicus. If the infant is receiving phototherapy and thus is not diapered, leg restraints or positioning aids may be indicated. A mitten or positioning aids are useful to prevent hands and fingers from contacting the catheter. Positioning the catheter away from the extremities lessens the chance of accidental dislodgement. A dressing over the umbilicus is unnecessary; dressings inhibit inspection of the umbilicus and evaluation of the catheter. The IV tubing, connecting tubing, and stopcock should be changed daily. Clots form in the stopcock, so changing it daily prevents the likelihood of embolus formation. Blood backing into the catheter can be caused by the following:
• Increased intraabdominal pressure, commonly caused by vigorous infant crying
• Disconnection of tubing or a loose connection
• Stopcock turned in wrong direction
• Infusion pump malfunction
• A leak in the filter or tubing or a crack in the stopcock
Drawing blood samples from an umbilical catheter is a sterile procedure. Samples may be obtained for blood gas analysis and to obtain laboratory specimens. Necessary items include a syringe for initially aspirating IV fluid and blood from the catheter, a heparinized blood gas syringe (if a blood gas sample is to be obtained), a syringe for aspirating laboratory samples (if laboratory samples are to be obtained), and a syringe containing flush solution.
PROCEDURE FOR DRAWING AN ARTERIAL BLOOD GAS SAMPLE
The reinfusion method of obtaining blood samples is described. This practice involves returning the “discard” blood and, in theory, minimizes patient blood loss. 16 Remove the stopcock cap and place it down so that sterility will be maintained. Attach the empty aspiration syringe to the stopcock. Turn off the stopcock to the IV solution so that the IV solution stops flowing. Aspirate 1 to 2 mL from the catheter into the dry aspiration syringe (Figure 7-11). The IV fluid is prevented from infusing, and aspiration clears the catheter of its IV fluid. Turn the stopcock to the neutral position (Figure 7-12), remove the syringe keeping the tip sterile, and replace it with the heparinized blood gas syringe or laboratory sample syringe. The neutral position of the stopcock prevents contaminating the sample with IV fluid and prevents blood loss from the infant.
Stay updated, free articles. Join our Telegram channel

Full access? Get Clinical Tree


