21 Orthopedics
Musculoskeletal problems in children fall into several general categories.
1 Trauma (discussed here and in Chapter 6)
2 Congenital problems—malformations resulting from genetic factors and from exposure to teratogens during the first trimester, as well as deformations stemming from insults later in pregnancy, many of which are associated with anomalies of other organ systems (discussed here and in Chapters 1, 2, and 15)
4 Inflammatory processes such as the collagen vascular diseases, the vasculitides, rheumatoid arthritis, and inflammatory bowel disease (see Chapters 7 and 10)
5 Metabolic diseases (see Chapters 9, 10, and 13)
Development of The Skeletal System
The terminal arterial loops and sinusoidal veins that form the vascular bed of growing metaphyses have sluggish blood flow, which increases the risk of thrombosis and of the deposition of bacteria during periods of bacteremia. As a result, there is a greater risk of developing hematogenous osteomyelitis in pediatric patients than in adults. Furthermore, the epiphyseal plates, which are incompletely formed in infancy, are a less effective barrier to extension of infection into adjacent joints, and the relatively thin diaphyseal cortices tend to permit rupture outward under the overlying periosteum. Similarly, penetration of vascular channels through the vertebral end plates into the intervertebral disks makes diskitis more likely than vertebral osteomyelitis in early childhood (see Chapter 12).
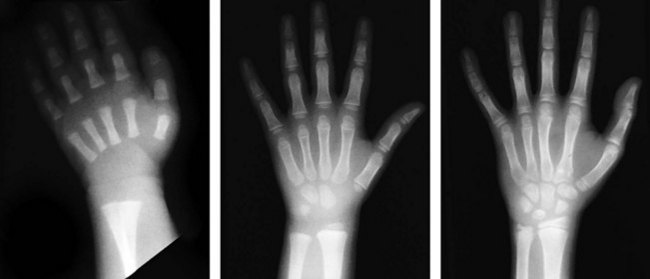
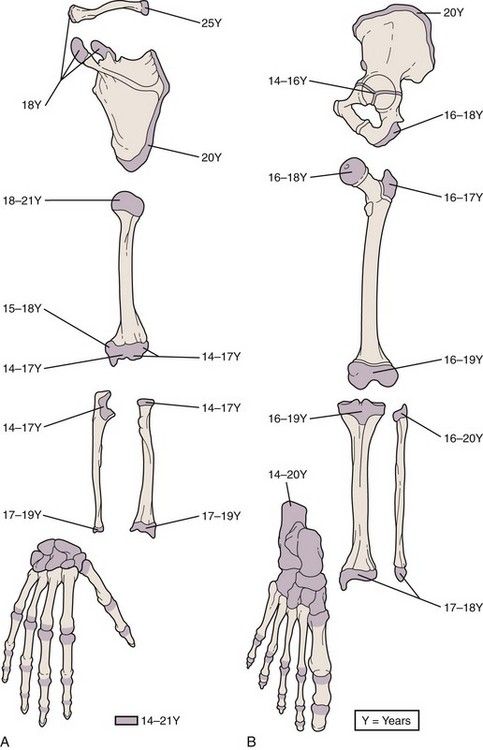
A thorough understanding of musculoskeletal development and of the radiographic findings at differing stages is particularly important in the diagnosis and management of orthopedic injuries. At birth only a few epiphyses have begun to ossify; the remainder are cartilaginous and thus are invisible radiographically. With development, other epiphyses begin to ossify, enlarge, and mature in such an orderly fashion that one can estimate a child’s age from the number and configuration of ossification centers (Figs. 21-1 and 21-2). The epiphyseal plates (physes), which are sites of cartilaginous proliferation and growth, do not begin to ossify and thereby close until puberty (Fig. 21-3). This process starts and ends earlier in girls than in boys. When skeletal injuries involve sites where ossification has not begun or is incomplete, radiographic findings may appear normal or may not reflect the full extent of the injury. This necessitates greater reliance on clinical findings. Magnetic resonance imaging (MRI) can be of assistance in defining unossified or incompletely ossified structures.
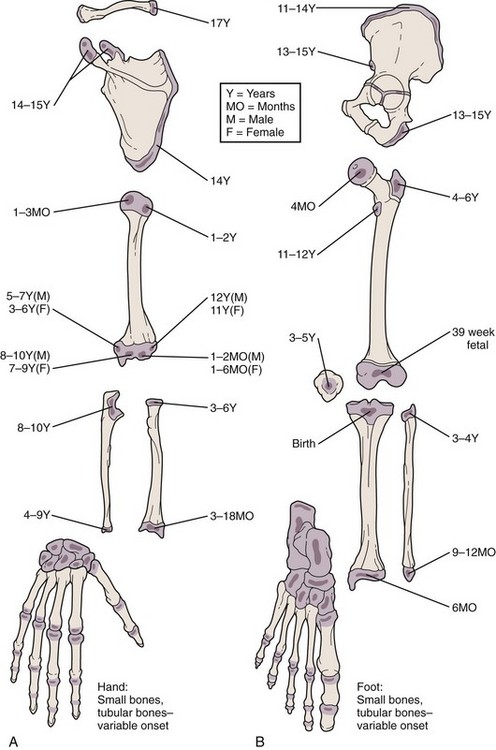
Figure 21-1 Ages at onset of ossification. At birth only a few epiphyses have begun to ossify. The remainder are cartilaginous and therefore invisible radiographically. With development, other epiphyses begin to ossify, enlarge, and mature in an orderly fashion, making it possible to estimate a child’s age from the number and configuration of ossification centers. This forms the basis for the use of bone age as part of the evaluation of children with growth disorders. When evaluating the radiographs of injured children, it is of crucial importance to bear in mind that fractures involving nonossified epiphyses are radiographically invisible until healing begins (see Fig. 21-57).
Physical Assessment
History
Key historical points in the evaluation of problems not resulting from trauma include the following:
3 Clinical course, including the manner and rate of progression and associated signs and symptoms
4 Past medical history, with an emphasis on the prenatal and perinatal history in the infant or young child
5 Family history, especially of genetic, metabolic, and musculoskeletal problems
This information helps considerably in narrowing the list of differential diagnostic possibilities.
1 The time and place of the accident and whether it was witnessed
2 The mechanism of injury, including the degree of force applied and the direction of force, if known (e.g., if a fall, from what height, onto what surface? Was the child running or walking [momentum]? In what position did the child land? Was there any head injury or loss of consciousness?)
3 The child’s behavior since the time of injury (e.g., decreased movement, guarding, refusal to walk or limping, any altered level of consciousness)
4 Complaint of pain (if so, how severe, and can it be localized?)
5 Prior treatment or first aid
6 Past medical history of serious illness and prior injuries
Physical Examination
Regional Musculoskeletal Examination
In the regional examination the area of concern is inspected visually for spontaneous movement, guarding, size, swelling, deformity, and the appearance of overlying skin, and the findings are compared with those for its paired structure. After this, the normal side and then the affected side are gently palpated for warmth, induration, and tenderness. Muscle mass, tone, and reflexes on the affected side are compared with those on the normal side, and the presence or absence of spasm is noted. If asymmetry in muscle mass is detected, the circumference is measured bilaterally at a point equidistant from a fixed bony landmark. The child is then asked to move the extremity or is handed objects to get him or her to do so, and active motion is observed. If this appears limited, passive range of motion is tested first on the normal and then on the affected side, taking care not to cause severe pain. Strength is tested against gravity and then against resistance (Table 21-1), being careful to stay within the limits of pain. Then sensation and vascular status are also evaluated.
Table 21-1 Grading of Muscle Strength
| Grade | Physical Finding |
|---|---|
| 0/5 | No movement seen |
| 1/5 | Muscle can move joint with gravity eliminated |
| 2/5 | Muscle can move joint against gravity but not against added resistance |
| 3/5 | Muscle can move joint against slight resistance |
| 4/5 | Muscle can move joint against moderate added resistance |
| 5/5 | Normal strength |
Axial Skeleton and Upper Extremity Examination
Thoracolumbar Spine
Viewed from the side, the normal child has a lordotic curve in the cervical area with a bony prominence at C7, a mild thoracic kyphosis, a lumbar lordosis, and a sacral kyphosis. Each patient is checked for the presence, absence, or accentuation of these curves. The midline of the back is inspected for evidence of abnormal pigmentation and the presence of hemangiomas, nevi, hairy tufts, dimples, masses, or defects, which may be associated with underlying bony or neural anomalies (see Chapter 15).
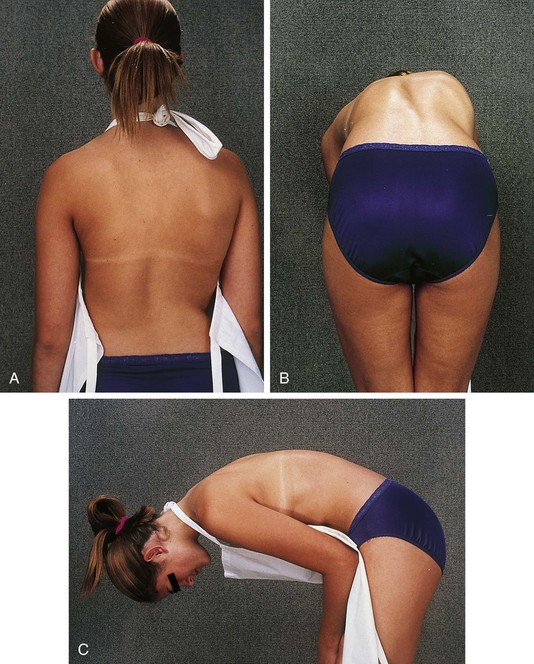
Examination of the back for spinal deformity is assisted by the use of the Adams forward bend test (Fig. 21-4). For this, the examiner stands behind the patient, who is then asked to bend forward with arms extended and the palms of the hands together. The surface of the back in the lumbar and thoracic regions is examined for asymmetrical elevation of the paravertebral spinous area, thus indicating a structural rotation of the spine and the possibility of scoliosis (Fig. 21-4, B). The examiner should also note any evidence of missing spinous processes (step-off) or their deviation from the midline and palpate the paravertebral muscles for spasm and tenderness. Increased kyphosis, especially in the thoracic region, may be detected when viewing the patient from the side (Fig. 21-4, C), as can lack of reversal of the lumbar lordosis, which may indicate muscle spasm or abnormality of the lumbar spine. Leg length inequality may be evaluated during the upright standing portion of this test (see Lower Extremity Examination, later) and, if present, should be corrected with appropriate lifts under the short side in order not to cause a false forward bend test.
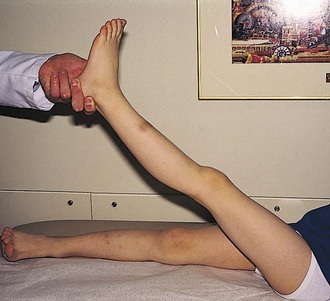
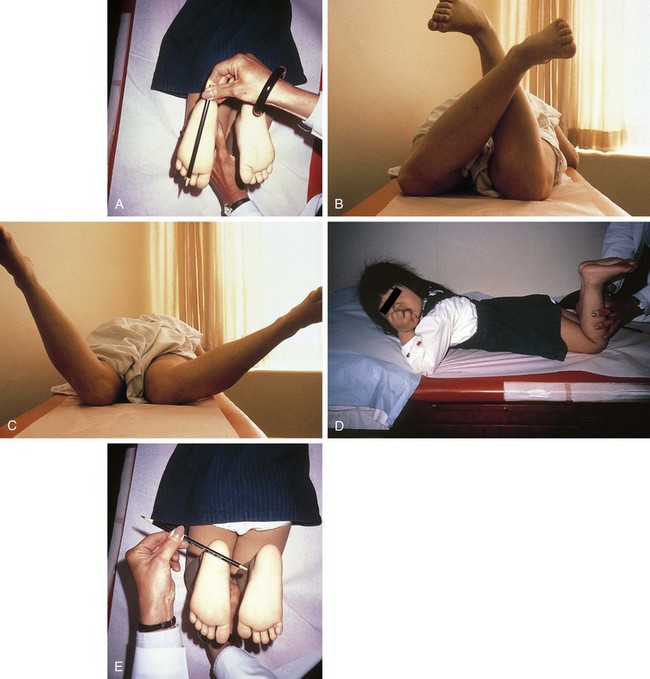
Any examination of the spine must include a neurologic assessment of strength, tone, reflexes, and sensation. The straight leg raising test (Fig. 21-5) can be helpful in demonstrating nerve root pathology in patients with slipped disks, spinal or paraspinal masses, or inflammatory processes. The test is performed with the patient lying supine on the examining table. The limb to be tested is grasped behind the ankle and elevated passively into hip flexion with the knee fully extended. This maneuver stretches the sciatic nerve as it passes behind the hip joint, and if one of its several roots has been irritated by a protruded disk, mass, or inflammatory process, pain will be felt with only 15 to 30 degrees of hip flexion. Normally the straight leg can be brought to 90 degrees of hip flexion without difficulty.
Elbow
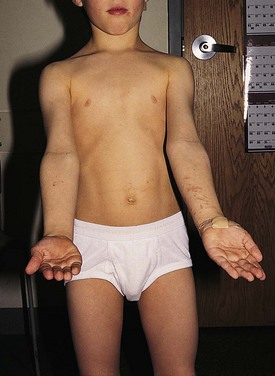
In the normal relationship of the extended, supinated forearm to the upper arm, there is 5 to 10 degrees of lateral (valgus) angulation, termed the carrying angle (Fig. 21-6). When this angle is greater than 10 degrees, the deformity is termed cubitus valgus and, when less or reversed, cubitus varus (gunstock deformity). The range of motion of the hinge joint of the elbow has four components: extension, a function of the triceps (normally to 0 degrees of flexion); flexion, a function of the biceps (normally to 145 degrees); supination (normally to 90 degrees); and pronation (80 to 90 degrees). The latter two components are tested by having the patient turn the palm up and down respectively, with the elbow flexed.
Wrist and Hand
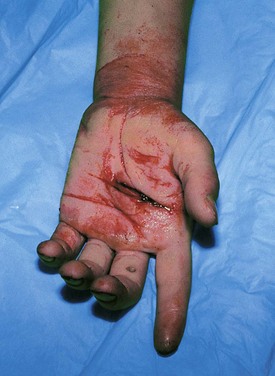
Because the bones of the hand are subcutaneous, displaced fractures and dislocations are readily evident on inspection. Laceration or rupture of the tendons is common because of their superficial location. Those involving flexor tendons result in extensor tendon overpull (Fig. 21-7), with the affected digit lying in greater extension than its neighbors at rest. Conversely, extensor tendon lacerations result in flexor muscle overpull, with the opposite result.
Muscle strength in the upper extremity is largely tested during assessment of range of motion of the joints, with and without resistance. Signs of neural dysfunction with injury of the upper extremity are listed in Table 21-2.
Table 21-2 Signs of Neural Dysfunction with Injury of the Upper Extremity
| Nerve | Sign |
|---|---|
| Radial | ↓ Strength of wrist and finger extensors |
| ↓ Sensation in web space between thumb and index finger, dorsum of hand to proximal interphalangeal joints, and radial aspect of ring finger | |
| Ulnar | ↓ Strength of wrist flexion and adduction |
| ↓ Strength of finger spread | |
| ↓ Sensation over ulnar aspect of palm and dorsum of hand, little finger, and ulnar aspect of ring finger | |
| Median | ↓ Strength of wrist flexion and abduction |
| ↓ Strength of flexion of proximal interphalangeal joints | |
| ↓ Strength of opposition of thumb to base of little finger | |
| ↓ Sensation over radial aspect of palm, thumb, index, and long fingers | |
| Anterior interosseous | ↓ Strength of flexion of the distal interphalangeal joints of the index finger and thumb |
Lower Extremity Examination
Hip
Because the hip lies deep and is surrounded by muscles, direct inspection is impossible and palpation is of limited value (although the femoral triangle, greater trochanter, and posterior aspect should be palpated to check for tenderness). As a result, assessment of the position of comfort (abduction and external rotation are seen with effusion, hemarthrosis, and fracture; see Figs. 21-15, C and 21-91, B), weight bearing, range of motion, and pain on motion are particularly important (for hip examination in the neonate, see Developmental Dislocation of the Hip, later).
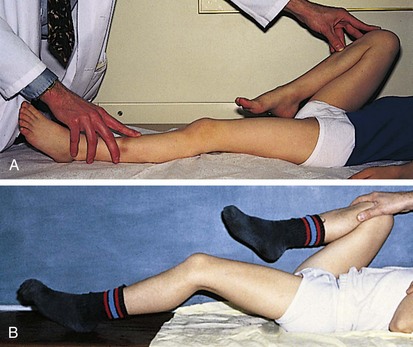
In evaluating range of motion of the hip, care must be taken to distinguish true hip motion from that occurring in combination with pelvic rotation or trunk flexion. The range of hip flexion is normally about 120 degrees. It is tested with the child lying supine. The hip to be tested is passively flexed while the contralateral hip and pelvis are observed or stabilized by one hand. The limit of flexion is reached when movement of the contralateral pelvis is noted. Alternatively, both hips can be flexed simultaneously to stabilize the pelvis and eliminate truncal flexion. The Thomas test is performed by flexing both hips so that the thighs touch the abdomen. Then one is held in place, thereby eliminating lumbar lordosis and movement of the lumbosacral joint, and the patient is asked to extend the hip to be tested. Normally he or she should be able to extend the hip to 0 degrees of flexion (Fig. 21-8, A). Failure to do this indicates the presence of a hip flexion contracture, which is a positive result on the Thomas test (Fig. 21-8, B). Next, the knee and thigh are held with the hip and knee flexed to 90 degrees and internal and external rotation are tested and recorded in degrees. Abduction and adduction are also checked with the hip flexed to 90 degrees. While the examiner places the thumb and index finger of one hand over the patient’s pelvis, attempting to span the distance between the anterior superior iliac spines, the hip to be tested is abducted and then adducted. The limit is determined by the point at which the pelvis begins to move (normally 45 degrees of abduction and 30 degrees of adduction). Extension is tested with the patient prone by having him or her lift the leg up from the table (normal, 20 to 30 degrees). Internal and external rotation are also tested with the patient prone and the hip and leg in extension.
When hip abductor weakness is suspected on the basis of the finding of a gait abnormality, the Trendelenburg test (Fig. 21-9) is performed. This involves having the child stand and asking him or her to lift one leg up. Normally the pelvis should rise slightly on the side of the leg that is lifted. If instead it drops, abductor weakness is present on the opposite side, and the Trendelenburg test is positive.
Knee
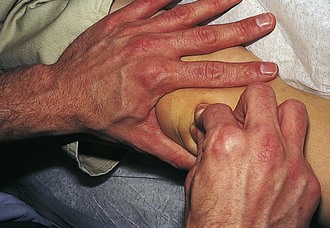
When there is evidence of a marked effusion, landmarks are obscured and the patella is readily ballotable. This is seen with intraarticular hemorrhage, arthritis, and synovitis, and range of motion is usually significantly limited. If landmarks are only mildly obscured (suggestive of a mild joint effusion or fluid collection in the bursae), pressure should be applied over the suprapatellar pouch with the thumb and index finger of one hand, milking down any fluid present while simultaneously pushing the patella up toward the femoral condyles with the other hand (Fig. 21-10). If fluid is present, the patella is ballotable and a palpable click is noted as the patella strikes the front of the femur.
With the knees flexed to 80 to 90 degrees, the patellas should face forward when viewed from the front and be located squarely at the ends of the femurs when seen from the side. The apprehension test (Fig. 21-11) is performed to check for a subluxating or dislocating patella. With the patient sitting, the examiner supports the lower leg and holds the knee flexed to 30 degrees. The patella is then gently pushed laterally. Any abnormal amount of lateral displacement, pain, or apprehension in response to this maneuver indicates a positive test.
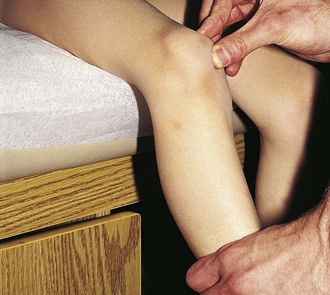
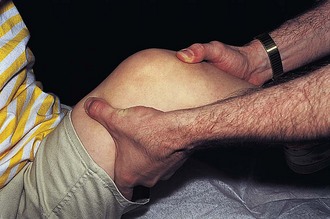
Anteroposterior ligamentous stability is provided by the anterior and posterior cruciate ligaments of the knee. They are tested by the anterior and posterior drawer and Lachman tests. The former are performed with the patient supine; the hip and knee flexed to 45 and 90 degrees, respectively; and the foot planted on the examining table, stabilized by the examiner’s thigh or buttock. The examiner then grasps the proximal tibia with his or her fingers behind the knee and the thumbs over the anterior joint line and gently pulls and pushes (Fig. 21-12). In a positive anterior drawer test, the tibia moves forward more than 0.5 to 1 cm, indicating instability of the anterior cruciate ligament. Movement backward more than 0.5 to 1 cm indicates instability of the posterior cruciate ligament. In the Lachman test (Fig. 21-13) for anterior cruciate tears, the knee is flexed to 15 degrees. The examiner grasps the distal femur with one hand and the proximal tibia with the other. The thumb of the lower hand is placed on the joint line, and the femur is pushed backward as the tibia is pulled forward. Abnormal anterior displacement of the tibia on the femur can be seen and felt if instability is present. The amount of excursion is estimated in millimeters, and the end point is recorded as soft or firm.

Gait and Gait Disturbances
Gait Disturbances Resulting from Weakness or Spasticity
Patients with weakness of the hip abductors (gluteus medius muscle) have a Trendelenburg gait. Because they are unable to maintain a level pelvis and linear progression of their center of gravity, their pelvis tilts toward the unsupported side and their shoulder lurches toward the weak side during stance phase to maintain their center of gravity over the foot. Patients with weakness of the gluteus maximus (seen most commonly in children with Duchenne muscular dystrophy) have to hyperextend their trunk and pelvis to maintain their center of gravity posterior to the hip joint (see Chapter 15). Proximal muscle weakness may also be demonstrated by observing a child getting up from the floor unassisted. A Gower sign indicates weak hip extensors and abductors, necessitating that the patient use his arms to assist in standing by placing his hands on his anterior thighs and pushing up, progressively moving his hands upward along the thighs until erect posture is achieved (see Chapter 15). Children with weakness of the quadriceps femoris muscle may have a relatively normal gait on level ground but difficulty climbing stairs. Weakness of the dorsiflexors of the foot results in foot drop and a steppage gait. Because the foot hangs down during the swing phase, the patient must lift the knee higher than usual to help the foot clear the floor and the forefoot tends to slap the floor on impact because smooth deceleration of the foot cannot be controlled. When the plantar flexors are weak, the patient is unable to push off at the end of the stance phase and so the heel and forefoot come off the floor at the same time.
Intoeing and Out-toeing
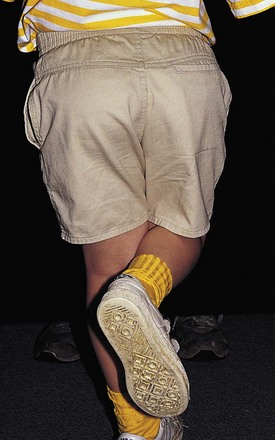
The angular difference between the long axis of the foot and the forward line of progression during walking is called the foot progression angle. A minus value is assigned to intoeing, a plus value to out-toeing. The normal range varies from 5 to 10 degrees to 10 to 20 degrees, respectively. The remaining rotational profile of the lower extremities can be examined with the patient in the prone position (Fig. 21-14). The foot axis can be determined by a line marked from the middle of the heel on the plantar surface to the lateral side of the second toe (Fig. 21-14, A). The hip excursion is the difference between the angular measure of the maximal prone internal rotation (Fig. 21-14, B) and that for external rotation (Fig. 21-14, C), and in the young child is usually negative, representing more internal rotation than external rotation. In the adolescent and adult, usually there is more external rotation, or a positive hip excursion angle. Finally, the axis of the tibia and fibula can be determined by looking down the lower extremity in the prone knee-flexed position and comparing the axis of the plane of motion of the knee (Fig. 21-14, D) with the transmalleolar axis (Fig. 21-14, E) estimated by palpating the malleoli. The normal axis is 15 to 25 degrees externally rotated.
Femoral anteversion, internal tibial torsion, and metatarsus adductus are common causes of excessive intoeing, or pigeon toe, and femoral eversion and external tibial torsion are common causes of out-toeing, or slew foot (see Disorders of the Lower Extremity, later).
Musculoskeletal Trauma
The normal impulsiveness and inquisitiveness of children combined with their lack of caution and love of energetic activities place them at a relatively high risk for accidental injury. The incidence of trauma is further increased by the prevalence of child abuse (see Chapter 6). In fact, beyond infancy, trauma is the leading cause of death in children and adolescents and is a source of significant morbidity. Musculoskeletal injuries are common, whether seen in isolation or as part of multisystem trauma. Although the management of life-threatening injuries to the airway, circulation, and central nervous system (CNS) must take precedence over treatment of accompanying musculoskeletal injuries in cases of multiple trauma, it must be kept in mind that fractures can result in significant blood loss. This is particularly true of pelvic and femoral fractures. Furthermore, prompt attention must be given to assessment of the status of neurovascular structures distal to obvious fractures because failure to recognize compromise may result in permanent loss of function. Finally, traumatic hip dislocations must be reduced within 6 to 12 hours if the risk of aseptic necrosis and long-term morbidity is to be minimized.
Fractures
Diagnosis
The first step in the physical examination is visual inspection of the injured area. The gross position of the extremity should be noted, and attention given to the presence or absence of deformity, distortion or abnormal angulation, and longitudinal shortening (Fig. 21-15). The overlying skin and soft tissues are examined for evidence of swelling, ecchymoses, abrasions, punctures, and lacerations. Comparison with the opposite extremity and measurement of circumference can be helpful when findings are subtle.
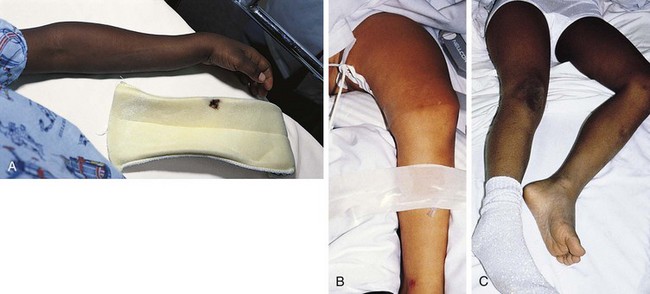
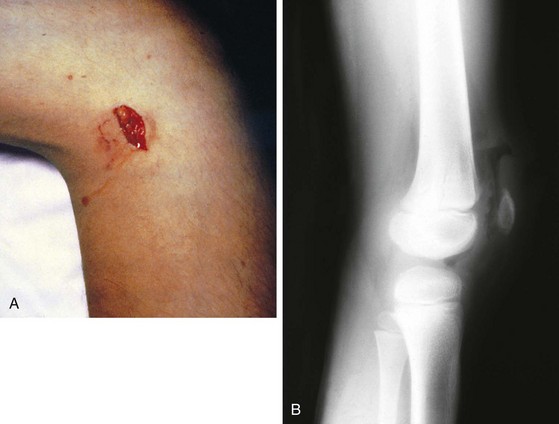
The location of open wounds is important in ascertaining whether an underlying fracture is open or closed and in assessing the risk of joint penetration. Small puncture wounds or lacerations overlying bony structures from which a bloody, fatty exudate is oozing usually reflect communication with the medullary cavity of a fractured bone. Similarly, punctures or tears over joints that weep serous or serosanguineous fluid, especially when drainage is increased on moving the joint, must be assumed to communicate with the joint capsule (Fig. 21-16, A). In patients with penetrating joint injuries, radiographs may demonstrate air in the joint, but absence of this does not rule out capsular penetration (Fig. 21-16, B). Probing of open wounds that are highly likely to communicate with a fracture or joint is contraindicated. The wound should be cleaned and covered with a sterile dressing until its extent can be determined under sterile conditions in the operating room.
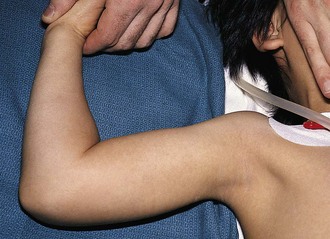
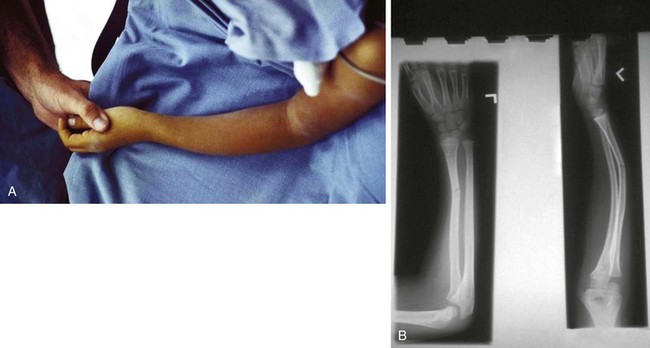
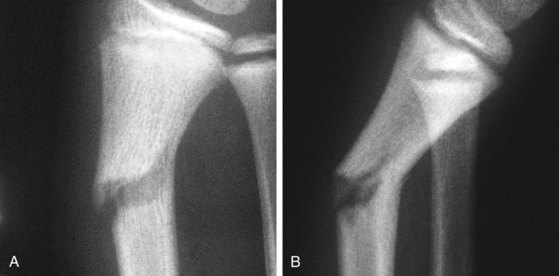
Clinical findings vary depending on the nature of the fracture. Undisplaced growth plate fractures typically present with mild, localized swelling and point tenderness at the level of the epiphysis (Fig. 21-17). Because ligamentous injury is relatively uncommon in a child, the finding of point tenderness should suffice to prompt treating the injury as a fracture until proven otherwise. Often initial radiographs appear normal and the fracture is confirmed only on follow-up when repeat radiographs disclose evidence of healing. Swelling is typically mild and occasionally imperceptible in cases of torus or buckle fractures and of undisplaced transverse and spiral fractures. Careful palpation should disclose focal tenderness, however. Usually, the patient also experiences some degree of discomfort on motion in some planes or on weight bearing, but it must be remembered that limitation of movement or function can be minimal in patients with such incomplete fractures. In contrast, fractures that completely disrupt the bone and displaced fractures are accompanied by more prominent swelling; more diffuse tenderness; and severe pain, which is markedly increased on motion (Fig. 21-18; see also Fig. 21-15, A and B). Crepitus may also be evident on gentle palpation. In examining children with these findings, manipulation must be kept to a minimum to prevent further injury.
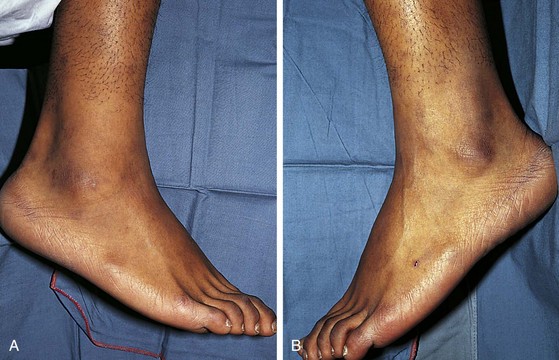
Figure 21-17 Salter-Harris type I fracture of the distal fibula. A, Slight swelling is present over the lateral malleolus. The degree of swelling can be truly appreciated only by comparing the injured ankle with its normal counterpart, shown in (B). The patient had point tenderness over the affected malleolus. The findings differ from those seen in an ankle sprain, in which tenderness and swelling are greatest over the ligaments inferior to the malleolus (see Fig. 21-65).
Even relatively minor fractures of the tibia, forearm bones, metatarsals, and femur can result in compartment syndrome, in which bleeding and edema collection within a closed fascial compartment produce increased pressure that causes neurovascular compromise and muscle ischemia. This should be strongly suspected in patients who complain of intense pain that is aggravated by passive stretching of the muscles. On palpation the area is noted to be swollen and tense, at times even hard. The patient may complain of paresthesias and show pallor and decreased pulses. However, it is important also to be aware of the fact that vascular compromise can be present in a patient who has normal distal pulses and good peripheral perfusion (see Compartment Syndromes, later).
Fracture Patterns
A common example of a nondisplaced spiral fracture is the toddler’s fracture (see Fig. 21-43), which results from a fall with a twist. Typically, the child was either running, turned, and then fell; jumped and fell with a twist; or got his or her foot caught and fell while twisting to extricate himself or herself. If a child’s arm or leg is forcibly pulled and twisted, a similar fracture pattern may be seen. Greenstick and torus fractures of the radius or ulna are incurred usually when the child falls on an outstretched arm with the wrist dorsiflexed. Vigorous repetitive shaking while holding a child by the hands, feet, or chest results in small metaphyseal chip or bucket-handle fractures, a major feature of the shaken-baby syndrome (see Chapter 6). Table 21-3 summarizes the major features of these various fracture patterns, which are illustrated in Figures 21-19 through 21-27.
Table 21-3 Patterns of Fractures
| Fracture Pattern | Major Feature | Radiographic Appearance |
|---|---|---|
| Longitudinal | Fracture line is parallel to the axis of a long bone | Fig. 21-19 |
| Transverse | Fracture line is perpendicular to the axis of a long bone | Fig. 21-20; and see Fig. 21-28 |
| Oblique | Fracture line is at an angle relative to the axis of a bone | Fig. 21-21 |
| Spiral | Fracture line takes a curvilinear course around the axis of a bone | Fig. 21-22; and see Fig. 21-43 |
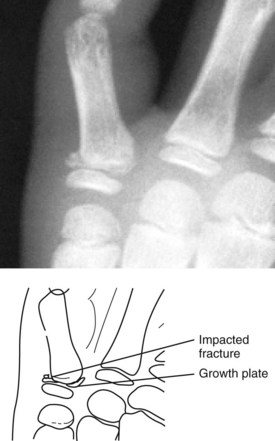
| Impacted | Bone ends are crushed together, producing an indistinct fracture line | Fig. 21-23 |
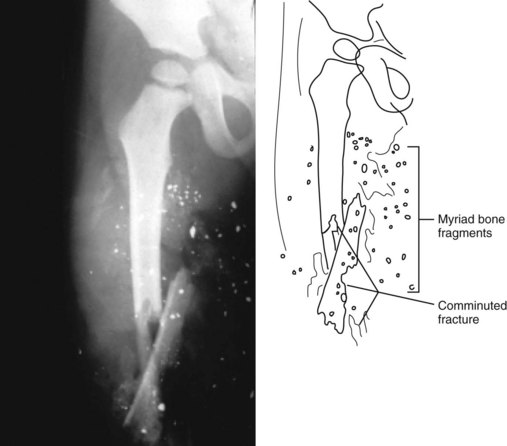
| Comminuted | Fracturing forces produce more than two separate fragments | Fig. 21-24 |
| Bowing | Bone bends to the point of plastic deformation without fracturing | Fig. 21-25 |
| Greenstick | Fracture is complete except for a portion of the cortex on the compression side of the fracture, which is only plastically deformed | Fig. 21-26; and see Fig. 21-25, B |
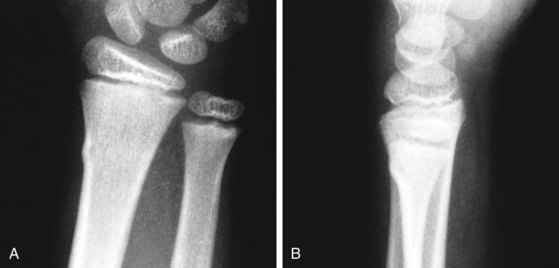
| Torus | Bone buckles and bends rather than breaks | Fig. 21-27; and see Fig. 21-29 |
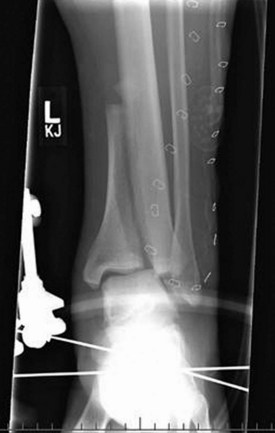
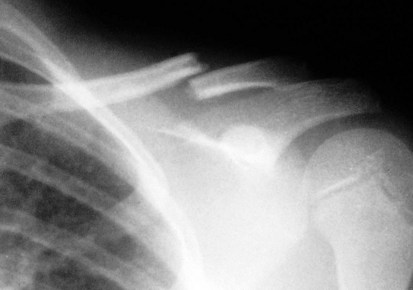

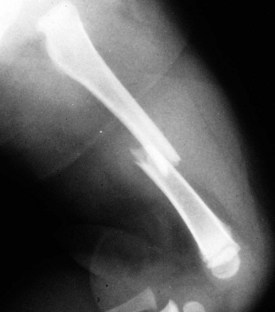
Figure 21-21 Oblique fracture of the midportion of the femur. The fracture line is angled relative to the axis of the bone.

Figure 21-22 Spiral fracture of the humerus. The fracture line takes a curvilinear course around the axis of the bone.
The anatomic location of the fracture line simply refers to that portion of the bone to which the injury force was applied. Table 21-4 presents types of fractures classified by anatomic location. These fractures are illustrated in Figures 21-28 through 21-36. There is some degree of overlap in this method of categorization, however.
Table 21-4 Classification of Fractures by Anatomic Location
| Type | Site | Radiographic Appearance |
|---|---|---|
| Diaphyseal | Fracture involves the central shaft of a long bone | Fig. 21-28; and see Figs. 21-21, 21-22, and 21-25 |
| Metaphyseal | Fracture involves the widened end of a long bone | Fig. 21-29; and see Fig. 21-26 and Chapter 6 |
| Epiphyseal | Fracture involves the chondro-osseous end of a long bone. Such fractures can also be classified as Salter-Harris fractures | Fig. 21-30 |
| Articular | Fracture involves the cartilaginous joint surface | Fig. 21-31; see also Figs. 21-40 and 21-41 |
| Intercondylar | Fracture is located between the condyles of a joint. This is one variant of articular fracture and could also be subclassified as a Salter-Harris fracture | Fig. 21-31, A |
| Physeal | Fracture involves the growth center of long bone. These are subclassified according to the Salter-Harris system | Fig. 21-32 |
| Condylar | Fracture traverses the condyle of a joint | Fig. 21-33 |
| Supracondylar | Fracture line is located just proximal to the condyles of a joint | Fig. 21-34 |
| Epicondylar | Fracture involves an area juxtaposed to the condylar surface of a joint | Fig. 21-35 |
| Subcapital | Fracture is located just below the epiphyseal head of certain bones | Fig. 21-36 |
< div class='tao-gold-member'>
Stay updated, free articles. Join our Telegram channel

Full access? Get Clinical Tree


