Department of Gynecology and Obstetrics, Kyoto University, Kyoto, Japan
(2)
Department of Obstetrics and Gynecology, Kitano Hospital, Kita-ku, Osaka, Japan
Keywords
Paravesical spacePararectal spaceCardinal ligamentDeep uterine veinPelvic splanchnic nerveHypogastric nerveAnterior (ventral) leaf of the vesicouterine ligamentPosterior (dorsal) leaf of the vesicouterine ligamentInferior hypogastric plexus (cross shaped)Bladder branch from the inferior hypogastric plexusUterine branch from the inferior hypogastric plexusParacolpiumDivision of the uterine branch onlyDivision of the rectovaginal ligamentT-shaped nerve planeDivision of the paracolpiumNerve-sparing radical hysterectomyGood quality of life after radical hysterectomy
8.1 The Surgical Process of the Step-by-Step Nerve-Sparing Radical Hysterectomy Is Listed in the Following Pages
However, each surgical procedure until the division of the deep uterine vein in the cardinal ligament is the same as that of the step-by-step radical hysterectomy without nerve-sparing radical hysterectomy as described in Chap. 5. Therefore, the detailed surgical procedure necessary for nerve-sparing radical hysterectomy shall start from the division of the cardinal ligament.
Development of the rectovaginal space and division of the uterosacral ligament
4.
Separation of the urinary bladder and anatomy of the vesicouterine ligament
5.
Treatment of the anterior(ventral) leaf of the vesicouterine ligament
6.
Treatment of the posterior (dorsal) leaf of the vesicouterine ligament
7.
Confirmation of the inferior hypogastric plexus
8.
The concept of the pelvic nerve plane
9.
Separation of the rectovaginal ligament
10.
Separation of the bladder branch from the paracolpium
11.
Separation of the uterine branch from the inferior hypogastric plexus
12.
Division of the uterine branch
13.
Separation of the rectovaginal ligament preserving T-shaped nerve plane
14.
Clamp of the paracolpium
15.
Ligation and division of the paracolpium
16.
Incise the vaginal wall for amputation of the vagina
17.
Removal of the uterus preserving T-shaped nerve plan
18.
Closure of the vaginal cuff
19.
Partial suture to the pelvic peritoneum and insertion of drains into the retroperitoneal space
20.
Closure of the abdominal wall
21.
Treatment after the operation
8.4 Treatment of the Cardinal Ligament
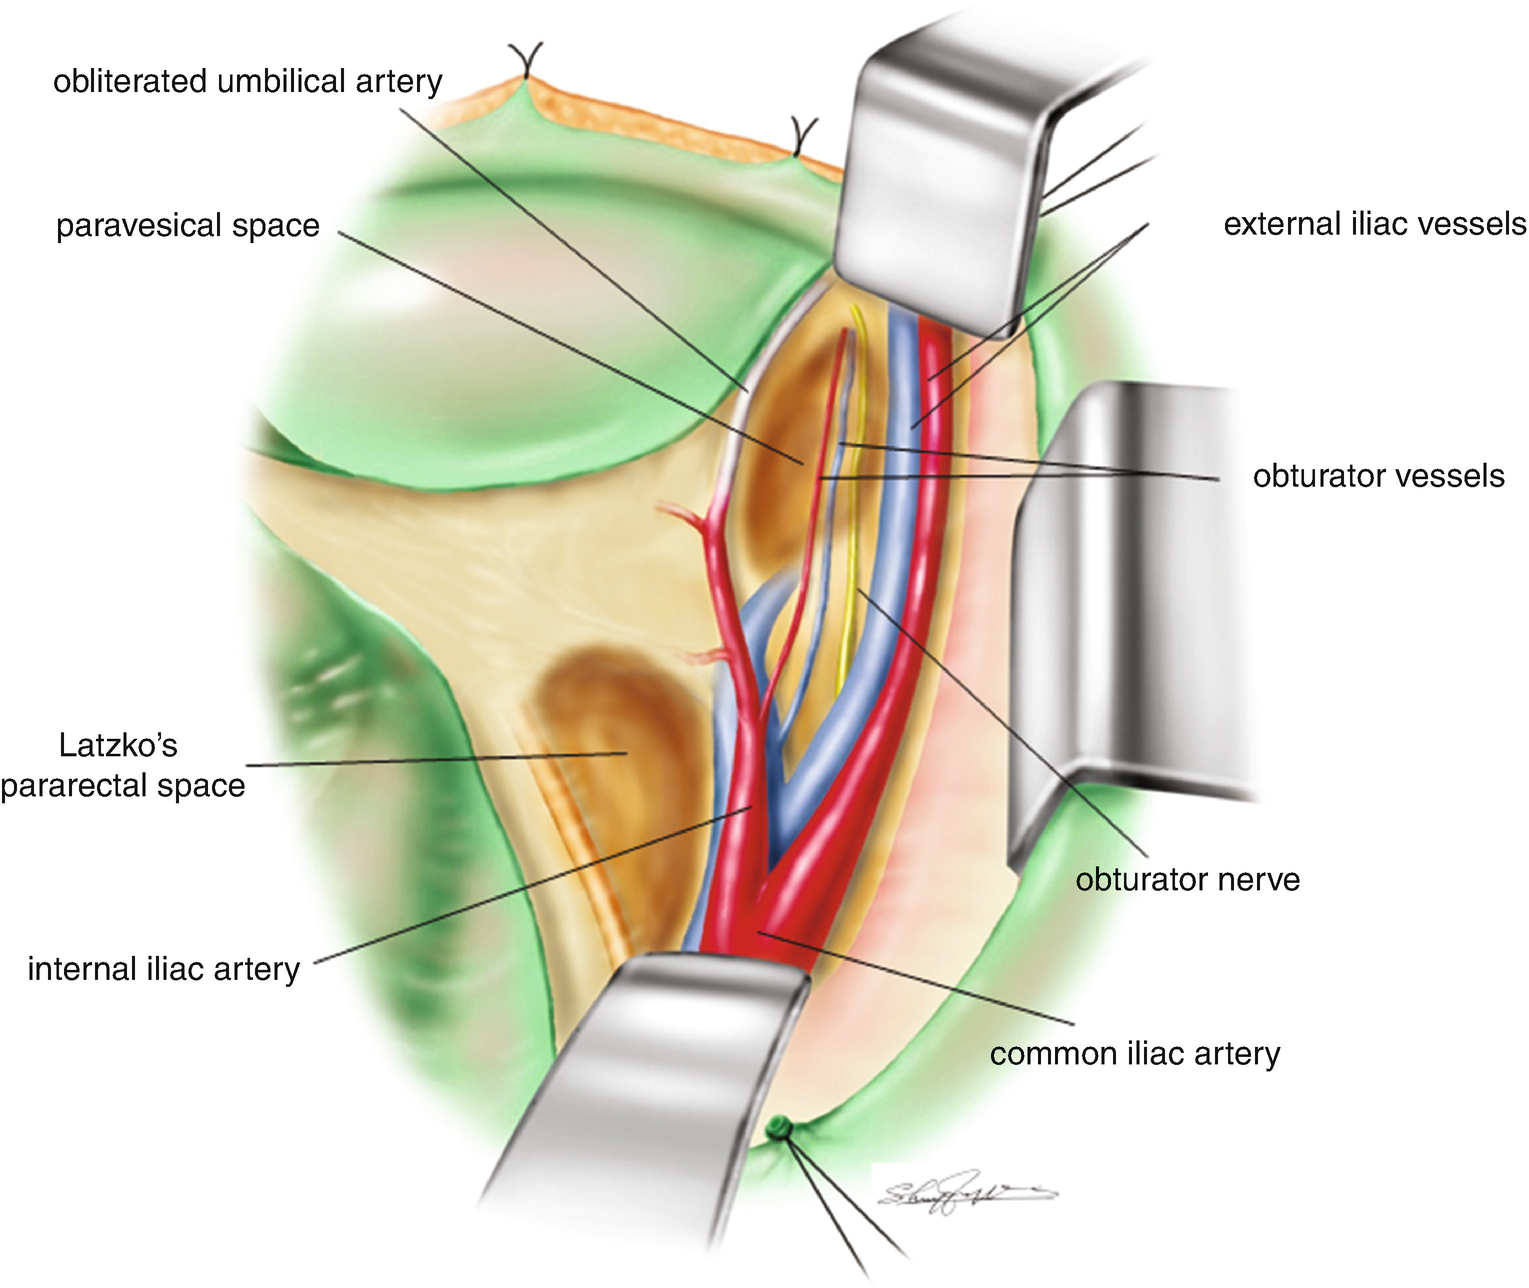
8.4.1 A View of Pelvis After the Lymphadenectomy (Figure 8.1)
After pelvic lymphadenectomy, both the external and internal iliac blood vessels are almost skeletonized with a view of the obturator nerve and artery/vein in the obturator fossa. The paravesical space and Latzko’s pararectal space are well recognized.
Figure 8.1
A view of pelvis after the lymphadenectomy
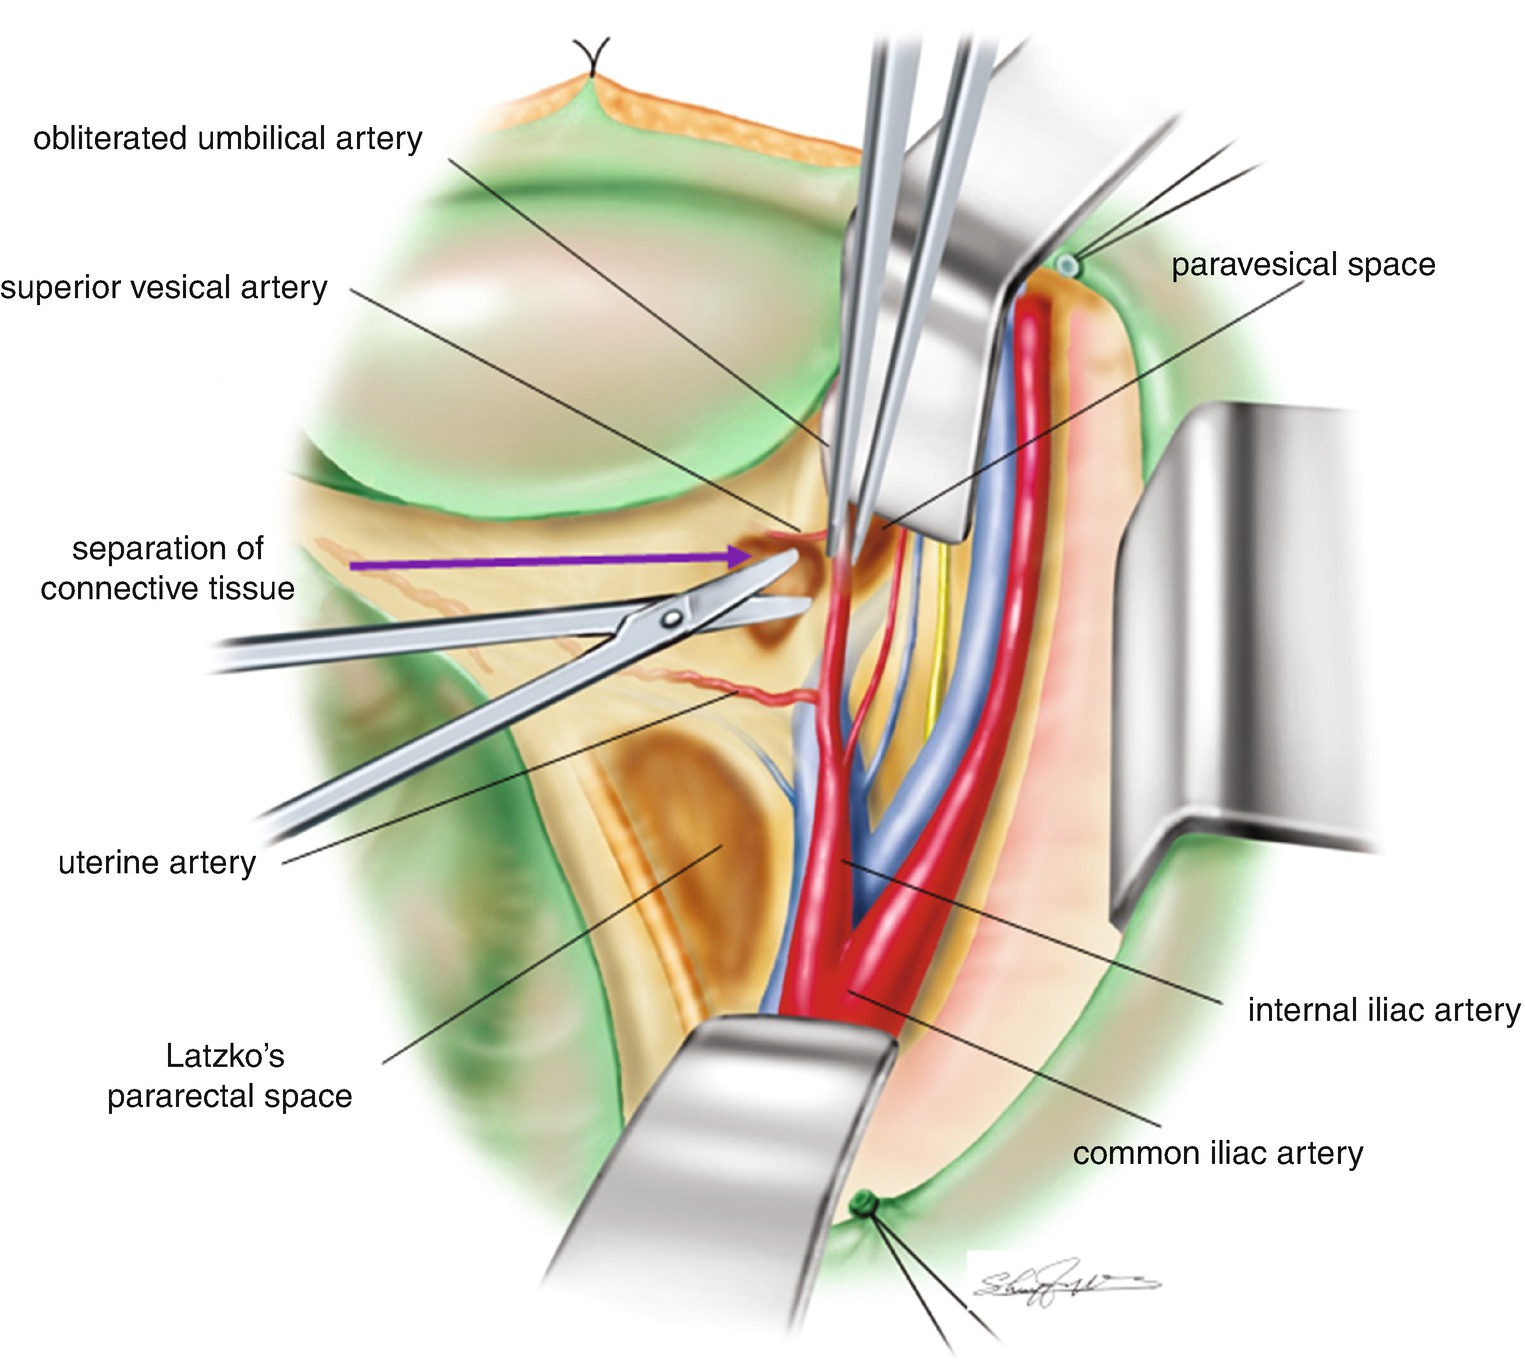
8.4.2 Separation of the Loose Connective Tissue Between the Uterine Artery and Superior Vesical Artery (Figure 8.2)
In order to give tension to the uterine artery, the obliterated umbilical artery (bladder side of the internal iliac artery) is picked up with the forceps, and the loose connective tissue between the urinary bladder and the obliterated umbilical artery is separated. The loose connective tissue layer between the uterine artery and the superior vesical artery is separated. The connective tissue layer is separated and penetrated, to enter the paravesical space.
Figure 8.2
Separation of the loose connective tissue between the uterine artery and superior vesical artery
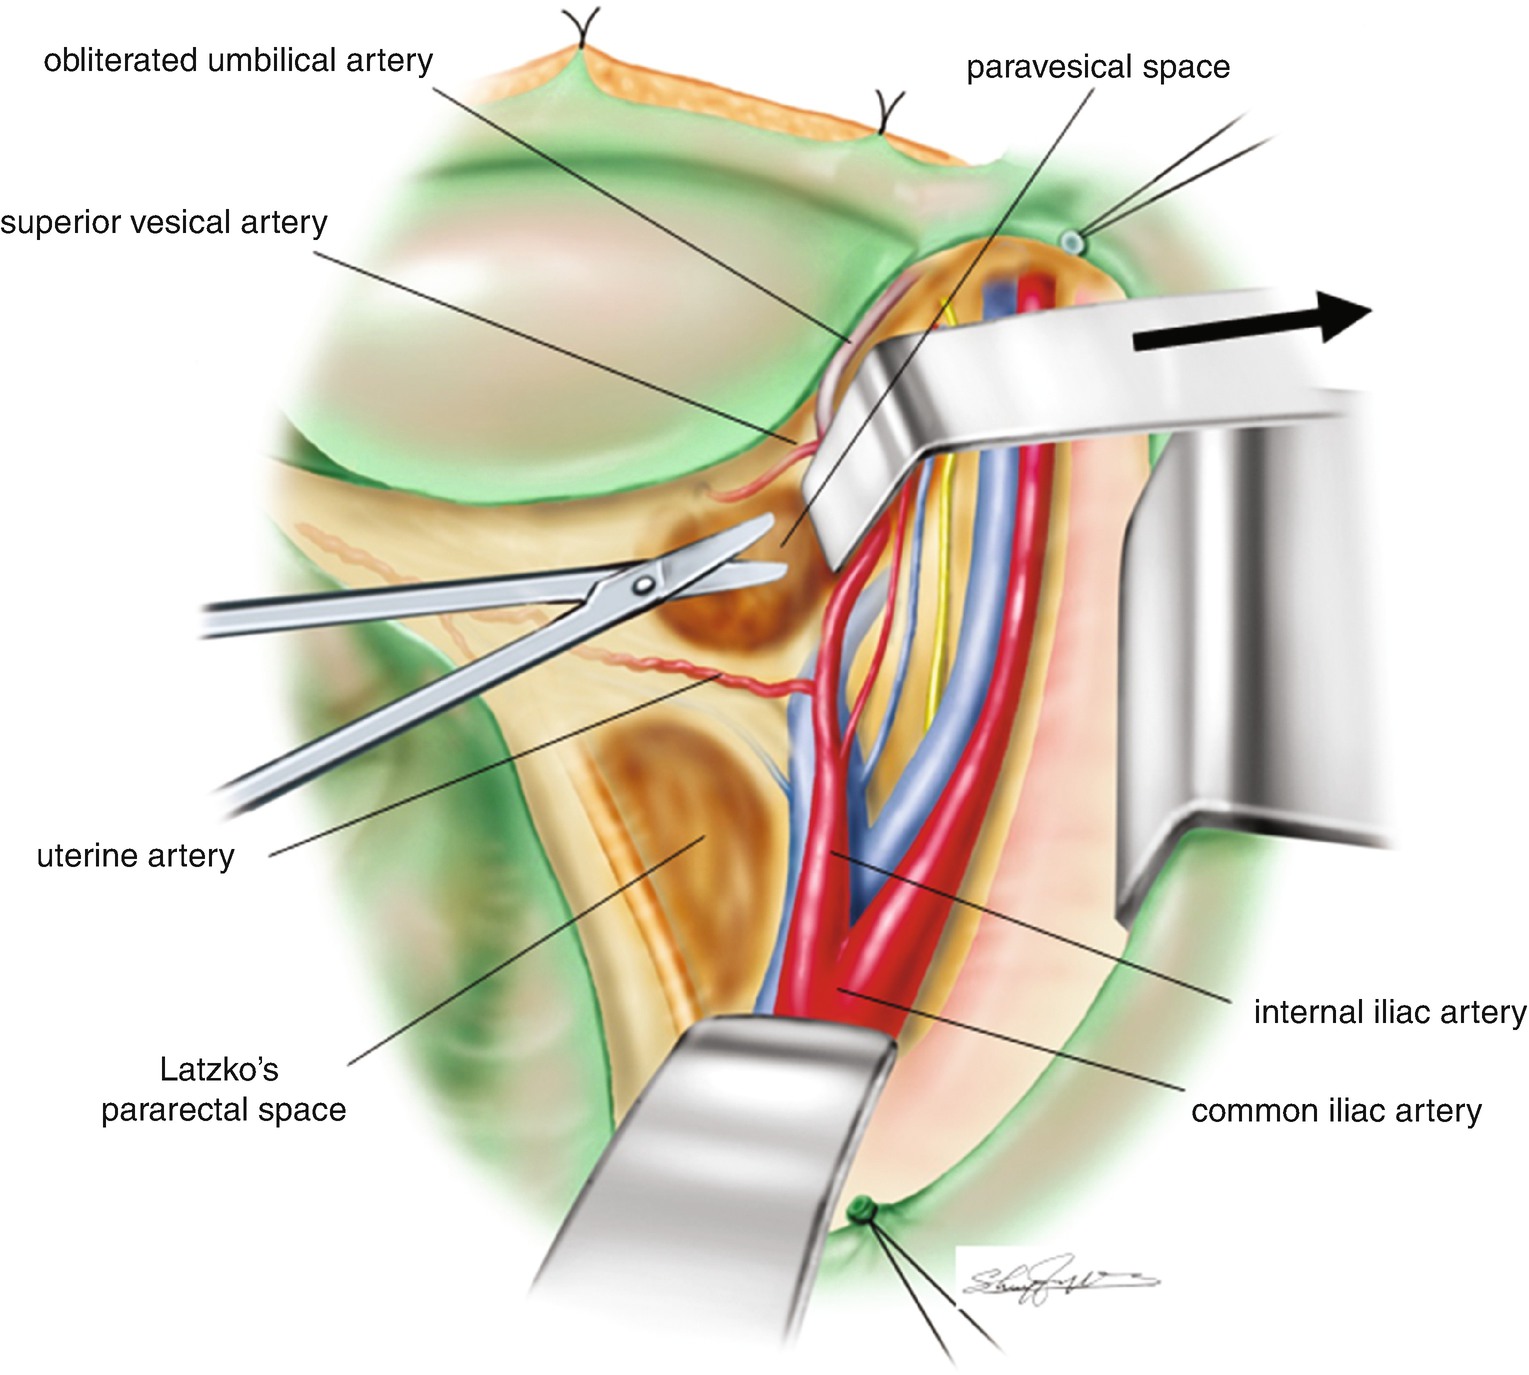
8.4.3 Development of the Paravesical Space and Confirmation of the Uterine Artery (Figure 8.3)
A long L-shaped retractor is inserted through the penetrated connective tissue and into the paravesical space to retract the tissue (including the isolated obliterated umbilical artery) toward the inguinal side. The uterine artery from the internal iliac artery is stretched between its origin of the internal iliac artery and the side wall of the uterus. This is a safer way to expose the uterine artery along its whole length.
Figure 8.3
Separation of the uterine artery
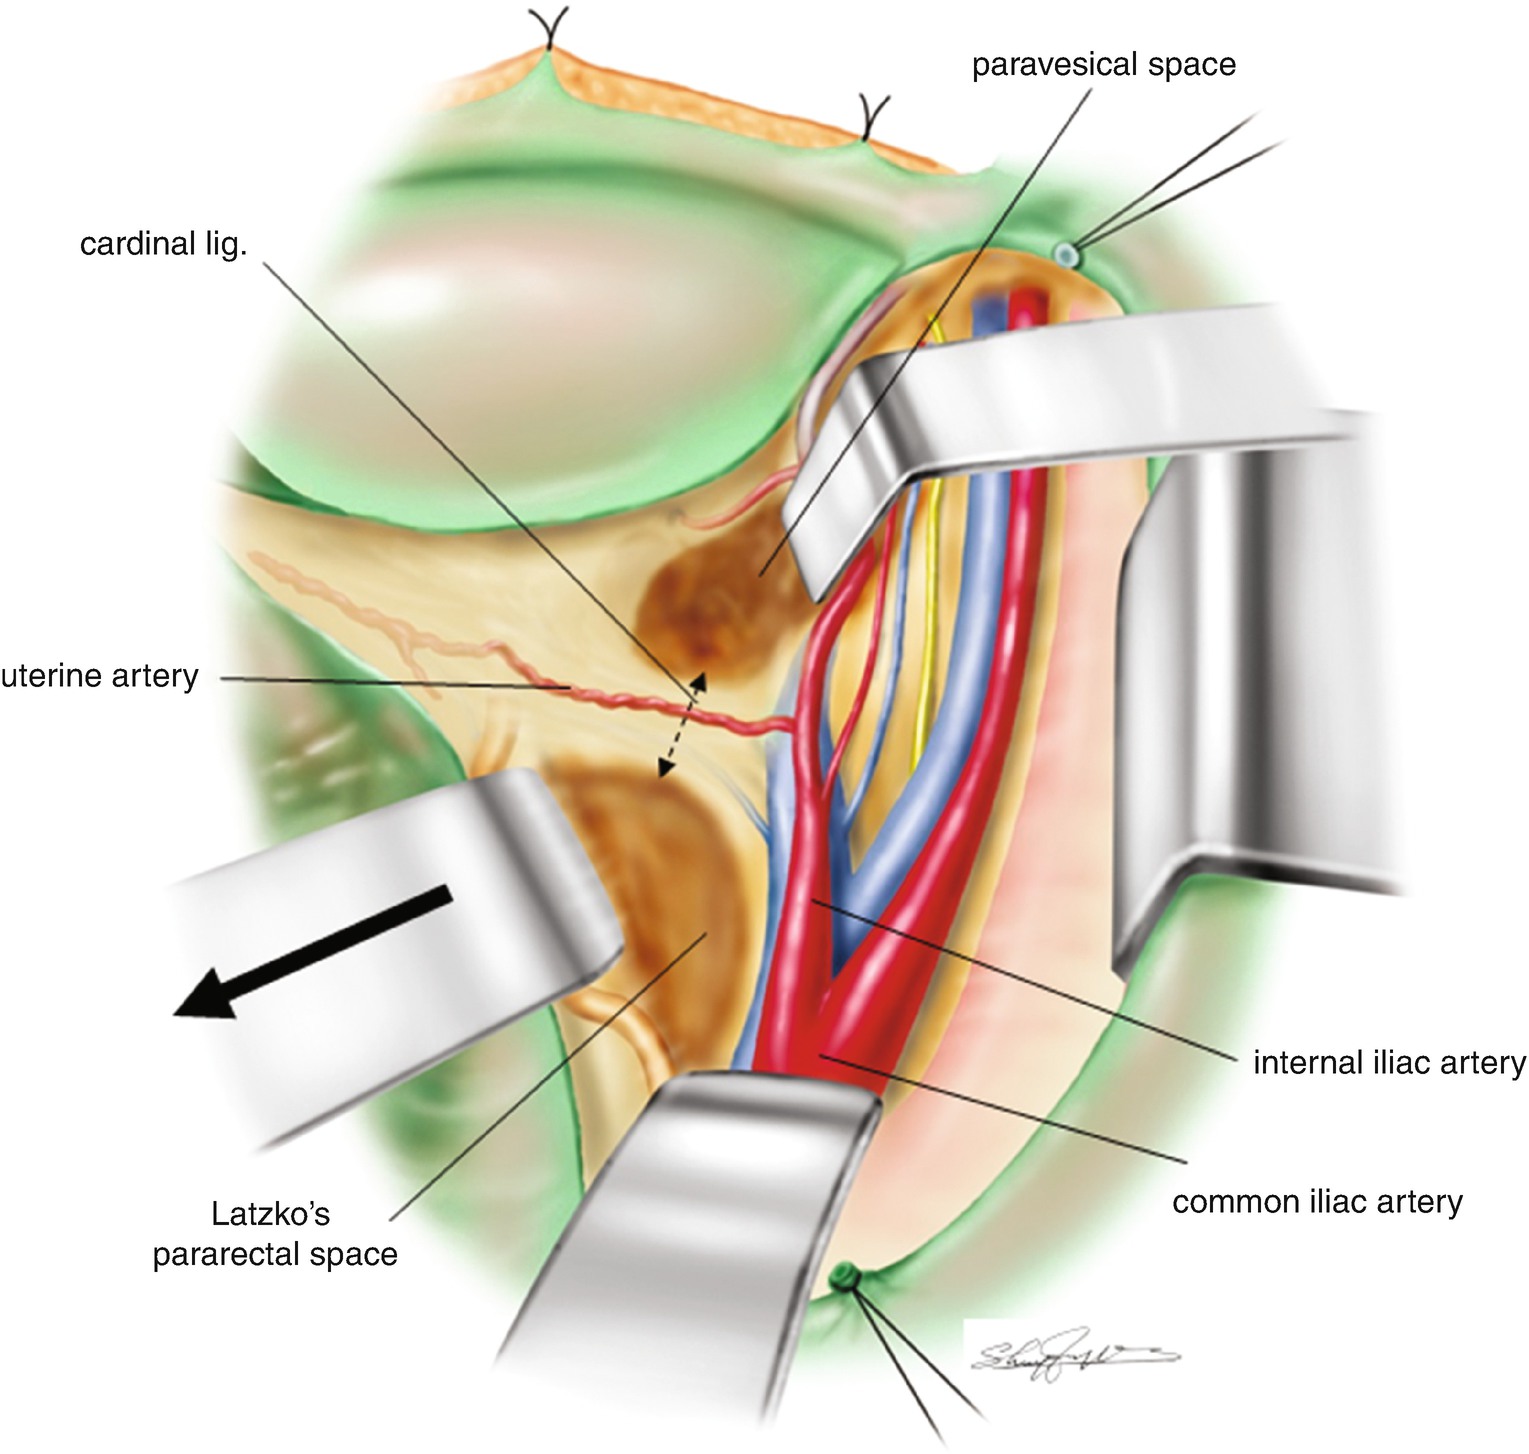
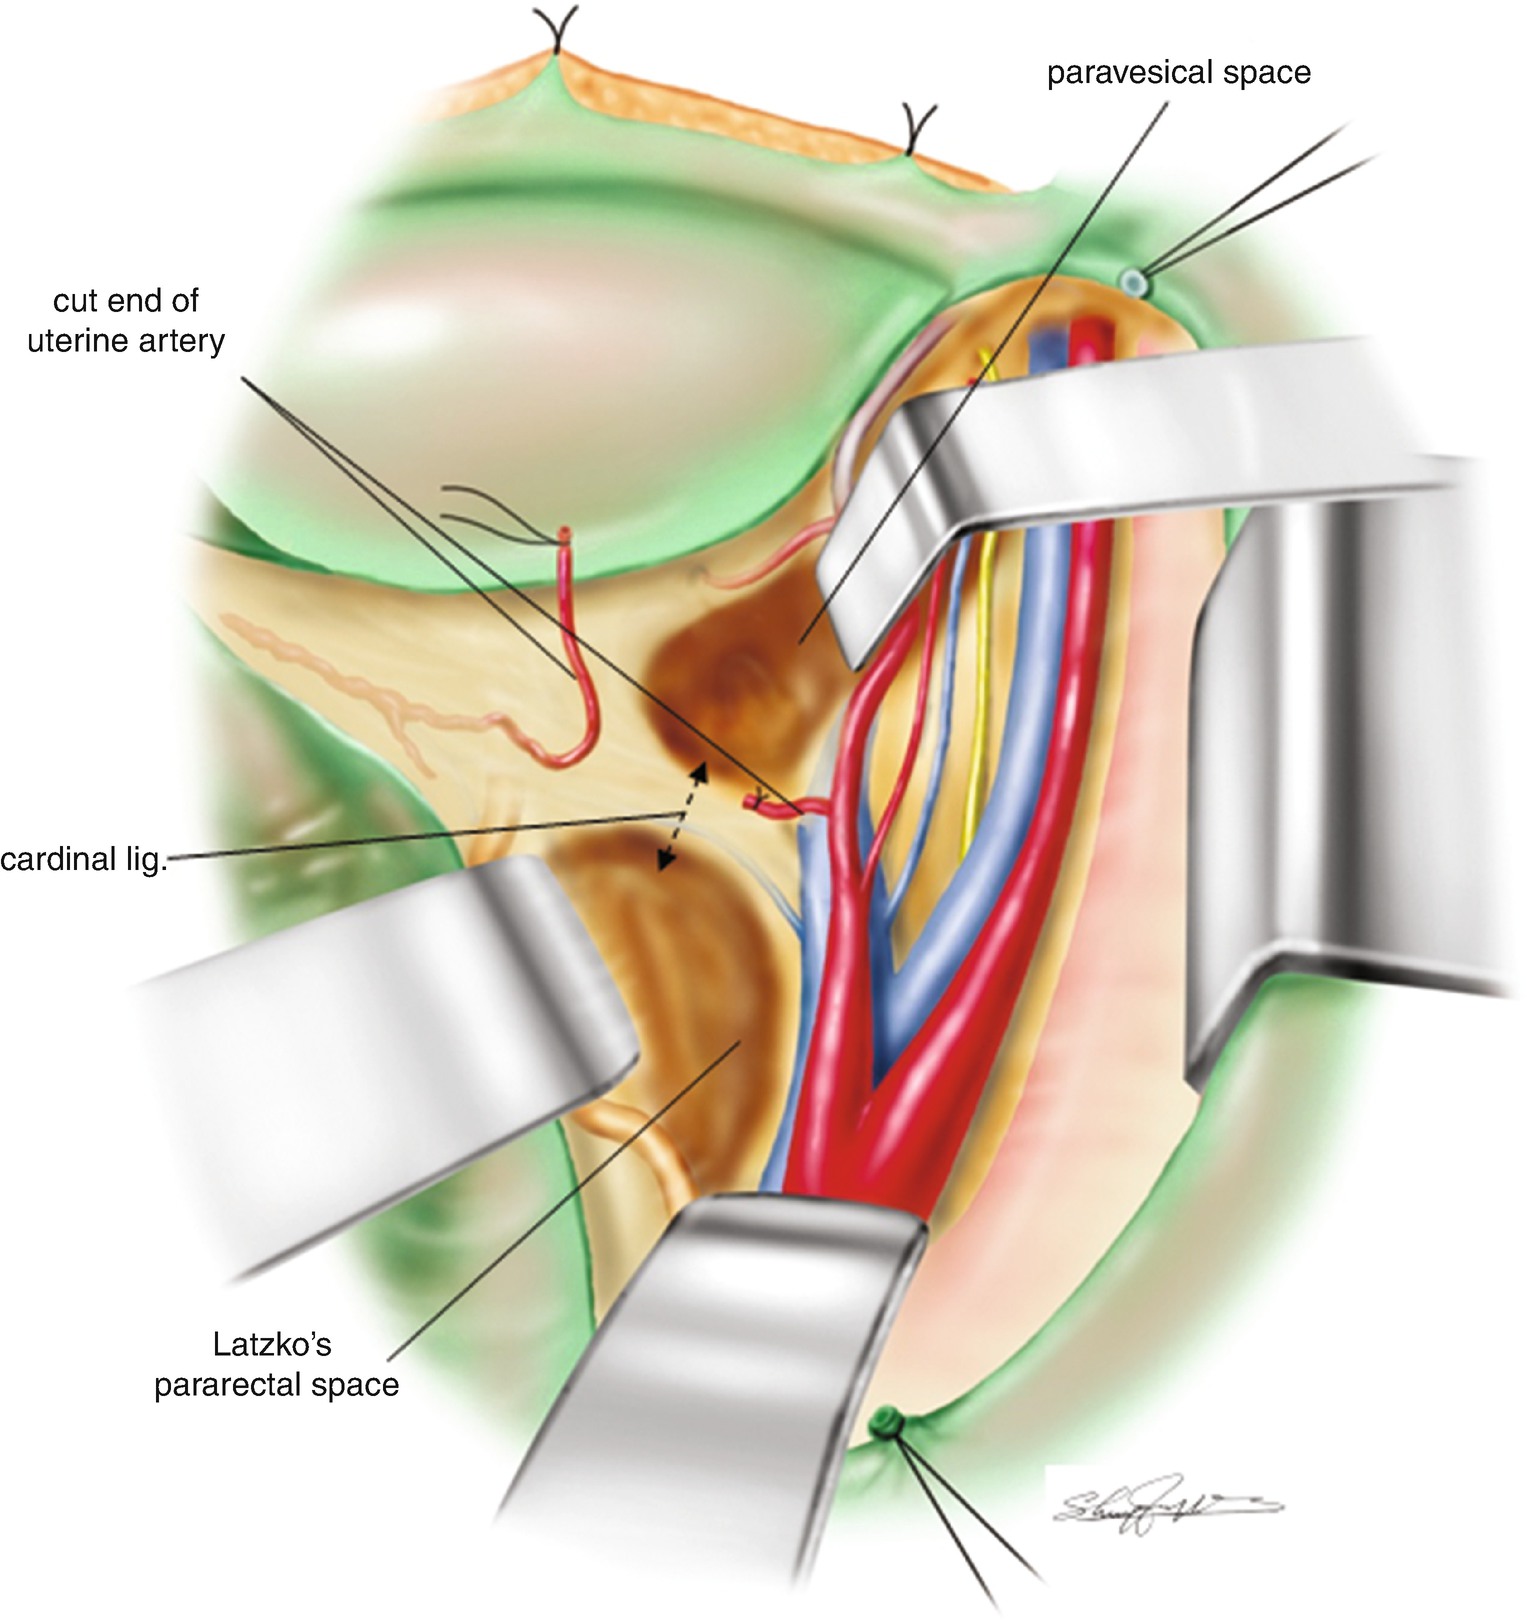
8.4.4 Confirmation of the Cardinal Ligament (Figure 8.4)
Another long L-shaped retractor is inserted into the pararectal space to push the rectum craniolateral side. The pararectal space is gradually expanded. Insertion of the L-retractor too deep into the pelvic floor risks the pelvic floor connective tissue being torn, resulting in bleeding which can be difficult to manage. Therefore, diligent placement of retractor tip in the pararectal space is important. The thick connective tissue bundle created between the paravesical space and pararectal space is a gross feature of the cardinal ligament (a two-directional arrow in Figure 8.4). The cardinal ligament is a thick connective tissue bundle formed between the internal iliac blood vessels and the sidewall of the uterus/upper vagina. The uterine artery and the superficial uterine vein run along the most ventral side of the cardinal ligament.
Figure 8.4
Confirmation of the cardinal ligament. A two directional arrow is indicating the connective tissue bundle of the cardinal ligament surgically created between the pararectal space and paravesical space
8.4.5 Isolation and Division of the Uterine Artery (Figure 8.5)
The uterine artery originates from the internal iliac artery and passes into the sidewall of the uterus. The uterine artery is appreciated on the most ventral side of the cardinal ligament. The uterine artery is easily isolated, doubly clamped, and ligated. The uterine artery between the two ligatures is divided. The suture of the uterine side of the uterine artery is usually left as a longer piece to act as an anatomical landmark.
Figure 8.5
Development of the paravesical space and confirmation of the uterine artery
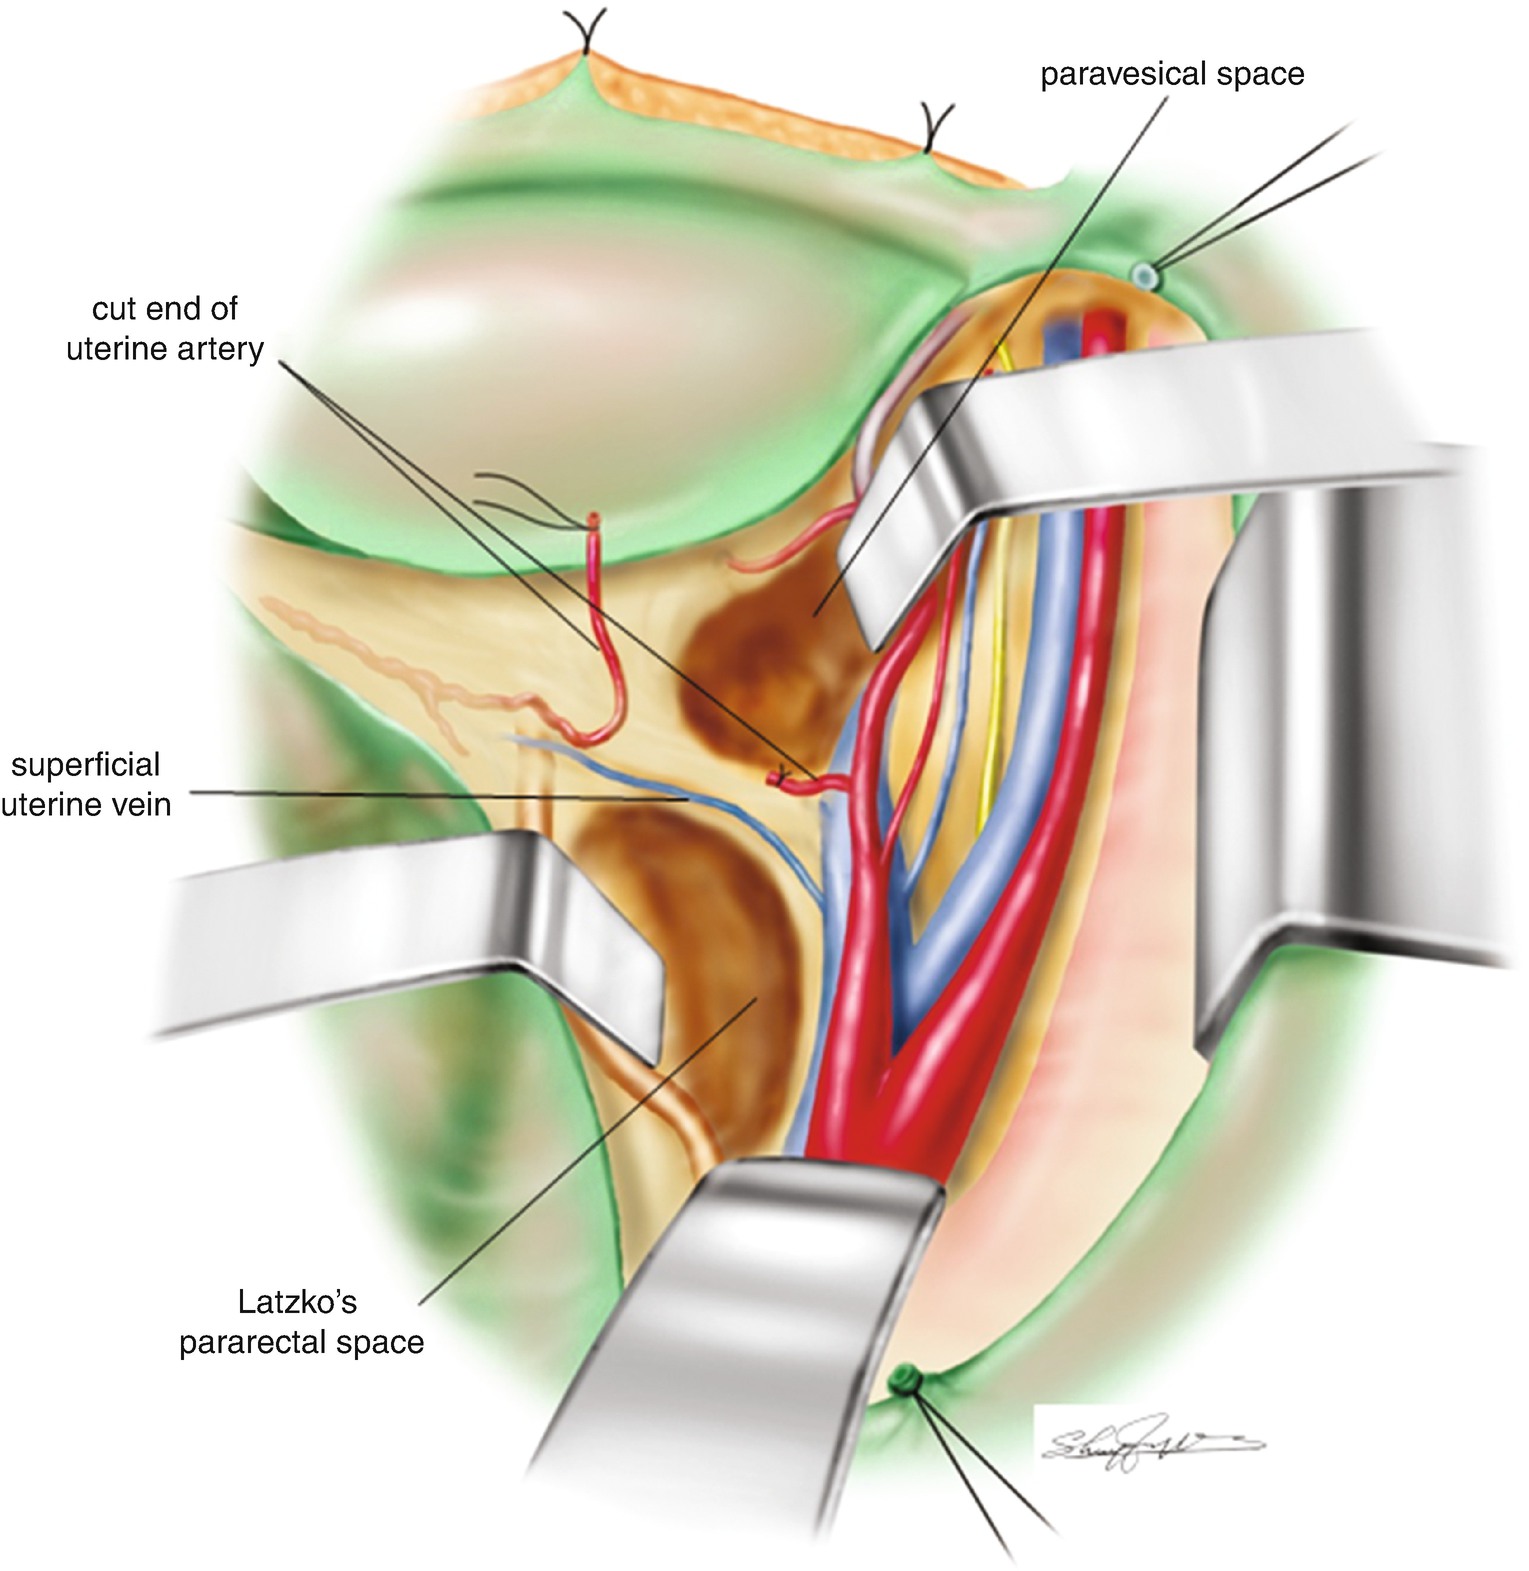
8.4.6 Separation of the Superficial Uterine Vein (Figure 8.6)
Careful separation of the cut-end of uterine side of the uterine artery from the connective tissue of the cardinal ligament usually reveals the superficial uterine vein running parallel to the uterine artery. The superficial uterine vein is often fragile. Therefore, in order to isolate the superficial uterine vein, a careful approach is required. If the vessel is inadvertently damaged, monopolar or bipolar coagulation can be effective in achieving hemostasis. The superficial uterine vein does not always run parallel to the uterine artery. Rarely, it may run parallel to the ureter.
Figure 8.6
Separation of the superficial uterine vein
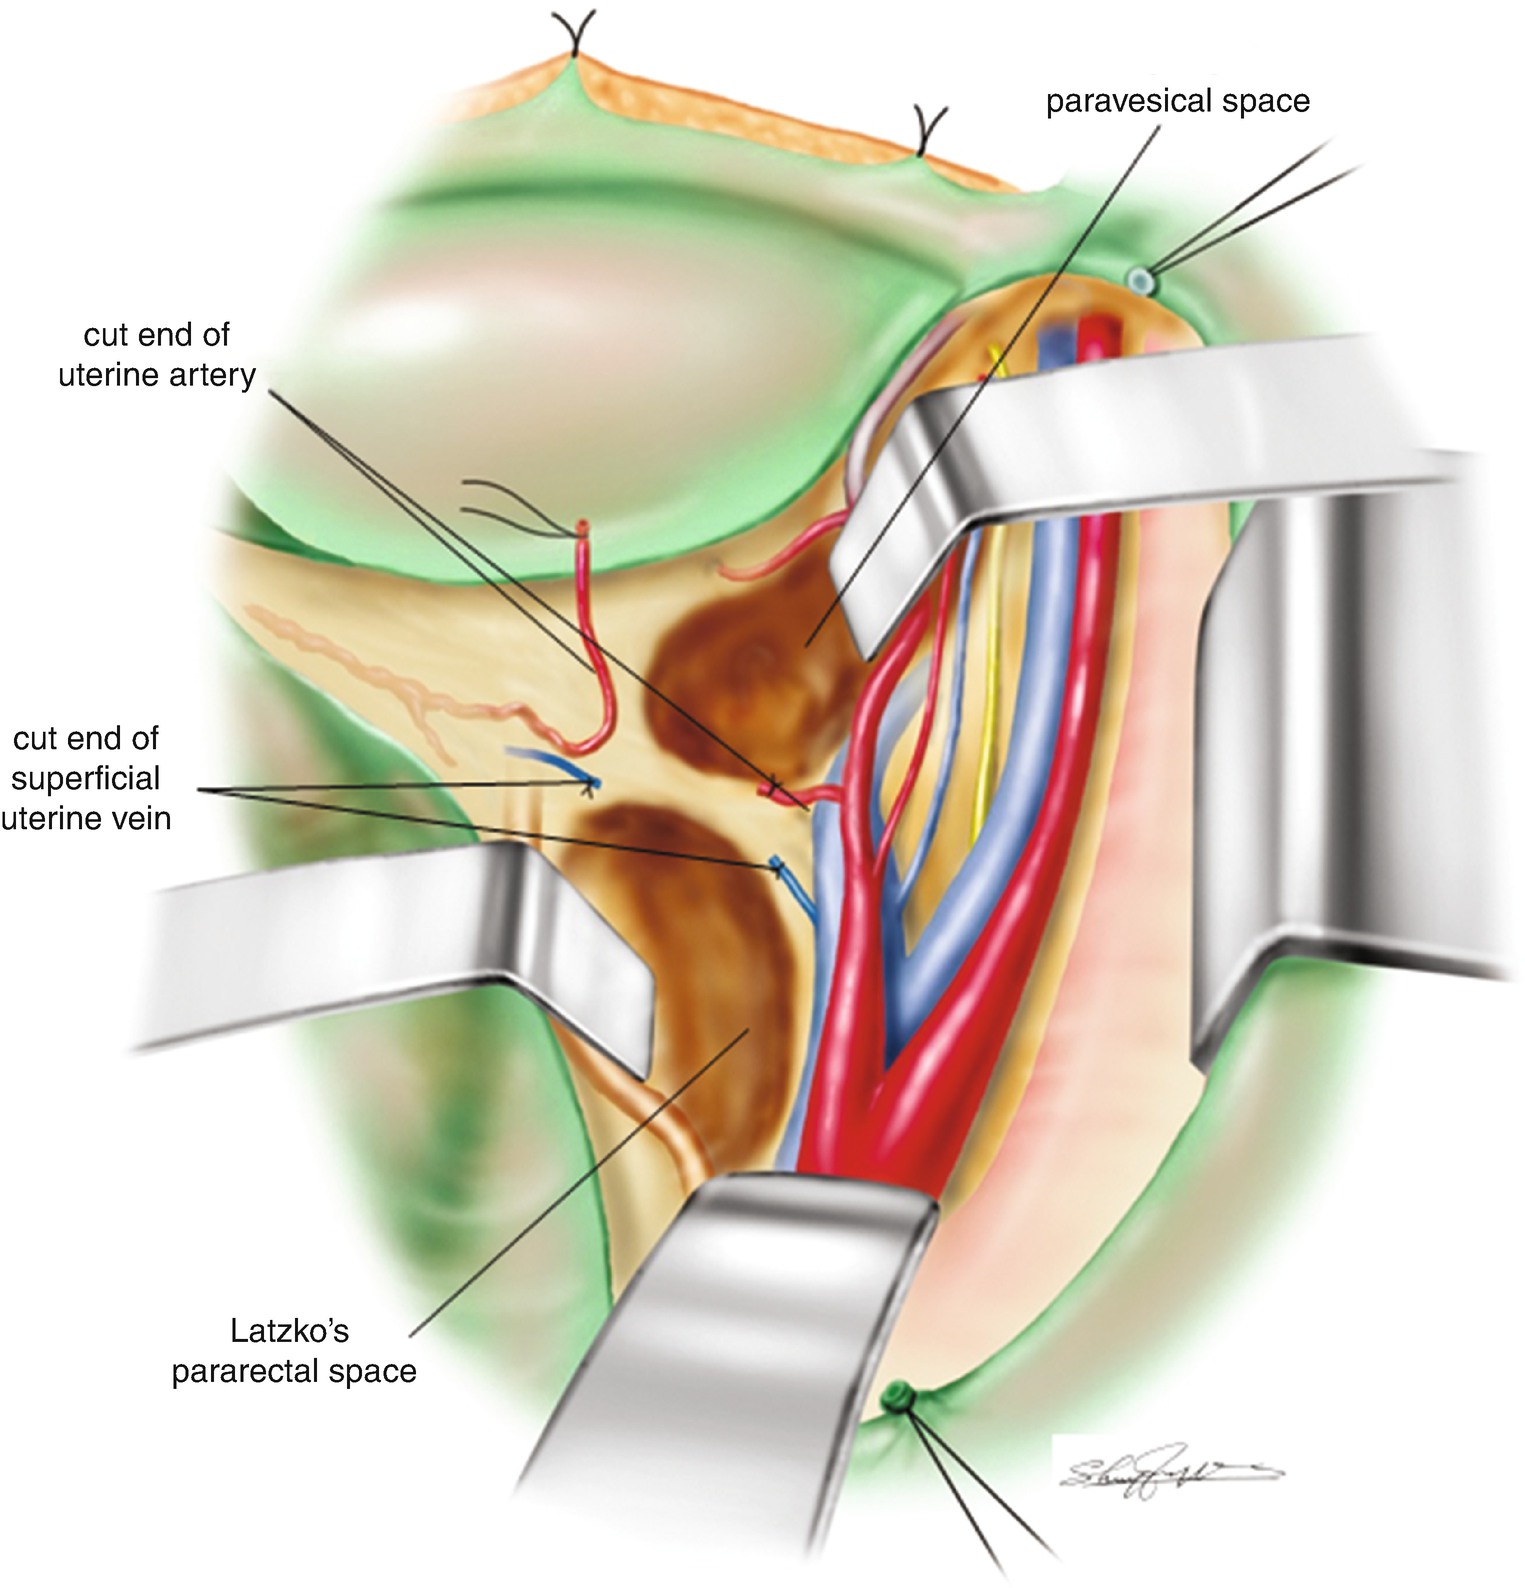
8.4.7 Clamping and Division of the Superficial Uterine Vein (Figure 8.7)
The superficial uterine vein is isolated and doubly clamped by Pean forceps. Then the superficial uterine vein is divided between the two clamps. Each clamp is replaced by ligature. The connective tissue of the cardinal ligament is then separated toward the pelvic floor. In the cardinal ligament, a small vein or artery may be identified. In such cases, each small blood vessel should be sealed either by electrocautery or ligature. However, the deep uterine vein always resides in the dorsal part of the cardinal ligament. Careful separation of the connective tissue and lymph nodes in the cardinal ligament is required to identify the deep uterine vein.
Figure 8.7
Division of the superficial uterine vein
8.4.8 Separation of the Deep Uterine Vein (Figure 8.8)
Careful separation of the connective tissue and lymph nodes in the cardinal ligament can reveal a vein running from the uterine sidewall to the internal iliac vein (Figure 8.8a, b). This is the deep uterine vein. The connective tissue and adipose tissue surrounding the deep uterine vein should be cleaned as much as possible. Skeletonizing the dorsal side of the deep uterine vein is very important for the isolation of the deep uterine vein.
Figure 8.8
Separation of the deep uterine vein. (a) is illustrating the deep uterine vein running between the uterine cervix and the internal iliac vein. (b) is a surgical photo of the deep uterine vein isolated between the uterine cervix and the internal iliac vein
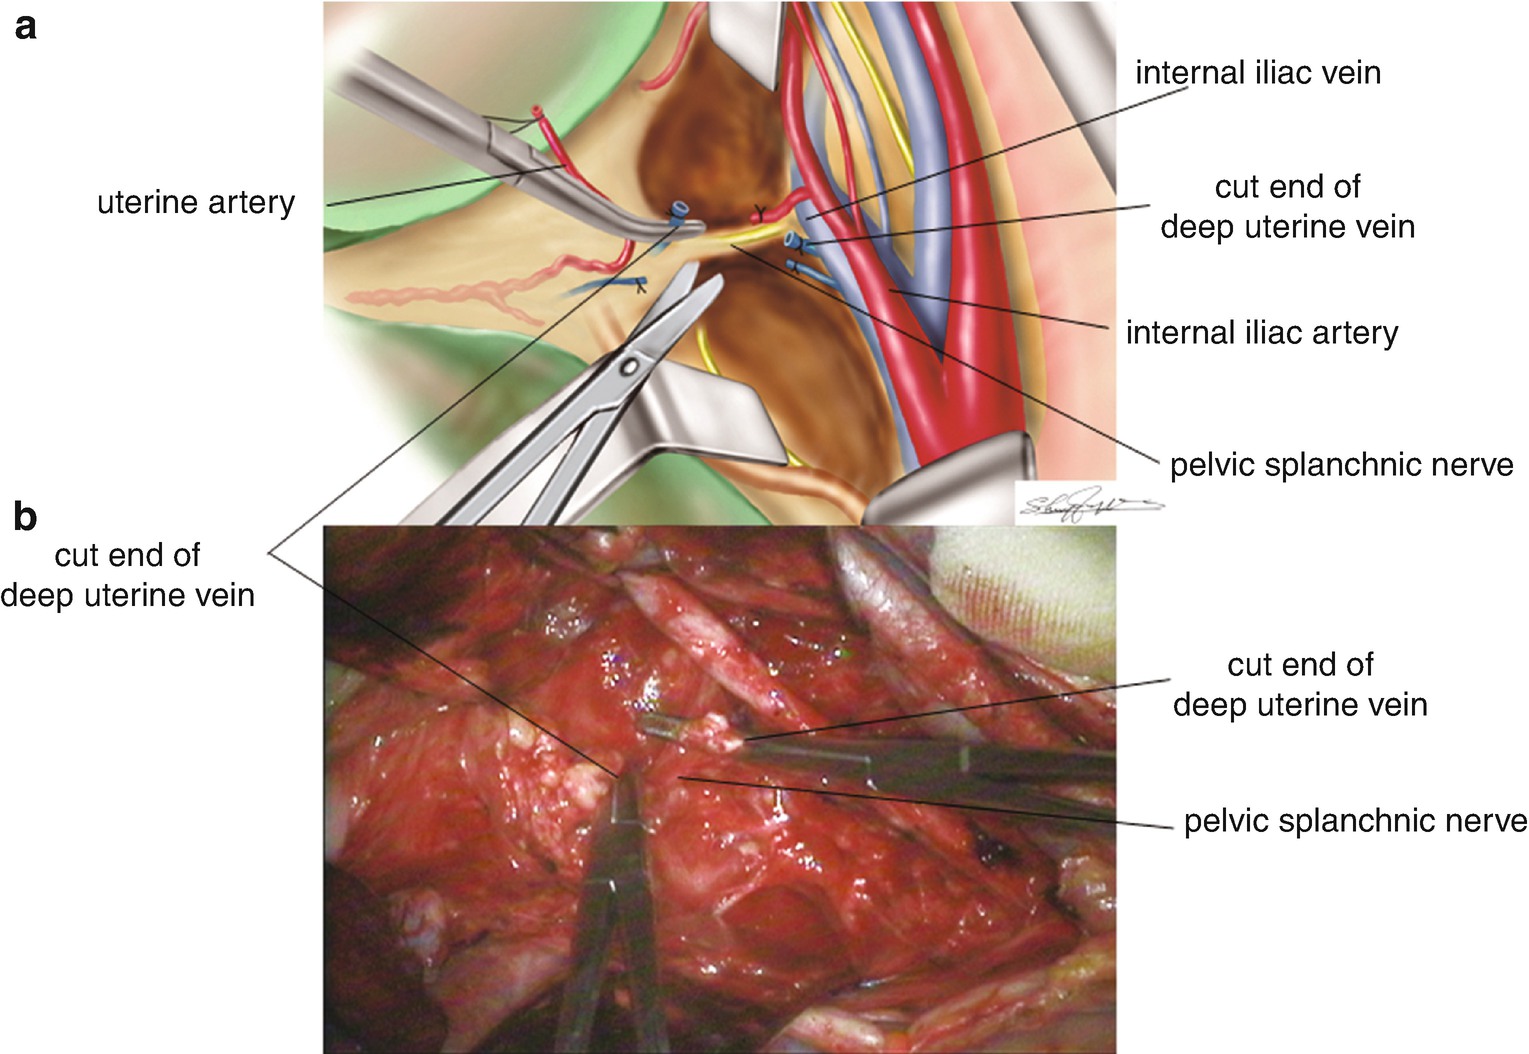
8.4.9 Division of the Deep Uterine Vein Reveals the Pelvic Splanchnic Nerve (Figure 8.9)
In the dorsal part of the deep uterine vein, a white yellow bundle is usually running parallel to it. This is the pelvic splanchnic nerve. After isolation, the deep uterine vein is doubly clamped by Pean forceps. The deep uterine vein is then divided between the two clamps. Each clamp is replaced by ligature. There is a risk of heavy bleeding if the deep uterine vein is injured. However, hemostasis can be achieved effectively if the deep uterine vein has been clearly identified, and the damaged portion of the vessel can be detected. The skeletonization of the connective tissue and the adipose tissue in the base of the cardinal ligament (draining portion of the deep uterine vein into the internal iliac vein) is a very important step in performing safer nerve-sparing radical hysterectomy.
Figure 8.9
Division of the deep uterine vein reveals the pelvic splanchnic nerve beneath the vein. (a) Relationship between the divided deep uterine vein and the pelvic splanchnic nerve. (b) A surgical photo of the divided deep uterine vein and the pelvic splanchnic nerve
8.5 Treatment of the Hypogastric Nerve
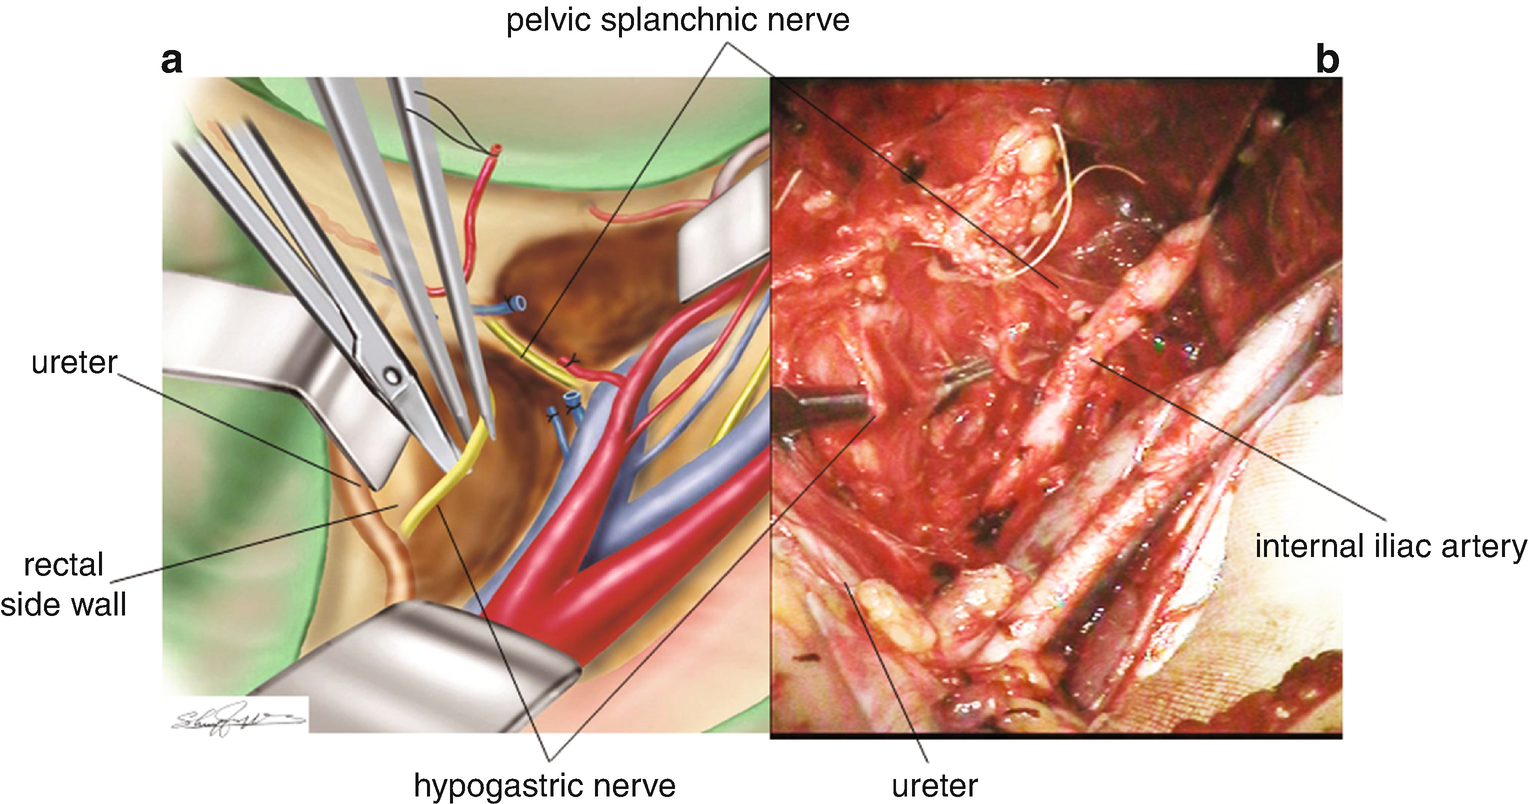
8.5.1 Isolation of the Hypogastric Nerve (Figure 8.10)
In the rectal sidewall of the pararectal space, 2–3 cm dorsal to the ureter, a white yellow bundle of the hypogastric nerve is appreciated. The hypogastric nerve is residing in the same connective tissue of the ureter. The hypogastric nerve is dissected and separated from the rectal sidewall.
Figure 8.10
Isolation of the hypogastric nerve. (a) An illustration of the separated hypogastric nerve from the lateral side wall of the rectum. (b) A surgical photo of the hypogastric nerve isolated from the lateral side wall of the rectum
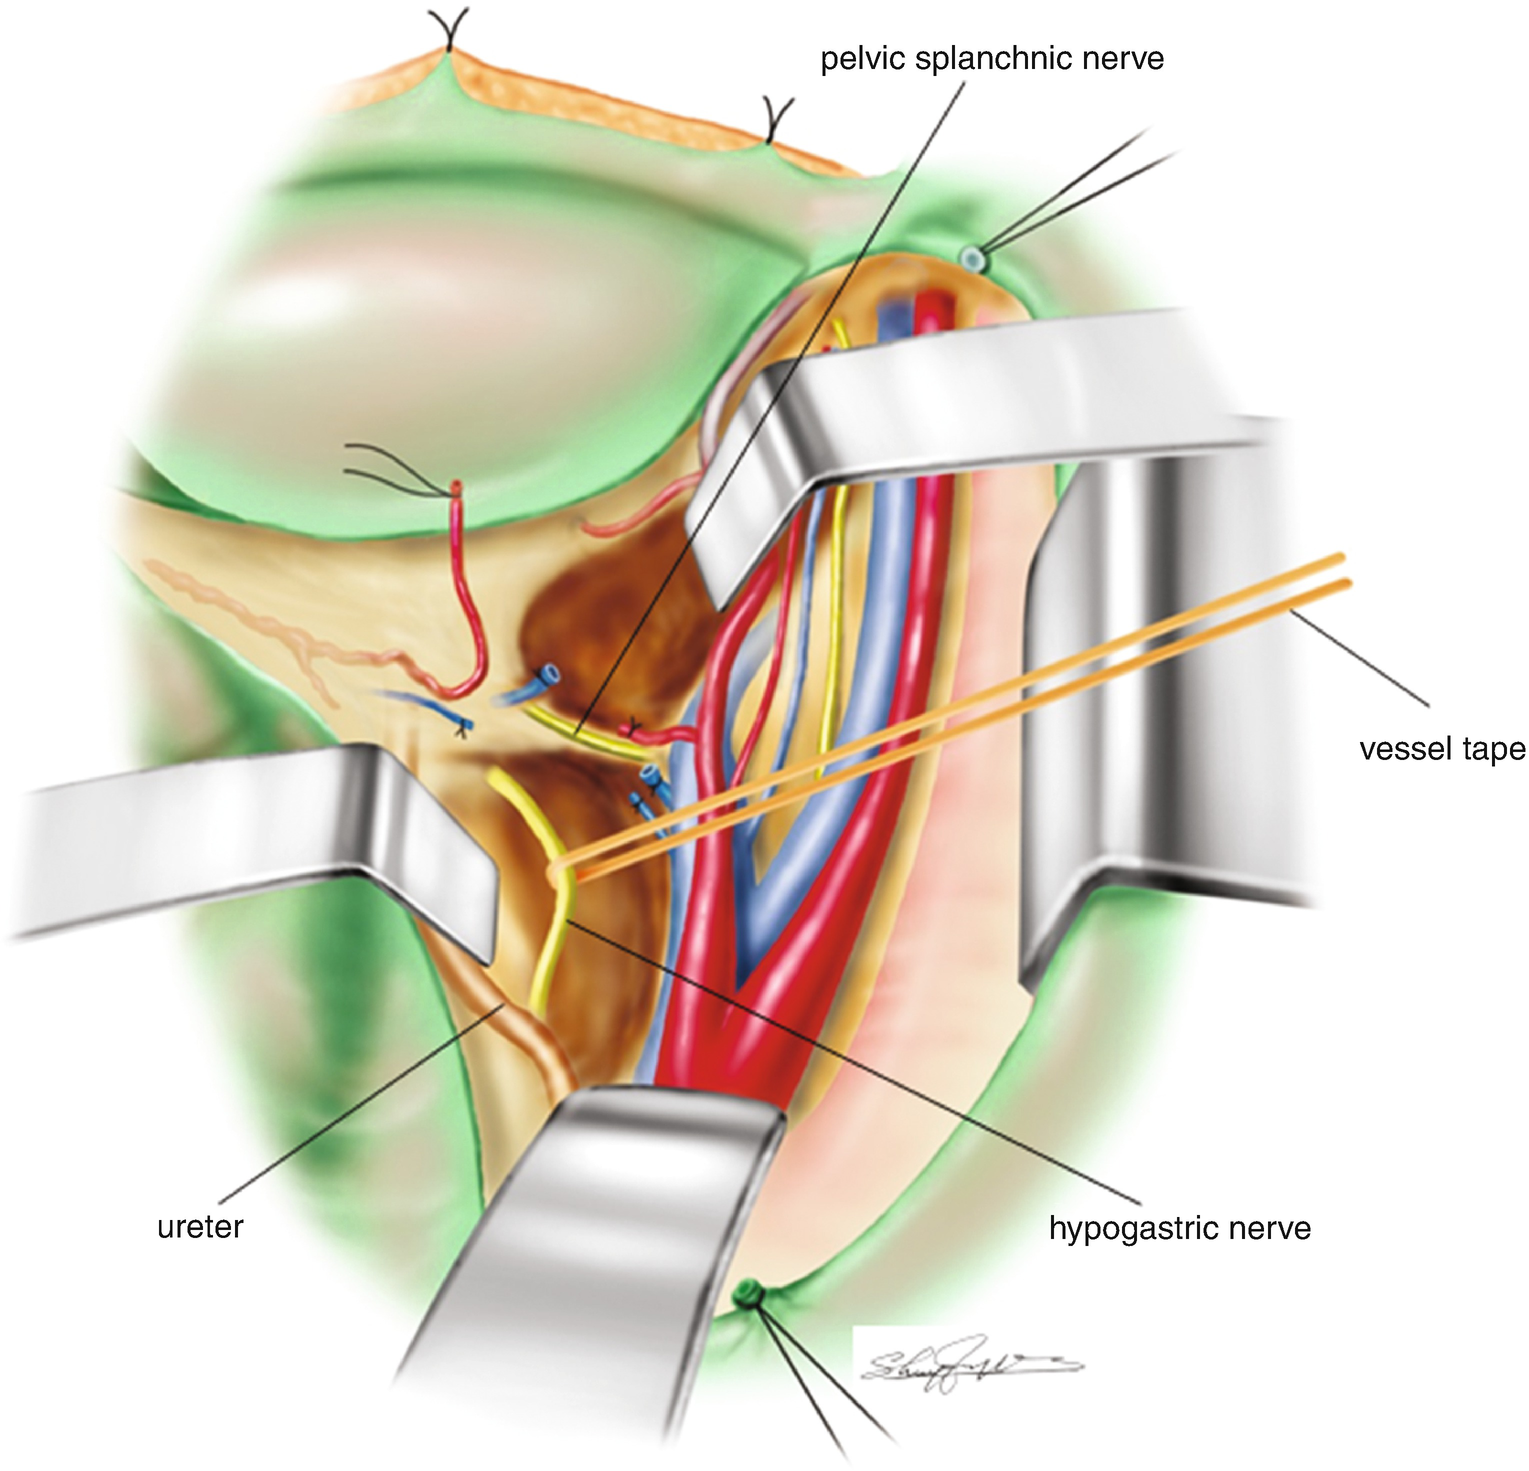
8.5.2 Apply a Vessel Tape to the Isolated Hypogastric Nerve (Figure 8.11)
A vessel tape is applied for a marker of the isolated hypogastric nerve. The hypogastric nerve is better separated as close as possible to the uterine side of the pelvic splanchnic nerve.
Figure 8.11
Application of a vessel tape to the isolated hypogastric nerve
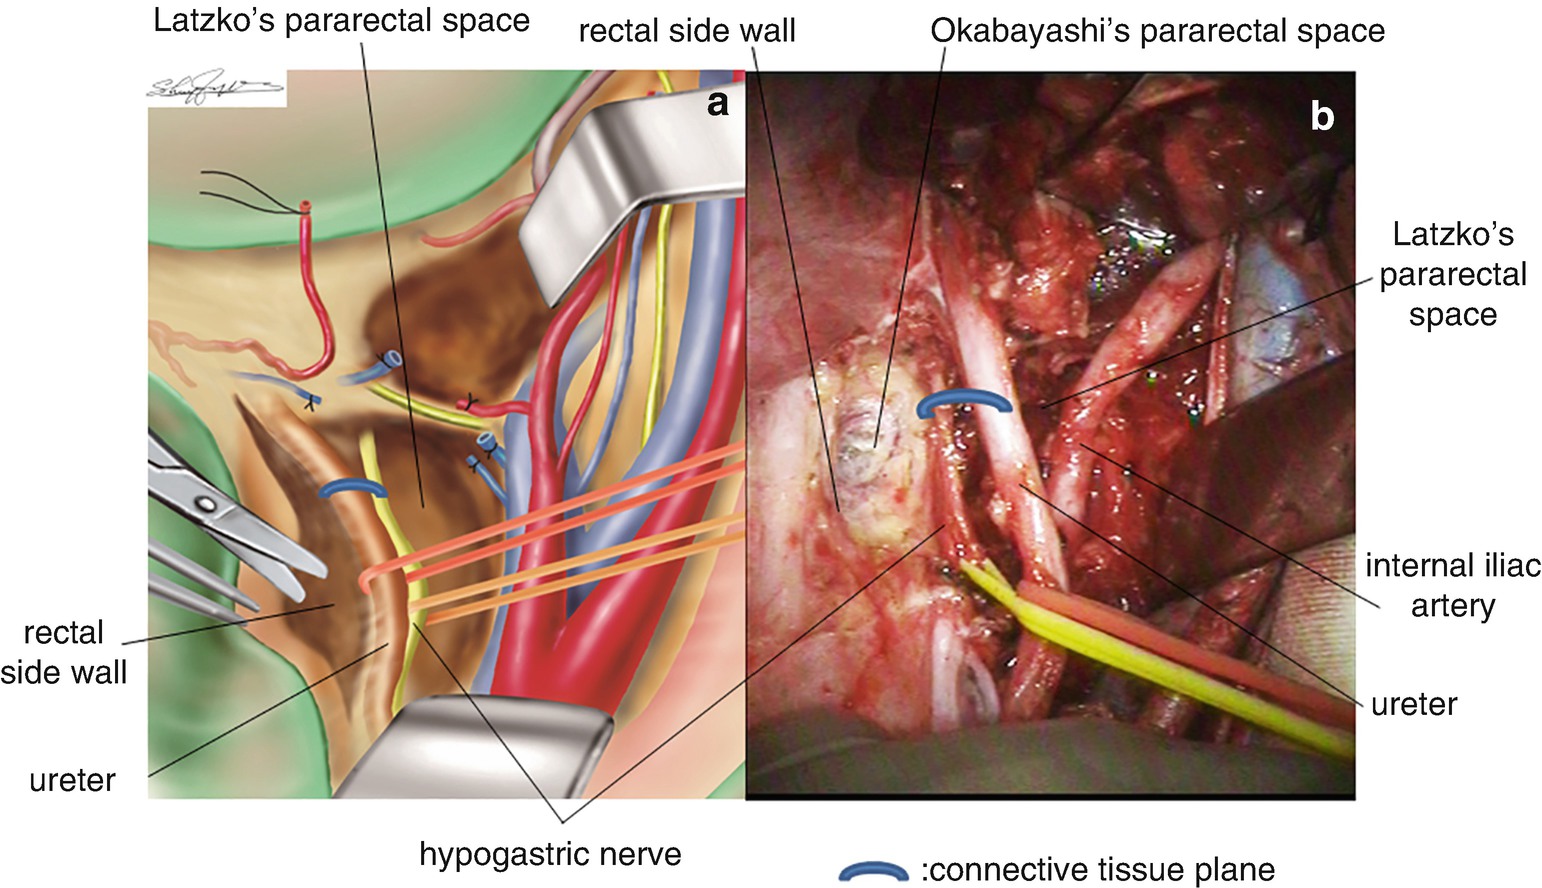
8.5.3 Separation of the Ureter from the Connective Tissue Plane and Application of a Vessel Tape to the Isolated Ureter (Figure 8.12)
The ureter can be identified on the ventral side of the hypogastric nerve. The ureter is isolated and a vessel tape is applied as a marker. The ureter is better separated as close as possible to the cut-end of the uterine side of the uterine artery.
Figure 8.12
Separation of the ureter from the connective tissue plane and application of a vessel tape to the isolated ureter. (a) A illustration of the isolated ureter and the hypogastric nerve with respective vessel tape. (b) A surgical photo of the isolated ureter and the hypogastric nerve with respective vessel tape
8.6 Development of the Rectovaginal Space and Division of the Uterosacral Ligament
8.6.1 Separation and Division of the Peritoneum of the Douglas’ Pouch (Figure 8.13)
The uterus is drawn toward the pubic arch and the rectum with its peritoneal surface is stretched by hand toward the cranial side. The peritoneum between the uterus and the rectum is lifted from the base of the Pouch of Douglas. The incision is made on the elevated peritoneum and extended with scissors across the dorsal side (back) of the cervix. At the end of this step, both sides of the retroperitoneal space of the broad ligament are connected. The rectum is gently freed from the cervical/vaginal wall with scissors or with a finger. With the uterus held over to the pubic arch and the rectum stretched toward the cranial portion by hand, a loose connective tissue layer between the rectum and the cervix/vagina is appreciated. This is the landmark of the rectovaginal space.
Only gold members can continue reading. Log In or Register to continue