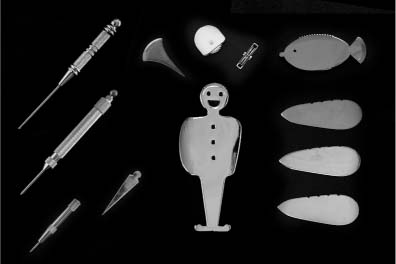
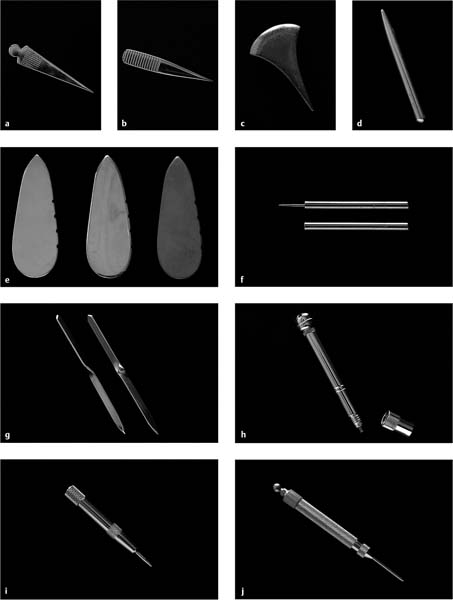
6 Basic Shonishin Treatment Tools Over the centuries many different tools have been developed and used in the practice of shonishin. Figure 6.1 shows tools in the author’s collection. One can see that there is a wide range of different stimulation methods possible with these tools. The techniques of stimulation break down into four types: Some of the instruments seen in Fig. 6.1, and in the figures below, can be used to give more than one of these four methods of stimulation, thus some of the different tools show up in more than one of the technique classifications below. It is natural to wonder why there are so many different tools, even within each of the four categories. There are a few possible explanations: __________________ 1 Mr. Tanioka uses such a tool; see Tanioka (2001a) and Wernicke (2009). Of course we don’t know, but I can easily imagine at least one of these three factors influencing the overall development of treatment tools within the shonishin tradition. Fig. 6.1 Examples of different shonishin treatment tools. This chapter discusses the different types of tools and how to handle them. Chapter 7 “The Core Treatment Model” and Section 5 “Treatment of Specific Problems/Diseases” discuss how to use the different tools in the context of the root treatment and the branch treatment. Figure 6.2 shows a range of tools that are used for applying the tapping technique. Figure 6.3 shows the tools that are usually easy to obtain from suppliers and which the author has found easy to use. One of the characteristics of the tools used for tapping is that they have some kind of a point on them. But some of these pointed surfaces are a little sharp; some quite sharp. It is thus important to know how to hold the tool so as not to cause pain or injure the child. Generally it is easier to hold the tool out of sight. The pointed end or edge is held between the index finger and thumb of the right hand (if right-handed). The instrument is held so that the tip of the point is either level with the tips of the finger and thumb, slightly retracted behind the level of the tips of the finger and thumb, or slightly protruding beyond the level of the tips of the finger and thumb. See the accompanying Fig. 6.2a–j A range of shonishin tapping instruments. Fig. 6.3a–f The author’s preferred shonishin tapping instruments. a Herabari, b Heragata, c Yoneyama, d Chokishin, e Large yukoshin, f Small yukoshin. The tapping is done rapidly with most of the motion coming from the wrist. As the finger, thumb, and instrument touch the skin surface it is good to allow the other fingers to also touch so as to partially cushion the contact. It is also good to keep all digits relaxed so that as they make contact they bend in a springy manner, thus also cushioning the contact. This technique is shown on the After estimating the amount of stimulation you want to apply you should hold the instrument so as to give less (point held slightly retracted) or more (point held slightly protruding) stimulation. You then tap the region you are working on the estimated number of times required, additionally modifying the weight of the tap. The dose is thus adjusted according to the scale outlined in Table 6.1. It is generally a good idea to briefly apply tapping with the instrument on yourself, for example on the back of the hand. This allows you to quickly see how it feels, and whether your attempt to adjust dose through how you hold and tap matches the level you are attempting to use on the child. When it matches you can immediately go on to applying the technique on the child. If not, you can readjust what you are doing. Figure 6.4 shows the range of tools used for applying stroking or rubbing techniques. Figure 6.5 shows the tools that are usually easy to obtain from suppliers and which the author has found easy to use. The tools used for stroking or rubbing come in two varieties. The first (Fig. 6.5a), which is used for stroking or rubbing, has a rounded ball-like surface. The second (Fig. 6.5f) has an elongated flatter surface that is either rounded or straight and smooth, both of which are used only for stroking. I use the term rubbing to refer to a back and forth rubbing of the skin surface, while stroking is applied in a single direction. This is an important distinction since, based on the treatment principles outlined above, it is useful to apply stroking only in a downward direction, as this helps direct the qi in this direction. In babies and small children this is often a very helpful tactic.
 Tapping
 Stroking or rubbing
 Pressing
 Scratching
 A particular tool was developed by an individual and came to be a hallmark of that person’s approach. This unique tool then fused into the general trend of shonishin practice, possibly inspiring others later to develop similar-looking or functional tools.1
 Some creative people designed many different tools, so that shonishin integrated this creative element within its general practice.
 Practitioners found it useful to have more than one instrument in each category as this can reduce emotional reaction in particular children. For example, after one picks up a tool and the child cries in fear after seeing it, one shows the tool more closely to the child, which does not reduce the fear; one then picks up another tool that does not provoke the reaction in the child; this allows one to proceed with treatment.
Tools Used for Tapping
![]() DVD for illustrations of this technique.
DVD for illustrations of this technique.
![]() DVD. The advantage of this is that the tapping is more relaxing and comfortable for the child. Often the child only feels the tap of your fingers and not the instrument, thus they can relax more and you are less likely to provoke reactions. If the tapping comes from further up the arm, such as only from the elbow and/or the digits are kept tense, the force of the contact is greater; not only can this increase the dose but it can be experienced as more uncomfortable by the patient as well, thus provoking unnecessary and unwanted emotional reactions. The methods of holding and applying the tapping technique are discussed further on the
DVD. The advantage of this is that the tapping is more relaxing and comfortable for the child. Often the child only feels the tap of your fingers and not the instrument, thus they can relax more and you are less likely to provoke reactions. If the tapping comes from further up the arm, such as only from the elbow and/or the digits are kept tense, the force of the contact is greater; not only can this increase the dose but it can be experienced as more uncomfortable by the patient as well, thus provoking unnecessary and unwanted emotional reactions. The methods of holding and applying the tapping technique are discussed further on the ![]() DVD and in Chapter 7.
DVD and in Chapter 7.
Tools Used for Stroking/Rubbing


Stay updated, free articles. Join our Telegram channel

Full access? Get Clinical Tree


