Fig. 5.1
ParaGard IUD—seen with sterile package contents which include device, loading instructions, ringed solid white insertion rod, and a measurement guide. Note the arms bend downward for loading
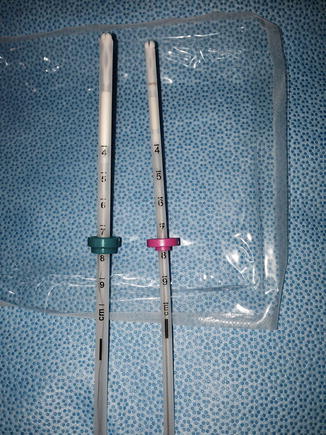
Fig. 5.2
Mirena and Skyla IUDs—a side by side comparison confirms the construction is very similar other than the distinguishing flange color, and the handle piece (not pictured)
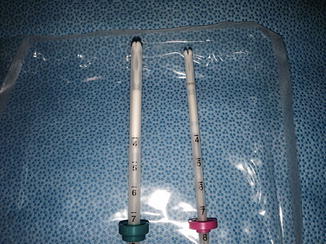
Fig. 5.3
Mirena and Skyla IUDs—close inspection of the two devices reveal the similarity that both devices have upward bending arms. But one can note, the variation in the outer insertion tube diameter (4.75 mm versus 3.8 mm), the device size discrepancy (32 × 32 mm versus 28 × 30 mm), and finally the identifying silver ring at the top of Skyla’s vertical stem
IUD placement within the confines of the office is generally well tolerated. On a pain scale of 1–10, 46 % of women rated a pain score of 2 or below, and two thirds of the women had a pain score of 4 or lower. Although IUD insertion is “well tolerated” it is important to remember that it still produces pain. Pre-procedure treatment with nonsteroidal anti-inflammatory drugs (NSAIDs) is common and beneficial for reducing bleeding associated with IUD insertion, but only two treatments—tramadol (50 mg) and naproxen (550 mg) administered 40 min prior to insertion have been proven effective in decreasing pain [6–8]. Paracervical block was proven to decrease pain associated with cervical manipulation during hysteroscopy and may provide similar relief for IUD insertion [9] (Chap. 4). A paracervical block using 10–20 cc of 1 % lidocaine, is sometimes performed for patients who are prone to vasovagal reaction but the analgesic effect of this procedure must be weighed against the pain caused by the injection itself in relation to the pain produced by IUD insertion alone [10]. And finally, misoprostol may soften the cervix but its usefulness in decreasing pain and facilitating IUD insertion was not supported in four randomized control trials. Furthermore, some studies suggest the uterine activity promoted by misoprostol may worsen post-procedure cramping and increase the risk of device expulsion [11–14].
An IUD may be inserted at any time during the menstrual cycle but pregnancy should be excluded prior to insertion. In general, a pregnancy test is not necessary if the patient is: using a reliable form of contraception, in the late follicular phase (cycle day 5–10), or abstinent since her last menses. For patients with irregular menses, questionable compliance to contraception, or amenorrhea, a negative pregnancy test is recommended. Guidelines for recommended backup contraception, duration, and change from prior contraception is outlined by the Centers for Disease Control (CDC) and updated regularly [15].
Box 5.1: IUD Insertion Procedure Checklist
Signed informed consent
Patient counseling on procedure, side effects, post procedure contraception, and recovery instructions provided
Pregnancy has been excluded
STI screening (either prior to or at the time of IUD placement for higher risk patients)
Sterile speculum
Gloves (consider sterile gloves for Paragard IUD, dependent on provider loading preference)
Antiseptic cleansing solution and large applicator swabs
Single tooth tenaculum
Uterine sound
Scissors
IUD
± cervical dilator
Box 5.2: IUD Insertion Step by Step
Perform a pelvic exam to assess for cervical motion tenderness, uterine position, or uterine tenderness
Perform a sterile speculum exam and inspect the vagina and cervix
Cleanse the cervical portio with antiseptic solution
Perform paracervical block if necessary
Slowly and gently grasp the anterior lip of the cervix with a tenaculum (for anteverted or mid position uteri) and place gentle traction to align the cervical canal with the uterine cavity
Sound the uterus, for patency, noting the direction of the canal and the uterine length—gentle cervical dilation may be required
Load device for insertion (if necessary)
Using sterile technique, introduce the device through the endocervical canal with controlled, slow, and steady pressure
Be alert to sudden loss of resistance or increased uterine length
Deploy device per specific instructions (Table 5.2)
Remove insertion apparatus
Trim threads to 3 cm
Gently remove the tenaculum
Ensure hemostasis from the tenaculum site and os
Remove the speculum
Assess the patient’s post-procedure condition
Schedule 4-week follow-up visit
Box 5.3: IUD Insertion Tips & Tricks
Place the tenaculum on the posterior lip of the cervix for retroverted uteri.
Slowly and gently close/open the tenaculum to reduce pain.
Quell patient anxiety: a calm and reassuring professional demeanor can significantly reduce patients’ anxiety and fear. Patients are less likely to perceive increased pain if they are adequately counseled and emotionally supported.
If insertion is particularly painful or difficult due to extreme uterine flexion or fibroids, consider device insertion under ultrasound guidance or a post procedure ultrasound to confirm proper device placement.
Peri-procedural Complications
Vasovagal reaction—IUD insertion, removal, and transcervical procedures in general may provoke a vasovagal response. The patient may experience transient (pre)syncope, nausea, hypotension, diaphoresis, or bradycardia. Should this occur, terminate the procedure and provide supportive care to the patient. Place her in a supine position and if necessary, elevate her lower extremities. If her symptoms persist, consider placing a paracervical block or removing the IUD. For the truly refractive vasovagal episode, atropine (0.4 mg intramuscular injection) may be given to the patient while assessing for uterine perforation and intra-abdominal bleeding.
Infection—Active infection or symptoms suspicious for infection are clear contraindications to IUD insertion. For patients who are at low risk for sexually transmitted infections (STI), the use of prophylactic antibiotics at the time of insertion confers no benefit and is not recommended [16]. An international study did confirm a transient increased risk of PID due to bacterial contamination at the time of IUD insertion. The first 20 days after an IUD is inserted is the time of greatest infection risk [17]. This suggests that resultant PID is due to the introduction of pathogens during device insertion and underscores the importance of sterile technique. A retrospective cohort study of 57,000 IUD insertions revealed that the risk of PID after device insertion is only 0.54 %. As encouraged by device manufacturers, many clinicians screen for gonorrhea and chlamydia in patients based on their STI risk. According to the CDC, the prevalence of chlamydia is highest among women 14–25 years of age and is approximately 3 %. In addition, the American College of Obstetricians and Gynecologists defines women with multiple sexual partners and those younger than 25 years old as “high risk” for STI. Therefore, for this group of women, it is advised and reasonable to perform STI screening on the day of IUD insertion. Same day screening and insertion increases contraceptive access and decreases the chance of unintended pregnancy. If an infection is detected, the patient and her partner should be treated and the IUD may remain in place [18].
Perforation—This complication usually occurs at the time of insertion and is prone to involve the fundus, lower uterine segment, and midline posterior wall. Perforation may also occur remote from IUD insertion as a result of uterine contractions. These perforations are usually in a different plane or trajectory of insertion and more commonly involve the cervix. Perforation is a rare event occurring in 1 out of 1,000 insertions or less in experienced hands. The risk of perforation is dependent upon provider experience and increases with a stenotic cervix, immobile uterus, and a markedly flexed uterus. A sudden inappropriate, loss of resistance, severe patient pain, or a large discrepancy between uterine depth and anticipated uterine length should trigger an evaluation for perforation. The instrument should be removed gently and the patient should be observed for hemorrhage. If the patient’s condition does not improve or there is a strong suspicion of intraperitoneal injury, swift surgical evaluation is necessary.
If uterine perforation occurs and the patient remains stable the clinician has two options: The procedure may be discontinued and the IUD inserted on a separate visit. Or, the IUD may still be inserted at the same visit, but care should be taken not to follow the previous tract. Although prophylactic antibiotics have been proven to be unnecessary for routine IUD insertion, when perforation occurs, the use of antibiotics is less clear since the procedure may have allowed passage of vaginal flora into the peritoneal cavity. In these instances, doxycycline (100 mg twice a day for 7 days) with or without metronidazole (500 mg twice a day for 7 days) may be considered [19, 20].
Expulsion—Expulsion of a device may occur even if the device was properly placed. Expulsion may be associated with pain and bleeding or the patient may be completely asymptomatic. Although it is a common practice to insert IUDs during a patient’s menses, the expulsion risk during the first 5 days of a cycle is 5 % compared to 2 % if inserted during the luteal phase [21]. The risk of expulsion is also greater when IUD insertion is performed immediately after uterine evacuation and the uterus is still enlarged [22]. On the other hand, expulsion rates may also increase with smaller uteri, length less than 6 cm, and with anatomic uterine aberrations. If an IUD is expelled, consider performing the second IUD placement under ultrasound guidance. Or, sonographically confirm correct placement immediately afterward, since a patient with one previous expulsion has a 30 % chance of subsequent expulsion [23].
Malposition—Ideally, the IUD should be located in the uterine fundus. Occasionally, IUDs are malpositioned and are located in the lower uterine segment or endocervix (versus a partially expelled IUD that is visible at the external os and should be removed), embedded within the myometrium, or rotated out of the uterine plane. Prior to removing or replacing the device, the clinician should note several things including: the type of device, if the patient is symptomatic and warrants device removal, if the malpositioned device is still providing effective contraception, and if the risk of removing the device, particularly in an asymptomatic patient, will increase the chance of unintended pregnancy. Specifically, there is limited data that suggests that due to their different mechanisms of action, malpositioned Copper IUDs within the endocervix, unlike their levonorgestrol counterparts [24], do not provide adequate contraception. One study noted a malpositioned Copper IUD located in the cervix is almost 14 times as likely to be associated with concomitant pregnancy [25]. Therefore, before removing a malpositioned device and/or inserting a new IUD, a clinician should assess for pregnancy and counsel the patient appropriately.
IUD Removal
Removal of an IUD is usually straightforward and swift. A sterile speculum is placed and using a ring forceps, the strings are grasped and used to gently remove the device from the uterus. Occasionally, removal is more involved. A sharply flexed uterus can be tricky and may decrease necessary visualization and access. In these instances, gentle traction applied with a tenaculum straightens the utero-cervical junction and aids in device retrieval. In addition, IUD strings are sometimes missing or retracted into the uterine cavity or endocervix. In this case, an ultrasound may be helpful to confirm that the device remains within the uterus. If the device is not seen within the uterus, a plain film X-ray of the abdomen and pelvis may confirm device perforation.
Endocervical speculums and endocervical brushes can be used to visualize the cervical canal and gently tease the threads outward. Furthermore, IUD hooks are also available and should be used by experienced clinicians to extricate the device threads. If the device is still unable to be retrieved flexible or rigid hysteroscopy can be performed to guide the threads outward.
Box 5.4: IUD Removal Tips & Tricks
Use a cytobrush or endocervical speculum to locate “lost” threads.
Ultrasound and pelvic radiographs are helpful in locating the device position and location.
Exercise caution when utilizing IUD hooks.
Flexible hysteroscopy can decrease time and patient discomfort, and can be used to produce a portion of the device or the threads at the external os.
Box 5.5: IUD Removal Procedure Checklist
Signed informed consent
Patient counseling on procedure, side effects including return to fertility, post procedure contraception, and recovery instructions provided
In the event of a partially expelled or a malpositioned device, confirm that the patient is not pregnant
Sterile speculum
Ring forceps
Gloves
As needed
Single tooth tenaculum
Cytobrush
Endocervical speculum
IUD hook
Ultrasound
Flexible or rigid hysteroscopy
Endometrial Sampling
Endometrial sampling (ES) in the office is a simple, safe, well tolerated, and cost-efficient method to obtain uterine tissue for histology diagnosis. As early as the 1920s, in-office endometrial biopsy (EMB) was lauded for the advantages of avoiding general anesthesia and allowing the patient to quickly resume her normal daily function.
The original Novak and Randall curettes are rigid, metal sheaths with an outer diameter of 4.2–3 mm respectively. The most distal end contains a small serrated or beveled lateral opening and the most proximal end attaches to an aspirator that provides suction. In 1968, Jensen described a modification. Using a rigid 3 mm cannula attached to 600 mmHg of vacuum suction, an in-office vacuum-abrasion technique, or Vabra, aspirator was introduced. Despite the small outer diameter and apparent effectiveness, the Vabra device and technique did not gain widespread office adoption. Significant patient discomfort and the reliance upon a machine to produce sufficient vacuum suction caused many clinicians to return to the operating room to perform a standard dilation and curettage until a superior in-office device came to market. Additional electronic and vacuum syringe devices were trialed but they too had limited clinical acceptance [26].
Today, the original curettes and aspirators have mostly been replaced with flexible, 2–4 mm, plastic pipelles that are very well tolerated by patients. The newer pipelle biopsy device is disposable and does not require an aspirator. Instead, a vacuum is created by withdrawing the inner piston from the pipelle cannula. This creates a negative pressure that draws the endometrial tissue into the pipelle channel. No additional personnel or equipment is necessary to perform the simple procedure. There are a number of pipelle kits available today—all with varying accessories such as additional suction syringes, multi-perforated channels, and even cytology abrasion brushes.
Given the numerous and varied indications for endometrial sampling, EMB is one of the most common procedures encountered in a gynecology office. The procedure’s efficacy for detecting malignancy has been investigated numerous times. Two separately conducted, large reviews—revealed that EMB has high accuracy in diagnosing endometrial cancer especially if the endometrial process is global and if an adequate specimen is obtained. If the malignancy occupies less than half of the endometrial surface, however, the cancer may not be detected by a blind, random, cavity sampling. Therefore, the procedure is more accurate at confirming a uterine cancer diagnosis than excluding an intrauterine malignancy [27, 28]. In summary, if a patient has a negative EMB result but continues to have symptoms, further clinical evaluation is warranted with either saline infusion sonography or office diagnostic hysteroscopy (Chaps. 6 and 7).
EMB should not be performed in cases of pregnancy, coagulopathy, or known pelvic infection. If possible, avoid scheduling a biopsy when the patient is having heavy uterine bleeding as this may increase the risk of insufficient tissue sampling. In addition, EMB can interfere with an early, undiagnosed pregnancy. Therefore, it should not be performed more than 14–16 days after ovulation.
Box 5.6: ES/EMB Procedure Checklist
Signed informed consent
Patient counseling on procedure, side effects, and post-procedure recovery instructions provided
Pregnancy has been excluded
STI screening (if needed)
Sterile speculum
Gloves
Antiseptic cleansing solution and large applicator swabs
± single tooth tenaculum
± cervical dilator
± paracervical anesthetic equipment
EMB pipelle or sampling device
Labeled, sterile pathology container
Box 5.7: ES/EMB Step by Step
Perform a pelvic exam to assess for cervical motion tenderness, uterine position, or uterine tenderness
Perform a sterile speculum exam and inspect the vagina and cervix
Cleanse the cervical portio with antiseptic solution
Perform a paracervical block if necessary
If the uterus is highly mobile, slowly and gently grasp the cervix with a tenaculum and place gentle traction to align the cervical canal with the uterine cavity
Using sterile technique, introduce the pipelle/sampling device through the endocervical canal with controlled, slow, and steady pressure—cervical dilation may be necessary, especially in postmenopausal patients
Be alert to sudden loss of resistance or increased uterine length
Gently advance the sampling device until resistance is met
Steady the device in one hand, while the other hand withdraws the inner piston from the outer cannula. Move the piston to its maximally extended position—it will remain attached to the cannula
Rotate the pipelle in a continuous 360° fashion and observe for tissue or blood to draw up into the plastic cannula
Continue a rotary motion while slowly removing the device
Maintain sterile technique and remove the entire device from the uterus
Expel the biopsy into a sterile formalin or saline specimen cup by replacing the inner piston into the cannula, avoid contaminating the pipelle
Assess tissue sample adequacy and if necessary repeat the procedure
Gently remove the tenaculum and ensure hemostasis from the tenaculum site and os
Remove the speculum
Assess the patient’s post procedure condition
Schedule 4-week follow-up visit
Box 5.8: ES/EMB Tips & Tricks
Challenging exams
As with most gynecologic procedures, supportive, patient positioning is key to any successful procedure. Updated or specialized examination tables and stirrups that accommodate patients with large habitus are increasingly necessary and their value in ensuring patient safety and comfort cannot be understated. In addition, adequate lighting, protective gowning, and extra-long gloves are sometimes necessary for clinician safety and comfort.
If vaginal tissue dystocia hinders cervical visualization consider “gloving” a speculum to create a modified tissue retractor. Cut the thumb of a sterile glove and slide it over the arms of the speculum, allowing the most distal ends of the arm to be uncovered by the glove. Together, these techniques usually improve access and visualization of the cervix.
Avoid moving the pipelle in an in/out motion as this increases the risk of uterine perforation.
Instead, rely on the rotational movement of the pipelle and the vacuum generated by the internal piston.
Provide emotional assurance to the patient when/if she expresses discomfort.
If cramping is severe, expeditiously complete the procedure
Assess the specimen for adequacy before removing all instruments by transilluminating clear specimen cups—mucus and organized blood can be identified from tissue and can indicate the need for a second or third pass.
Sometimes less is more
Some patients do not tolerate even a small speculum or may have anatomy that makes prolonged speculum positioning difficult (i.e., an anterior cervix located behind the pubic symphysis) Once the cervix has been adequately inspected and cleansed with antiseptic, remove the speculum, don sterile gloves, and perform an EMB by tactile sensation. This technique significantly limits patient discomfort.
Peri-procedural Complications
Vasovagal reaction, infection, and uterine perforation are all known complications of EMB. Vasovagal reaction is treated mostly with supportive care and rarely requires further intervention. Infection following EMB may be associated with marked uterine tenderness, foul discharge, and/or fever. The patient should be treated for endometritis with doxycycline (100 mg twice a day for 7 days) with or without metronidazole (500 mg twice a day for 7 days.) Uterine perforation is rare and has been reported to have an incidence of 1 or 2 cases per 1,000. Unless the patient is unstable, supportive therapy is advocated [29]. Finally, insufficient tissue for histologic diagnosis can be encountered regardless of the type of sampling device employed. In these instances, further clinical evaluation is advised.
Bartholin Gland Cyst & Abscess Treatment
Normally, the Bartholin glands are pea-sized, non-palpable glands located bilaterally at the 5 and 7 o’clock position of the posterolateral aspect of the vaginal orifice. The gland drains into a 2.5 cm long duct and the duct drains into the space between the hymen and the labia minora (see Fig. 5.4). Occasionally, trauma, inflammation, or obstruction of the orifice causes the ducts to dilate. Many of these dilations range from 1 to 3 cm in diameter and are commonly referred to as a Bartholin cyst, although it is actually an obstructed and dilated duct. An asymptomatic Bartholin cyst does not require treatment and is not an infection. One exception to this is a Bartholin cyst in a 40-year-old, or older, woman or a woman with Paget’s disease of the vulva. For these patients, incision, drainage, and additional biopsy of the gland is recommended to exclude carcinomas such as adenocarcinoma and squamous cell carcinoma [30, 31].
Fig. 5.4
Bartholin gland and duct—the bilateral glands and ducts are seen in normal anatomic relationship to the ductal orifice and hymen. The duct is approximately 2–2.5 cm in length and empties into a groove within the hymen and the labia minora
Sometimes, the duct rapidly enlarges over just a few days and causes significant pain. In addition, the dilated duct may become infected and progress to a polymicrobial abscess characterized by a fluctuant vulvar mass (that may extend past the vestibular area), severe pain, warmth, tenderness, edema and/ or cellulitis (see Fig. 5.5). A symptomatic Bartholin cyst or an overt Bartholin abscess requires intervention and this can be safely performed in the office. Definitive treatment for recurrent duct dilation or abscess formation is excision of the gland but given the risk of bleeding and need for adequate anesthesia, this procedure is usually performed in the operating room. It is also important to note that unusual or unremitting Bartholin gland infections warrant further evaluation. Immunocompromised and diabetic patients are more susceptible to rare, but life threatening, necrotizing subcutaneous infections which require immediate surgical excision and debridement.
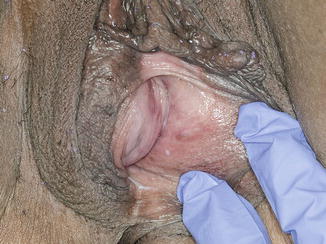
Fig. 5.5
Bartholin abscess—this 46-year-old patient had a recurrent, symptomatic right Bartholin abscess and was seen in the office for intense pain and swelling. Note the edema, erythema, and distortion of normal anatomy
In addition to malignancy, other benign vulvar masses can be found in the area of the Bartholin gland and should be considered prior to treatment. The differential diagnosis of these lesions is listed in Table 5.1. Simple Bartholin gland cysts do not require antibiotic treatment. For a cyst that is already draining, warm compresses and Sitz baths alone can be therapeutic. For patients affected by recurrent ductal dilation, abscess, extensive cellulitis, concomitant STI, pregnancy, immunosuppression, hospitalization, or increased risk of methicillin-resistant staphylococcus aureus infection, administer dual treatment with clindamycin (300 mg by mouth four times a day for 7 days) and amoxicillin–clavulanate (875 mg by mouth two times a day for 7 days) [32]. Antibiotic treatment should be reevaluated and tailored based on microbiology findings and correlation with the patient’s clinical condition.
Table 5.1


Differential diagnosis of vulvar masses in the Bartholin gland region
Stay updated, free articles. Join our Telegram channel
Full access? Get Clinical Tree
