Fig. 4.1
The vulva of a patient with congenital absence of vagina. 1 Vestibule
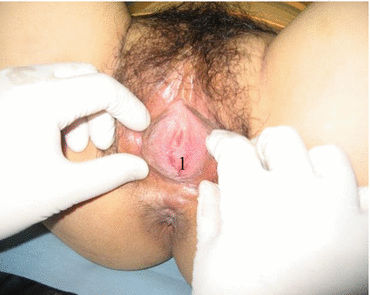
Fig. 4.2
Vestibular depression. 1 Vestibular depression
3.
Ovary: The ovarian development is normal, hence normal ovarian function with secondary sexual characteristics (Fig. 4.3).
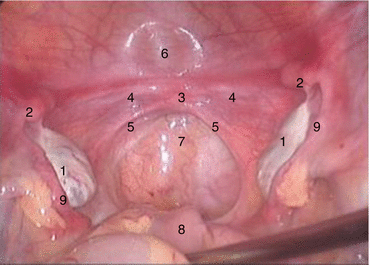

Fig. 4.3
Pelvic cavity of a patient with congenital absence of vagina. 1 Ovary, 2 primordial uterus, 3 trace of the uterus, 4 fibrous cord, 5 traces of the sacral ligament, 6 bladder, 7 pouch of Douglas, 8 rectum, 9 fallopian tubes
4.
Uterus: The uterus is mostly primordial with the size of a bean, situated at the medial ends of bilateral fallopian tubes (Fig. 4.3). A small number of uteri integrate in the midline to form a fibrous nodule posterior to the top of the bladder; sometimes it is referred as a trace of the uterus (Fig. 4.3). From both sides of the primordial uterus, there are fiber cords (Fig. 4.3). On the inner part on both cords, traces of sacral ligaments often are seen (Fig. 4.3). A small number of patients may even have a functional uterus, appearing as a solid spherical uterus but without the cervix and uterine cavity (Figs. 4.4 and 4.5), or with hypoplastic cervix and small uterine cavity. Sometimes, it leads to pelvic endometriosis, such as chocolate cysts (Fig. 4.6). The primordial uterus can also develop uterine fibroids (Fig. 4.7).
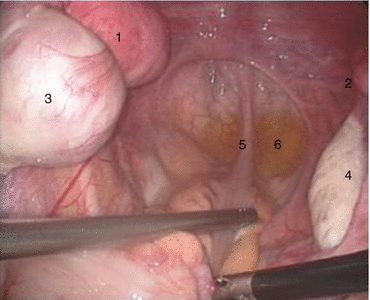
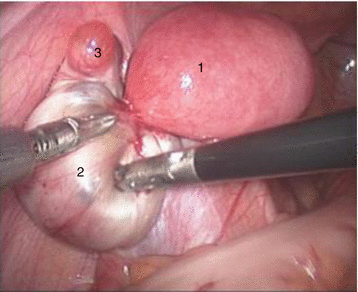
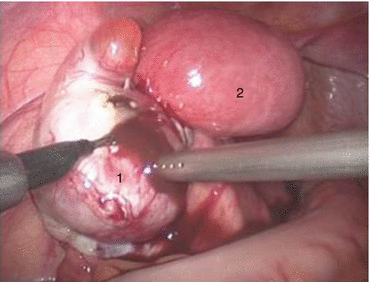
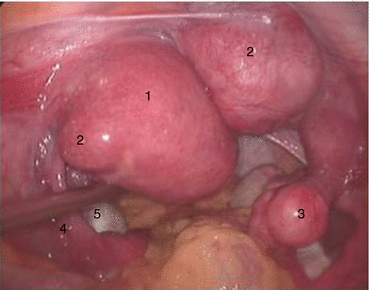

Fig. 4.4
Pelvic cavity of a functional primordial uterus. 1 Left functional primordial uterus, 2 right nonfunctional primordial uterus, 3 left chocolate cyst, 4 right ovary, 5 rectum, 6 pouch of Douglas

Fig. 4.5
Functional uterus. 1 Left functional primordial uterus, 2 left chocolate cyst, 3 follicular cyst

Fig. 4.6
Functional uterus with chocolate cyst, associated with severe cyclical abdominal pain. 1 Left ovarian chocolate cyst, 2 left functional uterus

Fig. 4.7
Functional uterus with fibroid. 1 left functional uterus, 2 uterine fibroid, 3 right primodial uterus, 4 left fallopian tube, 5 left ovary
5.
Other associated anomalies: A few patients with congenital absence of vagina may be associated with urinary tract anomalies. Common cases include the absence of kidney on one side, ectopic kidney, or pelvic kidney. Other patients may have associated spinal deformity. Common cases include lumbarization of first sacral spine, spina bifida, sacral recessive cleft, and vertebral fusion. If there are also abnormal secondary sexual characteristics and abnormal external genitalia, consideration should be given to chromosome abnormality or hermaphroditism.
4.1.2 Diagnosis and Investigations
The diagnosis is not difficult. In addition to the clinical history and physical signs, there are many useful investigations.
4.1.2.1 Gynecological Examination
Vestibular depression test (or depth of vestibular impression): After observing the vulval appearance, the vaginal vestibule is gently pressed with a gloved index finger lubricated with paraffin oil. With gradually increasing pressure, the depth of vestibular depression can be determined (Figs. 4.8, 4.9, and 4.10). Some depression can be over 5–6 cm in depth. This vestibular depression test is useful to select the type of surgical operations for this condition.
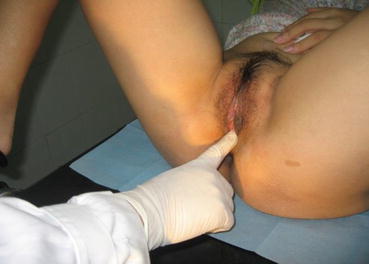
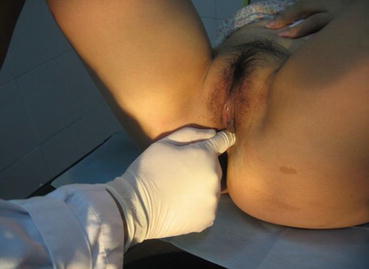
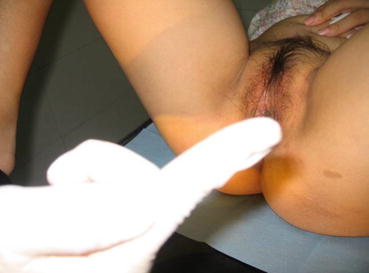

Fig. 4.8
Vestibular depression test. The vulval vestibule is pressed with gloved index finger

Fig. 4.9
The deepest point is reached by the finger, and the depth of depression is marked by the thumb

Fig. 4.10
The depth of vestibular depression is the distance from the fingertip to the marking thumb
4.1.2.2 Rectal (PR) Examination
PR examination can determine whether there is a uterus, its size, and any tenderness on palpation. It is generally difficult to palpate an absent uterus or small primordial uteri on both sides of the pelvis. Only if it is a uterine remnant at the back behind the top of the bladder, then a small nodular mass can be palpable (Fig. 4.3). If the uterus is enlarged and painful, it is most likely a functional uterus with retained blood (Figs. 4.6 and 4.7).
4.1.2.3 Ultrasound Examination
This is the most important and simple examination to determine whether there is a vaginal gas line, the size of uteri, ovaries, and the existence and locations of the kidneys.
4.1.2.4 Other Examinations
A few patients may require X-ray imaging or CT-scan examinations, in order to detect any urinary tract abnormality or spinal deformity.
4.1.3 Timing of Surgery
For patients with congenital absence of vagina (MRKH), operation is generally performed for adults after 18 years of age. For those who have periodic abdominal pain caused by a functional bleeding uterus, surgery should be performed as soon as possible to relieve the symptoms.
Currently, many doctors tell their patients with congenital absence of vagina to have surgery 2–3 months before marriage. This is inappropriate advice on the timing of surgery. It is because a woman without a vagina will have serious worry and concern about having a love affair with a man. This will lead to psychological barrier, and they will not dare to touch the men, hence inducing a sense of inferiority. They will abstain from the society and people. Some doctors are concerned with the stenosis and atrophy of the new vagina due to the lack of sex life. In fact, such concerns are unnecessary. A successful new vagina will not shrink. Even if not married, a vagina mold can often be used to expand the vagina to obtain satisfactory results.
4.1.4 Laparoscopic Peritoneal Vaginoplasty: Luo Hu Operation
Guangnan Luo7
(7)
The Luohu Hospital of Shenzhen, Shenzhen, China
There are many surgical approaches for laparoscopic peritoneal vaginoplasty. This section highlights the “Luo Hu Operation” pioneered by Dr. Luo Guang Nan from the Affiliated Hospital of Shenzhen University. This laparoscopic-assisted peritoneal vaginoplasty – Luo Hu Operation – is characterized by its simplicity, easy to learn, and minimally invasive. The postoperative result is good, especially without the need to wear a vaginal mold for a long period.
4.1.4.1 Operative Indications
(a)
Patients with congenital absence of vagina and uterus
(b)
Patients with androgen insensitivity syndrome with vaginal anomalies
4.1.4.2 Contraindications
(a)
Patients with severe pelvic adhesions
(b)
Patients with male sex reassignment surgery to become a male
4.1.4.3 Preoperative Preparation
(a)
Preoperative bowel preparations using low-residue diet and oral bowel antibiotic are recommended for 3 days before surgery, and enema is given in the previous night and the morning of surgery. It is to prepare for the situations when this surgical approach fails to complete, then it can be changed immediately to the sigmoid colon or ileum vaginoplasty.
(b)
Special surgical instruments
1.
“Luo Hu style” vaginal dilators (for use in surgery): A total of six vaginal dilators should be available. They are about 20–25 cm in length with blunt conical tips. Their diameters ranged from small to large as No. 1–2.2 cm, No. 2–2.5 cm, No. 3–2.8 cm, No. 4–3.0 cm, No. 5–3.3 cm, and No. 6–3.5 cm, respectively (Fig. 4.11).
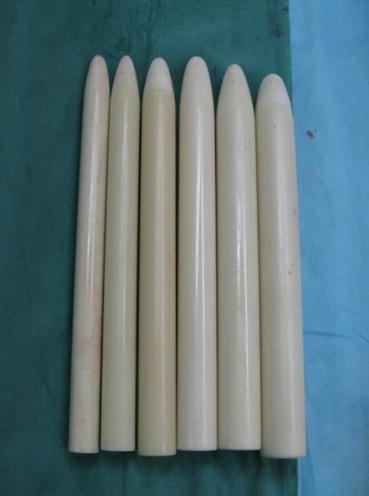

Fig. 4.11
Luo Hu style vaginal dilators
2.
A No. 0 Prolene (Ethicon Prolene 8418) nonabsorbable suture.
3.
An extracorporeal knot pusher.
4.
Injection fluid: 200–300 ml of normal saline with six units Pitressin and 1 mg Epinephrine for lifting pelvic peritoneum by distension.
5.
Homemade disposable vaginal mold: Take a 5 ml size syringe jacket, cut its ends, covering it with Vaseline gauze to about a thumb size in thickness. The new mold is further coated with three layers of condoms and ligated with No. 4 silk suture at its tail. After that, the excess condom material is cut off, leaving a short tail (Fig. 4.12).
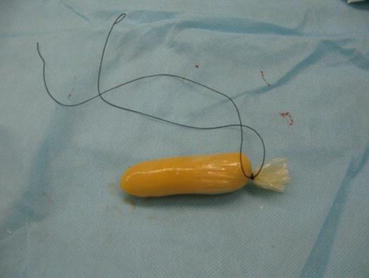

Fig. 4.12
Homemade disposable vaginal mold
4.1.4.4 Surgical Techniques
Diagrams of Luo Hu Operation (Figs. 4.13, 4.14, 4.15, 4.16, 4.17, 4.18, 4.19, 4.20, 4.21, and 4.22)
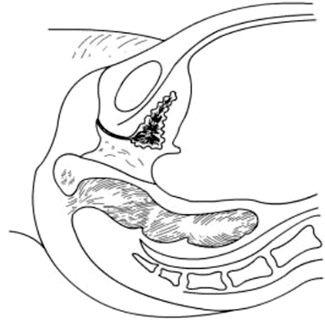
Fig. 4.13
Sagittal view of the pelvis in a patient with congenital absence of vagina and uterus
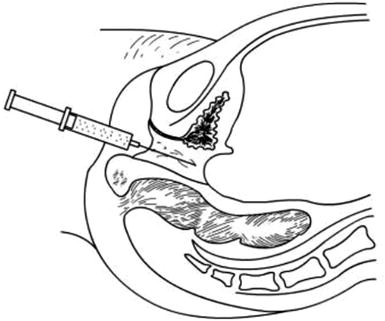
Fig. 4.14
Inject normal saline at the pelvic extraperitoneal space to create a water cushion between the bladder and rectum
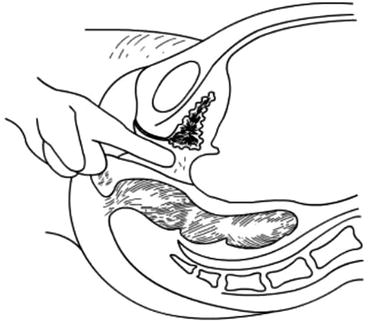
Fig. 4.15
Creating a vaginal tunnel with one or two index fingers of both hands
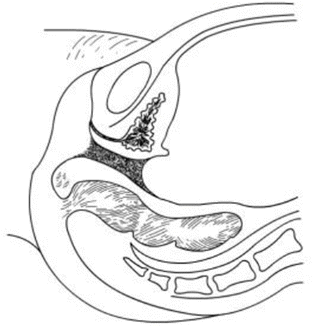
Fig. 4.16
A vaginal tunnel is created by pressure, stretching, and separating by fingers
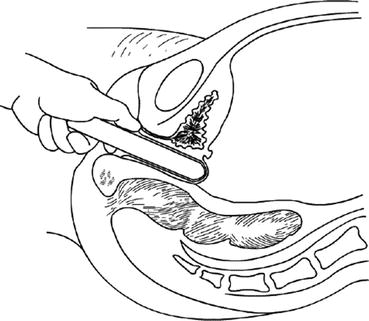
Fig. 4.17
A small-sized vaginal dilator is inserted into the tunnel, to push up the pelvic peritoneum behind the bladder
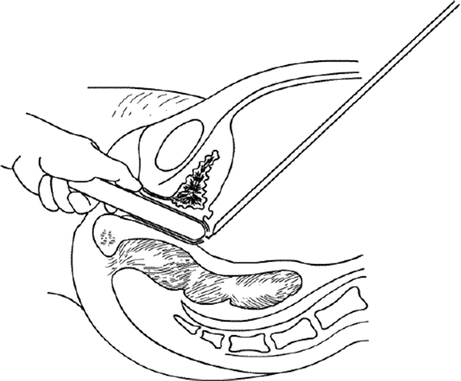
Fig. 4.18
The thinnest peritoneal peritoneum is cut transversely by a laparoscopic monopolar hook electrode at the head of the vaginal dilator
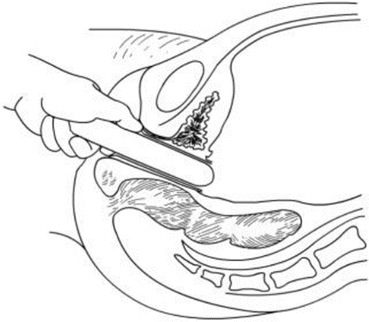
Fig. 4.19
The new vaginal tunnel is enlarged with small- to large-sized vaginal dilators, and the peritoneal opening is further cut open
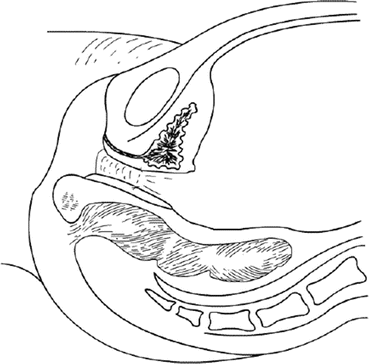
Fig. 4.20
The edge of the pelvic peritoneum is now pulled down to the vaginal opening and stitched to the vaginal mucosa at the vestibule. The pelvic peritoneum is now completely covering the vaginal tunnel
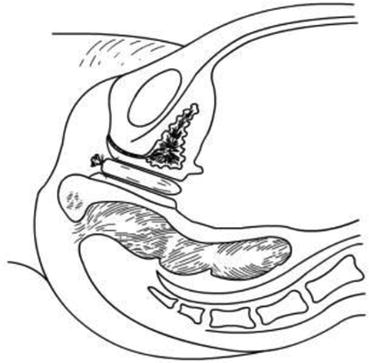
Fig. 4.21
A vaginal mold is inserted into the new vaginal tunnel
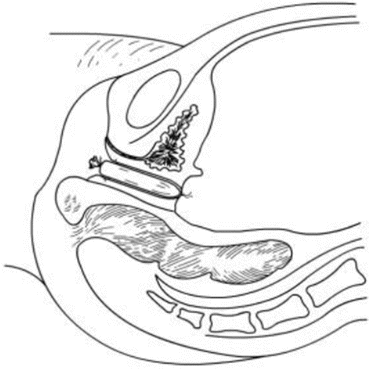
Fig. 4.22
The peritoneal opening in the pelvis is now closed, and a new vagina has been created
4.1.4.5 Surgical Procedures
Position
Patient is in a lithotomy position. Operation is performed under general anesthesia.
Insertion of a Foley Catheter
Bladder is catheterized emptied with an indwelling catheter F16 or F18. A large-sized catheter should be chosen in order to guide the creation of the vaginal tunnel serving as a direction marker, to avoid damage to the urethra.
Laparoscopic Examination of the Pelvic Cavity
A 10 mm size laparoscope is inserted into the peritoneal cavity via the umbilicus. Two 5 mm operating trocars and cannulas are inserted on both lower abdominal quadrants to examine the pelvic cavity, to observe and evaluate the pelvic peritoneum, bilateral adnexa, and the location and size of the primordial uterus.
Creation of an Extraperitoneal Water Cushion
An epidural needle is used to puncture into the center of the vaginal vestibule (Fig. 4.23), pass through the gap between the urethra and bladder in front, and rectum behind directly to the extraperitoneal space over the pouch of Douglas. The needle tip can be seen, under the laparoscope, just below the peritoneal surface, but care is taken not to puncture the peritoneum (Figs. 4.24 and 4.25). Saline with vasopressin and adrenaline is injected into the extraperitoneal space to form a large water cushion (Fig. 4.26). A successful water cushion will push up the pelvic peritoneum which appears white in color (Fig. 4.27), and hence separating and pushing up the pelvic peritoneum from the pelvic floor. The water cushion will also push back the rectal wall, to make it easier to create a channel for the new vagina and prevent the rectal wall from injury, as well as to reduce bleeding during this procedure (Fig. 4.28). The needle is slowly withdrawn while injecting more saline up to a total of 200–300 ml to fill up the space between the urethra, the bladder, and the rectum to facilitate the next step of making a tunnel.
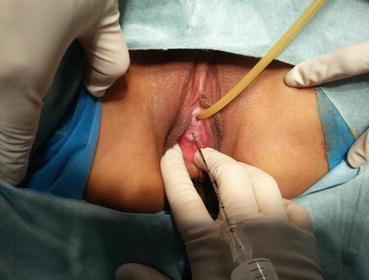
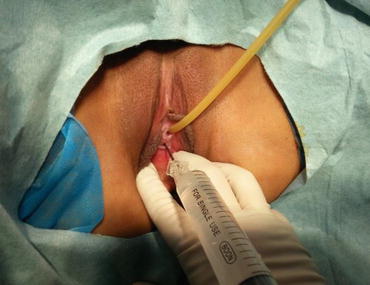
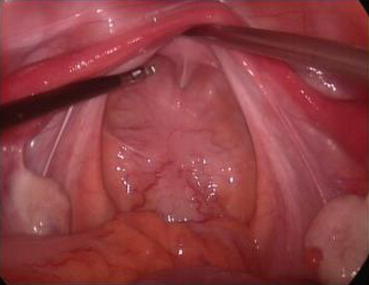
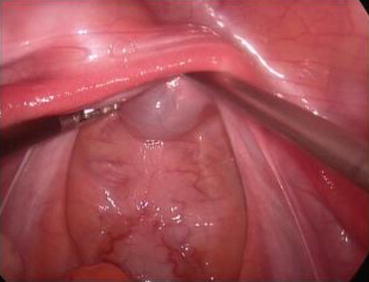
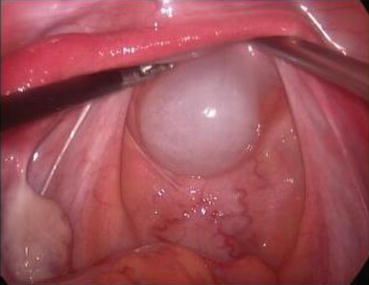
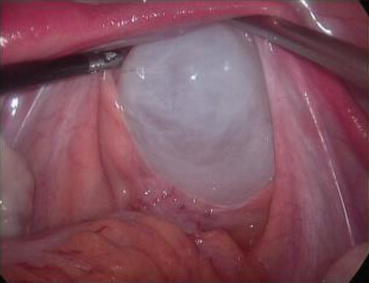

Fig. 4.23
A long epidural needle with 20 ml syringe filled with normal saline is inserted into the middle of the vaginal vestibule

Fig. 4.24
The needle is advancing into the tissue in a direction parallel to the urinary catheter up to 3–4 cm

Fig. 4.25
Under laparoscopy, the needle is inserted into the space between the bladder and the rectum up to the peritoneum of the pouch of Douglas. It is important not to puncture the peritoneum

Fig. 4.26
Normal saline is injected underneath the pelvic peritoneum, to form a white and semitransparent water cushion

Fig. 4.27
Normal saline is slowly injected and the water cushion is getting bigger

Fig. 4.28
The peritoneal membrane appears milky white in color, indicating that it has separated from the pelvic floor, the bladder, and the anterior wall of the rectum
The Creation of a Vaginal Tunnel
At the punctured hole in the center of the vaginal vestibule, a medium-sized curved forceps is used to puncture through the mucosal membrane, then in a direction parallel to the urethra, the tissue up to 3–4 cm is stretched opened (Figs. 4.29 and 4.30). Then an index finger is inserted into the space, bluntly separating the tissue in the direction parallel to the Foley catheter and creating a tunnel in the space among the urethra, the bladder, and the rectum (Figs. 4.31, 4.32, and 4.33). The smallest-sized vaginal dilator is then inserted into the newly created tunnel and is pushed further in toward the pelvic floor (Fig. 4.34). Under the laparoscope, the head of the vaginal dilator can be seen behind the bladder pushing toward the pelvic peritoneum. A pair of laparoscopic graspers can be used to grip the transverse fibrous cords at the bottom of the bladder and push the bladder up and forward so that the peritoneum of the pouch of Douglas between the rectum and the bladder can be seen firmly pressed against the head of the vaginal dilator (Fig. 4.35).
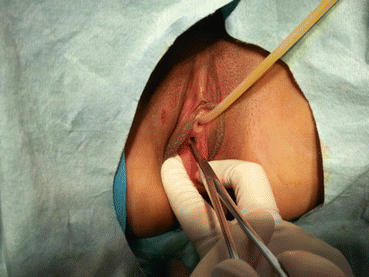
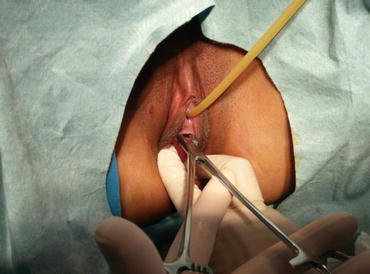
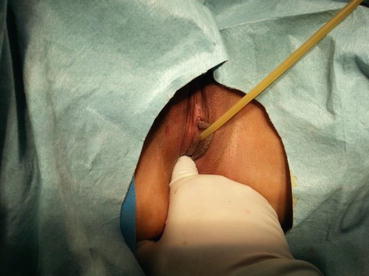
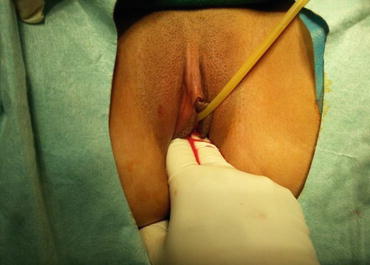
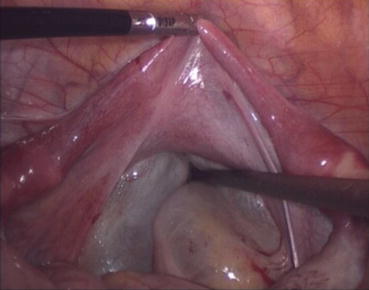
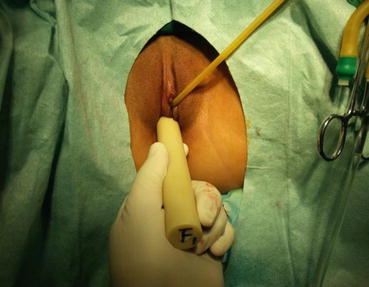
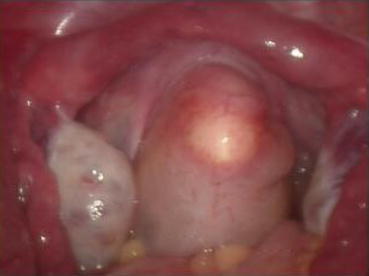

Fig. 4.29
The mucosa of the vaginal vestibule is punctured by inserting a medium or large curved forceps in order to penetrate and separate the tissue

Fig. 4.30
After advancing 3–4 cm in depth, the curved forceps is to open and to separate the intervening tissue

Fig. 4.31
An index finger is inserted into the tissue space to make further separation of the tissue

Fig. 4.32
Index and middle fingers are used to separate digitally the tissue until they reach the water cushion and pelvic peritoneum overlying it. The vaginal tunnel is now created

Fig. 4.33
Under the guide of the laparoscopy, an index finger will further separate the peritoneal membrane along the sides of a vaginal guide rod

Fig. 4.34
The smallest vaginal dilator is inserted into the vaginal tunnel

Fig. 4.35
A vaginal dilator now elevates the pelvic peritoneum which is very thin and white in color, suggesting that the anterior wall of the rectum is not close by, and is probably separated from the peritoneum
A monopolar hook electrode is used to incise the peritoneum transversely at the thinnest spot at the head of the vaginal dilator (Fig. 4.36), then push the dilator toward the peritoneal incision to expand it (Fig. 4.37). The dilators are progressively changed (Fig. 4.38) from small to large size (No. 1 to No. 6) (Figs. 4.39 and 4.40) to expand the tunnel (Figs. 4.41 and 4.42).
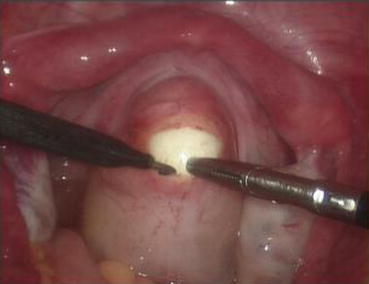
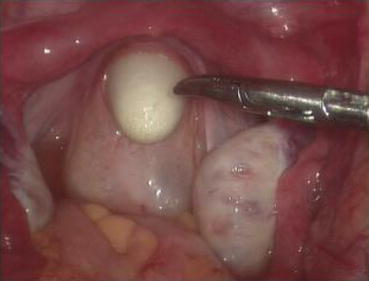
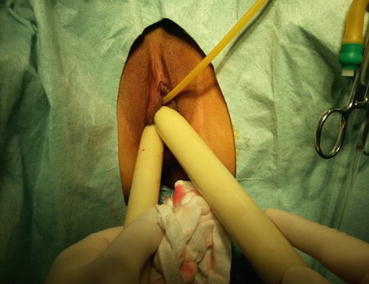
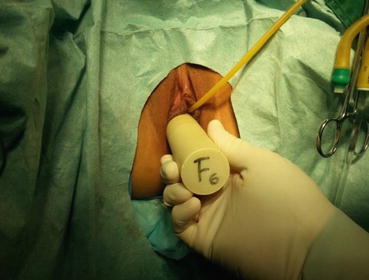
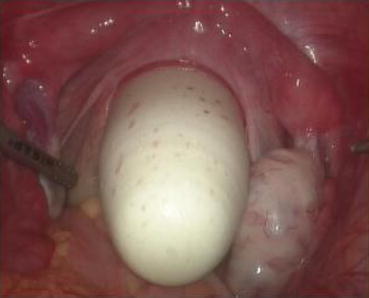
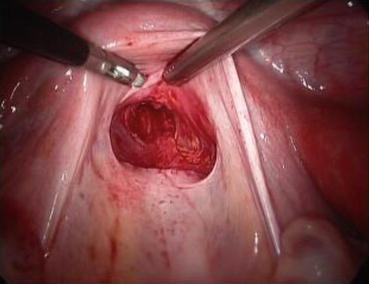
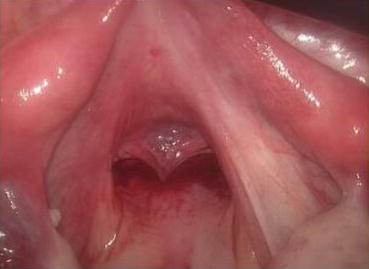

Fig. 4.36
A monopolar hook electrode or electrocautery is used to incise the peritoneal membrane at the head of the vaginal dilator

Fig. 4.37
A vaginal dilator is inserted through the peritoneal wound to expand the incision opening

Fig. 4.38
Vaginal dilator is changed from small to large size to expand the vaginal tunnel and incision opening

Fig. 4.39
The vaginal dilator is changed progressively from No. 1, No. 2, etc. till the largest No. 6 dilator was inserted into the vaginal tunnel

Fig. 4.40
Laparoscopic view of the largest No. 6 vaginal dilator at the peritoneal opening

Fig. 4.41
The new vagina is created at the pouch of Douglas. There is minimal bleeding

Fig. 4.42
The separated peritoneum is seen hanging over the pelvic peritoneal opening
A 3/0 absorbable suture is now passed into the pelvic cavity through the vaginal opening (Fig. 4.43). Under the laparoscopic vision, the incised peritoneal edges are marked with sutures at 12, 3, 6, and 9 o’clock positions, respectively. The needles with their sutures are then pulled out of the vaginal opening at the vestibule. These sutures are then sutured with the mucous membrane of the vaginal vestibule at corresponding 12, 3, 6, and 9 o’clock positions. Now the entire vaginal tunnel is covered with the peritoneal membrane (Figs. 4.44, 4.45, 4.46, 4.47, 4.48, 4.49, 4.50, 4.51, 4.52, 4.53, 4.54, 4.55, 4.56, and 4.57). A nonabsorbable 1/0 Prolene is passed into the pelvic cavity through the vagina and is used to close the pelvic floor (Fig. 4.58) for later closure of the peritoneum. A homemade vagina mold (Fig. 4.12) is inserted into the vagina (Fig. 4.59) reaching the cutting edge of the tunnel at the pelvic floor (Fig. 4.60) to prevent adhesion, provide hemostasis, and maintain the space of the tunnel. The vaginal opening is then sutured temporarily to hold the mold inside the vagina (Figs. 4.61 and 4.62).
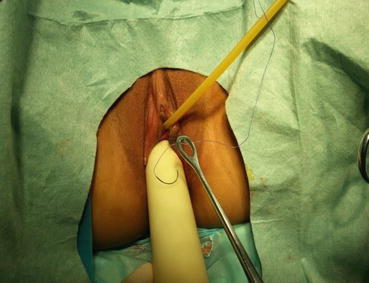
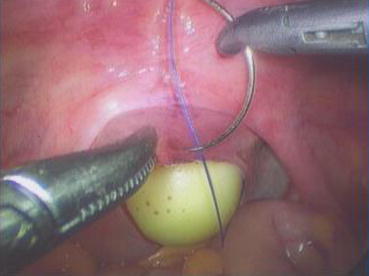
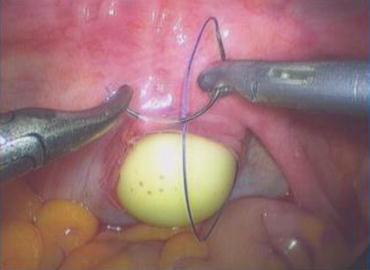
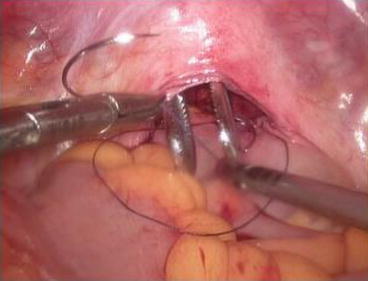
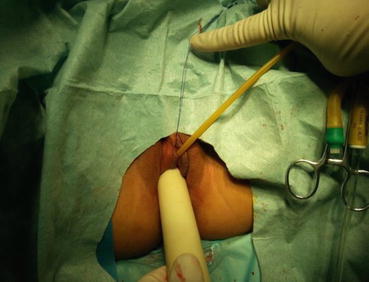
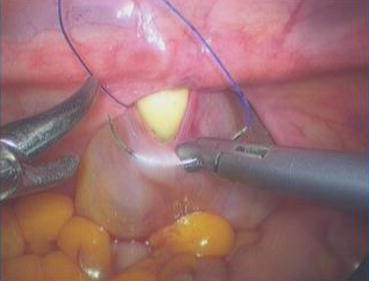
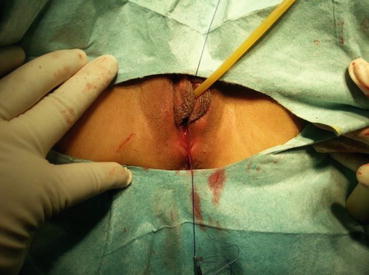
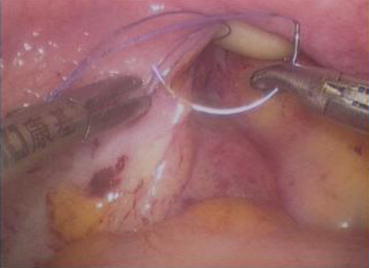
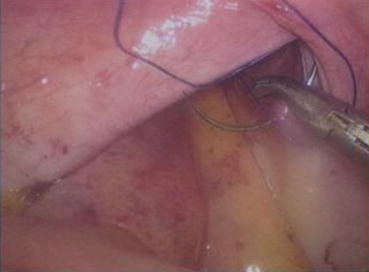
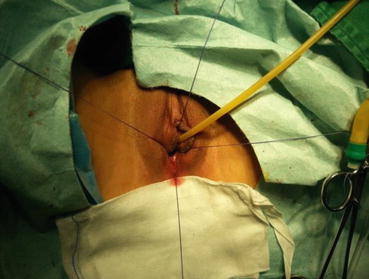
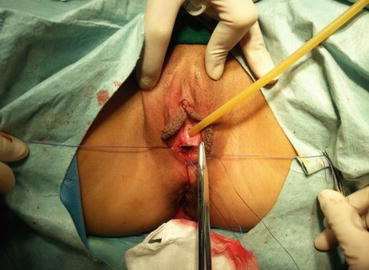
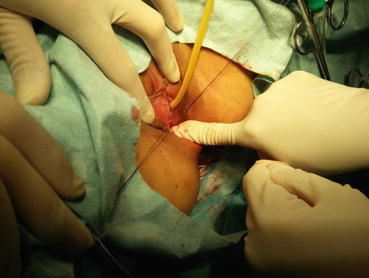
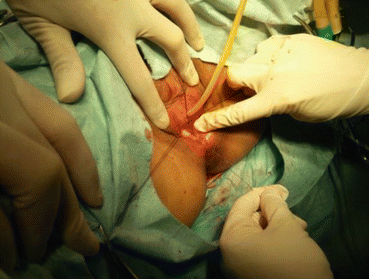
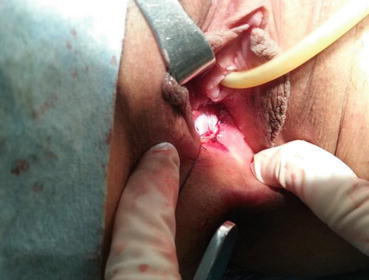
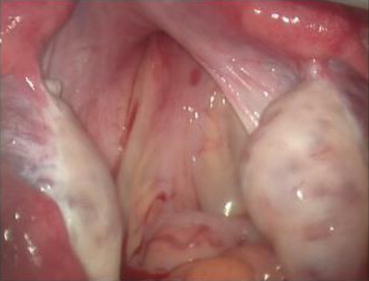
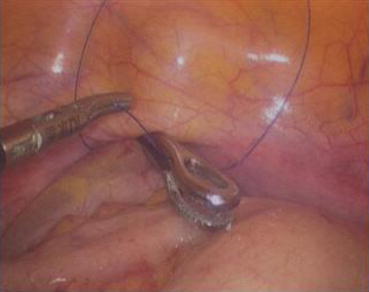
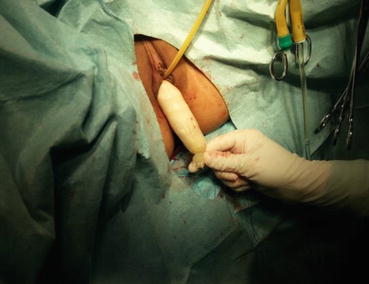
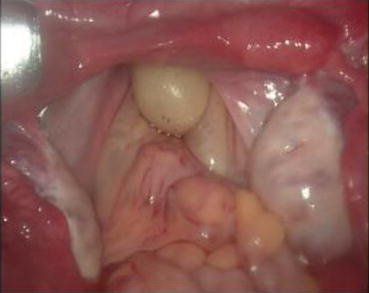
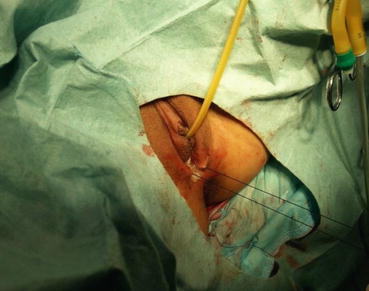
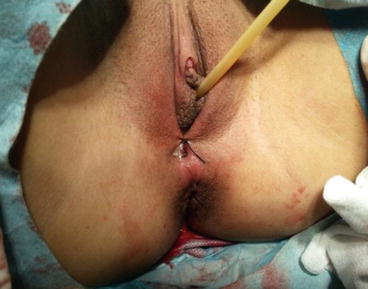

Fig. 4.43
Four 3/0 Vicryl sutures are introduced into the pelvic cavity via the vaginal tunnel, leaving the ends of these sutures outside the vaginal opening

Fig. 4.44
The pelvic peritoneum at 12 o’clock position is marked and sutured at the inner vaginal opening

Fig. 4.45
The needle passes through the peritoneum

Fig. 4.46
A ring forceps is inserted through the vaginal tunnel to pick up the suture

Fig. 4.47
The suture is pulled out of the vaginal opening and anchored at the corresponding 12 o’clock position of the vaginal vestibule

Fig. 4.48
Similarly, another suture is inserted to pick up the peritoneal membrane at the 6 o’clock by suturing it

Fig. 4.49
Both sutures are anchored at the 12 o’clock and 6 o’clock positions of the vaginal opening

Fig. 4.50
Similar procedure is to pick up the left peritoneum edge

Fig. 4.51
Same to the right peritoneum edge

Fig. 4.52
These sutures are anchored at the corresponding 12, 3, 6, and 9 o’clock positions at the vaginal opening

Fig. 4.53
The peritoneal membrane is stitched to the vaginal mucosa at the corresponding positions at the vaginal vestibule

Fig. 4.54
All sutures are tied to approximate the peritoneal membrane and the mucosal membrane of the vaginal vestibule

Fig. 4.55
Sutures are seen at respectively 12, 3, 6, and 9 o’clock positions

Fig. 4.56
The suturing of peritoneal membrane with the vaginal mucosa is completed and adequate hemostasis is observed

Fig. 4.57
The peritoneum of the pouch of Douglas has been pulled down and now it is covering the vaginal tunnel

Fig. 4.58
A nonabsorbable Prolene 1/0 suture is inserted into the pelvis to close the pelvic floor peritoneum

Fig. 4.59
A homemade vaginal mold is inserted into the new vagina

Fig. 4.60
The tip of the vaginal mold is positioned up to the level of fibrous cords in the pelvis

Fig. 4.61
The labia minora are sutured and closed to keep the vaginal mold in the vagina

Fig. 4.62
A suture knot is tied to close the vaginal opening to prevent the vaginal mold from falling out of the vagina
Suturing the Pelvic Floor
Under the laparoscopic vision, the 1/0 nonabsorbable Prolene, which has purposely left in the pelvic cavity in the last step, is now picked up and used to close the pelvic floor peritoneum using a purse-string suture over the inner tunnel above the vaginal mold (Fig. 4.63). Six extracorporeal knots are tied from outside and pushed down into the peritoneal cavity, closing the pelvic peritoneal opening securely. Although the newly formed pelvic floor may have gaps in the peritoneum, no further suturing is needed. When the pneumoperitoneum is released, the gaps will disappear, followed by reperitonealization to form a closed pelvic floor 10 days after surgery (Figs. 4.64, 4.65, 4.66, and 4.67).
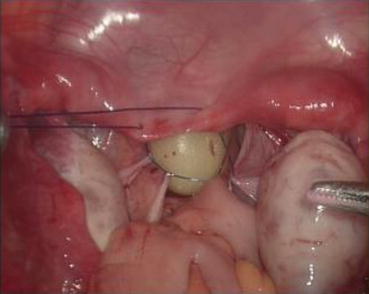
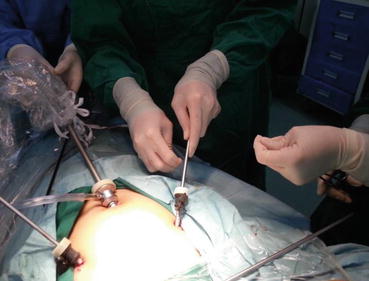
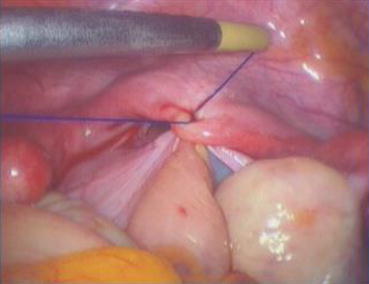
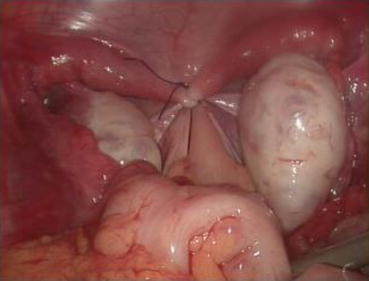
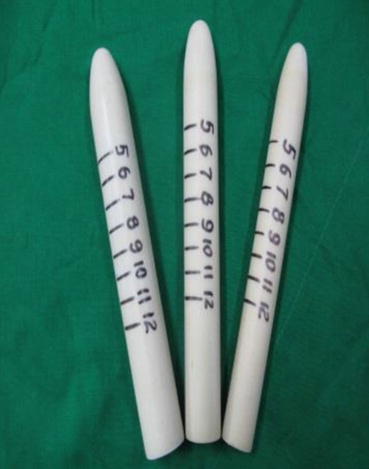

Fig. 4.63
A nonabsorbable Prolene suture is used to close the peritoneum of the pelvic floor with seven stitches purse-string suture method (practically, the seven stitches purse-string suture method involves the following: (1) the first stitch starts inserting the needle at 1 cm to the right of the center of the fibrous cords at the bottom level of the bladder; (2) the second stitch picks the side wall peritoneum below the right ovary; (3) the third stitch takes the peritoneum on the right side of the rectum; (4) the fourth stitch is at rectal wall about the level of the bottom of the bladder, the suture should penetrate only the serous muscular layer of the rectum; (5) the fifth stitch takes the peritoneum on the left of the rectum; (6) the sixth stitch at the peritoneal wall below the left ovary; (7) the final seventh stitch is at 1 cm to the left of the center of the fibrous cords at the bottom of the bladder

Fig. 4.64
The two ends of the above suture are delivered outside the abdomen via the cannula at the left lower cannula. An extracorporeal knot is tied and pushed down into the abdomen to form a taut purse-string suture to close the pelvic floor

Fig. 4.65
The above suturing knot is secured by another intracorporeal counter knot

Fig. 4.66
Reformation of the pelvic floor, a new peritoneal top of the vagina. The surgery is completed

Fig. 4.67
“Luo Hu style” vaginal dilators with scale marking (for patient use); specifications: length 20 cm; diameter: small 2.2 cm, medium 2.5 cm, large 2.8 cm
Key Points of Surgical Techniques
1.
Before making the vaginal tunnel, sufficient water should be injected to form a large water cushion. The water cushion helps to separate the pelvic peritoneum around the internal vaginal opening. This will also reduce bleeding and avoid rectal injury during the creation of the vaginal tunnel (Figs. 4.23, 4.24, 4.25, 4.26, 4.27, and 4.28)
2.
Vaginal dilators: Vaginal dilators are used to push up the pelvic peritoneum for the incision and progressively expand the tunnel and the peritoneal incision. This is the key technique of the surgery. This will result in less injury and bleeding with a new smooth vaginal tunnel
4.1.4.6 Postoperative Management
1.
Appropriate postoperative antibiotic treatment.
2.
Antiseptic solution (0.1 % iodophor) washing and preparation of the vulva and perineum twice a day after the operation.
3.
The urinary catheter can be removed on day 2–3 after operation.
4.
From the postoperative day 10, the vaginal mold can be removed. A urinary catheter is inserted into the vagina for washing it with 0.1 % iodophor daily for 3 days. Afterward, the patient should learn how to expand the vagina with a vaginal dilator once a day, 10 min each time. With the “Luo Hu style” vaginal dilators, a small-sized dilator is first used, followed by changing it to a medium-sized or a large-sized dilator according to the tightness of the vagina over a few days (Figs. 4.68, 4.69, 4.70, and 4.71). One to two months after operation, sexual activity can begin. The vaginal mold or dilator will not be required for those with regular sex.
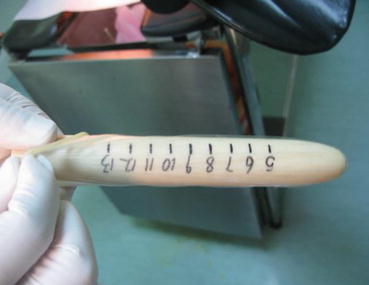
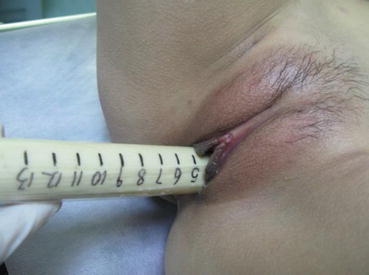
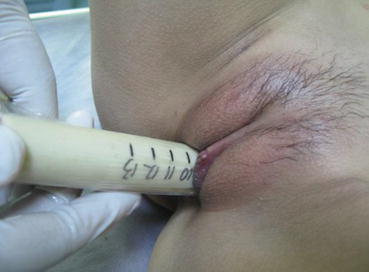
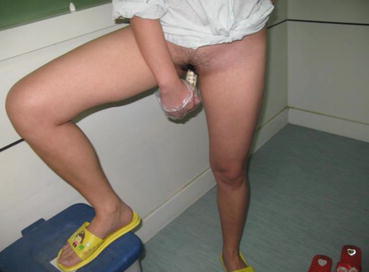

Fig. 4.68
A vaginal dilator is put into a condom and lubricant is smeared onto the head of the dilator

Fig. 4.69
The vaginal dilator is now gradually put into the vagina

Fig. 4.70
The dilator is pushed slightly harder till reaching the top end of the vagina. Then in and out movements are performed repeatedly, for 5–10 min duration

Fig. 4.71
Patient can easily perform the vaginal expansion herself by partly standing up on one leg, with another leg stepping on a small stool as shown
4.1.4.7 Recovery Stages After Laparoscopic Peritoneal-Assisted Vaginoplasty
In practice, we observed that after peritoneal vaginoplasty, there are different time intervals presenting in different recovery stages. According to different appearances and characteristics of the new vagina, there are four recovery stages which can be managed accordingly. Appropriate postoperative management is very important to the future success and functionality of the new vagina. The recovery stages are described as follows:
Stage of Creation of the Vagina: 10–15 Days After Surgery
Characteristics
When the vaginal mold is removed, a new vagina has now formed. The vaginal peritoneum has now adhered to the surrounding tissues with the pelvic floor closed. During this period, the vagina is loose and deep, up to 12–15 cm.
Management
Daily vaginal wash is with 0.1 % iodophor. Each time, the vagina is examined by inserting the index finger into the vagina to feel and assess the vaginal condition inside. In the meantime, small-sized vaginal dilators can be used to expand the vagina.
Stage of Scar Contracture: 15–30 Days After Surgery
Characteristics
A large amount of connective tissues will form around the vagina, which become narrower, lighter, and hardened. Pathological examination of the vagina will show fibrous connective tissue and inflammatory cells, but no epithelial cells. The depth of the vagina is now about 7–9 cm.
Management
Every day, a lubricated and gloved index finger is inserted into the vagina to expand it. At the beginning, the vagina may feel very tight and can accommodate only one finger. The anastomotic opening is narrow, allowing only one finger for an in and out expansion. After a few days, there is a gradual relaxation of the vagina. A small-sized vaginal dilator can then be used to replace the digital expansion. Patients should be taught to expand the vaginas by themselves. Every day, a vaginal dilator can be used to expand the vagina 1–2 times, 10 min each time (Figs. 4.68, 4.69, 4.70, and 4.71).
Each time after performing the vaginal expansion, there may be some vaginal bleeding which is self-limiting. The bleeding will stop on its own. After vaginal expansion, the vagina should be scrubbed with povidone-iodine cotton stick to prevent infection. This stage is the most important stage for vaginal expansion, usually under the guidance of a doctor. The patient should remain hospitalized for this period of time. It is therefore inappropriate to discharge her from hospital too early. At the same time, this patient should be provided with sexual and psychological counseling. If this stage is not properly handled, the depth of the vagina and the future sex life can be affected.
Stage of Relaxing and Softening: 30 Days and 3 Months After Surgery
Characteristics
The connective tissues around the vagina begin to be resorbed and become softened. The vagina is now soft and flexible and gradually deeper and wider. The depth of the vagina at this stage is about 8–12 cm.
Management
At this stage, the patient is generally discharged home and has returned to normal work and life. She can use a small- or a medium-sized vaginal dilator to expand the vagina, once every day, with a 10 min duration. Bleeding is gradually reduced to scanty and even nothing. Generally after 2 months, majority of patients can have sex life. If so, it may replace the use of vaginal dilators with even better effect.
Stage of Vaginal Maturity: 3 Months After Surgery
Characteristics
The vagina becomes increasingly soften and elastic with some vaginal folds appearing. There are also some milky whitish vaginal discharges covering the pink vaginal mucous membrane (Fig. 4.72). Pathological examination of the vaginal mucosa showed stratified squamous epithelium. The laparoscopic wounds will now become hardly visible (Fig. 4.73).
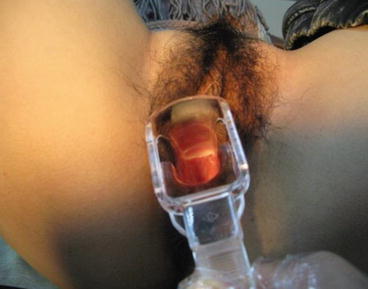
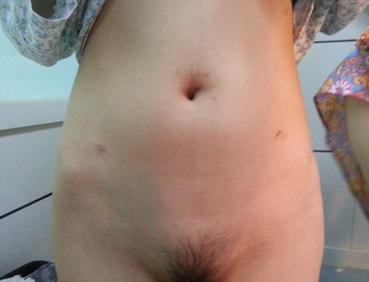

Fig. 4.72
Six months after surgery, the vagina becomes elastic and folds appear. The vagina shows pink vaginal mucous membrane and some milky white discharge

Fig. 4.73
The laparoscopic wound scars will gradually heal well and become hardly visible after a few months
Management
From this time onward, the vagina will no longer collapse or close. No special treatment is required for marriage and sexual intercourse. If without sex life, a vaginal dilator may be used one to two times a week or patient may expand the vagina with her own index and middle fingers during bath.
4.1.5 Transvaginal Peritoneal Vaginoplasty
Hang Mei Jin8
(8)
Department of Obstetrics, Affiliated Obstetrics and Gynecology Hospital, College of Medical Sciences, Zhejiang University, Hangzhou, 310006, China
4.1.5.1 The Structure and Functions of the Peritoneum
Peritoneum is a serous membrane, consisting of the mesothelium lining the peritoneal cavity and the connective tissues underneath. It covers the inner wall of the abdomen and pelvis and the surfaces of the internal organs. It is a thin, transparent, smooth, and shiny layer of tissue. According to its areas of coverage, it can be divided into parietal peritoneum and the visceral peritoneum. The parietal peritoneum covers the abdominal wall, the pelvic wall, and underneath the diaphragm; the visceral peritoneum wraps around the internal organs and forms the serosal layers of all internal organs. They are connected in continuation as a peritoneal sac. In male, the peritoneal sac is completely closed, but in female, the peritoneal sac opening of the fallopian tubes is connected outside via the uterine and vaginal cavities. The irregular spaces between the visceral peritoneal layers and parietal peritoneal layers are called the peritoneal cavity. In addition to supporting and fixing the internal organs, the peritoneum also has the function of secretion and absorption. Under normal circumstances, peritoneum secretes a small amount of serous fluid to lubricate the surface of the organs, hence reducing friction of their movements. Peritoneal surface area is huge, especially the parietal peritoneum which covers the abdominal wall and pelvic floor, but their attachments to these walls are loose and can be easily separated.
As the peritoneal cavity has a very large surface area, it has a strong absorptive capacity. In pathological cases, an increase in peritoneal exudation from these surfaces may form ascites. Peritoneum also defends the body from harms, with some peritoneal cells having phagocytic function, and also when the abdominal organs have infection and are infectious, peritoneal tissues especially the omentum can quickly move to the infectious lesions, to adhere to them, and to engulf and localize the infection from spreading.
Peritoneum is rich in nerve receptors. The spinal nerves that dominate the parietal peritoneum also dominate the corresponding segments of the skin and body; touching, temperature, or chemical stimulation in the parietal peritoneum can induce pain in conscious patients. When the parietal peritoneum is irritated, there are reflex contractions in the abdominal muscle, resulting in a rigid abdominal wall phenomenon, i.e., guarding tenderness. The nerve that dominates the visceral peritoneum comes from the autonomic nervous system that dominates the internal organs and the visceral afferent nerves. They have different sensitivity to different stimuli.
The peritoneum also has a strong ability to repair and heal. Peritoneal mesothelial cells can be transformed into fiber cells. At different levels, the merger of the fibroblasts of peritoneal mesothelial origin is the basis of the strong peritoneal regeneration ability. Therefore, for gastrointestinal surgeries, a good serosal suture can allow a smooth contact surface and a faster healing and lesser adhesion. If surgery is rough, the peritoneum may be injured resulting in postoperative peritoneal adhesion.
Since the peritoneal membrane has the above special features, it provides a theoretic and practical basis for the peritoneal membrane to form a new vaginal wall. At present, there are basically four approaches:
1.
By laparoscopic approach, the pelvic peritoneum is pushed down and fixed to the vaginal opening at the vaginal vestibule (under laparoscopy, a surgical procedure using a peritoneum pusher rod); the upper end of the new vagina is then sutured and closed by laparoscopic suturing.
2.
By a combination of vaginal and laparoscopic approach, a vaginal tunnel between the bladder and rectum is created. The pelvic peritoneum is pulled down to the vagina and fixed to the vaginal mucosa at the vaginal vestibule. The upper end of the new vagina is then closed by laparoscopic suturing. This is the Luo Hu procedure as described in the last section.
3.
By the vaginal approach, the pelvic peritoneum is pulled through the space between the bladder and rectum and fixed to the vaginal opening at the vaginal vestibule. The upper end of the new vagina is then closed by laparoscopic suturing.
4.
By only the vaginal approach, a vaginal tunnel is created and the pelvic peritoneum is pulled down through the space between the bladder and rectum and fixed to the vaginal opening at the vaginal vestibule. The upper end of the new vagina is also closed by vaginal suturing. The last approach will be highlighted as follows the transvaginal peritoneal vaginoplasty.
4.1.5.2 Preoperative Assessment of Transvaginal Peritoneal Vaginoplasty
In 1933, Ksido pioneered peritoneal vaginoplasty. Through continuous improvement, this approach is considered better than the other operations; besides, it is not a complicated procedure. The key point is that when the new vaginal tunnel is created, the patient’s own pelvic peritoneum is used to cover the vaginal tunnel to complete vaginoplasty. The success of this operation is the selection of patients. The surgical technique is now better developed, leading to significant improvement to free the pelvic peritoneum, to push it down as well as to close the vaginal vault.
If the pelvic peritoneum is more slack over a large area, it is then feasible to perform a relatively simple transvaginal peritoneal vaginoplasty. The key surgical techniques of this operation are that the freeing, pulling down of pelvic peritoneum, as well as the closure of the vaginal vault are completed within the newly created vagina. It is a minimally invasive procedure and leaves no abdominal surgical scar.
After years of practices, Dr. Sun Jin and his colleagues from the department of Obstetrics and Gynecology, Zhejiang University Hospital, had reached a satisfactory sexual function of 82.4 % after 20 years of follow-up. In order to guarantee a successful operation and satisfactory postoperative result, they proposed that before the operation, patients should be assessed on the size of the area and the degree of laxity of the pelvic peritoneum. They classified three types of pelvic peritoneum for this procedure.
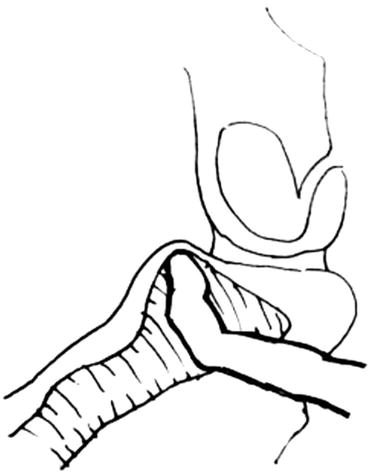
Get Clinical Tree app for offline access

1.
During rectal examination, a gloved index finger should pass deep into the rectum till reaching the pelvic peritoneum. At the junction of the primordial uteri on both sides, there is generally a palpable cordlike peritoneal folding band. If that can be reached by the finger, then with the tip of the index finger it should be hooked and pulled toward the anus (Fig. 4.74). If it can be pulled down for more than 2 cm, then it is a type I pelvic peritoneum, suggesting that pelvic peritoneum is more slack and can be freed for a larger area so that the surgery can be more easily performed and be successful. If the cordlike peritoneal folding band can be reached and pulled down with the hooked index fingertip but only slightly for less than 2 cm, it is a type II pelvic peritoneum, suggesting that the pelvic peritoneum is tight and can be freed for only a smaller area. Even the surgery can be successful, there may be some difficulties to perform. An experienced surgeon is required to perform this procedure to achieve a successful outcome. In some patients, suturing at the top end of the new vaginal tunnel may be more difficult; it might have to be done via the abdomen and perhaps under the laparoscope to avoid ending with a short vagina. If the index finger deep at the pelvic floor yet it cannot touch the cordlike peritoneal folding band, this is a pelvic peritoneum type III. For this group of patients, the pelvic peritoneum is either too tight or too high that only little area can be freed to allow the surgery to be completed successfully. If the surgeon does not have great experience in this surgical approach, it should be abandoned. He/She should consider other surgical approaches such as the sigmoid colon vaginoplasty or the biological patches (acellular dermal matrix) vaginoplasty.

