Venepuncture
Sites
- Cubital fossa.
- Dorsum of the hand.
- Others, as dictated by availability or necessity.
Suggested analgesia
- Topical local anaesthetic, e.g. amethocaine or EMLA (lignocaine [lidocaine], prilocaine), can be used for any age except preterm neonates.
- Sucrose in infants <3/12 (max 2 mL, 0.5 mL in infants <1500 g).
- Consider nitrous oxide in children >4 years.
- Consider sedation, e.g. midazolam oral 0.5 mg/kg (max 15 mg) intranasal/buccal 0.3 mg/ kg (max 10 mg).
Refer to chapter 4, Pain management.
Equipment
Needle (straight or butterfly), syringe, alcohol wipe, tourniquet, cotton ball, band-aid/tape, blood collection tubes.
Technique
- In adolescents and older children, blood can be collected with a needle and syringe, as in adults. In infants and small children, a 23-gauge butterfly needle offers more stability.
- Wash the site with an alcohol preparation and allow to dry. Using a tourniquet around the limb, insert the needle into a vein and aspirate gently; once enough blood is collected, release tourniquet and apply local pressure with a cotton ball on the puncture site.
- Some visible veins are too small to be used to take blood. A palpable vein is more likely to be successful than a visible but non-palpable vein.
- With small children, an assistant can hold the limb still and provide a tourniquet at the same time.
- An alternative technique is to insert a 21- or 23-gauge needle into a vein and allow the blood to drip out directly into collection tubes. Several millilitres can be collected this way.
Blood culture collection
- Strict asepsis is required.
- Use alcoholic chlorhexidine or 70% alcohol-based preparations for skin preparation and wait at least 1 min before taking blood. Do not touch the venepuncture site after skin preparation.
- Most paediatric blood culture bottles require 1–4 mL of blood; take as close to 4 mL as possible for optimal sensitivity.
- Consider anaerobic blood cultures (as well as aerobic) in neonates where there has been prolonged rupture of membranes or maternal chorioamnionitis, poor dentition, severe mucositis, sinusitis, abdominal sepsis, perianal infections, bite wounds or in immunosuppressed patients.
- In patients with central venous access devices take paired peripheral and central line cultures.
- There is no need to change needles between venepuncture and injecting the blood culture bottles. Inject blood culture bottles first (before dividing blood into other specimen tubes).
Sites
- Dorsum of the non-dominant hand is preferred.
- Alternative sites include the anatomical snuffbox, volar aspect of the forearm, dorsum of the foot, great saphenous vein or cubital fossa.
- The site usually requires splinting and this should be taken into consideration (e.g. foot in a mobile child is less desirable).
- Scalp veins should only be used when there are no other possibilities.
Suggested analgesia
- As for venepuncture above.
- Consider injectable local anaesthetic in older children, e.g. lignocaine (lidocaine) 1%, 1–2 mL.
Equipment
Dressing pack, antiseptic solution, i.v. cannula, blood collection tubes and syringe if needed, 0.9% saline flush, three-way tap/connection tubing (primed with 0.9% saline), tourniquet, splint, tapes, bandage.
Technique
- Be patient and look carefully for the best option. Ensure the child is warm and there is adequate light.
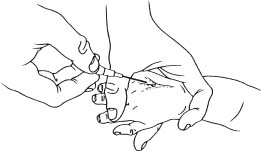
- If using the back of the hand in infants, grasp the wrist between the index and middle fingers with the thumb over the patient’s fingers, flexing the wrist. This achieves both immobilisation and tourniquet (see Fig. 3.1).
- Insert the cannula just distal to and along the line of the vein at an angle of 10–15°. When a large vein is entered, a ‘fl ash’ of blood will enter the hub of the needle.
- Advance the cannula a further 1–2 mm along the line of the vein, then remove the needle while advancing the cannula along the vein. If the cannula is in the vein, blood will flow back out along the cannula.
- Safety i.v. cannulae have a clip or mechanism which covers the needle tip when the needle is retracted fully from the cannula. It may be necessary to insert the cannula (with needle in situ) slightly further into the vein initially, as the safety mechanism often produces a backward movement as it retracts and may dislodge the cannula.
– When trying to cannulate a small vein, there may not be a flashback of blood. Insert the cannula and when it is likely to be in the vein, partially remove the needle and watch for blood moving slowly back along the cannula. Advance the cannula along the vein gently. With safety cannulae it is not possible to remove the needle and reinsert.
- Take required blood samples at this stage. In neonates and young infants, blood can be collected by allowing it to drip directly into collection tubes (without a syringe).
- Connect a primed three-way tap/connector and tape the cannula. Place tape over the cannula, then a clear plastic dressing and further tape over the top.
- Flush the cannula with saline to confirm i.v. placement. Connect the i.v. tubing and splint the arm to an appropriately-sized board. Wrap the entire distal extremity in a bandage.
Indications
- Prolonged venous access.
- Central venous placement for parenteral nutrition.
Sites
- Basilic and cephalic veins in older children.
- Basilic, cephalic and saphenous veins in neonates and infants.
Suggested analgesia
- See i.v. cannula insertion.
Equipment
Sterile drapes and gloves, dressing pack, antiseptic solution, silastic long line kit, i.v. cannula or butterfly needle, syringe with 0.9% saline flush, three-way tap/connection tubing, tourniquet, steristrips, clear adhesive dressing, bandage.
Technique
- Strict asepsis is required.
- Measure the distance from the site of insertion to the desired location of the catheter tip (e.g. axilla).
- Prime silastic line and three-way tap with sterile saline. Insert the introducer needle or i.v. cannula into the vein until free-flowing blood return is obtained. Release the tourniquet. If using an i.v. cannula, remove the needle leaving the cannula in situ.
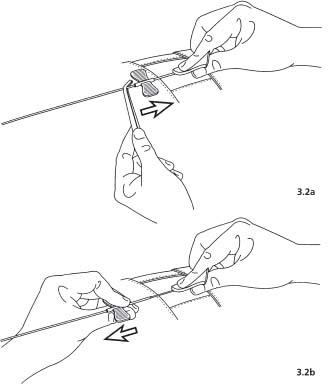
- Using smooth forceps, grasp the catheter very close to the tip and feed the catheter through the introducer needle/cannula to the desired length (see Fig. 3.2a).
- Place a finger over the vein proximally and slowly withdraw the needle/cannula keeping it parallel to the skin, leaving the silastic line in position. When the needle clears the skin, secure the catheter by trapping it with a gloved finger at the skin exit site (see Fig. 3.2b). Attach the catheter to the appropriate i.v. line connections and flush the catheter.
- Secure silastic line in place with steristrips, followed by a sterile transparent dressing.
- If the line is used for central access, confirm catheter tip placement radiologically. This may be aided by the injection of 0.3 mL of a contrast agent.
Accessing central venous catheters
Types
- Catheter devices, e.g. Hickman or Broviac catheters, are central venous access devices that are tunnelled subcutaneously before they enter a central vein. They may be either single or double lumen. The external part of the line has a clamp and a connector which is accessed.
- Infusaports are placed completely under the skin so no part is exposed. They consist of a small chamber placed subcutaneously on the chest wall attached to a catheter that is placed in a central vein. The chamber can be accessed through the skin.
Suggested analgesia
- Topical local anaesthetic, e.g. amethocaine or EMLA (lignocaine [lidocaine], prilocaine), for Infusaport access.
- Consider sedation and nitrous oxide in children >4 years.
- A procedural pain management plan should be developed for all children requiring a central access device.
Equipment
Sterile gloves, dressing pack, alcohol-based chlorhexidine, Huber point needle (90° bend) for Infusaport, short three-way tap or minimum volume extension tubing, giving set, sterile adhesive strips, syringe with sterile 0.9% saline flush, additional syringes/blood collection tubes, gauze, occlusive clear plastic dressing × 2.
Technique
Generic (Hickman, Broviac, Infusaport)
- Strict asepsis is required.
- Central venous access devices are flushed with heparin-containing solutions when not in use.
- For short-term disconnection use 50 units heparin/5 mL 0.9% saline.
- For long-term disconnection (e.g. on discharge) use 1000 units heparin/1 mL 0.9% saline ×1 mL diluted to 10 mL with 0.9% saline (i.e. 100 units heparin/1 mL final concentration).
- For both types of flush use 4–5 mL volume. Stop backflow immediately by clamping catheter devices and in Infusaports by turning tap to off (short-term flush) or removing needle (long-term flush).
- Catheter devices require weekly flushing; Infusaports require monthly flushing.
- Catheter devices require dressing changes weekly. The exit site is washed with antiseptic solution (applied radially from centre outwards) and the tubing is also washed. The solution is allowed to dry, then two clear adhesive dressings are used to ‘sandwich’ the tubing. The distal tubing is then taped to the child’s chest wall and the remainder safety-pinned to clothing to avoid pulling on the line. In younger children tape the clamp and tap to avoid little fingers exploring.
Infusaport specifi c
- Wash the site with antiseptic preparation and allow it to dry.
- Attach Huber point needle to minimum volume extension tubing connected to a three-way tap and prime the line with 0.9% saline.
- Insert Huber point needle into the centre of the port chamber. Aspirate 5 mL of blood back through three-way tap (may be used for blood cultures), then take other bloods using a second syringe as required. Ensure tap is turned to 45° to avoid backflow when connecting/disconnecting syringes. Flush line with 5 mL 0.9% saline.
- Make a pillow of gauze under the Huber point needle and secure with sterile adhesive strips then apply airtight adhesive clear plastic dressing.
Umbilical vein catheterisation
Indications
Used in neonates up to 7–10 days of age for:
- Emergency vascular access for resuscitation.
- I.v. access for exchange transfusion.
- Venous access in low-birthweight infants (preferred initial access in infants <800 g).
Equipment
- Sterile drapes, gown, mask and gloves, sterile instrument pack (gauze, forceps, needle holder, scalpel holder), umbilical tape (or rolled gauze), scalpel blade, antiseptic solution, umbilical catheter (baby <1000 g 3.5 FG, >1000 g 5.0 FG), syringe with 0.9% saline flush, three-way tap/connection tubing, suture.
- If no umbilical catheter is available, a sterile 5 FG feeding tube can be used for umbilical vein access in an emergency.
Site
- Measure the distance of a line drawn from the tip of the shoulder to the level of the umbilicus.
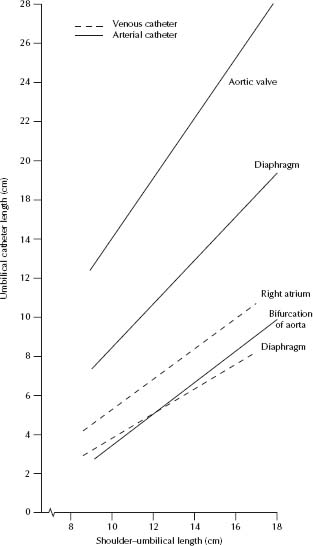
- Using Fig. 3.3 determine the catheter length needed to place the tip between the diaphragm and the right atrium in the inferior vena cava (IVC). Add the height of the umbilical stump to obtain the total length.
- In an emergency, short-term access can be obtained with the UVC tip inserted 3–5 cm past the mucocutaneous junction (will not be in portal circulation)
Technique
- Strict asepsis is required.
- Attach a three-way tap to the catheter and flush with sterile saline then close the three-way tap. Throughout insertion the catheter and connection must be kept filled with fluid to prevent air embolism.
- Drape and prepare the skin. Loosely tie a sterile umbilical tape or rolled gauze around base of the cord. Cut through the cord with a scalpel horizontally 1.5–2 cm from the skin; tighten the tape/gauze to prevent bleeding if necessary.
- Stabilize the cord with artery forceps. Identify the single large thin-walled vein and two smaller thick-walled arteries. Clear any thrombi with forceps, gently dilate the vein with curved iris forceps and insert the catheter.
- Gently advance the catheter to the pre-measured distance. Do not force. Aspirate to check position (blood should fill the cannula easily).
- Secure the catheter with both a purse string suture around the cord and a tape bridge. Radiologically confirm that the catheter tip lies above the diaphragm in the IVC; it is not acceptable within the liver.
Umbilical artery catheterisation
Indications
Used in low-birthweight neonates for:
- Monitoring blood pressure and arterial blood gases.
- Access and infusion site.
Equipment
As for umbilical vein access. In addition, blood pressure transducer and heparin solution.
Site
- Measure the distance of a line drawn from the tip of the shoulder to the level of the umbilicus. Use Fig. 3.3 to determine the catheter length needed:
– High line position: between T6–T9; tip above the diaphragm (proximal to the origin of renal and mesenteric arteries).
- The catheter length may also be calculated by formula: (weight (kg) × 3) + 9 cm.
Technique
- Strict asepsis is required.
- Flush the catheter and three-way tap, prepare skin and cord and cut cord as above.
- Identify the arteries, clear any thrombi and dilate the artery with curved iris forceps. Initially one tip of the forceps is inserted, then both, with the tips allowed to spring gently open.
- Insert catheter and advance gently. Aim tip towards the feet. Avoid excessive pressure or repeat probing. Aspirate to check position (blood should fill the cannula easily and pulsations will be seen) then flush line. Arterial lines are heparinised (see Pharmacopoeia).
- Secure the catheter as above and confirm tip position radiologically.
- Check for any complications caused by catheter placement, especially blanching or cyanosis of lower extremities. Nurse infant supine for 24 h after the procedure.
Indications
Suspected hypoxaemia, hypercapnia or severe acidosis with poor peripheral perfusion.
Note: Acid–base status can also be assessed by capillary or venous collection.
Sites
Radial artery.
Note: The femoral artery is used only in emergencies when no other arteries are palpable. Never use the ulnar artery.
Suggested analgesia
- Sucrose in infants <3/12.
- Topical local anaesthetic or injectable local anaesthetic, e.g. lignocaine (lidocaine) 1%, can be used, but does not prevent pain caused by puncturing the artery.
Equipment
Alcohol wipe, 23 or 25 FG needle (straight or butterfly), syringe (2 mL pre-heparinised syringe for blood gas), cotton ball, band-aid/tape, blood collection tubes.
Technique
- Clean the skin with an alcohol wipe.
- Pierce the skin at a 15–30° angle directly over the artery. On entering the artery, blood will fill the hub; however, gentle aspiration is usually required to fill the syringe.
- If there is no flashback at full depth or when the bone is contacted, withdraw the needle very slowly while aspirating. Blood will often be obtained at this point if the artery has been transfixed. If no blood is aspirated check position of pulse and repeat.
- Only 0.5 mL of blood is required for arterial blood gas, sodium, potassium and haemoglobin measurements.
- After obtaining a specimen, remove the needle quickly and apply firm pressure to the puncture site for 3–5 min.
Intra-arterial cannula insertion
Indications
Invasive blood pressure monitoring and frequent blood sampling in the intensive care setting.
Sites
Radial, posterior tibial and dorsalis pedis arteries.
Suggested analgesia
- Sucrose in infants <3/12.
- Topical local anaesthetic or injectable local anaesthetic, e.g. lignocaine (lidocaine) 1%, can be used, but does not prevent pain caused by puncturing the artery.
Equipment
Dressing pack, antiseptic solution, i.v. cannula, blood collection tubes and syringe if needed, 0.9% saline flush, three-way tap/connection tubing (primed with 0.9% saline), pressure transducer, heparin solution, splint, tapes, bandage.
Technique
- Do not use a tourniquet. Feel for the pulse of the artery to be cannulated and insert the cannula at an angle of 15–30° to the skin. Once a flashback of blood is obtained reduce the angle (to 10–15°) and advance the cannula gently with the needle in situ so it is clearly within the artery before the needle is removed.
- Place a finger proximally over the pulse when withdrawing the needle and attach (primed) connector tubing and transducer quickly.
- Take bloods if required, flush slowly and watch for blanching around the site and distally.
- Arterial lines require continuous heparin infusion.
Intraosseous cannula insertion
Indications
For emergency vascular access when efforts to cannulate a vein are unsuccessful.
Sites
Preferred sites of insertion are:
- Proximal tibia (depending on size, 1–3 cm inferomedial to tibial tuberosity).
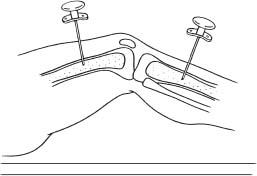
- Distal femur (approximately 3 cm above the condyles on anterolateral surface) (see Fig. 3.4).
- Avoid fractured bones and limbs with proximal fractures.
Suggested analgesia
Performed in emergency situations. Injectable local anaesthetic (lignocaine [lidocaine] 1%) if patient is conscious.
Equipment
Intraosseus needle (if not available a short large-bore lumbar puncture needle or bone marrow aspiration needle are alternatives), syringe with 0.9% saline flush, three-way tap/connection tubing (primed with 0.9% saline), alcohol wipe, syringe, blood collection tubes.
Technique
- Prepare the insertion site.
- Insert the needle at 90° to the skin (see Fig. 3.4). Apply downward pressure with a rotary motion to advance the needle. When the needle passes through the bony cortex into the marrow cavity, resistance suddenly decreases. The needle should stand without support (except in a very young infant).
- Remove the stylet and attach a syringe; aspirate to confirm that the needle is in the bone marrow (this is not always possible). Flush the needle with saline to confirm correct placement and connect i.v. tubing. Often fluids will not flow by gravity into the marrow – a three-way tap and syringe or pressure infusion may be needed.
- Watch the infusion site for fluid extravasation, or the calf becoming tense. A pair of artery forceps clamped around the base then taped along the limb (with appropriate padding underneath) can provide stability. The needle should be removed once i.v. access has been obtained.
- Any fluid or drug that can be given i.v. can be administered through the intraosseous route.
Stay updated, free articles. Join our Telegram channel

Full access? Get Clinical Tree


